
20. Sensevoice
SenseVoice 是具有音频理解能力的音频基础模型,包括语音识别(ASR)、语种识别(LID)、 语音情感识别(SER)和声学事件分类(AEC)或声学事件检测(AED)。
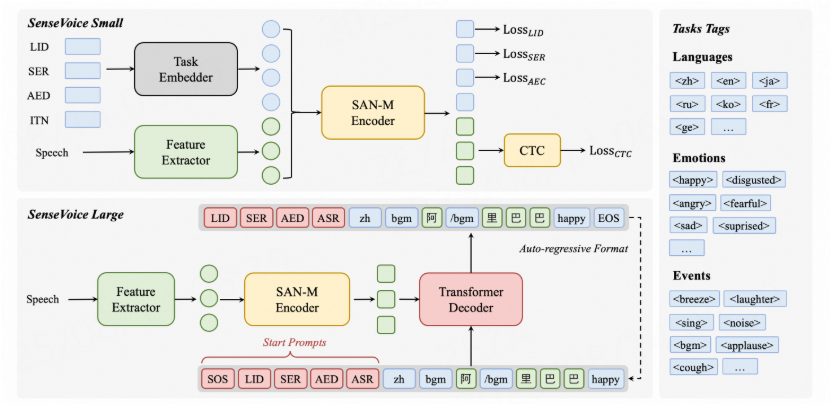
Sensevoice采用超过40万小时数据训练,支持超过50种语言,识别效果上优于Whisper模型。 将输入的音频转换为对应的文本序列,并根据特殊的标记来指定不同的任务。
github地址:https://github.com/FunAudioLLM/SenseVoice
本章将简单测试 Sensevoice Small 模型, 然后在鲁班猫rk系列(本教程目前测试支持 lubancat-3/4/5系列 )板卡上部署。
20.1. Sensevoice简单使用
在PC上创建一个虚拟环境,安装Sensevoice相关环境:
# 使用conda创建虚拟环境
conda create -n sensevoice python=3.11
conda activate sensevoice

# 安装相关库和软件
git clone https://github.com/alibaba/FunASR.git
cd FunASR
pip3 install -qq -e ./
cd ..

# 拉取SenseVoice源码,安装相关依赖库
git clone https://github.com/FunAudioLLM/SenseVoice
cd SenseVoice
pip install -qq -r ./requirements.txt
cd ..

pip install soundfile onnx onnxruntime kaldi-native-fbank librosa soundfile

# 配置pip源(可选)
# pip3 config set global.index-url https://pypi.tuna.tsinghua.edu.cn/simple/
获取模型(可选):
git clone https://www.modelscope.cn/iic/SenseVoiceSmall.git
参考https://github.com/FunAudioLLM/SenseVoice/blob/main/README_zh.md,在SenseVoice目录下创建一个test_sensevoice.py测试文件 :
1 2 3 4 5 6 7 8 9 10 11 12 13 14 15 16 17 18 19 20 21 22 23 24 25 26 | from funasr import AutoModel
from funasr.utils.postprocess_utils import rich_transcription_postprocess
model_dir = "../models/SenseVoiceSmall"
model = AutoModel(
model=model_dir,
trust_remote_code=True,
remote_code="./model.py",
vad_model="fsmn-vad",
vad_kwargs={"max_single_segment_time": 30000},
device="cuda:0",
)
# en
res = model.generate(
input=f"{model.model_path}/example/en.mp3",
cache={},
language="auto", # "zn", "en", "yue", "ja", "ko", "nospeech"
use_itn=True,
batch_size_s=60,
merge_vad=True, #
merge_length_s=15,
)
text = rich_transcription_postprocess(res[0]["text"])
print(text)
|
运行测试程序:
# 测试例程,测试的是base模型,例程将会自动下载该模型
(sensevoice) llh@llh:/xxx/SenseVoice$ python test_sensevoice.py
funasr version: 1.2.6.
Check update of funasr, and it would cost few times. You may disable it by set `disable_update=True` in AutoModel
You are using the latest version of funasr-1.2.6
Loading remote code successfully: ./model.py
Downloading Model from https://www.modelscope.cn to directory: /home/llh/.cache/modelscope/hub/models/iic/speech_fsmn_vad_zh-cn-16k-common-pytorch
2025-08-03 17:59:06,697 - modelscope - INFO - Got 7 files, start to download ...
Downloading [configuration.json]: 100%|████████████████████████████████████████████████████████████████████████████████████████████████| 365/365 [00:00<00:00, 604B/s]
Downloading [config.yaml]: 100%|█████████████████████████████████████████████████████████████████████████████████████████████████| 1.19k/1.19k [00:00<00:00, 1.98kB/s]
Downloading [README.md]: 100%|███████████████████████████████████████████████████████████████████████████████████████████████████| 10.6k/10.6k [00:00<00:00, 17.7kB/s]
Downloading [am.mvn]: 100%|██████████████████████████████████████████████████████████████████████████████████████████████████████| 7.85k/7.85k [00:00<00:00, 13.0kB/s]
Downloading [fig/struct.png]: 100%|██████████████████████████████████████████████████████████████████████████████████████████████| 27.3k/27.3k [00:00<00:00, 44.7kB/s]
Downloading [model.pt]: 100%|████████████████████████████████████████████████████████████████████████████████████████████████████| 1.64M/1.64M [00:00<00:00, 2.37MB/s]
Downloading [example/vad_example.wav]: 100%|█████████████████████████████████████████████████████████████████████████████████████| 2.16M/2.16M [00:00<00:00, 3.03MB/s]
Processing 7 items: 100%|██████████████████████████████████████████████████████████████████████████████████████████████████████████| 7.00/7.00 [00:00<00:00, 9.20it/s]
2025-08-03 17:59:07,459 - modelscope - INFO - Download model 'iic/speech_fsmn_vad_zh-cn-16k-common-pytorch' successfully.████████| 27.3k/27.3k [00:00<00:00, 44.7kB/s]
rtf_avg: 0.025: 100%|███████████████████████████████████████████████████████████████████████████████████████████████████████████████████| 1/1 [00:00<00:00,  5.60it/s]
rtf_avg: 0.045: 100%|███████████████████████████████████████████████████████████████████████████████████████████████████████████████████| 1/1 [00:00<00:00,  3.47it/s]
rtf_avg: 0.041, time_speech:  7.176, time_escape: 0.291: 100%|██████████████████████████████████████████████████████████████████████████| 1/1 [00:00<00:00,  3.29it/s]
The tribal chieftain called for the boy and presented him with 50 pieces of gold.
最后一行就是识别输出,也可以直接网页上体验SenseVoice:https://www.modelscope.cn/studios/iic/SenseVoice。
20.2. SenseVoice部署测试
教程鲁班猫RK系列板卡上部署SenseVoice模型,先使用将其导出onnx模型,然后使用 使用toolkit2工具转换成rknn模型,最后通过rknpu2提供的接口在板卡上部署。
20.2.1. 导出onnx模型
使用教程配套例程export_onnx.py导出onnx模型, 参考 sherpa-onnx :
1 2 3 4 5 6 7 8 9 10 11 12 13 14 15 16 17 18 19 20 21 22 23 24 25 26 27 28 29 30 31 | # 省略............................
def main():
# model, params = SenseVoiceSmall.from_pretrained(model="iic/SenseVoiceSmall", device="cpu")
model, params = SenseVoiceSmall.from_pretrained(model="../models/SenseVoiceSmall", device="cpu")
display_params(params)
generate_tokens(params)
model.__class__.forward = modified_forward
model.encoder.__class__.forward = encoder_forward
x = torch.randn(1, INPUT_LEN, 560, dtype=torch.float32)
x_length = torch.tensor([100], dtype=torch.int32)
language = torch.tensor([3], dtype=torch.int32)
text_norm = torch.tensor([15], dtype=torch.int32)
opset_version = 13
filename = "model.onnx"
torch.onnx.export(
model,
(x, x_length, language, text_norm),
filename,
opset_version=opset_version,
input_names=["x", "x_length", "language", "text_norm"],
output_names=["logits"],
)
if __name__ == "__main__":
torch.manual_seed(20250717)
main()
|
执行export_onnx.py程序,可自行修改模型路径和导出的onnx名称:
(sensevoice) llh@llh:/xxx/SenseVoice$ python export_onnx.py
# 省略............................................
默认导出的onnx模型是输入7秒左右语音,可自行修改输入长度,默认保存文件名为model.onnx
20.2.2. 转换成rknn模型
使用toolkit2工具,简单编程,将onnx模型转换成rknn模型,注意输入输出的配置。
参考配套例程的转换程序,将sensevoice的onnx模型成rknn模型:
# Usage: python3 convert_30.py onnx_model_path [platform] [dtype(optional)] [output_rknn_path(optional)]
#    platform choose from [rk3576,rk3588]
#    dtype choose from [fp] for [rk3576,rk3588]

# 该例程目前支持lubacat-3/4/5,教程测试lubancat-4设置参数rk3588
(toolkit2_2.3) llh@llh:/xxx$ python convert.py model.onnx rk3588 fp model.onnx
I rknn-toolkit2 version: 2.3.2
--> Config model
done
--> Loading model
# 省略.................
I Loading :   0%|                                                           | 0/917 [00:00<?, ?it/s]
I Loading :  94%|███████████████████████████████████████████▉   | 858/917 [00:00<00:00, 8536.70it/s]
I Loading : 100%|███████████████████████████████████████████████| 917/917 [00:00<00:00, 6075.70it/s]
done
--> Building model
# 省略...................
I OpFusing 1:   0%|█████████████████████████████████████   | 0/100 [00:00<?, ?it/s]
I OpFusing 2 : 100%|██████████████████████████████████████████████| 100/100 [00:16<00:00,  5.94it/s]
I rknn building ...
# 省略...................
E RKNN: [15:09:24.190] Unkown op target: 0
I rknn building done.
done
--> Export rknn model
done
20.2.3. 部署测试
在鲁班猫板卡上,获取部署例程:
# 获取测试例程
git clone https://gitee.com/LubanCat/lubancat_ai_manual_code.git

# 切换到sense-voice/目录下
cd lubancat_ai_manual_code/example/sense-voice/cpp
直接编译例程:
# 板卡系统安装相关库
sudo apt update
sudo apt install libfftw3-dev libsndfile1-dev libsdl2-dev

# 将前面转换好的模型放在例程model路径中,名称是model.rknn

# 编译例程,如果是lubancat4/5设置参数-t rk3588 , 如果是lubancat-3设置rk3576
cat@lubancat:~/xxx/examples/sense-voice/cpp$ ./build-linux.sh -t rk3588
./build-linux.sh -t rk3588
===================================
TARGET_SOC=rk3588
INSTALL_DIR=/home/cat/lubancat_ai_manual_code/example/sense-voice/cpp/install/rk3588_linux
BUILD_DIR=/home/cat/lubancat_ai_manual_code/example/sense-voice/cpp/build/build_rk3588_linux
DISABLE_RGA=OFF
BUILD_TYPE=Release
ENABLE_ASAN=OFF
CC=aarch64-linux-gnu-gcc
CXX=aarch64-linux-gnu-g++
===================================
# 省略..........
[ 83%] Built target imagedrawing
[100%] Built target imageutils
Install the project...
-- Install configuration: "Release"
-- Installing: /home/cat/lubancat_ai_manual_code/example/sense-voice/cpp/install/rk3588_linux/./sensevoice_demo
# 省略...........................
测试对语音文件的识别,切换到install/rk3588_linux目录下,然后执行sensevoice_demo例程:
# 查看使用命令
cat@lubancat:~/xxx$ ./sensevoice_demo  -h
Usage: ./sensevoice_demo -m ./model/model.rknn [options]

options:
-m or --model_path      Model path, could be .rknn file.(default:./model/model.rknn)
--tokens                Path to tokens.txt.(default: ./model/tokens.txt)
--audio_path            The input wave to be recognized  (default: ./model/en.wav).
--use-itn               1 to use inverse text normalization, 0 to not use inverse text normalization.(default: 0)
--language              Tthe language of the input wav file. Supported values: zh, en, ja, ko, yue, auto.(default: auto)

# 测试默认的一段英语语音,需要自行指定模型路径等
cat@lubancat:~/xxx$ ./sensevoice_demo  -m ../path/model/model.rknn  --use-itn 1
-- read_audio & convert_channels & resample_audio use: 2.013000 ms
-- read_vocab use: 6.724000 ms
model input num: 4, output num: 1
input tensors:
index=0, name=x, n_dims=3, dims=[1, 124, 560], n_elems=69440, size=138880, fmt=UNDEFINED, type=FP16, qnt_type=AFFINE, zp=0, scale=1.000000
index=1, name=x_length, n_dims=1, dims=[1], n_elems=1, size=4, fmt=UNDEFINED, type=INT32, qnt_type=AFFINE, zp=0, scale=1.000000
index=2, name=language, n_dims=1, dims=[1], n_elems=1, size=4, fmt=UNDEFINED, type=INT32, qnt_type=AFFINE, zp=0, scale=1.000000
index=3, name=text_norm, n_dims=1, dims=[1], n_elems=1, size=4, fmt=UNDEFINED, type=INT32, qnt_type=AFFINE, zp=0, scale=1.000000
output tensors:
index=0, name=logits, n_dims=3, dims=[1, 128, 25055], n_elems=3207040, size=6414080, fmt=UNDEFINED, type=FP16, qnt_type=AFFINE, zp=0, scale=1.000000
-- init_sensevoice_model use: 662.312988 ms
-- run_sensevoice use: 370.453003 ms

Output: The tribal chieftain called for the boy and presented him with 50 pieces of gold.

Real Time Factor (RTF): 0.370 / 7.152 = 0.052
以上就是鲁班猫rk系列板卡上简单测试Sensevoice Small模型,可自行优化程序。