
14. YOLO11
Ultralytics YOLO11 是新一代计算机视觉模型, 在目标检测、实例分割、图像分类、姿势估计、定向物体检测和对象跟踪等计算机视觉任务上展现了卓越的性能和准确性。
整体上yolo11相较于yolov8变化不大, 主要的改变有加入多头注意力机制,分类检测头加入深度可分离卷积等等,在性能和准确度上相对于yolov8有显著提升。
YOLO11 github地址:https://github.com/ultralytics/ultralytics
本章将简单测试YOLO11的 目标检测 和 图像分割 模型,然后在鲁班猫rk系列板卡上部署。
14.1. YOLO11目标检测
在个人PC上使用Anaconda创建一个yolo11开发环境,然后简单测试yolo11。
conda create -n yolo11 python=3.10
conda activate yolo11

# 配置pip源(可选)
pip config set global.index-url https://pypi.tuna.tsinghua.edu.cn/simple/

# 安装
pip install ultralytics

# 或者从源码安装
git clone https://github.com/ultralytics/ultralytics.git
cd ultralytics
pip install -e .

# 检测版本
(yolo11) llh@llh:/xxx$ yolo version
8.3.80
执行yolo命令,测试yolo11n模型:
# 使用yolo命令测试yolo11n.pt模型
(yolo11) llh@llh:/xxx$ yolo predict model=yolo11n.pt source='https://ultralytics.com/images/bus.jpg'
Downloading https://github.com/ultralytics/assets/releases/download/v8.3.0/yolo11n.pt to 'yolo11n.pt'...
100%|██████████████████████████████████████████████████████████████████████████| 5.35M/5.35M [00:16<00:00, 346kB/s]
Ultralytics 8.3.80 🚀 Python-3.10.15 torch-2.5.1 CUDA:0 (NVIDIA GeForce RTX 4070 Ti SUPER, 16376MiB)
YOLO11n summary (fused): 238 layers, 2,616,248 parameters, 0 gradients, 6.5 GFLOPs

Downloading https://ultralytics.com/images/bus.jpg to 'bus.jpg'...
100%|███████████████████████████████████████████████████████████████████████| 134k/134k [00:00<00:00, 1.25MB/s]
image 1/1 /xxx/bus.jpg: 640x480 4 persons, 1 bus, 54.0ms
Speed: 5.3ms preprocess, 54.0ms inference, 96.6ms postprocess per image at shape (1, 3, 640, 480)
Results saved to /xxx/runs/detect/predict
💡 Learn more at https://docs.ultralytics.com/modes/predict
VS Code: view Ultralytics VS Code Extension ⚡ at https://docs.ultralytics.com/integrations/vscode
将会拉取yolo11n.pt文件,运行推理,结果保存在runs/detect/predict目录下:
14.1.1. 模型转换
1、导出onnx模型
模型导出使用专门针对rknn优化的 ultralytics_yolo11 。 该工程在基于不影响输出结果, 不需要重新训练模型的条件下, 有以下改动:
修改输出结构, 移除后处理结构(后处理结果对于量化不友好);
dfl 结构在 NPU 处理上性能不佳,移至模型外部的后处理阶段,此操作大部分情况下可提升推理性能;
模型输出分支新增置信度的总和,用于后处理阶段加速阈值筛选。
git clone https://github.com/airockchip/ultralytics_yolo11.git

# 修改 ./ultralytics/cfg/default.yaml中model文件路径,默认为yolo11n.pt

# 导出onnx模型
export PYTHONPATH=./
python ./ultralytics/engine/exporter.py
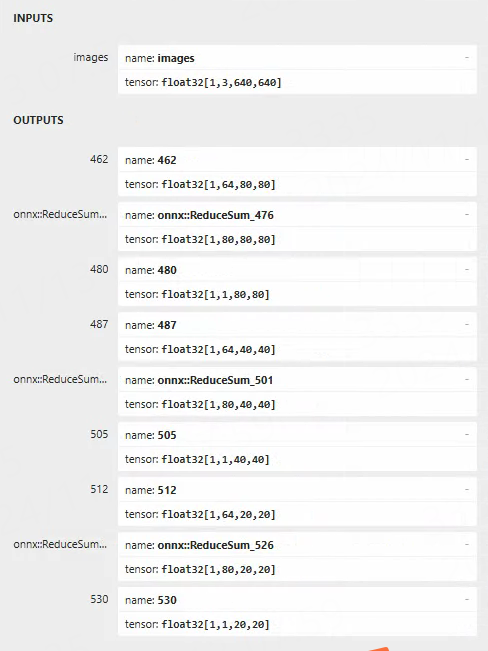
导出的onnx模型会在同目录下,使用 netron 查看其模型输入输出:
2、转换成rknn模型
使用toolkit2工具,简单编程(onnx2rknn.py程序参考 配套例程 或者rknn_model_zoo中yolo11转换程序), 将onnx模型转换成rknn模型:
Usage: python3 onnx2rknn.py onnx_model_path [platform] [dtype(optional)] [output_rknn_path(optional)]
    platform choose from [rk3562,rk3566,rk3568,rk3588,rk3576,rk1808,rv1109,rv1126]
    dtype choose from [i8, fp] for [rk3562,rk3566,rk3568,rk3588,rk3576]
    dtype choose from [u8, fp] for [rk1808,rv1109,rv1126]

# 测试鲁班猫4,设置参数rk3588,并且使用默认量化数据
(toolkit2.2) llh@llh:/xxx/yolo11$ python onnx2rknn.py ./yolo11n.onnx rk3588 i8
I rknn-toolkit2 version: 2.2.0
--> Config model
done
--> Loading model
I Loading : 100%|██████████████████████████████████████████████| 174/174 [00:00<00:00, 81918.16it/s]
done
--> Building model
I OpFusing 0: 100%|██████████████████████████████████████████████| 100/100 [00:00<00:00, 571.25it/s]
I OpFusing 1 : 100%|█████████████████████████████████████████████| 100/100 [00:00<00:00, 279.63it/s]
I OpFusing 0 : 100%|█████████████████████████████████████████████| 100/100 [00:00<00:00, 164.75it/s]
I OpFusing 1 : 100%|█████████████████████████████████████████████| 100/100 [00:00<00:00, 152.38it/s]
I OpFusing 2 : 100%|█████████████████████████████████████████████| 100/100 [00:00<00:00, 144.98it/s]
I OpFusing 0 : 100%|█████████████████████████████████████████████| 100/100 [00:00<00:00, 104.63it/s]
I OpFusing 1 : 100%|█████████████████████████████████████████████| 100/100 [00:00<00:00, 100.10it/s]
I OpFusing 2 : 100%|██████████████████████████████████████████████| 100/100 [00:01<00:00, 75.79it/s]
W build: found outlier value, this may affect quantization accuracy
                        const name                          abs_mean    abs_std     outlier value
                        model.23.cv3.1.1.1.conv.weight      0.55        0.60        -12.173
                        model.23.cv3.0.0.0.conv.weight      0.25        0.35        -15.593
I GraphPreparing : 100%|███████████████████████████████████████| 228/228 [00:00<00:00, 10247.11it/s]
I Quantizating : 100%|████████████████████████████████████████████| 228/228 [00:18<00:00, 12.04it/s]
# 省略....................................
I rknn buiding done.
done
--> Export rknn model
done
14.1.2. 板卡上部署测试
板卡上获取配套例程,然后将前面转换出的rknn模型放到例程model目录下。
# 板卡上安装opencv,git等等相关软件
sudo apt update
sudo apt install libopencv-dev git make gcc g++ libsndfile1-dev

# 鲁班猫系统中,使用命令直接拉取教程配套例程
git clone https://gitee.com/LubanCat/lubancat_ai_manual_code.git

# 切换到例程目录
cd lubancat_ai_manual_code/example/yolo11/cpp

# 或者拉取rknn_model_zoo例程测试,实际编译操作请查看工程的README文件
# git clone https://github.com/airockchip/rknn_model_zoo.git
重要
如果部署自己训练的模型,按前面的方式转换成rknn模型,在部署时请注意类别数量和类别,需要修改例程中的coco_80_labels_list.txt文件和宏OBJ_CLASS_NUM等等
切换到lubancat_ai_manual_code/example/yolo11/cpp目录下,然后编译例程(教程测试鲁班猫4,设置rk3588), 例程中yolo11_videocapture_demo将使用系统默认opencv,如果不需要,请注释CMakeLists.txt文件中的相关程序。
# 指定目标,如果内存大于4G,添加-d
cat@lubancat:/xxx/example/yolo11/cpp$ ./build-linux.sh -t rk3588
./build-linux.sh -t rk3588
===================================
TARGET_SOC=rk3588
INSTALL_DIR=/xxx/examples/yolo11/cpp/install/rk3588_linux
BUILD_DIR=/xxx/examples/yolo11/cpp/build/build_rk3588_linux
ENABLE_DMA32=OFF
DISABLE_RGA=OFF
BUILD_TYPE=Release
ENABLE_ASAN=OFF
CC=aarch64-linux-gnu-gcc
CXX=aarch64-linux-gnu-g++
===================================
-- The C compiler identification is GNU 10.2.1
-- The CXX compiler identification is GNU 10.2.1
-- Detecting C compiler ABI info
-- Detecting C compiler ABI info - done
-- Check for working C compiler: /usr/bin/aarch64-linux-gnu-gcc - skipped
-- Detecting C compile features
# 省略...............................
[ 95%] Linking CXX executable yolo11_videocapture_demo
[100%] Linking CXX executable yolo11_videocapture_demo_zero_copy
[100%] Built target yolo11_videocapture_demo
[100%] Built target yolo11_videocapture_demo_zero_copy
[  8%] Built target fileutils
[ 16%] Built target imageutils
[ 33%] Built target yolo11_videocapture_demo_zero_copy
[ 41%] Built target imagedrawing
[ 58%] Built target yolo11_image_demo_zero_copy
[ 75%] Built target yolo11_videocapture_demo
[ 91%] Built target yolo11_image_demo
[100%] Built target audioutils
在install/rk3588_linux目录下将生成4个可执行文件,其中带zero_copy结尾的是支持零拷贝的可执行程序。
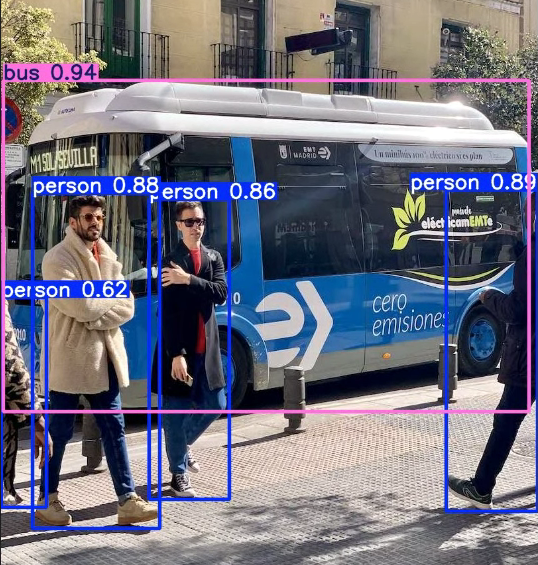
下面测试yolo11_image_demo例程,该例程将读取图像并进行检测,并将结果保存在当前目录下,终端输出检测结果:
cat@lubancat:/xxx$ ./yolo11_image_demo  model/yolo11n.rknn model/bus.jpg
load lable ./model/coco_80_labels_list.txt
model input num: 1, output num: 9
input tensors:
index=0, name=images, n_dims=4, dims=[1, 640, 640, 3], n_elems=1228800, size=1228800, fmt=NHWC, type=INT8, qnt_type=AFFINE, zp=-128, scale=0.003922
output tensors:
index=0, name=462, n_dims=4, dims=[1, 64, 80, 80], n_elems=409600, size=409600, fmt=NCHW, type=INT8, qnt_type=AFFINE, zp=-44, scale=0.135466
index=1, name=onnx::ReduceSum_476, n_dims=4, dims=[1, 80, 80, 80], n_elems=512000, size=512000, fmt=NCHW, type=INT8, qnt_type=AFFINE, zp=-128, scale=0.003027
index=2, name=480, n_dims=4, dims=[1, 1, 80, 80], n_elems=6400, size=6400, fmt=NCHW, type=INT8, qnt_type=AFFINE, zp=-128, scale=0.003036
index=3, name=487, n_dims=4, dims=[1, 64, 40, 40], n_elems=102400, size=102400, fmt=NCHW, type=INT8, qnt_type=AFFINE, zp=-38, scale=0.093536
index=4, name=onnx::ReduceSum_501, n_dims=4, dims=[1, 80, 40, 40], n_elems=128000, size=128000, fmt=NCHW, type=INT8, qnt_type=AFFINE, zp=-128, scale=0.003476
index=5, name=505, n_dims=4, dims=[1, 1, 40, 40], n_elems=1600, size=1600, fmt=NCHW, type=INT8, qnt_type=AFFINE, zp=-128, scale=0.003922
index=6, name=512, n_dims=4, dims=[1, 64, 20, 20], n_elems=25600, size=25600, fmt=NCHW, type=INT8, qnt_type=AFFINE, zp=-42, scale=0.084287
index=7, name=onnx::ReduceSum_526, n_dims=4, dims=[1, 80, 20, 20], n_elems=32000, size=32000, fmt=NCHW, type=INT8, qnt_type=AFFINE, zp=-128, scale=0.003903
index=8, name=530, n_dims=4, dims=[1, 1, 20, 20], n_elems=400, size=400, fmt=NCHW, type=INT8, qnt_type=AFFINE, zp=-128, scale=0.003922
model is NHWC input fmt
model input height=640, width=640, channel=3
origin size=640x640 crop size=640x640
input image: 640 x 640, subsampling: 4:2:0, colorspace: YCbCr, orientation: 1
scale=1.000000 dst_box=(0 0 639 639) allow_slight_change=1 _left_offset=0 _top_offset=0 padding_w=0 padding_h=0
rga_api version 1.10.1_[0]
rknn_run
bus @ (91 136 554 440) 0.944
person @ (108 236 224 535) 0.894
person @ (211 240 284 509) 0.855
person @ (476 230 559 521) 0.816
person @ (79 358 118 516) 0.396
write_image path: out.png width=640 height=640 channel=3 data=0x55b715aee0
测试yolo11_videocapture_demo例程,该例程将使用opencv读取摄像头或者视频文件,然后进行目标检测:
# 教程测试鲁班猫4,连接usb摄像头,然后执行程序,对其他屏幕显示的画面进行检测:
cat@lubancat:/xxx$ ./yolo11_videocapture_demo  model/yolo11n.rknn 0
load lable ./model/coco_80_labels_list.txt
model input num: 1, output num: 9
input tensors:
index=0, name=images, n_dims=4, dims=[1, 640, 640, 3], n_elems=1228800, size=1228800,
fmt=NHWC, type=INT8, qnt_type=AFFINE, zp=-128, scale=0.003922
output tensors:
# 省略......................
如果是打开USB摄像头,请确认摄像头的设备号,修改例程中摄像头支持的分辨率和MJPG格式等, 打开的是mipi摄像头时,opencv需要设置转换成rgb格式以及设置分辨率大小等等。
14.2. YOLO11图像分割
简单测试yolo11图像分割效果,相关环境安装和前面目标检测一致,直接执行yolo命令测试图像分割:
# 使用yolo命令测试model=yolo11n-seg.pt模型
(yolo11) llh@llh:/xxx$ yolo segment predict model=yolo11n-seg.pt source='https://ultralytics.com/images/bus.jpg'
Downloading https://github.com/ultralytics/assets/releases/download/v8.3.0/yolo11n-seg.pt to 'yolo11n-seg.pt'...
100%|███████████████████████████████████████████████████████████████| 5.90M/5.90M [05:54<00:00, 17.5kB/s]
Ultralytics 8.3.80 🚀 Python-3.10.15 torch-2.5.1 CUDA:0 (NVIDIA GeForce RTX 4070 Ti SUPER, 16376MiB)
YOLO11n-seg summary (fused): 113 layers, 2,868,664 parameters, 0 gradients, 10.4 GFLOPs
Found https://ultralytics.com/images/bus.jpg locally at bus.jpg
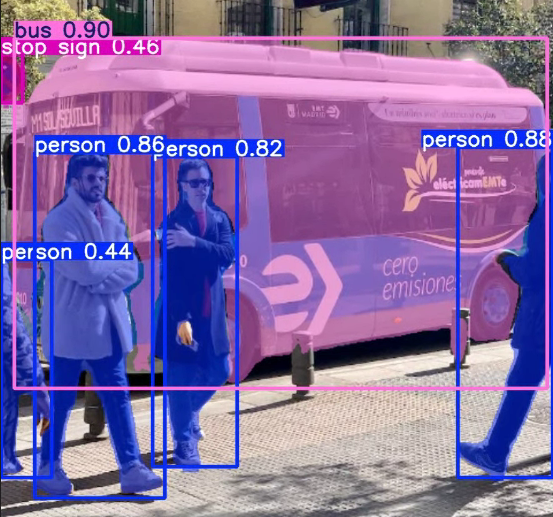
image 1/1 xxx/yolov11/bus.jpg: 640x480 4 persons, 1 bus, 1 stop sign, 61.0ms
Speed: 7.5ms preprocess, 61.0ms inference, 108.6ms postprocess per image at shape (1, 3, 640, 480)
Results saved to /xxx/runs/segment/predict
💡 Learn more at https://docs.ultralytics.com/modes/predict
VS Code: view Ultralytics VS Code Extension ⚡ at https://docs.ultralytics.com/integrations/vscode
结果保存在runs/segment/predict目录下:
14.2.1. 模型转换
1、导出onnx模型
使用专门针对rknn优化的 ultralytics_yolo11 , 参考README说明文件导出onnx模型(教程测试yolo11n-seg.pt模型)。
git clone https://github.com/airockchip/ultralytics_yolo11.git

# 修改 ./ultralytics/cfg/default.yaml中model文件路径,默认为yolo11n-seg.pt

# 导出onnx模型
export PYTHONPATH=./

(yolov11) llh@llh:/xxx$ python ./ultralytics/engine/exporter.py
Ultralytics 8.3.9 🚀 Python-3.10.15 torch-2.5.1 CPU (Intel Core(TM) i7-14700F)
YOLO11n-seg summary (fused): 265 layers, 2,868,664 parameters, 0 gradients, 10.4 GFLOPs

PyTorch: starting from 'yolo11n-seg.pt' with input shape (16, 3, 640, 640) BCHW and output shape(s)
((16, 64, 80, 80), (16, 80, 80, 80), (16, 1, 80, 80), (16, 32, 80, 80), (16, 64, 40, 40), (16, 80, 40, 40),
 (16, 1, 40, 40), (16, 32, 40, 40), (16, 64, 20, 20), (16, 80, 20, 20), (16, 1, 20, 20), (16, 32, 20, 20),
  (16, 32, 160, 160)) (5.9 MB)

RKNN: starting export with torch 2.5.1...

RKNN: feed yolo11n-seg.onnx to RKNN-Toolkit or RKNN-Toolkit2 to generate RKNN model.
Refer https://github.com/airockchip/rknn_model_zoo/tree/main/examples/
RKNN: export success ✅ 0.5s, saved as 'yolo11n-seg.onnx' (11.0 MB)

Export complete (2.0s)
Results saved to /xxx
Predict:         yolo predict task=segment model=yolo11n-seg.onnx imgsz=640
Validate:        yolo val task=segment model=yolo11n-seg.onnx imgsz=640 data=/ultralytics/ultralytics/cfg/datasets/coco.yaml
Visualize:       https://netron.app
导出的onnx模型会在同目录下,使用 netron 查看其模型输入输出。
2、转换成rknn模型
使用toolkit2工具将onnx模型转成rknn模型, 转换程序请参考 配套例程 ,执行命令:
# 测试鲁班猫4,设置参数rk3588,不量化
(toolkit2.2) llh@llh:/xxx/yolo11$ python onnx2rknn_seg.py  ./yolo11n-seg.onnx rk3588 fp ./yolo11n-seg.rknn
I rknn-toolkit2 version: 2.3.0
--> Config model
done
--> Loading model
I Loading : 100%|██████████████████████████████████████████████| 200/200 [00:00<00:00, 81506.10it/s]
done
--> Building model
I OpFusing 0: 100%|█████████████████████████████████████████████| 100/100 [00:00<00:00, 1023.17it/s]
I OpFusing 1 : 100%|█████████████████████████████████████████████| 100/100 [00:00<00:00, 499.55it/s]
I OpFusing 0 : 100%|█████████████████████████████████████████████| 100/100 [00:00<00:00, 208.42it/s]
I OpFusing 1 : 100%|█████████████████████████████████████████████| 100/100 [00:00<00:00, 199.37it/s]
I OpFusing 2 : 100%|█████████████████████████████████████████████| 100/100 [00:00<00:00, 194.74it/s]
I OpFusing 0 : 100%|█████████████████████████████████████████████| 100/100 [00:00<00:00, 154.58it/s]
I OpFusing 1 : 100%|█████████████████████████████████████████████| 100/100 [00:00<00:00, 149.67it/s]
I OpFusing 2 : 100%|██████████████████████████████████████████████| 100/100 [00:01<00:00, 97.79it/s]
I rknn building ...
I rknn building done.
done
--> Export rknn model
done
14.2.2. 板卡上部署测试
获取配套例程,然后前面获得的rknn模型放到mode目录下:
# 安装opencv,git等等
sudo apt update
sudo apt install libopencv-dev git make gcc g++ libsndfile1-dev

# 鲁班猫系统中,使用命令直接拉取教程配套例程(例程可能没有及时更新)
git clone xxxx
提示: yolo11n-seg可以使用yolov8-seg的部署例程。
切换到例程目录下,然后编译例程(教程测试鲁班猫4,设置rk3588),将生成rknn_yolo11_seg_demo例程。
# 先将前面转换好的yolo11n-seg.rknn传输到例程的model目录下

# -t参数设置平台,教程测试lubancat-4,设置rk3588
cat@lubancat:/xxx/example/yolo11/cpp$ ./build-linux.sh -t rk3588
./build-linux.sh -t rk3588
===================================
TARGET_SOC=rk3588
INSTALL_DIR=/home/cat/xxx/cpp/install/rk3588_linux
BUILD_DIR=/home/cat/xxx/cpp/build/build_rk3588_linux
BUILD_TYPE=Release
ENABLE_ASAN=OFF
CC=aarch64-linux-gnu-gcc
CXX=aarch64-linux-gnu-g++
===================================
# 省略................
[ 50%] Linking C static library libfileutils.a
[ 50%] Built target audioutils
[ 50%] Built target fileutils
[ 58%] Linking C static library libimagedrawing.a
[ 58%] Built target imagedrawing
[ 66%] Linking C static library libimageutils.a
[ 66%] Built target imageutils
# 省略................
[100%] Linking CXX executable rknn_yolo11_seg_demo
[100%] Built target rknn_yolo11_seg_demo
[ 16%] Built target fileutils
[ 33%] Built target imageutils
[ 50%] Built target imagedrawing
[ 83%] Built target rknn_yolo11_seg_demo
[100%] Built target audioutils
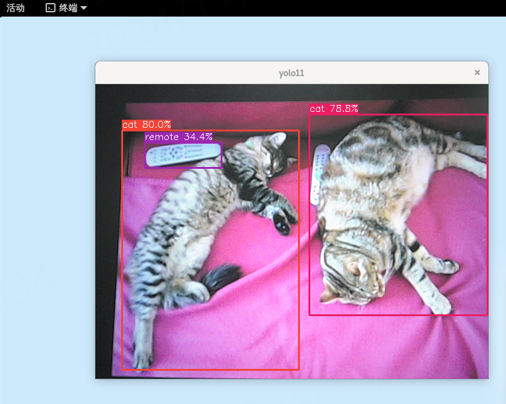
下面测试rknn_yolo11_seg_demo例程,该例程将读取图像并进行图像分割,并将结果保存在当前目录下out.png,终端输出结果:
# 命令使用
./rknn_yolo11_seg_demo <model_path> <image_path>

# 测试lubancat-4
cat@lubancat:~/xxx/install/rk3588_linux$ ./rknn_yolo11_seg_demo  ./model/yolo11n-seg.rknn model/bus.jpg
load lable ./model/coco_80_labels_list.txt
model input num: 1, output num: 13
input tensors:
index=0, name=images, n_dims=4, dims=[1, 640, 640, 3], n_elems=1228800, size=2457600, fmt=NHWC, type=FP16, qnt_type=AFFINE, zp=0, scale=1.000000
output tensors:
index=0, name=519, n_dims=4, dims=[1, 64, 80, 80], n_elems=409600, size=819200, fmt=NCHW, type=FP16, qnt_type=AFFINE, zp=0, scale=1.000000
index=1, name=onnx::ReduceSum_533, n_dims=4, dims=[1, 80, 80, 80], n_elems=512000, size=1024000, fmt=NCHW, type=FP16, qnt_type=AFFINE, zp=0, scale=1.000000
index=2, name=537, n_dims=4, dims=[1, 1, 80, 80], n_elems=6400, size=12800, fmt=NCHW, type=FP16, qnt_type=AFFINE, zp=0, scale=1.000000
index=3, name=498, n_dims=4, dims=[1, 32, 80, 80], n_elems=204800, size=409600, fmt=NCHW, type=FP16, qnt_type=AFFINE, zp=0, scale=1.000000
index=4, name=544, n_dims=4, dims=[1, 64, 40, 40], n_elems=102400, size=204800, fmt=NCHW, type=FP16, qnt_type=AFFINE, zp=0, scale=1.000000
index=5, name=onnx::ReduceSum_558, n_dims=4, dims=[1, 80, 40, 40], n_elems=128000, size=256000, fmt=NCHW, type=FP16, qnt_type=AFFINE, zp=0, scale=1.000000
index=6, name=562, n_dims=4, dims=[1, 1, 40, 40], n_elems=1600, size=3200, fmt=NCHW, type=FP16, qnt_type=AFFINE, zp=0, scale=1.000000
index=7, name=505, n_dims=4, dims=[1, 32, 40, 40], n_elems=51200, size=102400, fmt=NCHW, type=FP16, qnt_type=AFFINE, zp=0, scale=1.000000
index=8, name=569, n_dims=4, dims=[1, 64, 20, 20], n_elems=25600, size=51200, fmt=NCHW, type=FP16, qnt_type=AFFINE, zp=0, scale=1.000000
index=9, name=onnx::ReduceSum_583, n_dims=4, dims=[1, 80, 20, 20], n_elems=32000, size=64000, fmt=NCHW, type=FP16, qnt_type=AFFINE, zp=0, scale=1.000000
index=10, name=587, n_dims=4, dims=[1, 1, 20, 20], n_elems=400, size=800, fmt=NCHW, type=FP16, qnt_type=AFFINE, zp=0, scale=1.000000
index=11, name=512, n_dims=4, dims=[1, 32, 20, 20], n_elems=12800, size=25600, fmt=NCHW, type=FP16, qnt_type=AFFINE, zp=0, scale=1.000000
index=12, name=491, n_dims=4, dims=[1, 32, 160, 160], n_elems=819200, size=1638400, fmt=NCHW, type=FP16, qnt_type=AFFINE, zp=0, scale=1.000000
model is NHWC input fmt
model input height=640, width=640, channel=3
origin size=640x640 crop size=640x640
input image: 640 x 640, subsampling: 4:2:0, colorspace: YCbCr, orientation: 1
scale=1.000000 dst_box=(0 0 639 639) allow_slight_change=1 _left_offset=0 _top_offset=0 padding_w=0 padding_h=0
rga_api version 1.10.1_[0]
person @ (110 235 224 535) 0.878
bus @ (90 135 554 436) 0.848
person @ (476 229 560 520) 0.841
person @ (210 239 284 509) 0.820
person @ (80 328 127 518) 0.378
write_image path: out.png width=640 height=640 channel=3 data=0x559404ea40
测试结果保存在当前目录的out.png,查看结果:
