1. 垃圾检测和识别
本章将基于TACO数据集,使用YOLOv8分割模型进行垃圾检测和识别,并在鲁班猫板卡上部署运行。
1.1. Yolov8-seg
YOLOv8是Ultralytics开源的最新算法,目前支持目标检测、实例分割、姿态估计等任务,这些模型如何部署到板卡请参考下前面章节。
YOLOv8相关环境安装:
# 使用conda创建虚拟环境
conda create -n yolov8 python=3.8
conda activate yolov8

# 安装YOLOv8,直接使用命令安装
pip install ultralytics -i https://pypi.tuna.tsinghua.edu.cn/simple/

# 或者通过拉取仓库然后安装
git clone https://github.com/ultralytics/ultralytics
cd ultralytics

pip install -e .
1.2. TACO数据集
TACO 是一个包含在不同环境下(室内、树林、道路和海滩) 拍摄的垃圾图像数据集,这些图像中的垃圾对象被精细地用方框和多边形进行了标注, 标注信息采用与COCO数据集一样的格式,总共有60个类别,不过有的类别标注得很少甚至没有(建议训练数据集可以减少类别)。
下载数据集:
git clone https://github.com/pedropro/TACO.git
cd TACO

# 运行脚本下载图像数据,默认下载官方数据集(annotations.json)是1500张,也可以指定下载非官方的数据(annotations_unofficial.json)
python3 download.py
下载失败可以重新运行命令,如果还是下载失败,也可以到配套例程网盘下载数据集,然后解压到 TACO/data 目录下。
TACO数据集中有很多程序,可以查看数据集的相关信息:
# 参考demo.ipynb,查看官方数据集整体信息
import json
import numpy as np

dataset_path = './data'
anns_file_path = dataset_path + '/' + 'annotations.json'

# Read annotations
with open(anns_file_path, 'r') as f:
    dataset = json.loads(f.read())

categories = dataset['categories']
anns = dataset['annotations']
imgs = dataset['images']
nr_cats = len(categories)
nr_annotations = len(anns)
nr_images = len(imgs)

# Load categories and super categories
cat_names = []
super_cat_names = []
super_cat_ids = {}
super_cat_last_name = ''
nr_super_cats = 0
for cat_it in categories:
    cat_names.append(cat_it['name'])
    super_cat_name = cat_it['supercategory']
    # Adding new supercat
    if super_cat_name != super_cat_last_name:
        super_cat_names.append(super_cat_name)
        super_cat_ids[super_cat_name] = nr_super_cats
        super_cat_last_name = super_cat_name
        nr_super_cats += 1

print('Number of super categories:', nr_super_cats)
print('Number of categories:', nr_cats)
print('Number of annotations:', nr_annotations)
print('Number of images:', nr_images)
python  data.py
# 运行程序输出
Number of super categories: 28
Number of categories: 60
Number of annotations: 4784
Number of images: 1500
官方数据集总共1500张图像,有60个类别,4784个标注。
1.2.1. 数据集处理
TACO数据集标注信息和COCO格式一样,我们将使用COCO数据集的API来处理TACO数据集, 将数据集划分。要使用Yolov8-seg训练,还需要并将其转换成yolo格式。
利用TACO仓库提供的detector/split_dataset.py,我们将TACO数据集的标注信息annotations.json划分成三份 train, val, test,生成对应的json文件。
# 在TACO工程目录下执行detector/split_dataset.py划分数据集,--dataset_dir指定json路径,--test_percentage设置测试集
# --val_percentage设置验证集,--nr_trials设置份数
python  detector/split_dataset.py --dataset_dir ./data  --test_percentage 5 --val_percentage 10 --nr_trials 1
将在data目录下生成annotations_0_train.json,annotations_0_val.json,annotations_0_test.json三个文件, 并且划分测试集占5%,评估数据占10%,剩下的是训练集数据。
yolo的数据集分为一个图像目录和一个标签目录,一幅图像的所有标注信息放在一个与图像同名的txt文件中,YOLOv8分割模型训的标注格式如下:
<id> <x_1> <y_1> ... <x_n> <y_n>
一个对象的标注信息放在一行,一行的开始是类别id,之后是接着将多边形各点像素坐标的x和y值依次排列,而且x和y的值需要分别除以图像的宽度和高度进行归一化。 具体的形式,可以参考yolov8-seg测试数据 COCO8-Seg数据集 。
使用配套例程的程序,读取前面将划分的数据集的json文件,然后转换成yolo数据集要求的格式:
# 省略...............
# 类别ID
catIds = data_source.getCatIds()
# 获取类别名称
categories = data_source.loadCats(catIds)
categories.sort(key=lambda x: x['id'])

# 保存类别
class_path = args.save_path + '/classes.txt'
with open(class_path, "w") as file:
    for item in categories:
        file.write(f"{item['id']}: {item['name']}\n")

# 遍历每张图片
img_ids = data_source.getImgIds()
for index, img_id in tqdm.tqdm(enumerate(img_ids)):
    img_info = data_source.loadImgs(img_id)[0]
    file_name = img_info['file_name'].replace('/', '_')
    save_name = file_name.split('.')[0]

    height = img_info['height']
    width = img_info['width']

    save_label_path = yolo_label_path + '/' + save_name + '.txt'
    with open(save_label_path, mode='w') as fp:
        annotation_id = data_source.getAnnIds(img_id)
        if len(annotation_id) == 0:
            fp.write('')
            shutil.copy('data/{}'.format(img_info['file_name']), os.path.join(yolo_image_path, file_name))
            continue

        annotations = data_source.loadAnns(annotation_id)

        for annotation in annotations:
            category_id = annotation["category_id"]
            seg_labels = []
            for segmentation in annotation["segmentation"]:
                points = np.array(segmentation).reshape((int(len(segmentation) / 2), 2))
                for point in points:
                    x = point[0] / width
                    y = point[1] / height
                    seg_labels.append(x)
                    seg_labels.append(y)
            fp.write(str(category_id) + " " + " ".join([str(a) for a in seg_labels]) + "\n")

    shutil.copy('data/{}'.format(img_info['file_name']), os.path.join(yolo_image_path, file_name))
在TACO工程目录下执行程序:
# 测试集数据,运行程序将生成label文件和复制图像到对应目录下,转换为YOLO格式
python taco2yolo.py --annotation_path ./data/annotations_0_test.json  --subset test

# 评估集
python taco2yolo.py --annotation_path ./data/annotations_0_val.json  --subset val

# 训练集
python taco2yolo.py --annotation_path ./data/annotations_0_train.json  --subset train
程序会将TACO数据图像复制到指定的目录,并在对应目录下生成对应的标签文件以及类别和名称文件。处理后数据集存储的目录结构如下:
├── images
│   └── val
│   |   ├── 0000000001.jpg
│   |   ├── 0000000002.jpg
│   |   .......
│   └── test
│   |   ├── 0000000001.jpg
│   |   ├── 0000000002.jpg
|   │    .......
│   └── train
│       ├── 0000000001.jpg
│       ├── 0000000002.jpg
│       .......
├── labels
│   └── val
│   |   ├── 0000000001.txt
│   |   ├── 0000000002.txt
│   |   .......
│   └── test
│   |   ├── 0000000001.txt
│   |   ├── 0000000002.txt
│   |   .......
│   └── train
|   ...............
1.3. 模型训练
Yolov8训练模型,需要创建一份数据集配置文件和一个模型配置文件。
复制 ultralytics/cfg/datasets/coco8-seg.yaml 修改一份数据集配置文件,名称为taco-seg.yaml,内容如下:
path: /home/test/TACO/data
train: train.txt  # 训练集路径,相对于path目录
val: val.txt  # 验证集路径,相对于path目录
test:  test.txt # 测试集路径,相对于path目录,可以不写

names:
0: Aluminium foil
1: Battery
2: Aluminium blister pack
3: Carded blister pack
4: Other plastic bottle
5: Clear plastic bottle
6: Glass bottle
7: Plastic bottle cap
8: Metal bottle cap
9: Broken glass
10: Food Can
# 省略........
需要根据实际的数据集存放目录修改,类别id和类别名称复制前面数据集处理生成的classes.txt文件。
复制一份 ultralytics/cfg/models/v8/yolov8-seg.yaml, 然后修改模型配置文件,名称为yolov8n-seg-taco.yaml(将默认使用n尺寸的模型),如果将名称改成yolov8s-seg-taco.yaml将会使用s尺寸大小的模型。
# Ultralytics YOLO 🚀, AGPL-3.0 license
# YOLOv8-seg instance segmentation model. For Usage examples see https://docs.ultralytics.com/tasks/segment

# Parameters
nc: 60 # number of classes
scales: # model compound scaling constants, i.e. 'model=yolov8n-seg.yaml' will call yolov8-seg.yaml with scale 'n'
# [depth, width, max_channels]
n: [0.33, 0.25, 1024]
s: [0.33, 0.50, 1024]
m: [0.67, 0.75, 768]
l: [1.00, 1.00, 512]
x: [1.00, 1.25, 512]

# YOLOv8.0n backbone
backbone:
# [from, repeats, module, args]
# 省略........
模型训练可以使用命令,或者python程序,教程测试使用yolo命令。将前面修改的配置文件放到同一个目录下,在yolov8环境下,然后执行下面命令:
# 第一个参数是指任务[detect, segment, classify], 这里测试目标检测是detect,该参数是可选的;
# 第二个参数是模式[train, val, predict, export, track)],是选择进行训练、评估或者推理等等;
# 其他参数 data指定数据集配置文件,model指定修改的模型配置文件路径
(yolov8) xxx$ yolo segment train data=taco-seg.yaml model=yolov8n-seg-taco.yaml epochs=100 batch=16 imgsz=640
New https://pypi.org/project/ultralytics/8.1.35 available 😃 Update with 'pip install -U ultralytics'
Ultralytics YOLOv8.1.9 🚀 Python-3.8.18 torch-2.1.0+cu121 CUDA:0 (NVIDIA GeForce RTX 3060 Laptop GPU, 6144MiB)
engine/trainer: task=segment, mode=train, model=yolov8n-seg-taco.yaml, data=taco-seg.yaml, epochs=100, time=None,
patience=50, batch=16, imgsz=640, save=True, save_period=-1, cache=False, device=None, workers=8,
# 省略..................
opset=None, workspace=4, nms=False, lr0=0.01, lrf=0.01, momentum=0.937, weight_decay=0.0005,
warmup_epochs=3.0, warmup_momentum=0.8, warmup_bias_lr=0.1, box=7.5, cls=0.5, dfl=1.5, pose=12.0,
kobj=1.0, label_smoothing=0.0, nbs=64, hsv_h=0.015, hsv_s=0.7, hsv_v=0.4, degrees=0.0, translate=0.1,
scale=0.5, shear=0.0, perspective=0.0, flipud=0.0, fliplr=0.5, mosaic=1.0, mixup=0.0, copy_paste=0.0,
auto_augment=randaugment, erasing=0.4, crop_fraction=1.0, cfg=None, tracker=botsort.yaml,
save_dir=/mnt/f/wsl_file/wsl_ai/yolov8/ultralytics_yolov8/runs/segment/train

                from  n    params  module                                       arguments
0                  -1  1       464  ultralytics.nn.modules.conv.Conv             [3, 16, 3, 2]
1                  -1  1      4672  ultralytics.nn.modules.conv.Conv             [16, 32, 3, 2]
2                  -1  1      7360  ultralytics.nn.modules.block.C2f             [32, 32, 1, True]
3                  -1  1     18560  ultralytics.nn.modules.conv.Conv             [32, 64, 3, 2]
4                  -1  2     49664  ultralytics.nn.modules.block.C2f             [64, 64, 2, True]
5                  -1  1     73984  ultralytics.nn.modules.conv.Conv             [64, 128, 3, 2]
6                  -1  2    197632  ultralytics.nn.modules.block.C2f             [128, 128, 2, True]
7                  -1  1    295424  ultralytics.nn.modules.conv.Conv             [128, 256, 3, 2]
8                  -1  1    460288  ultralytics.nn.modules.block.C2f             [256, 256, 1, True]
9                  -1  1    164608  ultralytics.nn.modules.block.SPPF            [256, 256, 5]
10                  -1  1         0  torch.nn.modules.upsampling.Upsample         [None, 2, 'nearest']
11             [-1, 6]  1         0  ultralytics.nn.modules.conv.Concat           [1]
12                  -1  1    148224  ultralytics.nn.modules.block.C2f             [384, 128, 1]
13                  -1  1         0  torch.nn.modules.upsampling.Upsample         [None, 2, 'nearest']
14             [-1, 4]  1         0  ultralytics.nn.modules.conv.Concat           [1]
15                  -1  1     37248  ultralytics.nn.modules.block.C2f             [192, 64, 1]
16                  -1  1     36992  ultralytics.nn.modules.conv.Conv             [64, 64, 3, 2]
17            [-1, 12]  1         0  ultralytics.nn.modules.conv.Concat           [1]
18                  -1  1    123648  ultralytics.nn.modules.block.C2f             [192, 128, 1]
19                  -1  1    147712  ultralytics.nn.modules.conv.Conv             [128, 128, 3, 2]
20             [-1, 9]  1         0  ultralytics.nn.modules.conv.Concat           [1]
21                  -1  1    493056  ultralytics.nn.modules.block.C2f             [384, 256, 1]
22        [15, 18, 21]  1   1015780  ultralytics.nn.modules.head.Segment          [60, 32, 64, [64, 128, 256]]
YOLOv8n-seg-taco summary: 261 layers, 3275316 parameters, 3275300 gradients, 12.2 GFLOPs

Freezing layer 'model.22.dfl.conv.weight'
AMP: running Automatic Mixed Precision (AMP) checks with YOLOv8n...
AMP: checks passed ✅
# 省略....................................
  Epoch    GPU_mem   box_loss   seg_loss   cls_loss   dfl_loss  Instances       Size
100/100      3.01G      1.466       2.63      2.942      1.456         24        640: 100%|██████████| 80/80 [00:43<00:00,  1.83it/s]
             Class     Images  Instances      Box(P          R      mAP50  mAP50-95)     Mask(P          R      mAP50  mAP50-95): 100%|██████████| 5/5
               all        150        526      0.389      0.107     0.0917     0.0548      0.387      0.101     0.0765     0.0451

100 epochs completed in 1.281 hours.
Optimizer stripped from runs/segment/train/weights/last.pt, 6.8MB
Optimizer stripped from runs/segment/train/weights/best.pt, 6.8MB
以上只是简单训练了一个yolov8n-seg模型, 训练输出文件保存在runs/segment/train目录下,最终模型保存在runs/segment/train/weights/best.pt。
对训练的模型进行评估:
(yolov8) xxx$ yolo segment val model=xxx/runs/segment/train/weights/last.pt
输出文件保存在runs/segment/val下,以上训练的模型效果和精度较差,可以测试修改训练策略、 添加和优化数据集训练、使用其他尺寸的模型训练等等。
1.4. 模型导出
经过训练的yolov8n-seg模型,要在鲁班猫板卡上推理部署,还行需要进行一些优化修改,我们 使用 airockchip/ultralytics_yolov8 仓库程序导出适合部署到rknpu上的模型。
拉取仓库程序:
# 在当前目录下,拉取airockchip/ultralytics_yolov8,main分支
git clone https://github.com/airockchip/ultralytics_yolov8.git
cd ultralytics_yolov8
修改ultralytics/cfg/default.yaml文件:
# 修改ultralytics/cfg/default.yaml中model文件路径,可以修改为前面训练出的模型

# Train settings -------------------------------------------------------------------------------------------------------
model: xxxxx/runs/segment/train/weights/best.pt # (str, optional) path to model file, i.e. yolov8n.pt, yolov8n.yaml
data:  # (str, optional) path to data file, i.e. coco128.yaml
epochs: 100  # (int) number of epochs to train for
执行程序,导出onnx模型:
# 执行python ./ultralytics/engine/exporter.py导出模型
(yolov8) llh@anhao:~/ultralytics_yolov8$ export PYTHONPATH=./
(yolov8) llh@anhao:~/ultralytics_yolov8$ python ultralytics/engine/exporter.py
Ultralytics YOLOv8.0.151 🚀 Python-3.8.18 torch-2.1.0+cu121 CPU ()
YOLOv8n-seg-taco summary (fused): 195 layers, 3269764 parameters, 0 gradients, 12.0 GFLOPs

PyTorch: starting from '/mnt/f/wsl_file/wsl_ai/yolov8/ultralytics_yolov8/best.pt' with
input shape (16, 3, 640, 640) BCHW and output shape(s) ((16, 64, 80, 80), (16, 60, 80, 80), (16, 1, 80, 80),
(16, 32, 80, 80), (16, 64, 40, 40), (16, 60, 40, 40), (16, 1, 40, 40), (16, 32, 40, 40), (16, 64, 20, 20),
 (16, 60, 20, 20), (16, 1, 20, 20), (16, 32, 20, 20), (16, 32, 160, 160)) (6.5 MB)

RKNN: starting export with torch 2.1.0+cu121...

RKNN: feed /mnt/f/wsl_file/wsl_ai/yolov8/ultralytics_yolov8/best.onnx to RKNN-Toolkit or RKNN-Toolkit2 to generate RKNN model.
Refer https://github.com/airockchip/rknn_model_zoo/tree/main/models/CV/object_detection/yolo
RKNN: export success ✅ 0.6s, saved as '/mnt/f/wsl_file/wsl_ai/yolov8/ultralytics_yolov8/best.onnx' (12.5 MB)

Export complete (3.7s)
Results saved to /mnt/f/wsl_file/wsl_ai/yolov8/ultralytics_yolov8
Predict:         yolo predict task=segment model=/mnt/f/wsl_file/wsl_ai/yolov8/ultralytics_yolov8/best.onnx imgsz=640
Validate:        yolo val task=segment model=/mnt/f/wsl_file/wsl_ai/yolov8/ultralytics_yolov8/best.onnx imgsz=640 data=taco-seg.yaml
Visualize:       https://netron.app
导出的onnx模型保存在best.pt模型路径下,名称为best.onnx,使用 Netron 查看下该模型的输出:
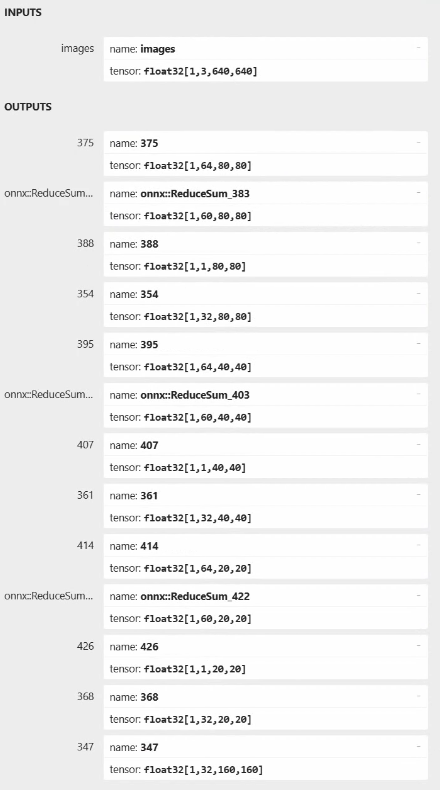
经过ultralytics_yolov8仓库导出的onnx模型(yolov8n-seg),输入是1*3*640*640,输出总共13个,分为三个特征图相关(12个)和一个分割掩码(1*32*160*160)
以特征图80*80为例,相关的输出为1*64*80*80、1*60*80*80、1*1*80*80、1*32*80*80。
第一个1*64*80*80与检测框坐标相关,经过相关后处理得到框的坐标(x1, y1, w, h);
第二个1*60*80*80,“80*80”表示检测框数量,“60”表示60个类别的置信度;
第三个1*1*80*80,表示检测框的60个类别的置信度的总和,用于在后处理加速过滤框;
第四个1*32*80*80是和分割掩码相关的权重。
1.5. 部署测试
导出rknn模型后,在板卡上推理部署使用rknpu2,rknpu2的使用请参考下前面 章节 。 对yolov8-seg模型的后处理我们参考 rknn_model_zoo 的部署例程。
推理程序大致步骤是:
读取图像,初始化模型,图像预处理
模型推理
后处理(boxes解码和NMS以及mask的处理)
结果可视化或者保存到图像
板卡上拉取教程配套例程,切换到example/garbage_detection/cpp目录下,然后编译程序:
# 拉取配套例程
cat@lubancat:~$ git clone https://gitee.com/LubanCat/lubancat_ai_manual_code.git
cat@lubancat:~$ cd lubancat_ai_manual_code/example/garbage_detection/cpp

# -t指定测试平台rk3588
cat@lubancat:~/xxx/cpp$ ./build-linux.sh -t rk3588
./build-linux.sh -t rk3588
===================================
TARGET_SOC=rk3588
INSTALL_DIR=/home/cat/yolov8/lubancat_ai_manual_code/example/yolov8/yolov8_seg/cpp/install/rk3588_linux
BUILD_DIR=/home/cat/yolov8/lubancat_ai_manual_code/example/yolov8/yolov8_seg/cpp/build/build_rk3588_linux
ENABLE_DMA32=OFF
CC=aarch64-linux-gnu-gcc
CXX=aarch64-linux-gnu-g++
===================================
-- Configuring done
-- Generating done
-- Build files have been written to: /home/cat/yolov8/lubancat_ai_manual_code/example/yolov8/yolov8_seg/cpp/build/build_rk3588_linux
Scanning dependencies of target rknn_yolov8_seg_demo
Scanning dependencies of target yolov8seg_videocapture_demo
Scanning dependencies of target taco_yolov8seg_videocapture
Scanning dependencies of target taco_yolov8_seg
[ 10%] Building CXX object CMakeFiles/taco_yolov8_seg.dir/postprocess.cc.o
[ 20%] Building CXX object CMakeFiles/taco_yolov8seg_videocapture.dir/taco_yolov8seg_videocapture.cc.o
[ 30%] Building CXX object CMakeFiles/taco_yolov8seg_videocapture.dir/postprocess.cc.o
[ 40%] Building CXX object CMakeFiles/taco_yolov8_seg.dir/taco_yolov8_seg.cc.o
# 省略...........
[ 90%] Linking CXX executable taco_yolov8seg_videocapture
[100%] Linking CXX executable taco_yolov8_seg
[100%] Built target taco_yolov8_seg
[100%] Built target taco_yolov8seg_videocapture
[ 50%] Built target taco_yolov8seg_videocapture
[100%] Built target taco_yolov8_seg
Install the project...

# 省略...........
编译输出文件在install/rk3588_linux目录下,taco_yolov8_seg和taco_yolov8seg_videocapture, 第一个用在对单一图像的测试,第二个可以调用摄像头或者视频文件测试。
# 从前面划分的测试集数据获取图像,然后对单一图像简单测试
cat@lubancat:~/xxx/cpp/install/rk3588_linux$ ./taco_yolov8_seg
./taco_yolov8_seg <model_path> <image_path>
cat@lubancat:~/xxx/cpp/install/rk3588_linux$ ./taco_yolov8_seg ./model/yolov8n_seg_rk3588.rknn ./model/batch_1_000001.jpg
load lable ./model/taco_labels.txt
model input num: 1, output num: 13
input tensors:
index=0, name=images, n_dims=4, dims=[1, 640, 640, 3], n_elems=1228800, size=1228800, fmt=NHWC, type=INT8, qnt_type=AFFINE, zp=-128, scale=0.003922
output tensors:
index=0, name=375, n_dims=4, dims=[1, 64, 80, 80], n_elems=409600, size=409600, fmt=NCHW, type=INT8, qnt_type=AFFINE, zp=51, scale=0.222927
index=1, name=onnx::ReduceSum_383, n_dims=4, dims=[1, 60, 80, 80], n_elems=384000, size=384000, fmt=NCHW, type=INT8, qnt_type=AFFINE, zp=-128, scale=0.002898
index=2, name=388, n_dims=4, dims=[1, 1, 80, 80], n_elems=6400, size=6400, fmt=NCHW, type=INT8, qnt_type=AFFINE, zp=-128, scale=0.003922
index=3, name=354, n_dims=4, dims=[1, 32, 80, 80], n_elems=204800, size=204800, fmt=NCHW, type=INT8, qnt_type=AFFINE, zp=-8, scale=0.020550
index=4, name=395, n_dims=4, dims=[1, 64, 40, 40], n_elems=102400, size=102400, fmt=NCHW, type=INT8, qnt_type=AFFINE, zp=34, scale=0.149211
index=5, name=onnx::ReduceSum_403, n_dims=4, dims=[1, 60, 40, 40], n_elems=96000, size=96000, fmt=NCHW, type=INT8, qnt_type=AFFINE, zp=-128, scale=0.002205
index=6, name=407, n_dims=4, dims=[1, 1, 40, 40], n_elems=1600, size=1600, fmt=NCHW, type=INT8, qnt_type=AFFINE, zp=-128, scale=0.003922
index=7, name=361, n_dims=4, dims=[1, 32, 40, 40], n_elems=51200, size=51200, fmt=NCHW, type=INT8, qnt_type=AFFINE, zp=35, scale=0.013169
index=8, name=414, n_dims=4, dims=[1, 64, 20, 20], n_elems=25600, size=25600, fmt=NCHW, type=INT8, qnt_type=AFFINE, zp=18, scale=0.093956
index=9, name=onnx::ReduceSum_422, n_dims=4, dims=[1, 60, 20, 20], n_elems=24000, size=24000, fmt=NCHW, type=INT8, qnt_type=AFFINE, zp=-128, scale=0.001961
index=10, name=426, n_dims=4, dims=[1, 1, 20, 20], n_elems=400, size=400, fmt=NCHW, type=INT8, qnt_type=AFFINE, zp=-128, scale=0.002739
index=11, name=368, n_dims=4, dims=[1, 32, 20, 20], n_elems=12800, size=12800, fmt=NCHW, type=INT8, qnt_type=AFFINE, zp=38, scale=0.012272
index=12, name=347, n_dims=4, dims=[1, 32, 160, 160], n_elems=819200, size=819200, fmt=NCHW, type=INT8, qnt_type=AFFINE, zp=-118, scale=0.029067
model is NHWC input fmt
model input height=640, width=640, channel=3
scale=0.312347 dst_box=(0 80 639 559) allow_slight_change=1 _left_offset=0 _top_offset=80 padding_w=0 padding_h=160
src width=2049 height=1537 fmt=0x1 virAddr=0x0x7fadaf4040 fd=0
dst width=640 height=640 fmt=0x1 virAddr=0x0x7fa76d2000 fd=9
src_box=(0 0 2048 1536)
dst_box=(0 80 639 559)
color=0x72
rga_api version 1.10.0_[2]
fill dst image (x y w h)=(0 0 640 640) with color=0x72727272
Error on improcess STATUS=-1
RGA error message: Unsupported function: src unsupport width stride 2049, rgb888 width stride should be 16 aligned!
try convert image use cpu
finish
rknn_run
matmul_by_cpu_uint8 use: 6.873000 ms
resize_by_opencv_uint8 use: 0.761000 ms
crop_mask_uint8 use: 1.175000 ms
seg_reverse use: 5.097000 ms
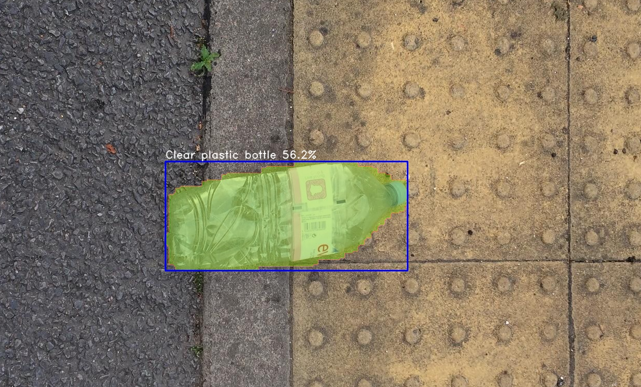
Clear plastic bottle @ (822 739 1290 950) 0.562
rknn run and process use 79.562000 ms
结果图片: