
7. BERT
BERT(Bidirectional Encoder Representations from Transformers)是Google于2018年提出的自然语言处理(NLP)预训练模型, 通过双向上下文理解和Transformer架构,在多项NLP任务中取得突破性效果。其核心思想是:
预训练+微调:在大规模语料库上预训练通用语言表示,再针对下游任务微调。
上下文敏感:每个词的表示动态依赖整个句子的上下文。
BERT采用的是Transformer的仅编码器(Encoder-only)架构,利用自注意力机制(Self-Attention Mechanism)来捕捉词与词之间的关系。 相比RNN和LSTM,Transformer架构能够并行处理输入序列,从而显著提升训练效率。
BERT 模型结构(简单参考):
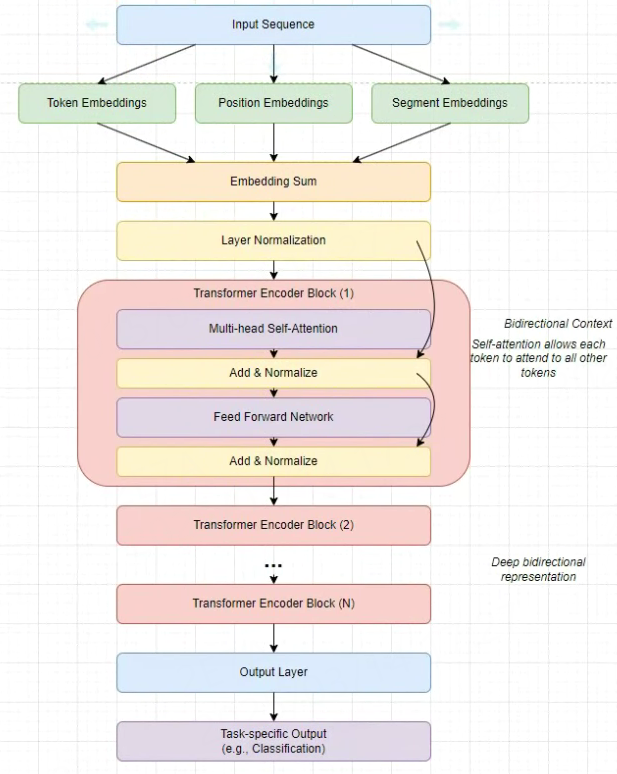
BERT模型有base和large两个版本,BERT-base对应的是12层encoder,BERT-large对应的是24层encoder。
详细请查看:https://arxiv.org/abs/1810.04805
github仓库:https://github.com/google-research/bert
本章节将简单测试BERT的预训练任务:掩码语言模型(Masked Language Model, MLM),然后部署到鲁班猫板卡上。
7.1. BERT简单使用
创建一个环境,然后安装transformers等相关库。
# 创建一个名称为tansformer的环境
conda create -n tansformer python=3.10
conda activate tansformer

# 参考命令
pip install --upgrade transformers
测试 google-bert/bert-base-uncased 的预训练任务MLM。
1 2 3 | from transformers import pipeline
unmasker = pipeline('fill-mask', model='bert-base-uncased')
unmasker("The man worked as a [MASK].")
|
(tansformer) llh@llh:/xxx$ python test.py
# 省略................
[{'score': 0.4167886972427368, 'token': 3000, 'token_str': 'paris', 'sequence': 'the capital of france is paris.'},
{'score': 0.07141676545143127, 'token': 22479, 'token_str': 'lille', 'sequence': 'the capital of france is lille.'},
{'score': 0.06339266151189804, 'token': 10241, 'token_str': 'lyon', 'sequence': 'the capital of france is lyon.'},
{'score': 0.04444749280810356, 'token': 16766, 'token_str': 'marseille', 'sequence': 'the capital of france is marseille.'},
{'score': 0.030297206714749336, 'token': 7562, 'token_str': 'tours', 'sequence': 'the capital of france is tours.'}]
测试查看输出特征:
1 2 3 4 5 6 7 8 9 10 11 12 13 14 | from transformers import BertTokenizer, BertModel
# 加载预训练模型和分词器
tokenizer = BertTokenizer.from_pretrained('bert-base-uncased')
model = BertModel.from_pretrained('bert-base-uncased')
# 输入处理
inputs = tokenizer("Hello, BERT!", return_tensors="pt")
# 前向传播
outputs = model(**inputs, output_hidden_states=True)
# 输出
last_hidden_states = outputs.last_hidden_state # (batch_size, seq_len, hidden_dim)
|
BERT模型可以得到输入序列所对应的所有token的向量表示,不仅可以使用最后一层BERT的输出连接上任务网络进行微调, 还可以直接使用这些token的向量当作特征。
7.2. BERT部署到板卡
7.2.1. 模型转换
教程测试使用 optimum 工具导出onnx模型, 也可以使用 google-bert/bert-base-uncased 仓库中提供的onnx文件。
先手动拉取 google-bert/bert-base-uncased , 需要执行optimum-cli命令时设置–model path/to/bert-base-uncased参数, 也可以执行optimum-cli命令时设置参数–model google-bert/bert-base-uncased,程序将自动拉取模型。
(tansformer) llh@llh:/xxx$ git lfs install #或者 sudo apt update && sudo apt install git-lfs
# google-bert/bert-base-uncased中有多种格式的模型,我们只拉取用于pytorch的模型pytorch_model.bin
(tansformer) llh@llh:/xxx$ GIT_LFS_SKIP_SMUDGE=1  git clone https://huggingface.co/google-bert/bert-base-uncased
(tansformer) llh@llh:/xxx$ cd bert-base-uncased
(tansformer) llh@llh:/xxx$ git lfs pull --include "pytorch_model.bin"

# 或者到镜像网址下载bert-base-uncased
(tansformer) llh@llh:/xxx$ git clone https://hf-mirror.com/google-bert/bert-base-uncased

# 测试导出onnx模型
(tansformer) llh@llh:/xxx$ optimum-cli export onnx --model ./bert-base-uncased  --task fill-mask onnx-mask/
BertForMaskedLM has generative capabilities, as `prepare_inputs_for_generation` is explicitly overwritten. However,
# 省略....................
Found different candidate ONNX initializers (likely duplicate) for the tied weights:
        bert.embeddings.word_embeddings.weight: {'bert.embeddings.word_embeddings.weight'}
        cls.predictions.decoder.weight: {'onnx::MatMul_2056'}
                -[x] values not close enough, max diff: 0.00016498565673828125 (atol: 0.0001)
The ONNX export succeeded with the warning: The maximum absolute difference between the output of the reference model and the
ONNX exported model is not within the set tolerance 0.0001:
- logits: max diff = 0.00016498565673828125.
The exported model was saved at: onnx-mask
使用toolkit2,简单编写一个模型转换程序,注意固定了sequence_length,教程测试设置为16。
1 2 3 4 5 6 7 8 9 10 11 12 13 14 15 16 17 18 19 20 21 22 23 24 25 26 27 28 29 30 31 32 33 34 35 36 37 38 39 40 | # 有省略.......
if __name__ == '__main__':
model_path, platform, do_quant, output_path = parse_arg()
# Create RKNN object
rknn = RKNN(verbose=False)
# Pre-process config
print('--> Config model')
rknn.config(target_platform=platform)
print('done')
# Load model
print('--> Loading model')
ret = rknn.load_onnx(model=model_path,
inputs=['input_ids', 'attention_mask', 'token_type_ids'],
input_size_list=[[1, sequence_length],[1, sequence_length],[1, sequence_length]])
if ret != 0:
print('Load model failed!')
exit(ret)
print('done')
# Build model
print('--> Building model')
ret = rknn.build(do_quantization=do_quant)
if ret != 0:
print('Build model failed!')
exit(ret)
print('done')
# Export rknn model
print('--> Export rknn model')
ret = rknn.export_rknn(output_path)
if ret != 0:
print('Export rknn model failed!')
exit(ret)
print('done')
# Release
rknn.release()
|
执行程序导出rknn模型,默认不量化。
# 教程测试lubancat-4,,设置rk3588参数
(toolkit2.3.0) llh@llh:/xxx/detr$ python convert.py ../onnx-mask/model.onnx rk3588 fp
I rknn-toolkit2 version: 2.3.0
--> Config model
done
--> Loading model
W load_onnx: If you don't need to crop the model, don't set 'inputs'/'input_size_list'/'outputs'!
I Loading : 100%|███████████████████████████████████████████████| 202/202 [00:00<00:00, 2135.47it/s]
done
--> Building model
W build: For tensor ['/bert/Constant_12_output_0'], the value smaller than -3e+38 has been corrected
to -10000. Set opt_level to 2 or lower to disable this correction.
I OpFusing 0: 100%|██████████████████████████████████████████████| 100/100 [00:00<00:00, 269.63it/s]
I OpFusing 1 : 100%|█████████████████████████████████████████████| 100/100 [00:00<00:00, 127.00it/s]
I OpFusing 0 : 100%|██████████████████████████████████████████████| 100/100 [00:01<00:00, 72.25it/s]
I OpFusing 1 : 100%|██████████████████████████████████████████████| 100/100 [00:01<00:00, 71.67it/s]
I OpFusing 2 : 100%|██████████████████████████████████████████████| 100/100 [00:01<00:00, 68.63it/s]
I OpFusing 0 : 100%|██████████████████████████████████████████████| 100/100 [00:01<00:00, 65.57it/s]
I OpFusing 1 : 100%|██████████████████████████████████████████████| 100/100 [00:01<00:00, 64.74it/s]
I OpFusing 2 : 100%|██████████████████████████████████████████████| 100/100 [00:01<00:00, 50.35it/s]
I rknn building ...
E RKNN: [10:19:04.907] channel is too large, may produce thousands of regtask, fallback to cpu!
E RKNN: [10:19:04.907] channel is too large, may produce thousands of regtask, fallback to cpu!
E RKNN: [10:19:04.907] channel is too large, may produce thousands of regtask, fallback to cpu!
E RKNN: [10:19:04.907] channel is too large, may produce thousands of regtask, fallback to cpu!
E RKNN: [10:19:04.963] channel is too large, may produce thousands of regtask, fallback to cpu!
I rknn building done.
done
--> Export rknn model
done
7.2.2. 部署测试
教程进行简单的部署,测试使用Toolkit Lite2, Toolkit Lite2的安装和使用参考 这里 。
1 2 3 4 5 6 7 8 9 10 11 12 13 14 15 16 17 18 19 20 21 22 23 24 25 26 27 28 29 30 31 32 33 34 35 36 37 38 39 40 41 42 43 44 45 46 47 48 49 50 51 52 53 54 55 | # 省略...............
if __name__ == '__main__':
# Get device information
host_name = get_host()
if host_name == 'RK3566_RK3568':
rknn_model = RK3566_RK3568_RKNN_MODEL
elif host_name == 'RK3562':
rknn_model = RK3562_RKNN_MODEL
elif host_name == 'RK3576':
rknn_model = RK3576_RKNN_MODEL
elif host_name == 'RK3588':
rknn_model = RK3588_RKNN_MODEL
else:
print("This demo cannot run on the current platform: {}".format(host_name))
exit(-1)
rknn_lite = RKNNLite()
tokenizer = BertTokenizerForMask()
# Load RKNN model
print('--> Load RKNN model')
ret = rknn_lite.load_rknn(rknn_model)
if ret != 0:
print('Load RKNN model failed')
exit(ret)
print('done')
# input text/tokenizer
inputs = tokenizer.encode("The capital of France is [MASK].", 16)
# Init runtime environment
print('--> Init runtime environment')
# Run on RK356x / RK3576 / RK3588 with Debian OS, do not need specify target.
if host_name in ['RK3576', 'RK3588']:
# For RK3576 / RK3588, specify which NPU core the model runs on through the core_mask parameter.
ret = rknn_lite.init_runtime(core_mask=RKNNLite.NPU_CORE_0)
else:
ret = rknn_lite.init_runtime()
if ret != 0:
print('Init runtime environment failed')
exit(ret)
print('done')
# Inference
print('--> Running model')
outputs = rknn_lite.inference(inputs=[np.array(inputs['input_ids']),np.array(inputs['attention_mask']),np.array(inputs['token_type_ids'])])
# Show/save the results
# np.save('./output.npy', outputs)
result = postprocess(tokenizer, outputs, np.array(inputs['input_ids']), 3)
print(result)
rknn_lite.release()
|
修改程序中rknn模型路径和前面模型转换固定的sequence_length,然后执行测试程序:
# 测试例程使用的是lubancat-4板卡,系统是ubuntu20.04
cat@lubancat:~/ViT$ python3 rknn_Inference.py
--> Load RKNN model
done
--> Init runtime environment
I RKNN: [10:30:38.635] RKNN Runtime Information, librknnrt version: 2.3.0 (c949ad889d@2024-11-07T11:35:33)
I RKNN: [10:30:38.635] RKNN Driver Information, version: 0.9.8
I RKNN: [10:30:38.636] RKNN Model Information, version: 6, toolkit version: 2.3.0(compiler version: 2.3.0 (c949ad889d@2024-11-07T11:39:30)),
 target: RKNPU v2, target platform: rk3588, framework name: ONNX, framework layout: NCHW, model inference type: static_shape
W RKNN: [10:30:38.835] query RKNN_QUERY_INPUT_DYNAMIC_RANGE error, rknn model is static shape type, please export rknn with dynamic_shapes
W Query dynamic range failed. Ret code: RKNN_ERR_MODEL_INVALID. (If it is a static shape RKNN model, please ignore the above warning message.)
done
--> Running model
[{'score': 0.4163118600845337, 'token': 3000, 'token_str': 'paris', 'sequence': 'the capital of france is paris.'},
 {'score': 0.07178116589784622, 'token': 22479, 'token_str': 'lille', 'sequence': 'the capital of france is lille.'},
 {'score': 0.06334665417671204, 'token': 10241, 'token_str': 'lyon', 'sequence': 'the capital of france is lyon.'}]
测试例程中的tokenizer和postprocess都参考 Huggingface Transformers , 并进行了非常简陋的修改,可自行优化修改。
7.3. 参考链接
BERT论文: BERT: Pre-training of Deep Bidirectional Transformers for Language Understanding。
Transformer论文: Attention Is All You Need 。
HuggingFace实现: Transformers BERT Documentation 。