17. YOLO-World
与传统的YOLO系列检测器不同,YOLO-World是一种实时的开放词汇对象检测器,可根据提示与描述性文本实现检测图像中的任何物体。

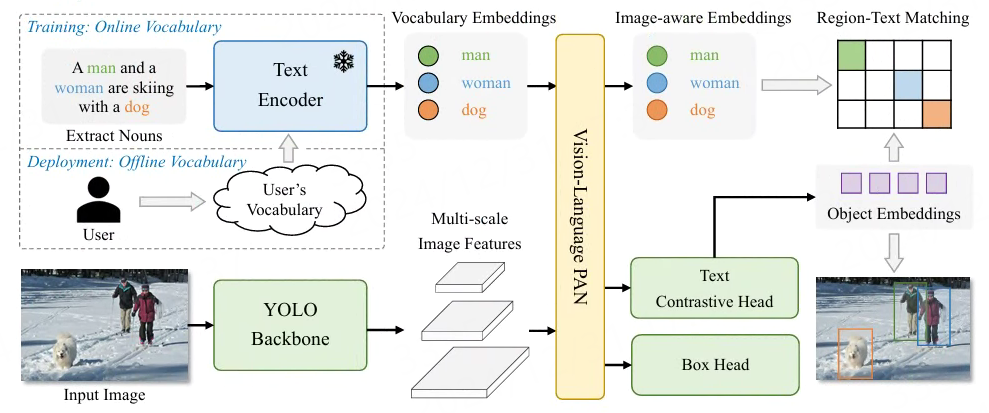
模型结构请查看 论文 , 由YOLO检测器、文本编码器和视觉语言路径聚合网络组成, 输入文本经过文本编码器将文本编码为文本嵌入,YOLO检测器中的图像编码器从输入图像中提取多尺度特征, 利用视觉语言路径聚合网络通过利用图像特征和文本嵌入之间的跨模态融合来增强文本和图像表示。
YOLO-World擅长zero-shot检测、高效率检测各种物体。 在具有挑战性的LVIS数据集上,YOLO-World在V100上以52.0FPS实现了35.4AP,在准确性和速度方面都优于许多最先进的方法。 此外,经过微调的YOLO-World在多个下游任务上取得了出色的性能,包括对象检测和开放词汇实例分割。
17.1. YOLO-World示例
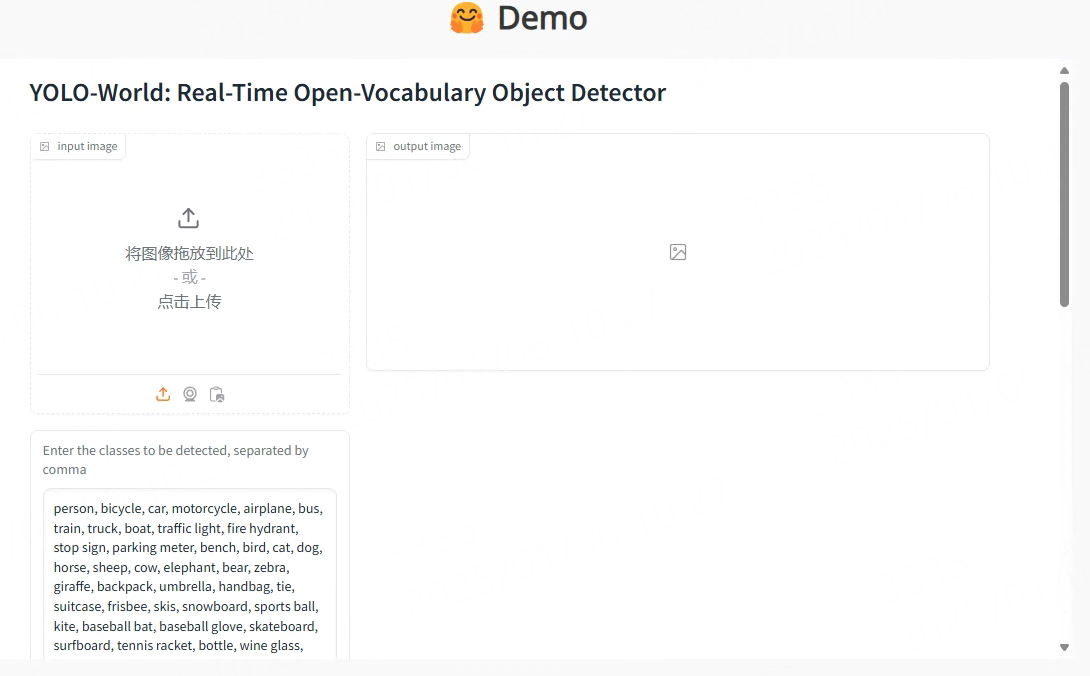
YOLO-World的在线演示示例查看:https://www.yoloworld.cc 或者 https://huggingface.co/spaces/stevengrove/YOLO-World, 打开网页然后下拉到DEMO界面:

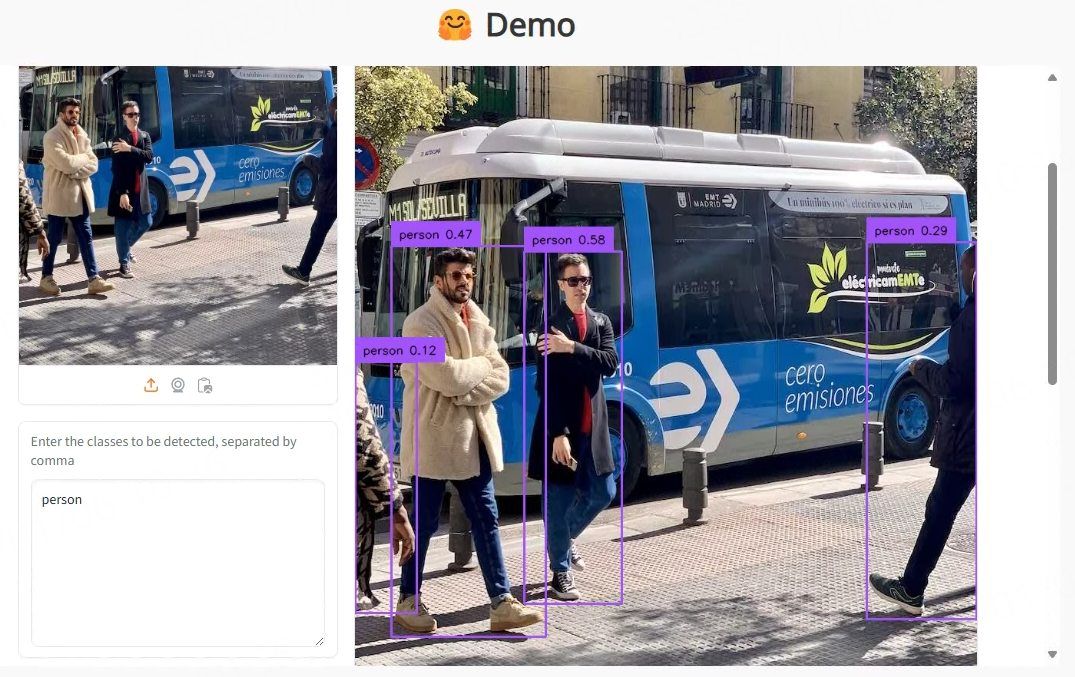
上传一张图片,在右下面的窗口输入要检测的类别,以逗号分隔。 最后点击submit,检测结果会在右边输出窗口显示。

如上图所示,在文本输入窗口只输入了“person”,结果窗口中显示检测出图像中的人。
17.2. YOLO-World部署测试
17.2.1. 创建YOLO-World环境
在个人PC上使用conda创建虚拟环境,安装pytorch等等相关库,然后测试YOLO-World。
# 使用conda创建虚拟环境
conda create -n yolo_world python=3.10
conda activate yolo_world

# 根据自行的环境安装pytorch,详细命令参考https://pytorch.org/get-started/locally/,下面是参考命令:
pip install torch==2.4.1 torchvision==0.19.1 torchaudio==2.4.1 --index-url https://download.pytorch.org/whl/cu118

# 配置pip源(可选)
# pip3 config set global.index-url https://pypi.tuna.tsinghua.edu.cn/simple/
安装YOLO-World相关环境:
# 拉取YOLO-World源码
git clone --recursive https://github.com/AILab-CVC/YOLO-World
cd YOLO-World/

# 安装YOLO-World
pip install -e .


# 例程测试是手动安装相关库,然后直接使用YOLO-World源码库
# 安装mmyolo
cd mmyolo
# Install albumentations
mim install -r requirements/albu.txt
# Install MMYOLO
mim install -v -e .
# 安装 transformers等等
pip install transformers
YOLO-World相关环境测试也可以直接使用工程中的 Dockerfile 来创建。
17.2.2. 导出onnx模型
拉取airockchip/YOLO-World仓库的源码,该仓库对YOLO-World进行了rknpu部署优化, 教程测试 yolo_world_v2_s_obj365v1 模型。
# 安装相关软件库(按需求安装)
#pip install supervision onnx onnxruntime onnxsim

git clone --recursive https://github.com/airockchip/YOLO-World.git
cd YOLO-World

# 执行deploy/export_onnx.py
PYTHONPATH=./ python deploy/export_onnx.py ./configs/pretrain/yolo_world_v2_s_vlpan_bn_2e-3_100e_4x8gpus_obj365v1_goldg_train_lvis_minival.py
../yolo_world_v2_s_obj365v1_goldg_pretrain-55b943ea.pth   --opset 12  --model-only
# 省略............
from torch.distributed.optim import \
Export ONNX with bbox decoder and NMS ...
Loads checkpoint by local backend from path: ../yolo_world_v2_s_obj365v1_goldg_pretrain-55b943ea.pth
<bound method DistancePointBBoxCoder.decode of <mmyolo.models.task_modules.coders.distance_point_bbox_coder.DistancePointBBoxCoder object at 0x7f5b70eb4af0>>
<bound method DistancePointBBoxCoder.decode of <mmyolo.models.task_modules.coders.distance_point_bbox_coder.DistancePointBBoxCoder object at 0x7f5b70eb4af0>>
ONNX export success, save into ./work_dirs/yolo_world_v2_s_obj365v1_goldg_pretrain-55b943ea.onnx
最终onnx模型保存在当前目录work_dirs/下。
文本处理模型使用的是openai/clip-vit-base-patch32的文本编码器,参考前面clip文档,导出文本编码器模型。
# 安装optimum exporters依赖模块
pip install optimum[exporters]

# 导出onnx模型,将会自动下载的openai/clip-vit-base-patch32 ,最后指定转换后的模型保存在clip-vit-base-patch32-onnx目录下
(yolo_world) llh@llh:/xxx/clip$ optimum-cli export onnx --model openai/clip-vit-base-patch32  --opset 18 ./clip-vit-base-patch32-onnx
导出的onnx模型保存在指定的目录clip-vit-base-patch32-onnx下,名称为model.onnx。
然后需要将模型截取出文本侧,参考配套例程的truncated_onnx.py文件。
1 2 3 4 5 6 7 8 9 10 11 12 13 | import onnx
import argparse
if __name__ == '__main__':
parser = argparse.ArgumentParser(description='Export clip onnx model', add_help=True)
parser.add_argument('--model', type=str, required=True,
help='onnx model path')
args = parser.parse_args()
output_path = './clip_text.onnx'
input_names = ['input_ids', 'attention_mask']
output_names = ['text_embeds']
onnx.utils.extract_model(args.model, output_path, input_names, output_names)
|
# 执行程序
cd clip-vit-base-patch32-onnx
python ./truncated_onnx.py --model ./model.onnx
执行程序后,会在当前目录下生成clip_text.onnx文件。
17.2.3. 转换成rknn模型
使用toolkit2工具,简单编程,将前面导出的yolo_world_v2s模型转换成rknn模型。
1 2 3 4 5 6 7 8 9 10 11 12 13 14 15 16 17 18 19 20 21 22 23 24 25 26 27 28 29 30 31 32 33 | # 省略.............
if __name__ == '__main__':
model_path, platform, do_quant, output_path = parse_arg()
# Create RKNN object
rknn = RKNN(verbose=False)
# Pre-process config
print('--> Config model')
rknn.config(target_platform=platform,
mean_values=[[0, 0, 0]],
std_values=[[255, 255, 255]],)
print('done')
# Load model
print('--> Loading model')
ret = rknn.load_onnx(model=model_path,
inputs=['images', 'texts'],
input_size_list=[[1, 3, IMAGE_SIZE[0], IMAGE_SIZE[1]], [1, TEXT_INPUT_SIZE, TEXT_EMBEDS]])
if ret != 0:
print('Load model failed!')
exit(ret)
print('done')
# Build model
print('--> Building model')
ret = rknn.build(do_quantization=do_quant, dataset=DATASET)
if ret != 0:
print('Build model failed!')
exit(ret)
print('done')
# 省略.............
|
#Usage: python3 onnx2rknn_yolow.py onnx_model_path [platform] [dtype(optional)] [output_rknn_path(optional)]
#   platform choose from [rk3562, rk3566, rk3568, rk3588, rk3576]
#   dtype choose from    [fp, i8]
# 教程测试lubancat4,设置rk3588平台.如果是lubancat-3,设置rk3576
(toolkit2_2.3) llh@llh:/xxx$ python onnx2rknn_yolow.py yolo_world_v2s.onnx rk3588 i8 yolo_world_v2s.rknn
I rknn-toolkit2 version: 2.3.0
--> Config model
done
--> Loading model
W load_onnx: If you don't need to crop the model, don't set 'inputs'/'input_size_list'/'outputs'!
I Loading : 100%|██████████████████████████████████████████████| 152/152 [00:00<00:00, 10960.22it/s]
W load_onnx: The config.mean_values is None, zeros will be set for input 1!
W load_onnx: The config.std_values is None, ones will be set for input 1!
done
--> Building model
I OpFusing 0: 100%|██████████████████████████████████████████████| 100/100 [00:00<00:00, 828.74it/s]
I OpFusing 1 : 100%|█████████████████████████████████████████████| 100/100 [00:00<00:00, 420.40it/s]
I OpFusing 0 : 100%|█████████████████████████████████████████████| 100/100 [00:00<00:00, 212.12it/s]
I OpFusing 1 : 100%|█████████████████████████████████████████████| 100/100 [00:00<00:00, 204.52it/s]
I OpFusing 2 : 100%|█████████████████████████████████████████████| 100/100 [00:00<00:00, 199.40it/s]
I OpFusing 0 : 100%|█████████████████████████████████████████████| 100/100 [00:00<00:00, 189.54it/s]
I OpFusing 1 : 100%|█████████████████████████████████████████████| 100/100 [00:00<00:00, 183.15it/s]
I OpFusing 2 : 100%|██████████████████████████████████████████████| 100/100 [00:01<00:00, 74.38it/s]
I GraphPreparing : 100%|███████████████████████████████████████| 240/240 [00:00<00:00, 21790.95it/s]
I Quantizating : 100%|████████████████████████████████████████████| 240/240 [00:09<00:00, 24.18it/s]
# 省略.............
I rknn building ...
I rknn building done.
done
--> Export rknn model
done
使用toolkit2工具,将前面导出的clip_text.onnx模型转换成rknn模型。
1 2 3 4 5 6 7 8 9 10 11 12 13 14 15 16 17 18 19 20 21 22 23 24 | # 省略.............
if __name__ == '__main__':
model_path, platform, do_quant, output_path = parse_arg()
# Create RKNN object
rknn = RKNN(verbose=False)
# Pre-process config
print('--> Config model')
rknn.config(target_platform=platform)
print('done')
# Load model
print('--> Loading model')
ret = rknn.load_onnx(model=model_path,
inputs=['input_ids', 'attention_mask'],
input_size_list=[[TEXT_BATCH_SIZE, SEQUENCE_LEN], [TEXT_BATCH_SIZE, SEQUENCE_LEN]])
if ret != 0:
print('Load model failed!')
exit(ret)
print('done')
# 省略.............
|
onnx2rknn_text.py将文本侧模型转换成rknn,需要注意设置的inputs和input_size_list,文本侧模型设置batch固定大小为1,序列长度为20。
#Usage: python3 onnx2tknn_clip_text.py onnx_model_path [platform] [dtype(optional)] [output_rknn_path(optional)]
#    platform choose from [rk3562, rk3566, rk3568, rk3588, rk3576]
#    dtype choose from    [fp]
(toolkit2_2.3) llh@llh:/xxx$ python onnx2rknn_yolow.py yolo_world_v2s.onnx rk3588 i8 yolo_world_v2s.rknn
I rknn-toolkit2 version: 2.3.0
--> Config model
done
--> Loading model
# 省略...............
I Loading : 100%|███████████████████████████████████████████████| 197/197 [00:00<00:00, 2916.35it/s]
done
--> Building model
# 省略...............
I OpFusing 0: 100%|██████████████████████████████████████████████| 100/100 [00:00<00:00, 292.24it/s]
I OpFusing 1 : 100%|█████████████████████████████████████████████| 100/100 [00:00<00:00, 115.79it/s]
I OpFusing 0 : 100%|██████████████████████████████████████████████| 100/100 [00:01<00:00, 60.33it/s]
I OpFusing 1 : 100%|██████████████████████████████████████████████| 100/100 [00:01<00:00, 59.26it/s]
I OpFusing 0 : 100%|██████████████████████████████████████████████| 100/100 [00:01<00:00, 57.21it/s]
I OpFusing 1 : 100%|██████████████████████████████████████████████| 100/100 [00:01<00:00, 56.90it/s]
I OpFusing 2 : 100%|██████████████████████████████████████████████| 100/100 [00:01<00:00, 56.01it/s]
I OpFusing 0 : 100%|██████████████████████████████████████████████| 100/100 [00:01<00:00, 54.04it/s]
I OpFusing 1 : 100%|██████████████████████████████████████████████| 100/100 [00:01<00:00, 53.49it/s]
I OpFusing 2 : 100%|██████████████████████████████████████████████| 100/100 [00:02<00:00, 48.76it/s]
I rknn building ...
I rknn building done.
done
--> Export rknn model
done
17.2.4. 部署测试
拉取配套例程,然后将前面转换出的rknn模型复制到例程的model目录下,然后编译例程。
# 安装相关软件等等
sudo apt update
sudo apt install git cmake make gcc g++ libsndfile1-dev

# 获取配套例程(例程可能没有及时更新同步)
git clone https://gitee.com/LubanCat/lubancat_ai_manual_code

# 或板卡上拉取rknn_model_zoo例程测试,具体使用请查看其中的README.md
# git clone https://github.com/airockchip/rknn_model_zoo.git

cd lubancat_ai_manual_code/examples/yolo_world/cpp
# 复制前面转换出的rknn模型到model目录下

# 编译例程,以鲁班猫4为例,设置rk3588
cat@lubancat:~/xxx/yolo_world/cpp$ ./build-linux.sh -t rk3588
./build-linux.sh -t rk3588
===================================
TARGET_SOC=rk3588
INSTALL_DIR=/home/cat/xxx/yolo_world/cpp/install/rk3588_linux
BUILD_DIR=/home/cat/xxx/yolo_world/cpp/build/build_rk3588_linux
ENABLE_DMA32=OFF
BUILD_TYPE=Release
ENABLE_ASAN=OFF
CC=aarch64-linux-gnu-gcc
CXX=aarch64-linux-gnu-g++
===================================
-- Configuring done
-- Generating done
-- Build files have been written to: /home/cat/xxx/yolo_world/cpp/build/build_rk3588_linux
[ 14%] Built target imagedrawing
[ 28%] Built target audioutils
[ 42%] Built target fileutils
[ 57%] Built target imageutils
Scanning dependencies of target rknn_yolo_world_demo
[ 64%] Building CXX object CMakeFiles/rknn_yolo_world_demo.dir/rknpu2/clip_text/clip_text.cc.o
[ 71%] Linking CXX executable rknn_yolo_world_demo
[100%] Built target rknn_yolo_world_demo
[ 14%] Built target fileutils
[ 28%] Built target imageutils
[ 42%] Built target imagedrawing
[ 85%] Built target rknn_yolo_world_demo
[100%] Built target audioutils
Install the project...
-- Install configuration: "Release"
# 省略................................
运行例程:
export LD_LIBRARY_PATH=./lib
./rknn_yolo_world_demo clip_text_fp16.rknn model/detect_classes.txt yolo_world_v2s_i8.rknn model/bus.jpg
--> init clip text model
model input num: 2, output num: 1
input tensors:
index=0, name=input_ids, n_dims=2, dims=[1, 20], n_elems=20, size=160, fmt=UNDEFINED, type=INT64, qnt_type=AFFINE, zp=0, scale=1.000000
index=1, name=attention_mask, n_dims=2, dims=[1, 20], n_elems=20, size=160, fmt=UNDEFINED, type=INT64, qnt_type=AFFINE, zp=0, scale=1.000000
output tensors:
index=0, name=text_embeds, n_dims=2, dims=[1, 512], n_elems=512, size=1024, fmt=UNDEFINED, type=FP16, qnt_type=AFFINE, zp=0, scale=1.000000
load lable ./model/detect_classes.txt
--> init yolo world model
model input num: 2, output num: 6
input tensors:
index=0, name=images, n_dims=4, dims=[1, 640, 640, 3], n_elems=1228800, size=1228800, fmt=NHWC, type=INT8, qnt_type=AFFINE, zp=-128, scale=0.003922
index=1, name=texts, n_dims=3, dims=[1, 80, 512], n_elems=40960, size=40960, fmt=UNDEFINED, type=INT8, qnt_type=AFFINE, zp=-52, scale=0.003410
output tensors:
index=0, name=1168, n_dims=4, dims=[1, 80, 80, 80], n_elems=512000, size=512000, fmt=NCHW, type=INT8, qnt_type=AFFINE, zp=-128, scale=0.003214
index=1, name=1076, n_dims=4, dims=[1, 4, 80, 80], n_elems=25600, size=25600, fmt=NCHW, type=INT8, qnt_type=AFFINE, zp=-128, scale=0.054310
index=2, name=1170, n_dims=4, dims=[1, 80, 40, 40], n_elems=128000, size=128000, fmt=NCHW, type=INT8, qnt_type=AFFINE, zp=-128, scale=0.003697
index=3, name=1121, n_dims=4, dims=[1, 4, 40, 40], n_elems=6400, size=6400, fmt=NCHW, type=INT8, qnt_type=AFFINE, zp=-128, scale=0.057563
index=4, name=1172, n_dims=4, dims=[1, 80, 20, 20], n_elems=32000, size=32000, fmt=NCHW, type=INT8, qnt_type=AFFINE, zp=-128, scale=0.003884
index=5, name=1166, n_dims=4, dims=[1, 4, 20, 20], n_elems=1600, size=1600, fmt=NCHW, type=INT8, qnt_type=AFFINE, zp=-128, scale=0.058563
model is NHWC input fmt
model input height=640, width=640, channel=3
num_lines=80
origin size=640x640 crop size=640x640
input image: 640 x 640, subsampling: 4:2:0, colorspace: YCbCr, orientation: 1
--> inference clip text model
--> inference yolo world model
scale=1.000000 dst_box=(0 0 639 639) allow_slight_change=1 _left_offset=0 _top_offset=0 padding_w=0 padding_h=0
rga_api version 1.10.1_[0]
rknn_run
-- inference_model use: 1358.119019 ms
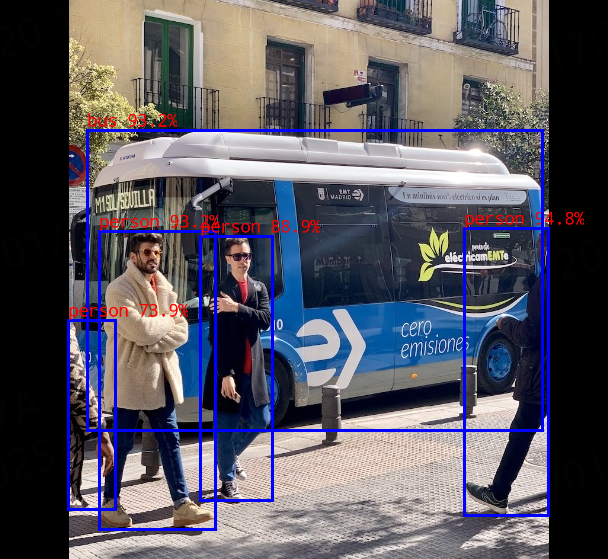
person @ (475 234 559 521) 0.948
person @ (110 237 226 535) 0.932
bus @ (98 136 553 436) 0.932
person @ (211 242 283 506) 0.889
person @ (79 326 126 515) 0.739
write_image path: out.png width=640 height=640 channel=3 data=0x7fa4036010
结果保存在当前目录下out.png文件:

