4. ResNet18
ResNet18是一种卷积神经网络,它有18层深度,其中包括带有权重的卷积层和全连接层。 它是ResNet系列网络的一个变体,使用了残差连接(residual connection)来解决深度网络的退化问题。
本章将简单介绍下PyTorch以及安装环境,然后简单分析下一个ResNet神经网络以及PyTorch的源码实现, 最后我们使用PyTorch简单构建一个ResNet18网络对Cifar-10进行分类,并部署到鲁班猫板卡上。 本章测试的例程源码请参考下 这里。
提示
测试环境:鲁班猫板卡使用Debian10,PC是WSL2(ubuntu20.04),PyTorch是1.10.1 CPU版,rknn-Toolkit2版本1.4.0。
4.1. PyTorch
PyTorch是一个开源的深度学习框架,该框架由Facebook人工智能研究院的Torch7团队开发, 它的底层基于Torch,但实现与运用全部是由python来完成。该框架主要用于人工智能领域的科学研究与应用开发。
4.1.1. PyTorch安装
PyTorch需要根据自己的环境安装,进入PyTorch官网,查看详细的安装教程。 下面示例在ubuntu20.04上简单安装:
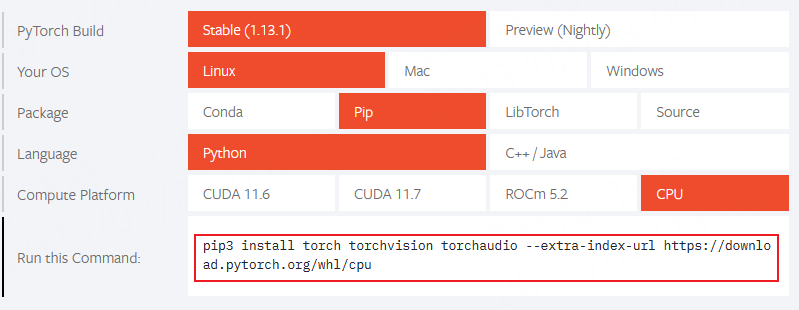
先到 PyTorch官网 ,选择你对应环境的,比如下面是选中linux系统,python语言,cpu版本的PyTorch。

该页面上面默认是最新稳定版的PyTorch,安装以前版本可以点击该页面下面的 Previous version of PyTorch
或者直接点击 这里 。
# 使用pytorch,需要先安装python3和pip基础环境,这些可以自行搜索下即可。
# CPU版:
pip3 install torch torchvision torchaudio --extra-index-url https://download.pytorch.org/whl/cpu

# GPU版(CUDA 11.6):
pip3 install torch torchvision torchaudio --extra-index-url https://download.pytorch.org/whl/cu116
安装GPU版本(英伟达GPU),需要先根据自己的显卡安装或者更新 显卡驱动 , 然后安装 CUDA工具包 , cuDNN 看自己情况安装, 最后点击 这里 查看Pytorch和CUDA的版本对应,
验证是否安装成功:
# 测试安装,终端输入python,
>>> import torch
>>> torch.__version__
'1.10.1+cu102'

# 如果安装的是CUDA版本的PyTorch,命令检测PyTorch的安装版本以及绑定的CUDA版本等
>>> torch.version.cuda
'10.2'
>>> torch.cuda.is_available()
True
# PyTorch的安装根据自己的实际环境和需求,也可以使用docker等环境。
关于程序编辑工具,你可以使用Sublime Text,PyCharm,Vim等,这里测试环境是使用WSL2(ubuntu20.04), 编辑工具使用Jupyter Notebook,安装教程可以参考下 这里 , 在Linux系统上使用是类似的。
4.1.2. ResNet18结构简介
ResNet(Residual Neural Network)由微软研究院的Kaiming He等人在2015年提出,ResNet的结构可以极快的加速神经网络的训练,模型的准确率也有比较大的提升。
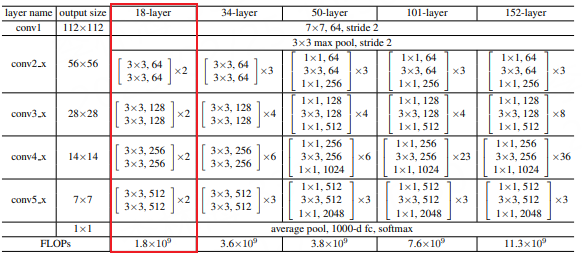
ResNet是一种残差网络,可以把它理解为一个子网络,这个子网络经过堆叠可以构成一个很深的网络。ResNet系列有多种变体,如ResNet18,ResNet34,ResNet50,ResNet101和ResNet152, 其网络结构如下(参考 论文 ):

这里我们主要看下ResNet18,ResNet18基本含义是网络的基本架构是ResNet,网络的深度是18层,是带有权重的18层,不包括BN层,池化层。 ResNet18使用的基本残差单元,每个单元由两个3x3卷积层组成,中间有一个BN层和一个ReLU激活函数。
4.1.3. PyTorch中的ResNet18实现
PyTorch中的ResNet18源码实现:https://github.com/pytorch/vision/blob/main/torchvision/models/resnet.py
4.2. ResNet18实现
4.2.1. 数据集准备和数据预处理
接下来我们将自定义一个ResNet18网络结构,并使用CIFAR-10数据集进行简单测试。 CIFAR-10数据集由10个类别的60000张32x32彩色图像组成,每个类别有6000张图像,总共分为50000张训练图像和10000张测试图像。
1 2 3 4 5 6 7 8 9 | # 导入下载的数据集,使用torchvision加载训练集和测试集,
# 其中参数download=True表示从互联网下载数据,存放到./data目录下,也可以自己下载放到指定目录下。
train_dataset = torchvision.datasets.CIFAR10('./data', download=True, train=True, transform=transform_train)
test_dataset = torchvision.datasets.CIFAR10('./data', download=True, train=False, transform=transform_test)
train_loader = torch.utils.data.DataLoader(train_dataset, batch_size=batch_size, shuffle=True)
test_loader = torch.utils.data.DataLoader(test_dataset, batch_size=batch_size, shuffle=False)
# classes = ('plane', 'car', 'bird', 'cat','deer', 'dog', 'frog', 'horse', 'ship', 'truck')
|
对划分的数据集进行预处理
1 2 3 4 5 6 7 8 9 10 11 12 13 14 | # 预处理
transform_train=torchvision.transforms.Compose([
torchvision.transforms.Pad(4),
torchvision.transforms.RandomHorizontalFlip(), #图像一半的概率翻转,一半的概率不翻转
torchvision.transforms.RandomCrop(32), #图像随机裁剪成32*32
torchvision.transforms.ToTensor(), #转为Tensor 把灰度范围从0-255变换到0-1,归一化
#torchvision.transforms.Normalize((0.4914, 0.4822, 0.4465),(0.2023, 0.1994, 0.2010))
torchvision.transforms.Normalize([0.5,0.5,0.5], [0.5,0.5,0.5]) #归一化用到的均值和方差
])
transform_test=torchvision.transforms.Compose([
torchvision.transforms.ToTensor(),
#torchvision.transforms.Normalize((0.4914, 0.4822, 0.4465), (0.2023, 0.1994, 0.2010))
torchvision.transforms.Normalize([0.5,0.5,0.5], [0.5,0.5,0.5])#归一化用到的均值和方差
])
|
4.2.2. 构建模型
1 2 3 4 5 6 7 8 9 10 11 12 13 14 15 16 17 18 19 20 21 22 23 24 25 26 27 28 29 30 31 32 33 34 35 36 37 38 39 40 41 42 43 44 45 46 47 48 49 50 51 52 53 54 55 56 57 58 59 60 61 62 63 64 65 66 67 68 69 70 71 72 73 74 75 76 | # 残差块实现
class ResidualBlock(nn.Module):
def __init__(self, in_channels, out_channels, stride=1, downsample=None):
super(ResidualBlock, self).__init__()
self.conv1 = conv3x3(in_channels, out_channels, stride)
self.bn1 = nn.BatchNorm2d(out_channels)
self.relu = nn.ReLU(inplace=True) # 原地替换 节省内存开销
self.conv2 = conv3x3(out_channels, out_channels)
self.bn2 = nn.BatchNorm2d(out_channels)
self.downsample = downsample # shortcut
def forward(self, x):
residual=x
out = self.conv1(x)
out = self.bn1(out)
out = self.relu(out)
out = self.conv2(out)
out = self.bn2(out)
if(self.downsample):
residual = self.downsample(x)
out += residual
out = self.relu(out)
return out
# 自定义一个神经网络,使用nn.model,,通过__init__初始化每一层神经网络。
# 使用forward连接数据
class ResNet(torch.nn.Module):
def __init__(self, block, layers, num_classes):
super(ResNet, self).__init__()
self.in_channels = 16
self.conv = conv3x3(3, 16)
self.bn = torch.nn.BatchNorm2d(16)
self.relu = torch.nn.ReLU(inplace=True)
self.layer1 = self._make_layers(block, 16, layers[0])
self.layer2 = self._make_layers(block, 32, layers[1], 2)
self.layer3 = self._make_layers(block, 64, layers[2], 2)
self.layer4 = self._make_layers(block, 128, layers[3], 2)
self.avg_pool = torch.nn.AdaptiveAvgPool2d((1, 1))
self.fc = torch.nn.Linear(128, num_classes)
# _make_layers函数重复残差块,以及shortcut部分
def _make_layers(self, block, out_channels, blocks, stride=1):
downsample = None
if (stride != 1) or (self.in_channels != out_channels): # 卷积核为1 进行升降维
downsample = torch.nn.Sequential( # stride==2的时候 也就是每次输出信道升维的时候
conv3x3(self.in_channels, out_channels, stride=stride),
torch.nn.BatchNorm2d(out_channels)
)
layers = []
layers.append(block(self.in_channels, out_channels, stride, downsample))
self.in_channels = out_channels
for i in range(1, blocks):
layers.append(block(out_channels, out_channels))
return torch.nn.Sequential(*layers)
def forward(self, x):
out = self.conv(x)
out = self.bn(out)
out = self.relu(out)
out = self.layer1(out)
out = self.layer2(out)
out = self.layer3(out)
out = self.layer4(out)
out = self.avg_pool(out)
out = out.view(out.size(0), -1)
out = self.fc(out)
return out
# Make model,使用cpu
model=ResNet(ResidualBlock, [2,2,2,2], num_classes).to(device=device)
# 打印model结构
print(f"Model structure: {model}\n\n")
# Loss and optimizer
criterion = nn.CrossEntropyLoss() #交叉熵损失函数
optimizer = torch.optim.Adam(model.parameters(), lr=learning_rate) #优化器随机梯度下降
|
测试时打印模型结构:
Model structure: ResNet(
    (conv): Conv2d(3, 16, kernel_size=(3, 3), stride=(1, 1), padding=(1, 1), bias=False)
    (bn): BatchNorm2d(16, eps=1e-05, momentum=0.1, affine=True, track_running_stats=True)
    (relu): ReLU(inplace=True)
    (layer1): Sequential(
        (0): ResidualBlock(
        (conv1): Conv2d(16, 16, kernel_size=(3, 3), stride=(1, 1), padding=(1, 1), bias=False)
        (bn1): BatchNorm2d(16, eps=1e-05, momentum=0.1, affine=True, track_running_stats=True)
        (relu): ReLU(inplace=True)
        (conv2): Conv2d(16, 16, kernel_size=(3, 3), stride=(1, 1), padding=(1, 1), bias=False)
        (bn2): BatchNorm2d(16, eps=1e-05, momentum=0.1, affine=True, track_running_stats=True)
        )
        (1): ResidualBlock(
        (conv1): Conv2d(16, 16, kernel_size=(3, 3), stride=(1, 1), padding=(1, 1), bias=False)
        (bn1): BatchNorm2d(16, eps=1e-05, momentum=0.1, affine=True, track_running_stats=True)
        (relu): ReLU(inplace=True)
        (conv2): Conv2d(16, 16, kernel_size=(3, 3), stride=(1, 1), padding=(1, 1), bias=False)
        (bn2): BatchNorm2d(16, eps=1e-05, momentum=0.1, affine=True, track_running_stats=True)
        )
    )
    (layer2): Sequential(
        (0): ResidualBlock(
        (conv1): Conv2d(16, 32, kernel_size=(3, 3), stride=(2, 2), padding=(1, 1), bias=False)
        (bn1): BatchNorm2d(32, eps=1e-05, momentum=0.1, affine=True, track_running_stats=True)
        (relu): ReLU(inplace=True)
        (conv2): Conv2d(32, 32, kernel_size=(3, 3), stride=(1, 1), padding=(1, 1), bias=False)
        (bn2): BatchNorm2d(32, eps=1e-05, momentum=0.1, affine=True, track_running_stats=True)
        (downsample): Sequential(
            (0): Conv2d(16, 32, kernel_size=(3, 3), stride=(2, 2), padding=(1, 1), bias=False)
            (1): BatchNorm2d(32, eps=1e-05, momentum=0.1, affine=True, track_running_stats=True)
        )
        )
        (1): ResidualBlock(
        (conv1): Conv2d(32, 32, kernel_size=(3, 3), stride=(1, 1), padding=(1, 1), bias=False)
        (bn1): BatchNorm2d(32, eps=1e-05, momentum=0.1, affine=True, track_running_stats=True)
        (relu): ReLU(inplace=True)
        (conv2): Conv2d(32, 32, kernel_size=(3, 3), stride=(1, 1), padding=(1, 1), bias=False)
        (bn2): BatchNorm2d(32, eps=1e-05, momentum=0.1, affine=True, track_running_stats=True)
        )
    )
    (layer3): Sequential(
        (0): ResidualBlock(
        (conv1): Conv2d(32, 64, kernel_size=(3, 3), stride=(2, 2), padding=(1, 1), bias=False)
        (bn1): BatchNorm2d(64, eps=1e-05, momentum=0.1, affine=True, track_running_stats=True)
        (relu): ReLU(inplace=True)
        (conv2): Conv2d(64, 64, kernel_size=(3, 3), stride=(1, 1), padding=(1, 1), bias=False)
        (bn2): BatchNorm2d(64, eps=1e-05, momentum=0.1, affine=True, track_running_stats=True)
        (downsample): Sequential(
            (0): Conv2d(32, 64, kernel_size=(3, 3), stride=(2, 2), padding=(1, 1), bias=False)
            (1): BatchNorm2d(64, eps=1e-05, momentum=0.1, affine=True, track_running_stats=True)
        )
        )
        (1): ResidualBlock(
        (conv1): Conv2d(64, 64, kernel_size=(3, 3), stride=(1, 1), padding=(1, 1), bias=False)
        (bn1): BatchNorm2d(64, eps=1e-05, momentum=0.1, affine=True, track_running_stats=True)
        (relu): ReLU(inplace=True)
        (conv2): Conv2d(64, 64, kernel_size=(3, 3), stride=(1, 1), padding=(1, 1), bias=False)
        (bn2): BatchNorm2d(64, eps=1e-05, momentum=0.1, affine=True, track_running_stats=True)
        )
    )
    (layer4): Sequential(
        (0): ResidualBlock(
        (conv1): Conv2d(64, 128, kernel_size=(3, 3), stride=(2, 2), padding=(1, 1), bias=False)
        (bn1): BatchNorm2d(128, eps=1e-05, momentum=0.1, affine=True, track_running_stats=True)
        (relu): ReLU(inplace=True)
        (conv2): Conv2d(128, 128, kernel_size=(3, 3), stride=(1, 1), padding=(1, 1), bias=False)
        (bn2): BatchNorm2d(128, eps=1e-05, momentum=0.1, affine=True, track_running_stats=True)
        (downsample): Sequential(
            (0): Conv2d(64, 128, kernel_size=(3, 3), stride=(2, 2), padding=(1, 1), bias=False)
            (1): BatchNorm2d(128, eps=1e-05, momentum=0.1, affine=True, track_running_stats=True)
        )
        )
        (1): ResidualBlock(
        (conv1): Conv2d(128, 128, kernel_size=(3, 3), stride=(1, 1), padding=(1, 1), bias=False)
        (bn1): BatchNorm2d(128, eps=1e-05, momentum=0.1, affine=True, track_running_stats=True)
        (relu): ReLU(inplace=True)
        (conv2): Conv2d(128, 128, kernel_size=(3, 3), stride=(1, 1), padding=(1, 1), bias=False)
        (bn2): BatchNorm2d(128, eps=1e-05, momentum=0.1, affine=True, track_running_stats=True)
        )
    )
    (avg_pool): AdaptiveAvgPool2d(output_size=(1, 1))
    (fc): Linear(in_features=128, out_features=10, bias=True)
)
4.2.3. 训练和测试模型
1 2 3 4 5 6 7 8 9 10 11 12 13 14 15 16 17 18 19 | if __name__ == "__main__":
# 训练模型
total_step = len(train_loader)
for epoch in range(0,num_epoches):
for i, (images, labels) in enumerate(train_loader):
images = images.to(device=device)
labels = labels.to(device=device)
outputs = model(images)
loss = criterion(outputs, labels)
# 梯度清零
optimizer.zero_grad()
# 反向传播
loss.backward()
# 更新参数
optimizer.step()
if (i+1) % total_step == 0:
print('Epoch [{}/{}], Step [{}/{}], Loss: {:.4f}'
.format(epoch+1, num_epoches, i+1, total_step, loss.item()))
print("Finished Tranining")
|
print('\nTest the model')
# 转换到`eval`模式
model.eval()  # eval mode (batchnorm uses moving mean/variance instead of mini-batch mean/variance)
with torch.no_grad():

    correct = 0
    total = 0

    for images, labels in test_loader:

        images = images.to(device=device)
        labels = labels.to(device=device)
        outputs = model(images)

        _, predicted = torch.max(outputs.data, 1)

        total += labels.size(0)
        correct += (predicted == labels).sum().item()

    print('Accuracy of the network on the 10000 test images: {} %'.format(100 * correct / total))
训练模型,后再测试集上测试准确率达89.8400%:
Epoch [88/100], Step [391/391], Loss: 0.0820
Epoch [89/100], Step [391/391], Loss: 0.0185
Epoch [90/100], Step [391/391], Loss: 0.0166
Epoch [91/100], Step [391/391], Loss: 0.0334
Epoch [92/100], Step [391/391], Loss: 0.0641
Epoch [93/100], Step [391/391], Loss: 0.0359
Epoch [94/100], Step [391/391], Loss: 0.0994
Epoch [95/100], Step [391/391], Loss: 0.0069
Epoch [96/100], Step [391/391], Loss: 0.0722
Epoch [97/100], Step [391/391], Loss: 0.0182
Epoch [98/100], Step [391/391], Loss: 0.2182
Epoch [99/100], Step [391/391], Loss: 0.0657
Epoch [100/100], Step [391/391], Loss: 0.0501
Finished Tranining

Test the model
在10000张测试集图片上的准确率:89.8400 %
4.2.4. 保存为onnx模型
这里我们使用torch.onnx.export保存模型为onnx模型(也可以导出pt模型等):
1 2 3 | # export onnx (rknn-toolkit2 only support to opset_version=12)
x = torch.randn((1, 3, 32, 32))
torch.onnx.export(model, x, './resnet18_pytorch_100.onnx', opset_version=12, input_names=['input'], output_names=['output'])
|
4.2.5. 导出RKNN模型和模拟测试
1 2 3 4 5 6 7 8 9 10 11 12 13 14 15 16 17 18 19 20 21 22 23 24 25 26 27 28 29 30 31 32 33 34 35 36 37 38 39 40 41 42 43 44 45 46 47 48 49 50 51 52 53 54 55 56 57 58 59 60 61 62 63 64 65 66 67 68 69 | def show_perfs(perfs):
perfs = 'perfs: {}\n'.format(perfs)
print(perfs)
def softmax(x):
return np.exp(x)/sum(np.exp(x))
if __name__ == '__main__':
MODEL = './resnet18_pytorch.onnx'
# 创建RKNN
# 如果测试遇到问题,请开启verbose=True,查看调试信息。
# rknn = RKNN(verbose=True)
rknn = RKNN()
# 配置模型,预处理
print('--> Config model')
rknn.config(mean_values=[125.307, 122.961, 113.8575], std_values=[51.5865, 50.847, 51.255], target_platform='rk3568')
print('done')
# 加载模型
print('--> Loading model')
#ret = rknn.load_pytorch(model=model, input_size_list=input_size_list)
ret = rknn.load_onnx(model=MODEL)
if ret != 0:
print('Load model failed!')
exit(ret)
print('done')
# 构建模型
print('--> Building model')
ret = rknn.build(do_quantization=False)
if ret != 0:
print('Build model failed!')
exit(ret)
print('done')
# 导出rknn模型
print('--> Export rknn model')
ret = rknn.export_rknn('./resnet_18_100.rknn')
if ret != 0:
print('Export rknn model failed!')
exit(ret)
print('done')
# 输入图片处理
img = cv2.imread('./0_125.jpg')
img = cv2.cvtColor(img, cv2.COLOR_BGR2RGB)
img = cv2.resize(img,(32,32))
img = np.expand_dims(img, 0)
# 初始化运行环境
print('--> Init runtime environment')
ret = rknn.init_runtime()
if ret != 0:
print('Init runtime environment failed!')
exit(ret)
print('done')
# 模拟推理
print('--> Running model')
outputs = rknn.inference(inputs=[img])
np.save('./pytorch_resnet18_qat_0.npy', outputs[0])
#show_outputs(softmax(np.array(outputs[0][0])))
print(outputs)
print('done')
rknn.release()
|
4.2.6. 板端部署测试
4.2.6.1. 简单测试
1 2 3 4 5 6 7 8 9 10 11 12 13 14 15 16 17 18 19 20 21 22 23 24 25 26 27 28 29 30 31 32 33 34 35 36 37 38 39 40 | IMG_PATH = '0_125.jpg'
RKNN_MODEL = './resnet_18_100.rknn'
img_height = 32
img_width = 32
class_names = ["plane","car","bird","cat","deer","dog","frog","horse","ship","truck"]
# Create RKNN object
rknn_lite = RKNNLite()
# load RKNN model
print('--> Load RKNN model')
ret = rknn_lite.load_rknn(RKNN_MODEL)
if ret != 0:
print('Load RKNN model failed')
exit(ret)
print('done')
# Init runtime environment
print('--> Init runtime environment')
ret = rknn_lite.init_runtime()
if ret != 0:
print('Init runtime environment failed!')
exit(ret)
print('done')
# load image
img = cv2.imread(IMG_PATH)
img = cv2.resize(img,(32,32))
img = cv2.cvtColor(img, cv2.COLOR_BGR2RGB)
img = np.expand_dims(img, 0)
# runing model
print('--> Running model')
outputs = rknn_lite.inference(inputs=[img])
print("result: ", outputs)
print(
"This image most likely belongs to {}."
.format(class_names[np.argmax(outputs)])
)
rknn_lite.release()
|
测试结果:
--> Load RKNN model
done
--> Init runtime environment
I RKNN: [16:02:15.992] RKNN Runtime Information: librknnrt version: 1.4.0 (a10f100eb@2022-09-09T09:07:14)
I RKNN: [16:02:15.992] RKNN Driver Information: version: 0.7.2
I RKNN: [16:02:15.992] RKNN Model Information: version: 1, toolkit version: 1.4.0-22dcfef4(compiler version: 1.4.0 (3b4520e4f@2022-09-05T20:52:35)), target: RKNPU lite, target platform: rk3568, framework name: ONNX, framework layout: NCHW
done
--> Running model
result:  [array([[ -2.0566406, -15.234375 ,   6.6835938,  -6.828125 ,  -9.9921875,
        -6.5390625,  -5.671875 , -15.8515625, -17.96875  , -11.90625  ]],
    dtype=float32)]
This image most likely belongs to bird.
4.2.6.2. 使用测试集图像测试
先转换测试集为.jpg格式图片,然后传输到板卡进行部署测试:
1 2 3 4 5 6 7 8 9 10 11 12 13 14 15 16 17 18 19 20 21 22 23 24 25 26 27 28 29 | # CIFAR-10数据集所在的绝对路径,根据具体路径修改
base_dir = "/mnt/e/Users/Administrator/Desktop/wsl_user/pytorch/"
data_dir = os.path.join(base_dir, "data", "cifar-10-batches-py")
test_o_dir = os.path.join( base_dir, "Data", "cifar-10-png", "raw_test")
# 解压缩
def unpickle(file):
with open(file, 'rb') as fo:
dict_ = pickle.load(fo, encoding='bytes')
return dict_
# 生成测试集图片
if __name__ == '__main__':
print("start...")
test_data_path = os.path.join(data_dir, "test_batch")
test_data = unpickle(test_data_path)
for i in range(0, 10000):
img = np.reshape(test_data[b'data'][i], (3, 32, 32))
img = img.transpose(1, 2, 0)
label_num = str(test_data[b'labels'][i])
o_dir = os.path.join(test_o_dir, label_num)
if not os.path.isdir(o_dir):
os.makedirs(o_dir)
img_name = label_num + '_' + str(i) + '.jpg'
img_path = os.path.join(o_dir, img_name)
imwrite(img_path, img)
print("done.")
|
然后修改板端测试文件添加:
1 2 3 4 5 6 7 8 9 10 11 12 13 14 | def rknn_inference(root):
total=0
correct=0
for path in os.listdir(root):
image_filenames = os.listdir(root + '/' + path)
for image_filename in image_filenames:
img = cv2.imread(root + '/' + path + '/' + image_filename)
img = cv2.cvtColor(img, cv2.COLOR_BGR2RGB)
outputs = rknn_lite.inference(inputs=[img])
total += 1
if np.argmax(outputs) == int(path[:1]) :
correct += 1
print("corrorect={}, total={}".format(correct,total))
print('在{}张测试集图片上的准确率:{:.2f} %'.format(total,100 * correct / total))
|
简单测试结果:
1 2 3 4 5 6 7 8 9 10 11 12 | --> Load RKNN model
done
--> Init runtime environment
I RKNN: [10:23:15.384] RKNN Runtime Information: librknnrt version: 1.4.0 (a10f100eb@2022-09-09T09:07:14)
I RKNN: [10:23:15.385] RKNN Driver Information: version: 0.7.2
I RKNN: [10:23:15.385] RKNN Model Information: version: 1, toolkit version:
1.4.0-22dcfef4(compiler version: 1.4.0 (3b4520e4f@2022-09-05T20:52:35)), target:
RKNPU lite, target platform: rk3568, framework name: ONNX, framework layout: NCHW
done
--> Running model
在10000张测试集图片上的准确率:71.21 %
done
|
