16. OWL-ViT
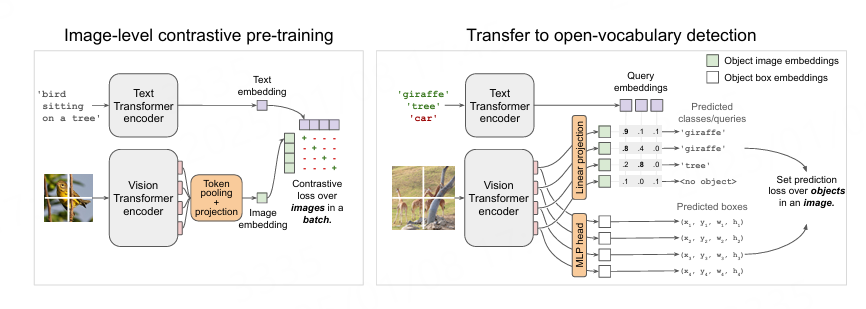
OWL-ViT(short for Vision Transformer for Open-World Localization) 是一个基于Transformer的图像-文本模型转移到开放词汇表(open-vocabulary)的目标检测模型。 它可以用于使用一个或多个文本查询来查询图像,搜索和检测文本中描述的目标对象。

论文: Simple Open-Vocabulary Object Detection with Vision Transformers
Github仓库: https://github.com/google-research/scenic/tree/main/scenic/projects/owl_vit
16.1. OWL-ViT推理测试
教程测试使用 Huggingface Transformers , 先使用conda创建虚拟环境,安装相关pytorch、transformers等等相关库:
# 使用conda创建虚拟环境
conda create -n owlvit python=3.10
conda activate owlvit

# 根据自行的环境安装pytorch,详细命令参考https://pytorch.org/get-started/locally/,下面是参考命令:
conda install pytorch torchvision pytorch-cuda=12.1 -c pytorch -c nvidia

# 配置pip源(可选)
# pip3 config set global.index-url https://pypi.tuna.tsinghua.edu.cn/simple/

# 安装Huggingface Transformers
pip install transformers
参考Huggingface模型示例简单测试模型,测试使用的是 google/owlvit-base-patch32 模型。
1 2 3 4 5 6 7 8 9 10 11 12 13 14 15 16 17 18 19 20 21 22 | # 省略.............
from transformers import OwlViTProcessor, OwlViTForObjectDetection
processor = OwlViTProcessor.from_pretrained("google/owlvit-base-patch32")
model = OwlViTForObjectDetection.from_pretrained("google/owlvit-base-patch32")
url = "http://images.cocodataset.org/val2017/000000039769.jpg"
image = Image.open(requests.get(url, stream=True).raw)
texts = [["a photo of a cat", "a photo of a dog"]]
inputs = processor(text=texts, images=image, return_tensors="pt")
outputs = model(**inputs)
# Target image sizes (height, width) to rescale box predictions [batch_size, 2]
target_sizes = torch.Tensor([image.size[::-1]])
# Convert outputs (bounding boxes and class logits) to Pascal VOC format (xmin, ymin, xmax, ymax)
results = processor.post_process_object_detection(outputs=outputs, target_sizes=target_sizes, threshold=0.1)
i = 0 # Retrieve predictions for the first image for the corresponding text queries
text = texts[i]
boxes, scores, labels = results[i]["boxes"], results[i]["scores"], results[i]["labels"]
for box, score, label in zip(boxes, scores, labels):
box = [round(i, 2) for i in box.tolist()]
print(f"Detected {text[label]} with confidence {round(score.item(), 3)} at location {box}")
|
(owlvit) llh@llh:/xxx$ python test_model.py
preprocessor_config.json: 100%|██████████████████████████████████████| 392/392 [00:00<00:00, 122kB/s]
tokenizer_config.json: 100%|██████████████████████████████████████| 775/775 [00:00<00:00, 422kB/s]
vocab.json: 100%|███████████████████████████████████████████████████| 1.06M/1.06M [00:00<00:00, 2.42MB/s]
merges.txt: 100%|████████████████████████████████████████████████████| 525k/525k [00:00<00:00, 22.0MB/s]
special_tokens_map.json: 100%|████████████████████████████████████████████| 460/460 [00:00<00:00, 560kB/s]
config.json: 100%|██████████████████████████████████████████████████████████████| 4.42k/4.42k [00:00<00:00, 3.03MB/s]
model.safetensors: 100%|██████████████████████████████████████████████████████| 613M/613M [00:18<00:00, 32.3MB/s]
Detected a photo of a cat with confidence 0.707 at location [324.97, 20.44, 640.58, 373.29]
Detected a photo of a cat with confidence 0.717 at location [1.46, 55.26, 315.55, 472.17]
16.2. 部署测试
在鲁班猫RK系列板卡上部署google/owlvit-base-patch32模型,需要先使用Huggingface的工具 optimum 导出onnx模型,然后使用 使用toolkit2工具转换成rknn模型。
16.2.1. 导出onnx模型
使用optimum工具导出onnx模型,测试使用 google/owlvit-base-patch32 。
# 需要注意opset设置的版本,版本不同,后面截取onnx模型时设置的节点名称可能不同
optimum-cli export onnx --model google/owlvit-base-patch32  owlvit_onnx/ --opset 18
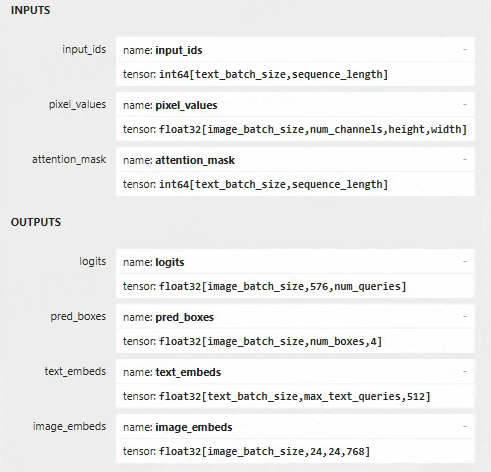
导出的模型使用 Netron 工具查看模型输入输出:

截取onnx模型,提取出两个模型:
1 2 3 4 5 6 7 8 9 10 11 12 13 14 15 16 | import onnx
# owlvit-image.onnx
input_path = "owlvit_onnx/model.onnx"
output_path = "owlvit_onnx/owlvit-image.onnx"
input_names = ["pixel_values"]
output_names = ["image_embeds","pred_boxes"]
onnx.utils.extract_model(input_path, output_path, input_names, output_names)
# owlvit-text.onnx
output_path = "owlvit_onnx/owlvit-text.onnx"
input_names = ["/layer_norm/LayerNormalization_output_0", "input_ids", "attention_mask"]
output_names = ["logits"]
onnx.utils.extract_model(input_path, output_path, input_names, output_names)
|
在安装了onnx相关库的环境中执行命令:
(owlvit) llh@llh:/xxx$ python extract_model.py
执行上面命令并且没有显示错误后,就会在owlvit_onnx/目录下生成owlvit-image.onnx和owlvit-text.onnx模型文件。
16.2.2. 转换成rknn模型
使用toolkit2工具,简单编程,将onnx模型转换成rknn模型,注意输入输出的配置。
下面是转换owlvit-text.onnx模型成rknn模型的部分程序:
1 2 3 4 5 6 7 8 9 10 11 12 13 14 15 16 17 18 19 20 21 22 23 24 25 26 27 28 29 30 31 32 33 34 35 36 37 38 39 | if __name__ == '__main__':
model_path, platform, do_quant, output_path = parse_arg()
# Create RKNN object
rknn = RKNN(verbose=False)
# Pre-process config
print('--> Config model')
rknn.config(target_platform=platform)
print('done')
# Load model
print('--> Loading model')
ret = rknn.load_onnx(model=model_path,
inputs=['image_embeds', 'input_ids' , 'attention_mask'],
input_size_list=[[1, 24, 24, IMAGE_SIZE[0]], [1, 16], [1, 16]])
if ret != 0:
print('Load model failed!')
exit(ret)
print('done')
# Build model
print('--> Building model')
ret = rknn.build(do_quantization=do_quant)
if ret != 0:
print('Build model failed!')
exit(ret)
print('done')
# Export rknn model
print('--> Export rknn model')
ret = rknn.export_rknn(output_path)
if ret != 0:
print('Export rknn model failed!')
exit(ret)
print('done')
# Release
rknn.release()
|
在安装了rknn-toolkit2的环境中,执行程序:
# Usage: python3 onnx2rknn_test_new.py onnx_model_path [platform] [dtype(optional)] [output_rknn_path(optional)]
#    platform choose from [rk3562, rk3566, rk3568, rk3588, rk3576]
#    dtype choose from    [fp]

# 教程测试鲁班猫4,设置rk3588,如果是鲁班猫3设置rk3576,其他板卡类似,最后一个参数设置rknn模型保存路径。
(toolkit2_2.3) llh@llh:/xxx$ python onnx2rknn_text.py owlvit-image.onnx rk3588 fp ./owlvit-image.rknn
I rknn-toolkit2 version: 2.3.0
--> Config model
done
--> Loading model
W load_onnx: If you don't need to crop the model, don't set 'inputs'/'input_size_list'/'outputs'!
# 省略.............
I OpFusing 0: 100%|██████████████████████████████████████████████| 100/100 [00:00<00:00, 388.51it/s]
I OpFusing 1 : 100%|█████████████████████████████████████████████| 100/100 [00:00<00:00, 133.49it/s]
I OpFusing 0 : 100%|██████████████████████████████████████████████| 100/100 [00:01<00:00, 64.00it/s]
I OpFusing 1 : 100%|██████████████████████████████████████████████| 100/100 [00:01<00:00, 62.43it/s]
I OpFusing 0 : 100%|██████████████████████████████████████████████| 100/100 [00:01<00:00, 60.27it/s]
I OpFusing 1 : 100%|██████████████████████████████████████████████| 100/100 [00:01<00:00, 59.83it/s]
I OpFusing 2 : 100%|██████████████████████████████████████████████| 100/100 [00:01<00:00, 58.74it/s]
I OpFusing 0 : 100%|██████████████████████████████████████████████| 100/100 [00:01<00:00, 55.77it/s]
I OpFusing 1 : 100%|██████████████████████████████████████████████| 100/100 [00:01<00:00, 55.09it/s]
I OpFusing 2 : 100%|██████████████████████████████████████████████| 100/100 [00:02<00:00, 49.30it/s]
I rknn building ...
I rknn building done.
done
--> Export rknn model
done
下面是转换owlvit-image.onnx模型成rknn模型的部分程序:
1 2 3 4 5 6 7 8 9 10 11 12 13 14 15 16 17 18 19 20 21 22 | if __name__ == '__main__':
model_path, platform, do_quant, output_path = parse_arg()
# Create RKNN object
rknn = RKNN(verbose=False)
# Pre-process config
print('--> Config model')
rknn.config(target_platform=platform,
mean_values=[[0.48145466*255, 0.4578275*255, 0.40821073*255]],
std_values=[[0.26862954*255, 0.26130258*255, 0.27577711*255]])
print('done')
# Load model
print('--> Loading model')
ret = rknn.load_onnx(model=model_path,
inputs=['pixel_values'],
input_size_list=[[1, 3, IMAGE_SIZE[0], IMAGE_SIZE[1]]])
if ret != 0:
print('Load model failed!')
exit(ret)
print('done')
|
在安装了rknn-toolkit2的环境中,执行程序:
(toolkit2_2.3) llh@llh:/xxx$ python onnx2rknn_image.py owlvit-image.onnx rk3588 fp ./owlvit-image.rknn
I rknn-toolkit2 version: 2.3.0
--> Config model
done
--> Loading model
W load_onnx: If you don't need to crop the model, don't set 'inputs'/'input_size_list'/'outputs'!
I Loading : 100%|███████████████████████████████████████████████| 207/207 [00:00<00:00, 2770.80it/s]
done
--> Building model
I OpFusing 0: 100%|██████████████████████████████████████████████| 100/100 [00:00<00:00, 419.97it/s]
I OpFusing 1 : 100%|██████████████████████████████████████████████| 100/100 [00:01<00:00, 92.29it/s]
I OpFusing 0 : 100%|██████████████████████████████████████████████| 100/100 [00:01<00:00, 53.91it/s]
I OpFusing 1 : 100%|██████████████████████████████████████████████| 100/100 [00:01<00:00, 53.54it/s]
I OpFusing 2 : 100%|██████████████████████████████████████████████| 100/100 [00:01<00:00, 52.61it/s]
I OpFusing 0 : 100%|██████████████████████████████████████████████| 100/100 [00:01<00:00, 50.79it/s]
I OpFusing 1 : 100%|██████████████████████████████████████████████| 100/100 [00:01<00:00, 50.28it/s]
I OpFusing 2 : 100%|██████████████████████████████████████████████| 100/100 [00:05<00:00, 18.17it/s]
I rknn building ...
I rknn building done.
done
--> Export rknn model
done
16.2.3. 部署测试
拉取配套例程,然后将前面转换出的rknn模型复制到相应目录下,然后编译例程。
# 安装相关软件等等
sudo apt update
sudo apt install git cmake make gcc g++ libsndfile1-dev

# 例程可能没有及时更新同步
git clone https://gitee.com/LubanCat/lubancat_ai_manual_code
板卡上直接编译例程(教程测试lubancat-4):
# 切换到例程目录
cd lubancat_ai_manual_code/examples/owl_vit/cpp

# 复制前面转换出的rknn模型到model目录下
# 编译
cat@lubancat:~/xxx/owl_vit$ ./build-linux.sh -t rk3588
生成的可执行文件在install/rk3588_linux目录下,然后切换到该目录下,执行owlvit_demo例程。
# ./owlvit_demo <owlvit_text_model_path> <owlvit_image_model_path> <text_path> <image_path>
# 请注意相关文件的路径
cat@lubancat:~/xxx/install/rk3588_linux$ ./owlvit_demo ./model/owlvit-text.rknn ./model/owlvit-image.rknn ./model/classes.txt ./000000039769.jpg
--> init owlvit text model
model input num: 3, output num: 1
input tensors:
index=0, name=image_embeds, n_dims=4, dims=[1, 24, 768, 24], n_elems=442368, size=884736, fmt=NHWC, type=FP16, qnt_type=AFFINE, zp=0, scale=1.000000
index=1, name=input_ids, n_dims=2, dims=[1, 16], n_elems=16, size=128, fmt=UNDEFINED, type=INT64, qnt_type=AFFINE, zp=0, scale=1.000000
index=2, name=attention_mask, n_dims=2, dims=[1, 16], n_elems=16, size=128, fmt=UNDEFINED, type=INT64, qnt_type=AFFINE, zp=0, scale=1.000000
output tensors:
index=0, name=logits, n_dims=3, dims=[1, 576, 1], n_elems=576, size=1152, fmt=UNDEFINED, type=FP16, qnt_type=AFFINE, zp=0, scale=1.000000
model input num: 1, output num: 2
input tensors:
index=0, name=pixel_values, n_dims=4, dims=[1, 768, 768, 3], n_elems=1769472, size=3538944, fmt=NHWC, type=FP16, qnt_type=AFFINE, zp=0, scale=1.000000
output tensors:
index=0, name=image_embeds, n_dims=4, dims=[1, 24, 24, 768], n_elems=442368, size=884736, fmt=NCHW, type=FP16, qnt_type=AFFINE, zp=0, scale=1.000000
index=1, name=pred_boxes, n_dims=3, dims=[1, 576, 4], n_elems=2304, size=4608, fmt=UNDEFINED, type=FP16, qnt_type=AFFINE, zp=0, scale=1.000000
model is NHWC input fmt
model input height=768, width=768, channel=3
num_lines=2
origin size=640x480 crop size=640x480
input image: 640 x 480, subsampling: 4:4:4, colorspace: YCbCr, orientation: 1
--> inference model
-- inference_owlvit_model use: 1307.791992 ms
rknn_run owlvit_image_ctx
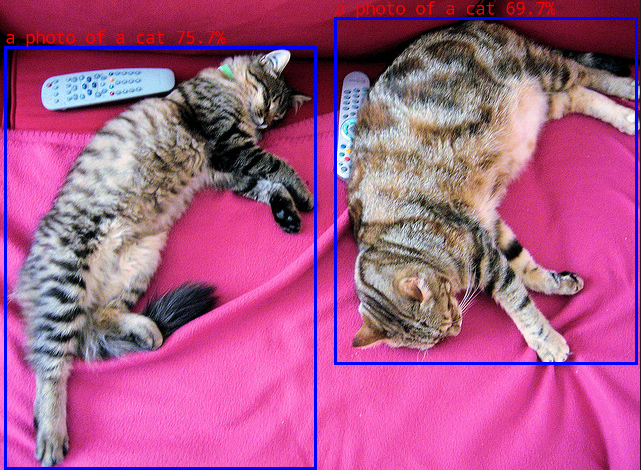
a photo of a cat @ (5 53 315 474) 0.757
a photo of a cat @ (335 24 636 369) 0.697
write_image path: out.png width=640 height=480 channel=3 data=0x7fa2027010
我们设置的检测类别是在classes.txt文件中,测试设置的是:
a photo of a cat
a photo of a dog
测试结果图像保存为当前目录out.jpg文件:

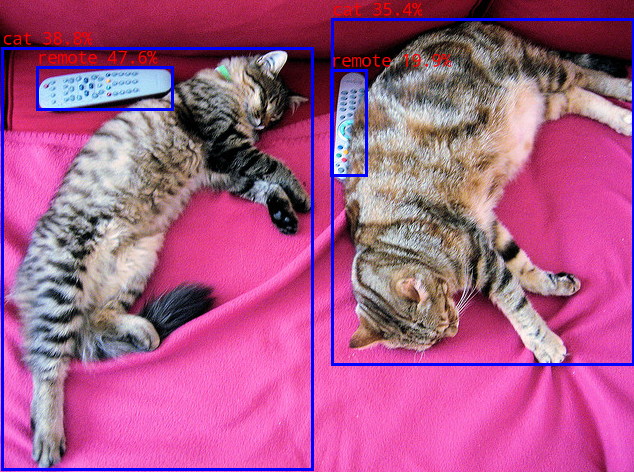
修改classes.txt文件为:
person
cat
remote
dog
然后重新执行命令,查看结果图像:

以上就是在鲁班猫RK系列板卡上部署OWL-ViT模型,测试中使用的文件都在配套例程,可以自行去优化。
