9. DETR(目标检测)
DETR(Detection Transformer)是Facebook团队于2020年提出的一个基于Transformer的端到端目标检测模型,实际也可以扩展实现全景分割。 其整体结构如下:

整体看可以分为四个部分: backbone、 encoder 、 decoder 以及 prediction heads 。
backbone 是特征提取网络,输入的图片首先会在主干网络里面进行特征提取,可以采用多种的主干特征提取网络,DETR论文中使用的是ResNet。
encoder 是Transformer的编码网络,进入编码网络之前,对主干提取的特征进行通道数压缩,转换成序列号数据,加上位置编码操作, 然后会在这一部分继续使用Self-Attension进行加强特征提取,获得一个加强后的有效特征层。
decoder 是Transformer的解码网络,在encoder部分获得的一个加强后的有效特征层会在这一部分进行解码, 解码需要使用到一个非常重要的可学习模块,即上图呈现的object queries。
prediction heads 是DETR的分类器与回归器,其实就是对decoder获得的预测结果进行全连接,两次全连接分别代表种类和回归参数。
DETR论文:https://arxiv.org/abs/2005.12872 。
源码地址:https://github.com/facebookresearch/detr 。
本章将使用 Huggingface Transformers 库中的DETR, 简单测试DETR模型,并将其转换成rknn模型在鲁班猫RK系列板卡上部署。
9.1. DETR简单测试
教程测试使用 Huggingface Transformers 库中的DETR, 主要是比较方便,而且Huggingface还有 说明文档 以及 DETR推理和微调笔记 。
9.1.1. 环境安装
创建一个虚拟环境,安装相关软件:
# 使用conda创建虚拟环境
conda create -n detr python=3.9
conda activate detr

# 根据自行的环境安装pytorch,详细命令参考https://pytorch.org/get-started/locally/,下面是参考命令:
conda install pytorch torchvision pytorch-cuda=12.1 -c pytorch -c nvidia

# 配置pip源
pip3 config set global.index-url https://pypi.tuna.tsinghua.edu.cn/simple/

# 安装Huggingface Transformers(pytorch),教程测试安装的是"4.45.2"版本
pip install transformers
9.1.2. 推理测试
使用命令或者编程一个简单python程序,对单个图像的简单推理,打印输出检测到的目标。
1 2 3 4 5 6 7 8 9 10 11 12 13 14 15 16 17 18 19 20 21 22 23 24 25 26 27 28 | from transformers import AutoImageProcessor, DetrModel
from transformers import DetrForObjectDetection
from PIL import Image
import requests
import torch
# url = "http://images.cocodataset.org/val2017/000000039769.jpg"
# image = Image.open(requests.get(url, stream=True).raw)
image = Image.open("./000000039769.jpg")
#image_processor = AutoImageProcessor.from_pretrained("detr-resnet-50/")
#model = DetrForObjectDetection.from_pretrained("detr-resnet-50/")
image_processor = AutoImageProcessor.from_pretrained("facebook/detr-resnet-50")
model = DetrForObjectDetection.from_pretrained("facebook/detr-resnet-50")
inputs = image_processor(images=image, return_tensors="pt")
outputs = model(**inputs)
# convert outputs (bounding boxes and class logits) to Pascal VOC format (xmin, ymin, xmax, ymax)
target_sizes = torch.tensor([image.size[::-1]])
results = image_processor.post_process_object_detection(outputs, target_sizes=target_sizes)[0]
for score, label, box in zip(results["scores"], results["labels"], results["boxes"]):
box = [round(i, 2) for i in box.tolist()]
print(
f"Detected {model.config.id2label[label.item()]} with confidence "
f"{round(score.item(), 3)} at location {box}"
)
|
测试使用 detr-resnet-50模型 ,是使用COCO数据集,运行例程会自动下载模型, 如果网络不好可以手动下载网盘链接(提取码:)中模型文件,模型文件仅供学习参考,然后修改程序中from_pretrained参数指定模型路径。
测试输出:
(detr) llh@llh:/xxx$ git lfs install    #或者 sudo apt-get update && sudo apt-get install git-lfs
# 到镜像网址下载detr-resnet-50模型
(detr) llh@llh:/xxx$ git clone https://hf-mirror.com/facebook/detr-resnet-50

(detr) llh@llh:/xxx/detr$ python detr_test.py
preprocessor_config.json: 100%|█████████████████████████| 290/290 [00:00<00:00, 76.7kB/s]
config.json: 100%|█████████████████████████████████| 4.59k/4.59k [00:00<00:00, 1.00MB/s]
model.safetensors: 100%|█████████████████████████| 167M/167M [07:05<00:00, 392kB/s]
# 省略.........
- This IS NOT expected if you are initializing DetrForObjectDetection from the checkpoint of a
model that you expect to be exactly identical (initializing a BertForSequenceClassification
model from a BertForSequenceClassification model).
Detected remote with confidence 0.998 at location [40.16, 70.81, 175.55, 117.98]
Detected remote with confidence 0.996 at location [333.24, 72.55, 368.33, 187.66]
Detected couch with confidence 0.995 at location [-0.02, 1.15, 639.73, 473.76]
Detected cat with confidence 0.999 at location [13.24, 52.05, 314.02, 470.93]
Detected cat with confidence 0.999 at location [345.4, 23.85, 640.37, 368.72]
Huggingface Transformers中detr源码参考下 这里 。
9.2. 模型转换
在鲁班猫RK系列板卡上部署detr模型,需要先使用Huggingface的工具 optimum 导出onnx模型,然后使用 使用toolkit2工具转换成rknn模型。
9.2.1. 导出onnx
手动下载 detr-resnet-50模型 , 然后使用 optimum 工具导出onnx模型。
# 安装optimum exporters依赖模块
pip install optimum[exporters]

# 查看命令参数帮助
optimum-cli export onnx --help

# 命令导出detr-resnet-50的onnx模型,--model指定本地下载的detr-resnet-50模型路径,detr_onnx是导出模型保存的路径
(detr) llh@llh:/xxx/detr$ optimum-cli export onnx --model detr-resnet-50/ --task object-detection  detr_onnx/
# 省略......
if attn_output.size() != (batch_size * self.num_heads, target_len, self.head_dim):
                -[x] values not close enough, max diff: 4.1961669921875e-05 (atol: 1e-05)
The ONNX export succeeded with the warning: The maximum absolute difference between the output of the
reference model and the ONNX exported model is not within the set tolerance 1e-05:
- logits: max diff = 4.1961669921875e-05.
The exported model was saved at: detr_onnx

# 或者使用下面命令,自动下载facebook/detr-resnet-50,然后导出onnx模型
optimum-cli export onnx --model facebook/detr-resnet-50 detr_onnx/
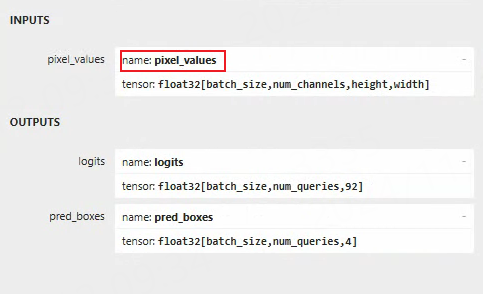
导出的onnx模型保存在指定的detr_onnx路径下,可以单独编写例程推理onnx模型。 教程测试只用在导出rknn模型,需要使用 netron 工具简单查看下onnx模型的输入节点:

主要查看输入节点名称,该名称将用在后面rknn模型导出。
9.2.2. 转换成rknn
使用toolkit2,简单编写一个模型转换程序:
1 2 3 4 5 6 7 8 9 10 11 12 13 14 15 16 17 18 19 20 21 22 23 24 25 26 27 28 29 30 31 32 33 34 35 36 37 | if __name__ == '__main__':
model_path, platform, do_quant, output_path = parse_arg()
# Create RKNN object
rknn = RKNN(verbose=False)
# Pre-process config
print('--> Config model')
rknn.config(mean_values=[[123.675, 116.28, 103.53]], std_values=[[58.395, 58.395, 58.395]],target_platform=platform)
print('done')
# Load model
print('--> Loading model')
ret = rknn.load_onnx(model=model_path, inputs=['pixel_values'], input_size_list=[[1, 3, 800, 800],])
if ret != 0:
print('Load model failed!')
exit(ret)
print('done')
# Build model
print('--> Building model')
ret = rknn.build(do_quantization=do_quant)
if ret != 0:
print('Build model failed!')
exit(ret)
print('done')
# Export rknn model
print('--> Export rknn model')
ret = rknn.export_rknn(output_path)
if ret != 0:
print('Export rknn model failed!')
exit(ret)
print('done')
# Release
rknn.release()
|
Huggingface DETR 会调整输入图像大小,最长边最长为1333, 在训练时,使用比例增强,最短边随机设置为至少480像素,最多800像素,在推理时,最短边设置为800。
模型转换程序中,在导入onnx模型时单独设置了模型输入名称以及输入形状,输入shape简单设置为[1, 3, 800, 800]。
# 在一个安装了toolkit2的环境中执行模型转换例程
#Usage: python3 convert.py onnx_model_path [platform] [dtype(optional)] [output_rknn_path(optional)]
#   platform choose from [rk3562,rk3566,rk3568,rk3576,rk3588]
#   dtype choose from [fp] for [rk3562,rk3566,rk3568,rk3576,rk3588]
(toolkit2.2) llh@llh:/xxx/detr$ python convert.py ../detr_onnx_test/model.onnx rk3588 fp
I rknn-toolkit2 version: 2.2.0
--> Config model
done
--> Loading model
W load_onnx: If you don't need to crop the model, don't set 'inputs'/'input_size_list'/'outputs'!
I Loading : 100%|██████████████████████████████████████████████| 424/424 [00:00<00:00, 19512.03it/s]
done
--> Building model
I OpFusing 0: 100%|███████████████████████████████████████████████| 100/100 [00:02<00:00, 39.86it/s]
I OpFusing 1 : 100%|██████████████████████████████████████████████| 100/100 [00:07<00:00, 14.02it/s]
I OpFusing 0 : 100%|██████████████████████████████████████████████| 100/100 [00:12<00:00,  8.15it/s]
I OpFusing 1 : 100%|██████████████████████████████████████████████| 100/100 [00:12<00:00,  8.07it/s]
I OpFusing 2 : 100%|██████████████████████████████████████████████| 100/100 [00:12<00:00,  7.94it/s]
I OpFusing 0 : 100%|██████████████████████████████████████████████| 100/100 [00:12<00:00,  7.81it/s]
I OpFusing 1 : 100%|██████████████████████████████████████████████| 100/100 [00:12<00:00,  7.72it/s]
I OpFusing 2 : 100%|██████████████████████████████████████████████| 100/100 [00:14<00:00,  6.70it/s]
I rknn building ...
I rknn buiding done.
done
--> Export rknn model
done
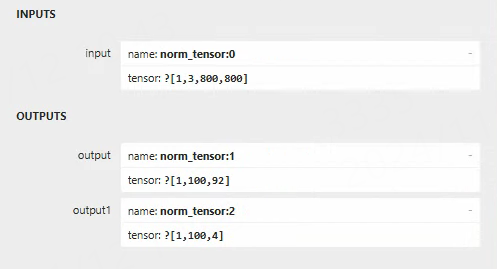
上面是测试在鲁班猫4板卡上,设置rk3588平台,导出的rknn模型保存在指定的onnx模型路径中。 可以使用 netron 工具简单查看下模型的输入输出:

输入shape是[1, 3, 800, 800],输出shape是[1, 100, 92]和[1, 100, 4],第一个输出是分类信息头,模型使用coco训练集,最后的维度是92, 表示80个类别,11个空类,一个背景。 第二个输出是回归信息,最后一个维度4,代表box的中心点坐标和预测框宽高。
9.3. 部署测试
在板卡上测试推理使用Toolkit Lite2,简单编写程序:
1 2 3 4 5 6 7 8 9 10 11 12 13 14 15 16 17 18 19 20 21 22 23 24 25 26 27 28 29 30 31 32 33 34 35 36 37 38 39 40 41 42 43 44 45 46 47 48 49 50 51 52 53 54 55 56 57 58 59 60 61 62 63 | # 省略..................................
# 导入模型
print('--> Load RKNN model')
ret = rknn_lite.load_rknn(rknn_model)
if ret != 0:
print('Load RKNN model failed')
exit(ret)
print('done')
# 输入
image = cv2.imread(IMG_PATH)
img = cv2.cvtColor(image, cv2.COLOR_BGR2RGB)
# letterbox
img, ratio, (dw, dh) = letterbox(img, new_shape=(IMG_SIZE, IMG_SIZE))
#img = cv2.resize(img, (IMG_SIZE, IMG_SIZE))
img = np.expand_dims(img, 0)
img_shape = np.array([(IMG_SIZE, IMG_SIZE)])
# Init runtime environment
print('--> Init runtime environment')
# Run on RK356x / RK3576 / RK3588 with Debian OS, do not need specify target.
if host_name in ['RK3576', 'RK3588']:
# For RK3576 / RK3588, specify which NPU core the model runs on through the core_mask parameter.
ret = rknn_lite.init_runtime(core_mask=RKNNLite.NPU_CORE_0)
else:
ret = rknn_lite.init_runtime()
if ret != 0:
print('Init runtime environment failed')
exit(ret)
print('done')
# 推理
print('--> Running model')
outputs = rknn_lite.inference(inputs=[img])
print('done')
# 后处理
results = post_process(outputs, img_shape, OBJ_THRESH)
# 保存结果
_results = results[0]
for score, label, (xmin, ymin, xmax, ymax) in zip( _results['scores'].tolist(), _results['labels'].tolist(), _results['boxes'].tolist()):
# unletterbox result
xmin = np.clip((xmin - dw)/ratio, 0, image.shape[1])
ymin = np.clip((ymin - dh)/ratio, 0, image.shape[0])
xmax = np.clip((xmax - dw)/ratio, 0, image.shape[1])
ymax = np.clip((ymax - dh)/ratio, 0, image.shape[0])
# print resuilt
print("%s @ (%d %d %d %d) %.6f" % (CLASSES[label], xmin, ymin, xmax, ymax, score))
# draw resuilt
cv2.rectangle(image, (int(xmin), int(ymin)), (int(xmax), int(ymax)), CLASS_COLORS[label], 2)
if (int(xmin) <= 10 or int(ymin) <= 10):
cv2.putText(image, '{0} {1:.3f}'.format(CLASSES[label], score),(int(xmin) + 6, int(ymin) + 10), cv2.FONT_HERSHEY_SIMPLEX, 0.5, (0, 0, 255), 2)
else :
cv2.putText(image, '{0} {1:.3f}'.format(CLASSES[label], score),(int(xmin), int(ymin) - 6), cv2.FONT_HERSHEY_SIMPLEX, 0.5, (0, 0, 255), 2)
# save resuilt
cv2.imwrite("result.jpg", image)
# 释放rknn
rknn_lite.release()
|
模型的后处理简单参考了DETR的 PostProcess 以及文章 DETR转RKNN ,可自行去优化。
# 安装opencv等等相关库
# 测试例程使用的是lubancat-4板卡,系统是ubuntu20.04

# 获取一张测试图像
cat@lubancat:~/detr$ wget http://images.cocodataset.org/val2017/000000039769.jpg

# 在安装Toolkit Lite2了板卡环境中,执行命令(需要自行修改图像路径和模型路径等等):
cat@lubancat:~/detr$ python3 rknn_Inference.py
--> Load RKNN model
done
--> Init runtime environment
done
--> Running model
done
remote @ (40 70 176 121) 0.998663
cat @ (12 52 314 472) 0.998676
couch @ (0 1 639 480) 0.995750
remote @ (335 73 368 189) 0.997902
cat @ (345 21 639 367) 0.998692
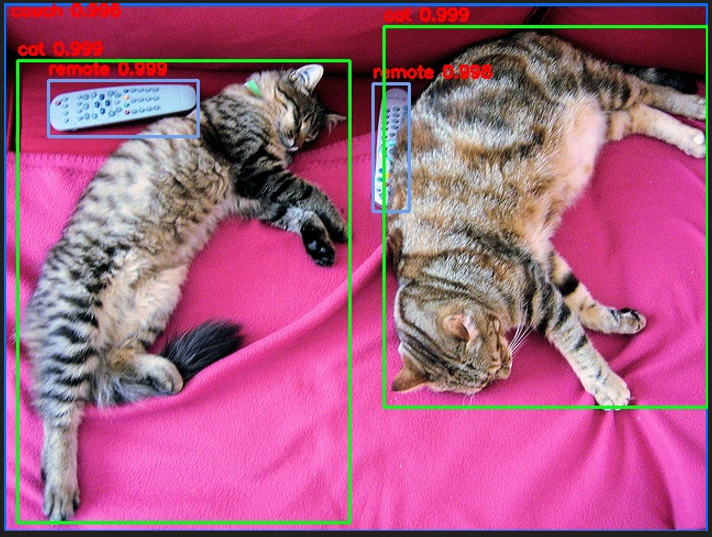
结果保存在当前目录中,名称为result.jpg。

