8. YOLOv5(目标检测)
Yolov5 是一种目标检测算法,属于单阶段目标检测方法,是在COCO数据集上预训练的物体检测架构和模型系列, 它代表了Ultralytics对未来视觉AI方法的开源研究,其中包含了经过数千小时的研究和开发而形成的经验教训和最佳实践。 最新的YOLOv5 v7.0有YOLOv5n、YOLOv5s、YOLOv5m、YOLOv5l、YOLOv5x等,除了目标检测,还有分割,分类等应用场景。
YOLOv5基本原理,简单的讲是:将整张图片划分为若干个网络,每个网格预测出该网格内物体的种类和位置信息 ,然后根据预测框与真实框之间的交并比值进行目标框的筛选,最终输出预测框。
本章将简单测试YOLOv5,并在鲁班猫板卡上部署测试。
提示
测试环境:鲁班猫RK板卡系统是Debian或者ubuntu(带桌面的系统),PC是WSL2(ubuntu20.04),PyTorch是2.1.2,YOLOv5 v7.0,airockchip/yolov5 v6.2。
8.1. YOLOv5环境安装
在个人PC上安装python以及相关依赖库,然后克隆YOLOv5仓库的源码,简单测试YOLOv5目标检测。
# 安装anaconda参考前面环境搭建教程,然后使用conda命令创建环境
conda create -n yolov5 python=3.9
conda activate yolov5

# 拉取最新的yolov5(教程测试时是v7.0),可以指定下版本分支
# git clone https://github.com/ultralytics/yolov5.git -b v7.0
git clone https://github.com/ultralytics/yolov5
cd yolov5

pip3 config set global.index-url https://pypi.tuna.tsinghua.edu.cn/simple/

# 安装依赖库
pip3 install -r requirements.txt

# 进入python命令行,检测安装的环境
(yolov5) llh@anhao:~yolov5$ python
Python 3.9.18 (main, Sep 11 2023, 13:41:44)
[GCC 11.2.0] :: Anaconda, Inc. on linux
Type "help", "copyright", "credits" or "license" for more information.
>>> import torch
>>> import utils
>>> display=utils.notebook_init()
Checking setup...
YOLOv5 🚀 v7.0-253-g63555c8 Python-3.9.18 torch-2.1.2+cu121 CUDA:0 (NVIDIA GeForce RTX 3060 Laptop GPU, 6144MiB)
Setup complete ✅ (12 CPUs, 15.6 GB RAM, 142.6/1006.9 GB disk)
8.2. YOLOv5简单测试
接下来将简单测试Ultralytics/YOLOv5,并在鲁班猫板卡上部署。
8.2.1. 获取预训练权重文件
下载yolov5s.pt,yolov5m.pt,yolov5l.pt,yolov5x.pt权重文件,可以直接从 这里 获取。 其中后面n、s、m、l、x表示网络的宽度和深度,最小的是n,它速度最快、精度最低。
8.2.2. YOLOv5简单测试
进入yolov5源码目录,把前面下载的权重文件放到当前目录下,两张测试图片位于./data/images/,
# 简单测试
# --source指定测试数据,可以是图片或者视频等
# --weights指定权重文件路径,将前面获取的模型权重yolov5s.pt 放到yolov5工程文件下
(yolov5) llh@anhao:~$ cd yolov5
(yolov5) llh@anhao:~/yolov5$ python3 detect.py --source ./data/images/ --weights yolov5s.pt
detect: weights=['yolov5s.pt'], source=./data/images/, data=data/coco128.yaml, imgsz=[640, 640], conf_thres=0.25,
iou_thres=0.45, max_det=1000, device=, view_img=False, save_txt=False, save_csv=False, save_conf=False, save_crop=False,
nosave=False, classes=None, agnostic_nms=False, augment=False, visualize=False, update=False, project=runs/detect,
name=exp, exist_ok=False, line_thickness=3, hide_labels=False, hide_conf=False, half=False, dnn=False, vid_stride=1
YOLOv5 🚀 v7.0-253-g63555c8 Python-3.9.18 torch-2.1.2+cu121 CUDA:0 (NVIDIA GeForce RTX 3060 Laptop GPU, 6144MiB)
Fusing layers...
YOLOv5s summary: 213 layers, 7225885 parameters, 0 gradients, 16.4 GFLOPs
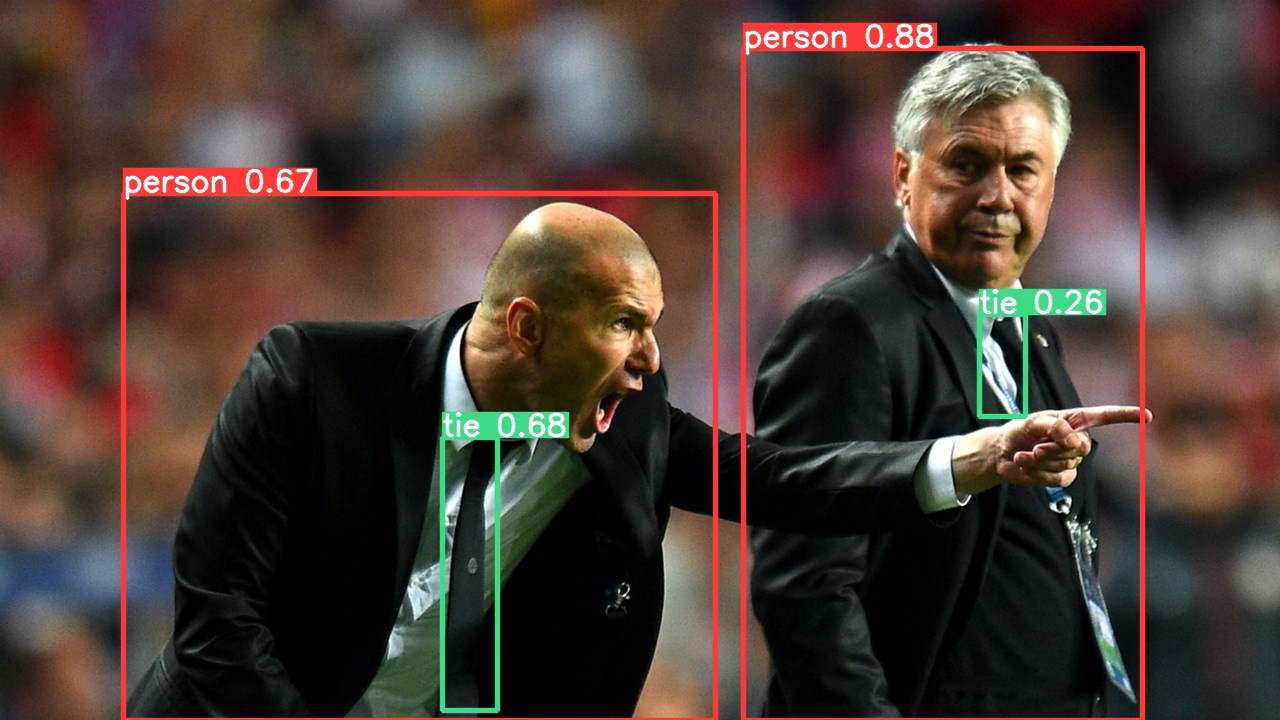
image 1/2 /home/llh//yolov5/data/images/bus.jpg: 640x480 4 persons, 1 bus, 73.5ms
image 2/2 /home/llh/yolov5/data/images/zidane.jpg: 384x640 2 persons, 2 ties, 71.4ms
Speed: 1.0ms pre-process, 72.4ms inference, 159.0ms NMS per image at shape (1, 3, 640, 640)
Results saved to runs/detect/exp
上面依次显示:基础配置、网络参数、检测的结果、处理速度、最后是保存的位置, 切换到runs/detect/exp目录,查看检测的结果图片(下面展示其中一张)。
8.2.3. 导出rknn模型以及简单测试
接下来将基于yolov5s.pt,导出rknn:
1、转成yolov5s.onnx(也可以是torchscript等模型),需要安装下onnx环境。
# 安装下onnx的环境
pip3 install -r requirements.txt onnx onnx-simplifier

# 指定权重文件yolov5s.pt或者自己训练的模型文件best.pt,使用下面命令将导出onnx模型
python3 export.py --weights yolov5s.pt --include  onnx

# 或者使用下面命令,导出torchscript
python3 export.py --weights yolov5s.pt --include  torchscript
使用export.py导出onnx模型:
(yolov5) llh@anhao:~/yolov5$ python export.py --weights yolov5s.pt --include  onnx
export: data=data/coco128.yaml, weights=['yolov5s.pt'], imgsz=[640, 640], batch_size=1, device=cpu, half=False,
inplace=False, keras=False, optimize=False, int8=False, per_tensor=False, dynamic=False, simplify=False, opset=17,
verbose=False, workspace=4, nms=False, agnostic_nms=False, topk_per_class=100, topk_all=100,
iou_thres=0.45, conf_thres=0.25, include=['onnx']
YOLOv5 🚀 v7.0-253-g63555c8 Python-3.9.18 torch-2.1.2+cu121 CPU

Fusing layers...
YOLOv5s summary: 213 layers, 7225885 parameters, 0 gradients, 16.4 GFLOPs

PyTorch: starting from yolov5s.pt with output shape (1, 255, 80, 80) (14.1 MB)

ONNX: starting export with onnx 1.12.0...
ONNX: export success ✅ 0.8s, saved as yolov5s.onnx (27.6 MB)

Export complete (2.4s)
Results saved to /home/llh/yolov5
Detect:          python detect.py --weights yolov5s.onnx
Validate:        python val.py --weights yolov5s.onnx
PyTorch Hub:     model = torch.hub.load('ultralytics/yolov5', 'custom', 'yolov5s.onnx')
Visualize:       https://netron.app
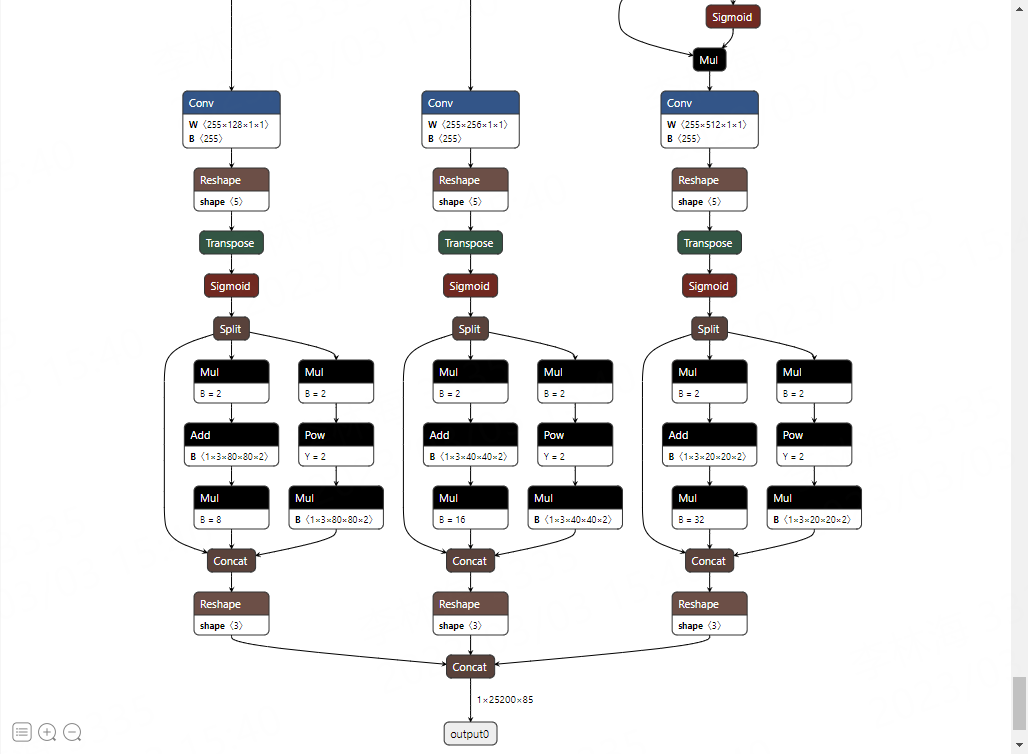
会在当前目录下生成yolov5s.onnx文件,然后使用 Netron 工具可视化模型:
2、重新导出
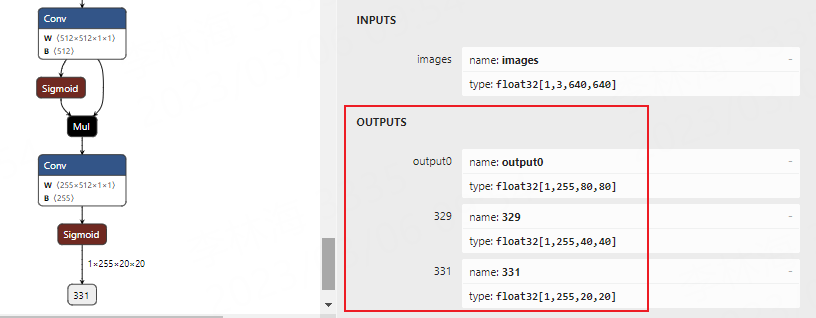
看上面的图片,转出onnx模型尾部最后经过Detect,为适配到rknn做适当处理,这里移除这个网络结构(但模型结构尾部的sigmoid函数没有删除),直接输出三个特征图。 详细参考下 这里
需要修改yolov5的检查头部分,以及模型导出部分,注意下面只是简单修改测试,只用于模型导出。
# 在models/yolo.py中,修改类Detect的forward函数

# def forward(self, x):
#     z = []  # inference output
#     for i in range(self.nl):
#         x[i] = self.m[i](x[i])  # conv
#         bs, _, ny, nx = x[i].shape  # x(bs,255,20,20) to x(bs,3,20,20,85)
#         x[i] = x[i].view(bs, self.na, self.no, ny, nx).permute(0, 1, 3, 4, 2).contiguous()

#         if not self.training:  # inference
#             if self.dynamic or self.grid[i].shape[2:4] != x[i].shape[2:4]:
#                 self.grid[i], self.anchor_grid[i] = self._make_grid(nx, ny, i)

#             if isinstance(self, Segment):  # (boxes + masks)
#                 xy, wh, conf, mask = x[i].split((2, 2, self.nc + 1, self.no - self.nc - 5), 4)
#                 xy = (xy.sigmoid() * 2 + self.grid[i]) * self.stride[i]  # xy
#                 wh = (wh.sigmoid() * 2) ** 2 * self.anchor_grid[i]  # wh
#                 y = torch.cat((xy, wh, conf.sigmoid(), mask), 4)
#             else:  # Detect (boxes only)
#                 xy, wh, conf = x[i].sigmoid().split((2, 2, self.nc + 1), 4)
#                 xy = (xy * 2 + self.grid[i]) * self.stride[i]  # xy
#                 wh = (wh * 2) ** 2 * self.anchor_grid[i]  # wh
#                 y = torch.cat((xy, wh, conf), 4)
#             z.append(y.view(bs, self.na * nx * ny, self.no))

#     return x if self.training else (torch.cat(z, 1), ) if self.export else (torch.cat(z, 1), x)

def forward(self, x):
    z = []  # inference output
    for i in range(self.nl):
        z.append(torch.sigmoid(self.m[i](x[i])))

    return z
# 在export.py文件run()函数中修改:

    if half and not coreml:
        im, model = im.half(), model.half()  # to FP16
-   shape = tuple((y[0] if isinstance(y, tuple) else y).shape)  # model output shape
+   shape = tuple((y[0] if (isinstance(y, tuple) or (isinstance(y, list))) else y).shape)  # model output shape
    metadata = {'stride': int(max(model.stride)), 'names': model.names}  # model metadata
    LOGGER.info(f"\n{colorstr('PyTorch:')} starting from {file} with output shape {shape} ({file_size(file):.1f} MB)")
修改之后重新执行命令转换: python export.py --weights yolov5s.pt --include onnx
使用 Netron 可视化模型:
3、转换成rknn模型
这里将前面的onnx模型转换成rknn模型,需要安装下rknn-Toolkit2等环境,参考下前面开发环境章节。
1 2 3 4 5 6 7 8 9 10 11 12 13 14 15 16 17 18 19 20 21 22 23 24 25 26 27 28 29 30 31 32 33 34 35 36 | # 省略........
# Create RKNN object
rknn = RKNN(verbose=False)
# Pre-process config
print('--> Config model')
rknn.config(mean_values=[[0, 0, 0]], std_values=[
[255, 255, 255]], target_platform=platform)
print('done')
# Load model
print('--> Loading model')
ret = rknn.load_onnx(model=model_path)
if ret != 0:
print('Load model failed!')
exit(ret)
print('done')
# Build model
print('--> Building model')
ret = rknn.build(do_quantization=do_quant, dataset=DATASET_PATH)
if ret != 0:
print('Build model failed!')
exit(ret)
print('done')
# Export rknn model
print('--> Export rknn model')
ret = rknn.export_rknn(output_path)
if ret != 0:
print('Export rknn model failed!')
exit(ret)
print('done')
# Release
rknn.release()
|
运行模型转换程序,导出rknn模型:
# 教程测试是lubancat-4(设置rk3588平台)
(toolkit2_1.6) llh@YH-LONG:~/xxx/yolov5$ python3 test.py
W __init__: rknn-toolkit2 version: 1.6.0+81f21f4d
--> Config model
done
--> Loading model
W load_onnx: It is recommended onnx opset 19, but your onnx model opset is 17!
W load_onnx: Model converted from pytorch, 'opset_version' should be set 19 in torch.onnx.export for successful convert!
Loading : 100%|████████████████████████████████████████████████| 134/134 [00:00<00:00, 18444.97it/s]
done
--> Building model
W build: found outlier value, this may affect quantization accuracy
const name               abs_mean    abs_std     outlier value
model.0.conv.weight      0.83        1.39        14.282
GraphPreparing : 100%|██████████████████████████████████████████| 145/145 [00:00<00:00, 5296.85it/s]
Quantizating : 100%|█████████████████████████████████████████████| 145/145 [00:00<00:00, 265.99it/s]
# 省略.....
done
--> Export rknn model
done

# 导出rknn模型,保存在./model/yolov5s.rknn
4、连板测试模型
我们也可以使用rknn-Toolkit2进行连板测试、性能和内存评估等等。需要板卡通过usb或者连接PC,确认adb连接正常,以及启动rknn_server。
# 连接板卡测试模型,程序请从配套例程获取
(toolkit2_1.6) llh@YH-LONG:~/xxx/yolov5$ python test.py
W __init__: rknn-toolkit2 version: 1.6.0+81f21f4d
*************************
all device(s) with adb mode:
192.168.103.152:5555
*************************
I NPUTransfer: Starting NPU Transfer Client, Transfer version 2.1.0 (b5861e7@2020-11-23T11:50:36)
D RKNNAPI: ==============================================
D RKNNAPI: RKNN VERSION:
D RKNNAPI:   API: 1.6.0 (535b468 build@2023-12-11T09:05:46)
D RKNNAPI:   DRV: rknn_server: 1.5.0 (17e11b1 build: 2023-05-18 21:43:39)
D RKNNAPI:   DRV: rknnrt: 1.6.0 (9a7b5d24c@2023-12-13T17:31:11)
D RKNNAPI: ==============================================
D RKNNAPI: Input tensors:
D RKNNAPI:   index=0, name=images, n_dims=4, dims=[1, 640, 640, 3], n_elems=1228800, size=1228800,
 w_stride = 0, size_with_stride = 0, fmt=NHWC, type=INT8, qnt_type=AFFINE, zp=-128, scale=0.003922
D RKNNAPI: Output tensors:
D RKNNAPI:   index=0, name=output0, n_dims=4, dims=[1, 255, 80, 80], n_elems=1632000, size=1632000,
 w_stride = 0, size_with_stride = 0, fmt=NCHW, type=INT8, qnt_type=AFFINE, zp=-128, scale=0.003905
D RKNNAPI:   index=1, name=360, n_dims=4, dims=[1, 255, 40, 40], n_elems=408000, size=408000,
w_stride = 0, size_with_stride = 0, fmt=NCHW, type=INT8, qnt_type=AFFINE, zp=-128, scale=0.003917
D RKNNAPI:   index=2, name=362, n_dims=4, dims=[1, 255, 20, 20], n_elems=102000, size=102000,
w_stride = 0, size_with_stride = 0, fmt=NCHW, type=INT8, qnt_type=AFFINE, zp=-128, scale=0.003918
--> Running model
done
class        score      xmin, ymin, xmax, ymax
--------------------------------------------------
person       0.816     [ 211,  241,  285,  518]
person       0.812     [ 472,  230,  561,  522]
person       0.790     [ 115,  233,  207,  546]
person       0.455     [  79,  334,  122,  517]
 bus         0.770     [  88,  131,  557,  464]
Save results to result.jpg!
测试结果保存在result.jpg。
8.2.4. 部署到鲁班猫板卡
导出rknn模型后,使用RKNN Toolkit Lite2在板端进行简单部署,获得结果后进行画框等后处理等等,也可以使用rknpu2的C/C++ API进行部署, 例程参考 rknn_model_zoo仓库 。
配套例程有些使用了opencv,所以板卡系统还需安装OpenCV(opencv4),请使用命令:
# 鲁班猫板卡系统默认是debian或者ubuntu发行版,直接使用apt安装opencv
sudo apt update
sudo apt install libopencv-dev git cmake make gcc g++ libsndfile1-dev
如果是自行编译安装的opencv,自定义安装的路径,使用时需要修改下例程的CMakeLists.txt文件,例如:
1 2 3 4 5 6 7 8 9 10 | # ......
# 查找系统默认opencv
#find_package(OpenCV REQUIRED)
# 查找自行编译安装的OpenCV,请修改下面的OpenCV_DIR路径
set(OpenCV_DIR /path/opencv/lib/cmake/opencv4)
find_package(OpenCV REQUIRED)
file(GLOB OpenCV_FILES "${OpenCV_DIR}/../../libopencv*")
install(PROGRAMS ${OpenCV_FILES} DESTINATION lib)
# .....
|
拉取配套例程程序,然后编译:
# 拉取配套例程程序或者rknn_model_zoo仓库程序到板卡
cat@lubancat:~/$ git clone https://gitee.com/LubanCat/lubancat_ai_manual_code.git
cat@lubancat:~/$ cd lubancat_ai_manual_code/example/yolov5/cpp

# 将rknn模型放到model目录下,然后编译,教程测试是lubancat-4(指定参数rk3588)
cat@lubancat:~/lubancat_ai_manual_code/example/yolov5/cpp$ ./build-linux.sh -t rk3588
./build-linux.sh -t rk3588
===================================
TARGET_SOC=rk3588
INSTALL_DIR=/home/cat/lubancat_ai_manual_code/example/yolov5/cpp/install/rk3588_linux
BUILD_DIR=/home/cat/lubancat_ai_manual_code/example/yolov5/cpp/build/build_rk3588_linux
CC=aarch64-linux-gnu-gcc
CXX=aarch64-linux-gnu-g++
===================================
-- The C compiler identification is GNU 10.2.1
-- The CXX compiler identification is GNU 10.2.1
# 省略....
[100%] Linking CXX executable rknn_yolov8_demo
[100%] Built target rknn_yolov8_demo
[100%] Built target rknn_yolov8_demo
Install the project...
# 省略....
复制前面导出rknn模型到install/rk3588_linux目录下,然后运行程序,模型推理。
# ./yolov5_image_demo <model_path> <image_path>
cat@lubancat:~/xxx/install/rk3588_linux$ ./yolov5_image_demo ./model/yolov5s.rknn ./model/bus.jpg
load lable ./model/coco_80_labels_list.txt
model input num: 1, output num: 3
input tensors:
index=0, name=images, n_dims=4, dims=[1, 640, 640, 3], n_elems=1228800, size=1228800, fmt=NHWC, type=INT8, qnt_type=AFFINE, zp=-128, scale=0.003922
output tensors:
index=0, name=output0, n_dims=4, dims=[1, 255, 80, 80], n_elems=1632000, size=1632000, fmt=NCHW, type=INT8, qnt_type=AFFINE, zp=-128, scale=0.003905
index=1, name=360, n_dims=4, dims=[1, 255, 40, 40], n_elems=408000, size=408000, fmt=NCHW, type=INT8, qnt_type=AFFINE, zp=-128, scale=0.003917
index=2, name=362, n_dims=4, dims=[1, 255, 20, 20], n_elems=102000, size=102000, fmt=NCHW, type=INT8, qnt_type=AFFINE, zp=-128, scale=0.003918
model is NHWC input fmt
model input height=640, width=640, channel=3
scale=1.000000 dst_box=(0 0 639 639) allow_slight_change=1 _left_offset=0 _top_offset=0 padding_w=0 padding_h=0
src width=640 height=640 fmt=0x1 virAddr=0x0x7f95dfe040 fd=0
dst width=640 height=640 fmt=0x1 virAddr=0x0x5590d37cf0 fd=0
src_box=(0 0 639 639)
dst_box=(0 0 639 639)
color=0x72
rga_api version 1.10.0_[2]
rknn_run
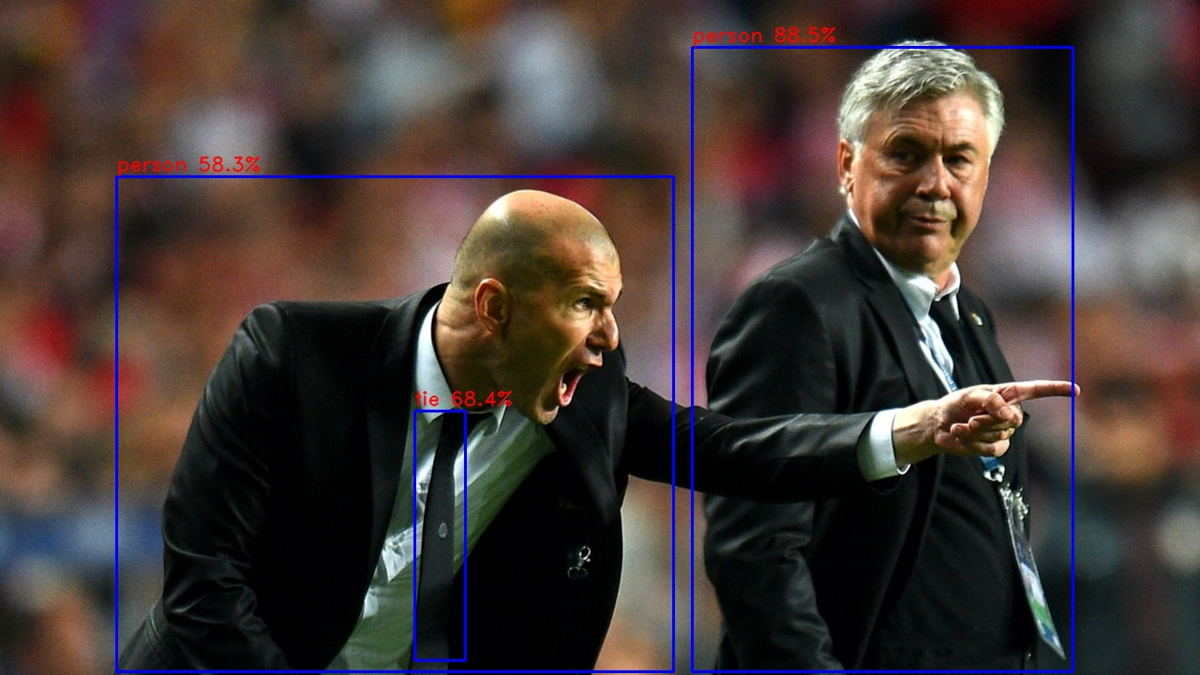
person @ (211 241 285 518) 0.816
person @ (472 230 561 522) 0.812
person @ (115 233 207 546) 0.790
bus @ (88 131 557 464) 0.770
person @ (79 334 122 517) 0.455
rknn run and process use 29.048000 ms
结果会保存在当前目录下的out.jpg,查看图片:
如果测试提示RGA相关问题,请参考下 Rockchip_FAQ_RGA_CN.md 。
8.3. airockchip/yolov5简单测试
上面是使用Ultralytics官方的YOLOv5 v7.0进行简单测试,接下来我们使用 airockchip/yolov5 仓库, 该仓库的yolov5对rknpu设备进行了部署优化:
优化focus/SPPF块,以相同的结果获得更好的性能;
更改输出节点,从模型中删除post_process(后处理量化方面不友好);
使用ReLU代替SiLU作为激活层(仅在使用该仓库训练新模型时才会替换)。
拉取最新的 airockchip/yolov5 仓库, 注意教程这里测试的是rk_opt@v6.2.1分支,如果使用默认使用master也是一样的(使用命令有些不同),具体请参考README文件说明。
# 测试时是rk_opt@v6.2.1分支,目标检测使用master也是一样的,操作类似。
git clone -b rk_opt@v6.2.1 https://github.com/airockchip/yolov5.git
cd yolov5
从yolov5官方权重文件,教程这里测试使用 airockchip/yolov5 重新训练模型, 也可以使用自己Ultralytics官方仓库训练的模型,然后使用该库导出适配rknpu的模型。
# 可以自定义数据集添加数据集配置文件,修改模型配置文件等等,最后使用该仓库训练模型
# 教程测试就重新训练coco128,使用预训练权重yolov5s.pt
(yolov5) llh@anhao:~/yolov5$ python3 train.py --data coco128.yaml --weights yolov5s.pt  --img 640

# 训练会自动拉取权重和数据集,训练过程中结束输出信息很多,其中会输出:
...
Optimizer stripped from runs/train/exp/weights/last.pt, 14.9MB
Optimizer stripped from runs/train/exp/weights/best.pt, 14.9MB

Validating runs/train/exp/weights/best.pt...
...
# 训练一些分析和权重保存在runs/train/exp/目录下
模型最后保存在runs/train/exp/weights/目录下的best.bt,接下来将该模型导出为onnx模型。
# export.py 参数说明
# --weights指定权重文件的路径
# --rknpu指定平台(rk_platform支持 rk1808, rv1109, rv1126, rk3399pro, rk3566, rk3568, rk3588, rv1103, rv1106)
# --include 设置导出模型格式,默认导出torchscript格式模型,也可以指定onnx
python3 export.py --weights runs/train/exp/weights/best.pt --rknpu rk3588
export: data=data/coco128.yaml, weights=['runs/train/exp4/weights/best.pt'], imgsz=[640, 640],
batch_size=1, device=cpu, half=False, inplace=False, train=False, keras=False, optimize=False, int8=False,
dynamic=False, simplify=False, opset=12, verbose=False, workspace=4, nms=False, agnostic_nms=False, topk_per_class=100,
topk_all=100, iou_thres=0.45, conf_thres=0.25, include=['torchscript'], rknpu=rk3588
YOLOv5 🚀 v6.2-4-g23a20ef3 Python-3.9.18 torch-2.1.2+cu121 CPU

Fusing layers...
Model summary: 213 layers, 7225885 parameters, 0 gradients, 16.4 GFLOPs
---> save anchors for RKNN
[[10.0, 13.0], [16.0, 30.0], [33.0, 23.0], [30.0, 61.0], [62.0, 45.0], [59.0, 119.0], [116.0, 90.0], [156.0, 198.0], [373.0, 326.0]]

PyTorch: starting from runs/train/exp4/weights/best.pt with output shape (1, 255, 80, 80) (14.2 MB)

TorchScript: starting export with torch 2.1.2+cu121...
TorchScript: export success, saved as runs/train/exp4/weights/best.torchscript (27.9 MB)

Export complete (2.82s)
Results saved to /mnt/f/wsl_file/wsl_ai/yolov5/airockchip/yolov5-6.2.1/runs/train/exp4/weights
Detect:          python detect.py --weights runs/train/exp4/weights/best.torchscript
Validate:        python val.py --weights runs/train/exp4/weights/best.torchscript
PyTorch Hub:     model = torch.hub.load('ultralytics/yolov5', 'custom', 'runs/train/exp4/weights/best.torchscript')
Visualize:       https://netron.app

# 或者使用下面命令,导出onnx模型,会在runs/train/exp/weights目录下生成best.onnx文件,注意下环境可能需要安装onnx。
python3 export.py --weights runs/train/exp/weights/best.pt --include onnx --rknpu rk3588
导出torchscript模型,会保存在对应模型目录runs/train/exp/weights下,名称为best.torchscript,如果是onnx模型,则会在目录下生成best.onnx文件。
8.3.1. 转换成rknn模型并连板测试
测试使用前面的转换文件,直接运行程序导出rknn模型文件, 或者使用 这里 的工具进行模型转换,模型评估,模型部署等。
# 运行转换程序,将torchscript或者onnx模型转成rknn模型,这里测试onnx模型,
# lubancat-4(指定参数rk3588),lubancat-2(指定参数rk3568)
# python onnx2rknn.py  <onnx_model> <TARGET_PLATFORM> <dtype(optional)> <output_rknn_path(optional)>
(toolkit2_2.2.0) llh@YH-LONG:~/xxx/yolov5$ python onnx2rknn.py ./yolov5n.onnx rk3588 i8
I rknn-toolkit2 version: 2.2.0
--> Config model
done
--> Loading model
I Loading : 100%|██████████████████████████████████████████████| 121/121 [00:00<00:00, 73212.75it/s]
done
--> Building model
I OpFusing 0: 100%|█████████████████████████████████████████████| 100/100 [00:00<00:00, 1144.06it/s]
I OpFusing 1 : 100%|█████████████████████████████████████████████| 100/100 [00:00<00:00, 846.42it/s]
I OpFusing 2 : 100%|█████████████████████████████████████████████| 100/100 [00:00<00:00, 308.64it/s]
W build: found outlier value, this may affect quantization accuracy
                        const name          abs_mean    abs_std     outlier value
                        onnx::Conv_347      0.68        0.89        -11.603
I GraphPreparing : 100%|███████████████████████████████████████| 149/149 [00:00<00:00, 10361.63it/s]
I Quantizating : 100%|████████████████████████████████████████████| 149/149 [00:13<00:00, 11.03it/s]
# 省略..........
I rknn buiding done.
done
--> Export rknn model
done
然后再使用rknn-toolkit2工具连接板卡,进行模型测试,评估等等。需要板卡通过usb或者连接PC,确认adb连接正常,以及启动rknn_server。
# 连接板卡测试模型,结果保存在result.jpg
(toolkit2) llh@YH-LONG:~/xxx/yolov5$ python test.py
*************************
all device(s) with adb mode:
192.168.103.152:5555
*************************
I NPUTransfer: Starting NPU Transfer Client, Transfer version 2.1.0 (b5861e7@2020-11-23T11:50:36)
D RKNNAPI: ==============================================
D RKNNAPI: RKNN VERSION:
D RKNNAPI:   API: 1.6.0 (535b468 build@2023-12-11T09:05:46)
D RKNNAPI:   DRV: rknn_server: 1.5.0 (17e11b1 build: 2023-05-18 21:43:39)
D RKNNAPI:   DRV: rknnrt: 1.6.0 (9a7b5d24c@2023-12-13T17:31:11)
D RKNNAPI: ==============================================
D RKNNAPI: Input tensors:
D RKNNAPI:   index=0, name=images, n_dims=4, dims=[1, 640, 640, 3], n_elems=1228800, size=1228800, w_stride = 0,
# 省略....
--> Running model
done
class        score      xmin, ymin, xmax, ymax
--------------------------------------------------
person       0.884     [ 209,  244,  286,  506]
person       0.868     [ 478,  238,  559,  526]
person       0.825     [ 110,  238,  230,  534]
person       0.339     [  79,  354,  122,  516]
 bus         0.705     [  94,  129,  553,  468]
Save results to result.jpg!
8.3.2. 部署到板卡
在板卡部署,可以使用rknn-toolkit-lite2(python接口),也可以使用RKNPU(C/C++接口)。 接下来我们将参考 rknn_model_zoo仓库 提供的部署例程,进行部署测试。
# 拉取例程,或者拉取rknn_model_zoo仓库例程,直接在板卡上编译
cat@lubancat:~/$ git clone https://gitee.com/LubanCat/lubancat_ai_manual_code.git
cat@lubancat:~/$ cd lubancat_ai_manual_code/example/yolov5/cpp

# 如果没有编译可以执行下面命令编译程序,教程测试是lubancat-4/5(指定参数rk3588)
cat@lubancat:~/lubancat_ai_manual_code/example/yolov5/cpp$ ./build-linux.sh -t rk3588
编译完成后,会生成多个可执行程序(保存在install/rk3588_linux目录下),教程测试对图片进行推理,切换到该目录下执行程序:
# ./rknn_yolov5_demo <model_path> <image_path>
cat@lubancat:~/xxx/install/rk3588_linux$ ./yolov5_image_demo  model/yolov5n.rknn  model/bus.jpg
load lable ./model/coco_80_labels_list.txt
rknn_api/rknnrt version: 2.2.0 (c195366594@2024-09-14T12:18:56), driver version: 0.9.2
model input num: 1, output num: 3
input tensors:
index=0, name=images, n_dims=4, dims=[1, 640, 640, 3], n_elems=1228800, size=1228800, fmt=NHWC,
type=INT8, qnt_type=AFFINE, zp=-128, scale=0.003922, ,size_with_stride=1228800, w_stride=640
output tensors:
index=0, name=output0, n_dims=4, dims=[1, 255, 80, 80], n_elems=1632000, size=1632000, fmt=NCHW,
type=INT8, qnt_type=AFFINE, zp=-128, scale=0.003917, ,size_with_stride=1638400, w_stride=0
index=1, name=343, n_dims=4, dims=[1, 255, 40, 40], n_elems=408000, size=408000, fmt=NCHW,
type=INT8, qnt_type=AFFINE, zp=-128, scale=0.003922, ,size_with_stride=491520, w_stride=0
index=2, name=345, n_dims=4, dims=[1, 255, 20, 20], n_elems=102000, size=102000, fmt=NCHW,
type=INT8, qnt_type=AFFINE, zp=-128, scale=0.003922, ,size_with_stride=163840, w_stride=0
model is NHWC input fmt
model input height=640, width=640, channel=3
origin size=640x640 crop size=640x640
input image: 640 x 640, subsampling: 4:2:0, colorspace: YCbCr, orientation: 1
scale=1.000000 dst_box=(0 0 639 639) allow_slight_change=1 _left_offset=0 _top_offset=0 padding_w=0 padding_h=0
rga_api version 1.10.1_[0]
rknn_run
-- inference_yolov5_model use: 28.292999 ms
person @ (110 232 203 528) 0.822
person @ (209 241 287 512) 0.809
person @ (483 222 564 515) 0.617
bus @ (115 143 564 452) 0.527
person @ (79 333 122 518) 0.130
write_image path: out.png width=640 height=640 channel=3 data=0x558c489130
在install/rk3588_linux目录下, 还有一个yolov5_videocapture_demo例程,支持打开摄像头,这里测试打开摄像头,然后对其他显示器显示的图片进行检测。
# ./yolov5_videocapture_demo <model_path> <video path/capture>
cat@lubancat:~/xxx/install/rk3588_linux$ ./yolov5_videocapture_demo ./model/yolov5s.rknn 0
[ WARN:0] global ../modules/videoio/src/cap_gstreamer.cpp (961) open OpenCV | GStreamer warning: Cannot query video position: status=0, value=-1, duration=-1
load lable ./model/coco_80_labels_list.txt
rknn_api/rknnrt version: 2.2.0 (c195366594@2024-09-14T12:18:56), driver version: 0.9.2
model input num: 1, output num: 3
input tensors:
index=0, name=images, n_dims=4, dims=[1, 640, 640, 3], n_elems=1228800, size=1228800,
 fmt=NHWC, type=INT8, qnt_type=AFFINE, zp=-128, scale=0.003922, ,size_with_stride=1228800, w_stride=640
output tensors:
index=0, name=output0, n_dims=4, dims=[1, 255, 80, 80], n_elems=1632000, size=1632000,
 fmt=NCHW, type=INT8, qnt_type=AFFINE, zp=-128, scale=0.003917, ,size_with_stride=1638400, w_stride=0
index=1, name=343, n_dims=4, dims=[1, 255, 40, 40], n_elems=408000, size=408000, fmt=NCHW,
 type=INT8, qnt_type=AFFINE, zp=-128, scale=0.003922, ,size_with_stride=491520, w_stride=0
index=2, name=345, n_dims=4, dims=[1, 255, 20, 20], n_elems=102000, size=102000, fmt=NCHW,
 type=INT8, qnt_type=AFFINE, zp=-128, scale=0.003922, ,size_with_stride=163840, w_stride=0
model is NHWC input fmt
model input height=640, width=640, channel=3
# 省略........
结果显示:
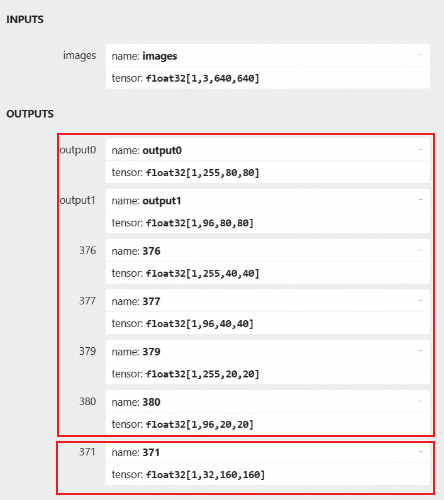
需要注意:测试usb摄像头,请确认摄像头的设备号,修改yolov5_videocapture_demo.cc例程中摄像头支持的分辨率和MJPG格式等, 如果是mipi摄像头,需要opencv设置转换成rgb格式以及设置分辨率大小等等。
更多模型例程请参考 rknn_model_zoo仓库 。
