
3. UART communication
In this chapter, we begin to introduce a common communication protocol UART. On our Lubancat board, we often use the terminal to interact with the board. Among the many ways to connect the terminal to the board, the UART serial port is one of the most commonly used ways.
Regarding the specific content of the UART protocol, we will not explore too much here, and you can search for the relevant knowledge of the UART communication protocol to learn.
In this chapter, our focus is to use the previous Python library to call the serial port resources on the board. In terms of hardware, it is connected to our computer through the board and USB to TTL module, and the demonstration and operation of the experimental phenomenon are performed through the serial port host computer.
重要
If there is no special mention, the tutorials in this book are based on the Python 3.8.10 version (extboot partition Ubuntu20.04 image) for experiments and explanations.
3.1. Experiment preparation
3.1.1. Add UART resource
Some GPIOs on the board may not be enabled, you can comment out the loading of some device tree nodes or device tree plug-ins, and restart the system to enable them. The pin reference of LubanCat_RK series boards is as follows: “LubanCat-RK Series-40pin Pin Comparison Diagram”
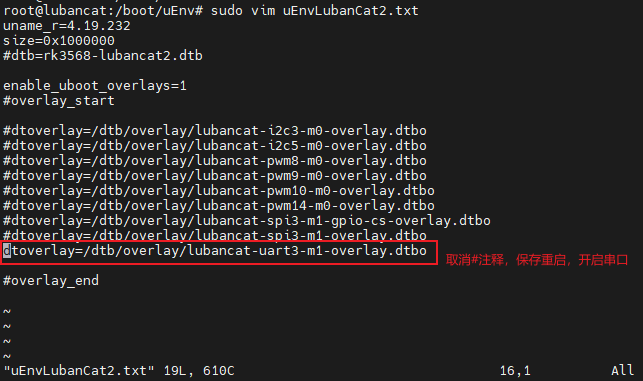
For example, for the LubanCat 2 board used by the author, according to the 40 pin comparison diagrams, the serial port resources can use UART3. Let’s open the UART3 device tree plug-in:
# The configuration files of different boards are different from pwm, taking LubanCat 2 as an example, the configuration file is uEnvLubanCat 2.txt
# Use the following command:
sudo vim /boot/uEnv/uEnvLubanCat 2.txt
#Enter edit mode, cancel the comment in front of pwm, save and exit the file, restart the system
If you are using other Lubancat RK series boards, the operation is similar.
# Enter the following command in the terminal to view the UART resource:
ls /dev/ttyS*
The UART resource example on the board is for reference only:

Among them, /dev/ttyS3 corresponds to the uart3 resource on the board.
3.1.2. Hardware connection
Note: In the hardware connection section, you need to make reference adjustments to the content of this chapter according to your own development environment and other conditions.
In this chapter, we use the above Python library to write the code to use the UART3 resource on the LubanCat 2 board. And through the USB to TTL module, the serial port host computer to test the correctness of the code.
The author’s hardware connection is shown in the figure, for reference only:

The USB to TTL module is connected as shown above.
3.2. Method 1: Use the pyserial library
The pyserial library encapsulates the access methods to serial port resources, and this library is compatible with the use of serial port resources on various platforms. There are many methods related to platform features, official usage instructions refer to: pyserial
On the Linux system, for the content related to the UART subsystem, refer to “Serial Port Communication” 。
3.2.1. Install pyserial
重要
In the experiment in the previous section, this library may have been installed, if it is installed, skip this operation.
pyserial is installed as follows:
# Use the following command to install on the board
sudo pip3 install pyserial
3.2.2. Use pyserial
1 2 3 4 5 6 7 8 9 10 11 12 13 14 15 16 17 18 19 20 21 22 23 24 25 | """ pyserial uart test """
import serial
# Open uart3, set the serial port baud rate to 115200, data bits to 8, no parity bit, stop bit to 1, no flow control, open the serial port in non-blocking mode, and wait for 3s
with serial.Serial(
"/dev/ttyS3",
baudrate=115200,
bytesize=serial.EIGHTBITS,
stopbits=serial.STOPBITS_ONE,
parity=serial.PARITY_NONE,
timeout=3,
) as uart3:
# Use the requested serial port to send byte stream data "Hello World!\n"
uart3.write(b"Hello World!\n")
# The serial port opened in a non-blocking way, when reading the data received by the serial port, the function returns the condition that one of the two conditions is satisfied. First, read 128 bytes. and second, the reading time exceeds 1 second
buf = uart3.read(128)
# Note: The data type read by Python is:bytes
# Print raw data
print("Raw data:\n", buf)
# Transcode to gbk string, can display Chinese
data_strings = buf.decode("gbk")
# Print the read data volume and data content
print("{:d} bytes read, print as string:\n {:s}".format(len(buf), data_strings))
|
3.2.2.1. Experimental operation
Since the TX\RX interface corresponding to uart3 has been connected to the RXD\TXD interface of the USB to TTL module during the hardware connection. Therefore, to view the experimental phenomenon, it is necessary to use the serial port host computer to display the data to facilitate the observation of the experimental phenomenon.
When using the Embedfire multi-function debugging assistant, it comes with a serial port host computer.
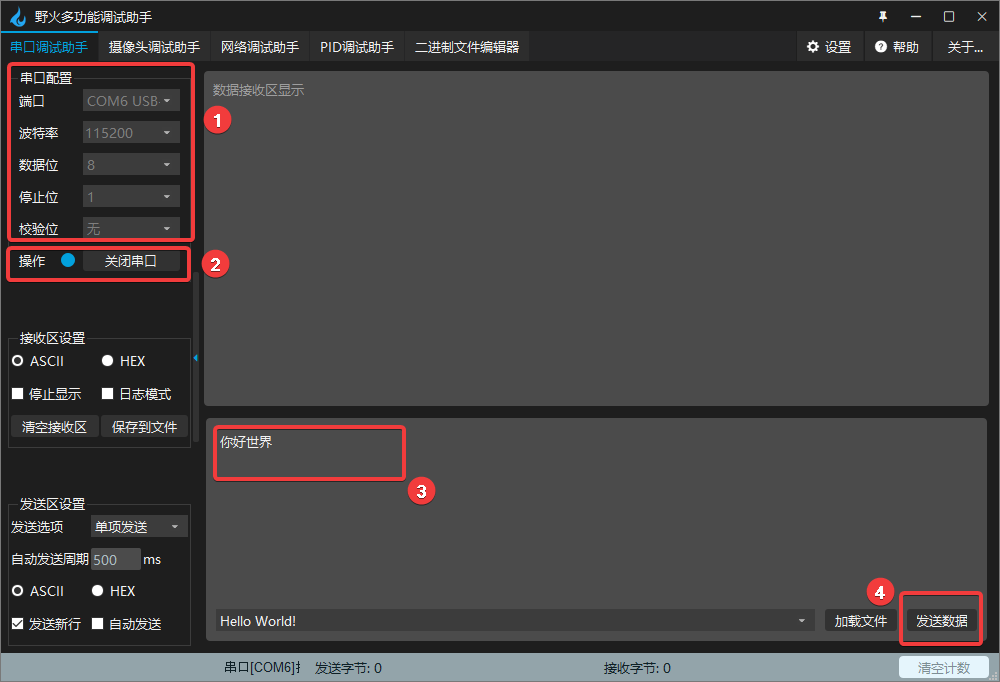
As shown in the figure, we set the working mode of the serial port in the serial port assistant to be consistent with our program configuration, and open the corresponding port, that is, steps 1 and 2 in the figure. Next we run the program.
The sample code uses the LubanCat i.MX6ULL MINI board, the operation is as follows:
# Confirm that the pyserial package is installed
# Confirm that the UART device tree plugin is enabled
# Execute the following command in the directory where the board uart_test.py is located
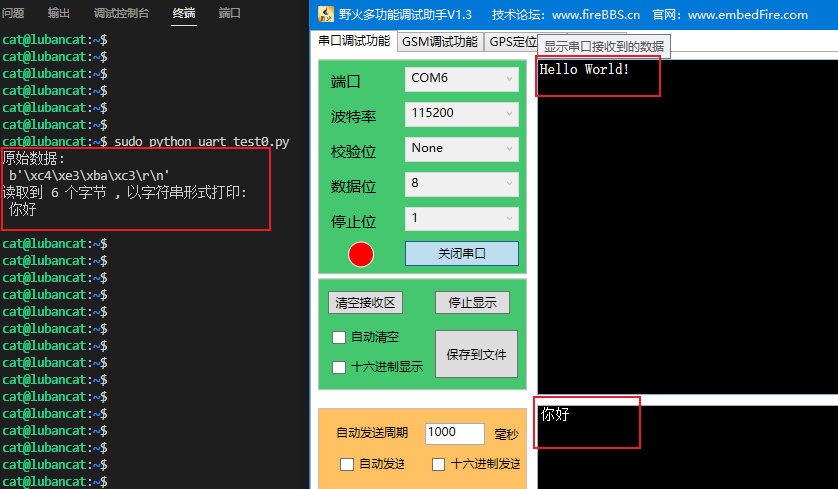
sudo python3 uart_test.py
# You can see the programmed data in the program printed by the serial port assistant: Hello World!\n
After entering the command in the terminal, we edit the data to be sent in the serial port assistant and send it, that is, steps 3 and 4 in the figure.
After waiting for a timeout, you can see the received data printed out by the terminal: hello world
For more usage of this library, refer to:pyserial API .
3.3. Method 2: Use python-periphery
The UART function supported by the python-periphery library is implemented based on the Linux UART system, so if you want to use this library to use the UART function, you need the board to provide support. Like the Lubancat board, you can perfectly use the python-periphery library UART communication function.
3.3.1. Install python-periphery
重要
Be sure to skip this if you installed the library in the previous section.
python-periphery is installed as follows:
# Use the following command to install on the board
sudo pip3 install python-periphery
3.3.2. The periphery uses the UART function
The sample code for using the python-periphery library for the UART function is as follows:
1 2 3 4 5 6 7 8 9 10 11 12 13 14 15 16 17 18 19 20 21 22 23 24 25 26 27 28 29 30 31 32 | """ python-periphery uart test """
from periphery import Serial
try:
# Apply for the serial port resource /dev/ttyS3, set the serial port baud rate to 115200, data bits to 8, no parity bit, stop bit to 1, no flow control
serial = Serial(
"/dev/ttyS3",
baudrate=115200,
databits=8,
parity="none",
stopbits=1,
xonxoff=False,
rtscts=False,
)
# Use the requested serial port to send byte stream data "python-periphery!\n"
serial.write(b"python-periphery!\n")
# To read the data received by the serial port, the function returns the condition that one of the two conditions is satisfied, first, 128 bytes are read, and second, the reading time exceeds 1 second
buf = serial.read(128, 1)
# Note: The data type read by Python is: bytes
# Print raw data
print("Received raw data:\n", buf)
# Transcode to gbk string, can display Chinese
data_strings = buf.decode("gbk")
# Print the read data volume and data content
print("Read up to {:d} bytes, print as string:\n {:s}".format(len(buf), data_strings))
finally:
# Release the requested serial port resources
serial.close()
|
Code description:
Line 6: Apply for UART resources, occupy uart3, and configure the corresponding working mode
Line 16: Use the applied serial port resources to send data
Line 19: Use the applied serial port resources to receive data, and the receiving method is blocking reception
Lines 23~29: Print out the read data
Line 32: Release UART resource, release uart3
3.3.2.1. Experimental operation
The experimental operation is the same as above.
The sample code uses the LubanCat 2 board, and the operation is as follows:
# Confirm that the python-periphery package is installed
# Confirm that the UART device tree plugin is enabled
# Execute the following command in the directory where the board uart_test.py is located
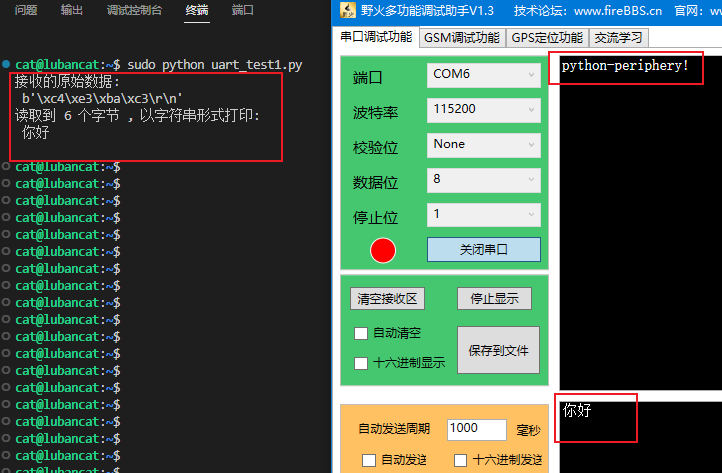
sudo python3 uart_test1.py
# You can see the programmed data in the program printed by the serial port assistant: Hello World!\n
After entering the command in the terminal, we edit the data to be sent in the serial port assistant and send it, that is, steps 3 and 4 in the figure.
After waiting for a timeout, you can see the received data printed out by the terminal: Hello
Since then, the experiment has been completed.
For more UART usage of python-periphery library, pay attention to: Periphery UART