
6. Screen Display - Pygame
Our Lubancat boards support a variety of display devices, and the boards generally have HDMI interfaces and MIPI DSI interfaces.
6.1. Introduction to the Pygame library
Pygame is a tool for developing games in the Python library. Perhaps it is a bit restrictive to use Pygame. Pygame can be used not only for game development, but also for display processing, multimedia device processing, etc. The library provides many multimedia and display device operation functions. The display module provides various functions to control the Pygame display interface (display). This chapter will use this module for screen display.
6.2. Experiment preparation
6.2.1. Add screen resources
# Enter the following command in the terminal to view the display device resources:
cat@lubancat:~$ ls /dev/dri/card*
/dev/dri/card0  /dev/dri/card1

# After connecting the screen, there will be:
cat@lubancat:~/lcd$ ls /dev/fb*
/dev/fb0
The example of display device resources on the board is for reference only (take LubanCat 2, ubuntu image as an example):
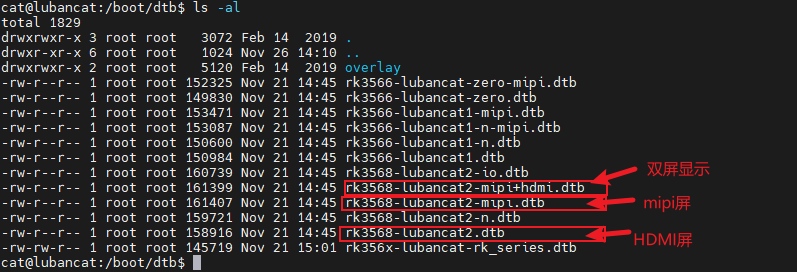
The default is to use the rk3568-LubanCat 2.dtb device tree, and select the corresponding device tree by creating a soft connection:
#You must first switch to the boot directory
cd /boot
#Switch device tree for mipi screen
ln -sf dtb/rk3568-LubanCat 2-mipi.dtb rk-kernel.dtb
#Reboot to use mipi screen
sudo reboot
For more information on screen display, please refer to “Screen” .
6.2.2. Hardware connection
For the hardware connection section, you need to make reference adjustments to the content of this chapter according to your own development environment and other conditions. The experiment here is to connect the mipi screen (5.5 inches) to the LubanCat 2 board, and the board system has a desktop.
6.2.3. Pygame library installation
We use the apt tool to install.
# Enter the following command in the terminal to install the Pygame library:
sudo apt -y install python3-pygame
# If it was installed before, there is no need to reinstall
6.2.4. The Pygame library uses
After installing the corresponding library, we can use the installed Pygame library to write some test code.
Although the display driver is DRM, the driver also implements the simulated FB device. Before testing, we can simply use Linux Framebuffer. The Pygame library uses the Linux Framebuffer mechanism to realize the function of adjusting the display device. The Linux Framebuffer maps each point on the screen into a linear memory space. The program can simply change the value of this memory to change the color of a certain point on the screen. You can use the following commands to continuously write random data to /dev/fb0, making the screen blurry.
# Enter the following command in the terminal to test:
cat /dev/urandom > /dev/fb0
For more usage, please refer to “Screen Display (framebuffer)” 。
6.3. Test code one
The test code is as follows:
1 2 3 4 5 6 7 8 9 10 11 12 13 14 15 16 17 18 19 20 21 22 23 24 25 26 27 28 29 | """ Screen display test using pygame """
import os
import sys
import time
import pygame
# Setting up the system environment, no mouse.
os.environ["SDL_NOMOUSE"] = "1"
# Initialize display device
pygame.display.init()
# Set the range of the display window to the screen size and return a screen object
screen = pygame.display.set_mode((448,418))
# Set window name
pygame.display.set_caption("test")
# Load images using the pygame image module
ball = pygame.image.load("test.png")
# Bitwise copy image to window
screen.blit(ball,(0,0))
# Refresh window
pygame.display.flip()
time.sleep(5)
sys.exit()
|
The above code will display the image below on a window on the mipi display:

6.3.1. Experimental procedure
Upload the test code and test pictures in the supporting code Lcd directory to the same directory of the development board:
# Enter the following command in the terminal, because access to hardware pays attention to sudo permission:
sudo python3 lcd_test1.py
6.4. Test code two
1 2 3 4 5 6 7 8 9 10 11 12 13 14 15 16 17 18 19 20 21 22 23 24 25 26 27 28 29 30 31 32 33 34 35 36 37 38 39 40 41 42 43 44 45 46 47 48 49 50 51 52 53 54 55 56 57 58 59 60 61 62 63 | """ Screen testing with pygame """
import os
import sys
import time
import pygame
class PyScope:
""" Define a PyScope class for screen testing """
screen = None
def __init__(self):
"The initialization method of the PyScope class, using framebuffer to construct the image buffer that pygame will use"
# Set the system environment to no mouse mode
#os.environ["SDL_NOMOUSE"] = "1"
pygame.display.init()
# Create, set the window size used by pygame
self.screen = pygame.display.set_mode((600,600))
#Set window title
pygame.display.set_caption('lcd_test2.py')
# Fill background color to gray
self.screen.fill((156,156,156))
# Initialize the font library
pygame.font.init()
# Use the default font to display English
font=pygame.font.Font(None,32)
text=font.render("Hello!",True,(255,255,255))
self.screen.blit(text,(100,100))
# Display text using default font
text=font.render("Display Test!",True,(255,0,0))
self.screen.blit(text,(100,150))
# Update screen content
pygame.display.flip()
def __del__(self):
"This method will be called when exiting the pygame library, you can add resource release operations here"
pygame.display.quit()
def test(self):
while True:
# Loop to get events, listen to events
for event in pygame.event.get():
# Determine whether the user mouse clicked the close button
if event.type == pygame.QUIT:
#Uninstall all modules
pygame.quit()
#Terminate program
sys.exit()
#Update screen content
#pygame.display.flip()
# Create a test instance and start testing
scope = PyScope()
# Call the test method of the scope class
scope.test()
|
The code function simply looks at the comments above. In the __init__ method, the window display will be initialized, and finally the code will display two lines of English in the pop-up window.
6.4.1. Experimental procedure
Upload the test code in the supporting code Lcd directory to any directory of the development board:
# Enter the following command in the terminal:
sudo python3 lcd_test2.py
After the command is executed, a pop-up window will appear on the system desktop, and the window can be closed by clicking the mouse or closing the program.
6.5. Reference
This chapter does not introduce the use of the basic functions of the display module in detail. For more functions of the Pygame display module, please refer to Pygame display .
For the use of Python Pygame library, please refer to Pygame tutorial .