
3. Handwritten digit recognition – PaddlePaddle
3.1. PaddlePaddle Introduction

Based on Baidu’s years of deep learning technology research and business applications, PaddlePaddle integrates deep learning core training and reasoning frameworks, basic model libraries, end-to-end development kits, and rich tool components. It is China’s first self-developed, feature-rich , Open source and open industry-level deep learning platform.
PaddlePaddle has gathered 4.77 million developers, created 560,000 models based on PaddlePaddle, and served 180,000 enterprises and institutions. PaddlePaddle helps developers quickly realize AI ideas, innovate AI applications, and as a basic platform supports more and more industries to realize industrial intelligent upgrading. As of December 2022, the latest report of the Institute of Communication Communications shows that PaddlePaddle has become the deep learning framework and enabling platform with the largest application scale in China’s deep learning market. It has gathered 5.35 million developers and served 200,000 enterprises and institutions. It is based on PaddlePaddle 670,000 models were obtained.
We will complete a simple handwritten digit recognition task based on PaddlePaddle and deploy it to the Lubancat board. Through this chapter, you can simply understand the PaddlePaddle and the deep learning model.
提示
Test environment: lubancat board uses Debian10, PC is ubuntu20.04. PaddlePaddle is the CPU version, rknn-Toolkit2 version 1.4.0.
3.2. Install PaddlePaddle
# Use the pip3 tool on the PC side to install the Flying Paddle CPU version
pip3 install paddlepaddle -i https://mirror.baidu.com/pypi/simple

# Verify the installation, enter the python interpreter, and enter:
python
import paddle
paddle.utils.run_check()

# Verify installation, print version information
print(paddle.__version__)

# Finally, it shows that PaddlePaddle is installed successfully! Let's start deep learning with PaddlePaddle now.
# Indicates that the installation was successful
For detailed installation of paddlepaddle, please refer to Installation Tutorial.
3.3. Handwritten digit recognition task
The task of recognizing handwritten digits is one of the most widely used examples in the field of machine learning, and it is a relatively simple model that is very suitable for beginners. For the overall process of the task, refer to the picture below (picture from Paddle tutorial):
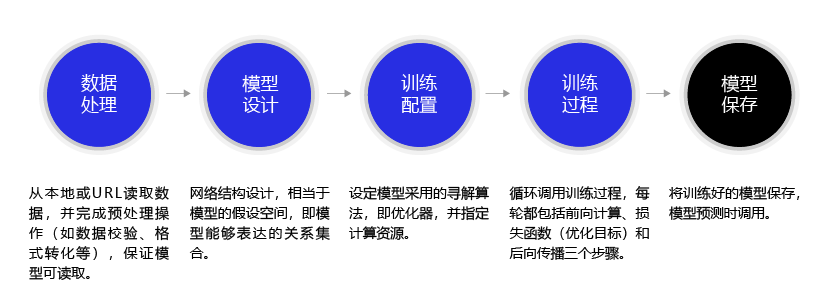
3.3.1. Prepare training and test sets
Handwritten digit recognition uses grayscale images to represent the digits written by different people. The size of each picture is 28*28. We use the MNIST data set. You can go to the official website http://yann.lecun.com/exdb/mnist/ to download it, or we load MNIST directly using Paddle.
Here we load the MNIST training set (mode=’train’) and test set (mode=’test’). The training set is used to train the model, and the test set is used to evaluate the effect of the model.
# Download the dataset and initialize the DataSet
train_dataset = paddle.vision.datasets.MNIST(mode='train', transform=transform)

test_dataset = paddle.vision.datasets.MNIST(mode='test', transform=transform)
3.3.2. Model networking
In the process of digital recognition, LeNet, the built-in model of Flying Paddle, is directly used. Using the high-level API, the network construction and initialization of LeNet can be completed with one line of code, and the network can also be customized. For details, please refer to https://www.paddlepaddle.org.cn/documentation/docs/zh/guides/beginner/model_cn.html
# Model network and initialize the network,
lenet = paddle.vision.models.LeNet(num_classes=10)
model = paddle.Model(lenet)
#paddle.summary(lenet,(1, 1, 28, 28))
The LeNet model contains 2 Conv2D convolutional layers, 2 ReLU activation layers, 2 MaxPool2D pooling layers, and 3 Linear fully connected layers. Cancel the comment above the line.``paddle.summary(lenet,(1, 1, 28, 28)) `` Print the structure and parameter statistics of the network:
---------------------------------------------------------------------------
Layer (type)       Input Shape          Output Shape         Param #
===========================================================================
Conv2D-1       [[1, 1, 28, 28]]      [1, 6, 28, 28]          60
ReLU-1        [[1, 6, 28, 28]]      [1, 6, 28, 28]           0
MaxPool2D-1     [[1, 6, 28, 28]]      [1, 6, 14, 14]           0
Conv2D-2       [[1, 6, 14, 14]]     [1, 16, 10, 10]         2,416
ReLU-2       [[1, 16, 10, 10]]     [1, 16, 10, 10]           0
MaxPool2D-2    [[1, 16, 10, 10]]      [1, 16, 5, 5]            0
Linear-1          [[1, 400]]            [1, 120]           48,120
Linear-2          [[1, 120]]            [1, 84]            10,164
Linear-3          [[1, 84]]             [1, 10]              850
===========================================================================
Total params: 61,610
Trainable params: 61,610
Non-trainable params: 0
---------------------------------------------------------------------------
Input size (MB): 0.00
Forward/backward pass size (MB): 0.11
Params size (MB): 0.24
Estimated Total Size (MB): 0.35
---------------------------------------------------------------------------
3.3.3. Model Training and Evaluation
Model training includes multi-round iterations (EPOCH), which traversed through a training data set per round, and each time is obtained from a small batch (mini-batch) sample, and the prediction value is obtained before the model execution, and calculate the loss functional values (LOSS) between Predict_label and true values (True_label). Perform the gradient reverse propagation and update the parameters of the model based on the set optimization algorithm. Observe the decrease in the LOSS value of each round of iteration, and the model training effect can be judged.
# Set the optimizer and its learning rate, and pass the parameters of the network into the optimizer, set the loss function and accuracy calculation method
# OPTIMIZER , find the best solution method; LOSS loss function; Metric evaluation index
# Here the configuration uses an ADAM optimizer, and the cross -entropy loss function CrosSEntropyLoss is used for classification task assessment.
model.prepare(paddle.optimizer.Adam(parameters=model.parameters()),
            paddle.nn.CrossEntropyLoss(),
            paddle.metric.Accuracy())

# Model training, epoch training round, batch_size batch size, Verbose = 1 log in the log in training process.
model.fit(train_dataset, epochs=5, batch_size=64, verbose=1)

# Model assessment, send the test dataset into the training model for evaluation, get the predicted value.
# Calculate the loss functional value (LOSS) between the calculation of the predicted value and the real value.
# And calculate the evaluation index value (Metric) to evaluate the model effect.
model.evaluate(test_dataset, batch_size=64, verbose=1)
3.3.4. Model saving and exporting onnx model
The well -trained model can be saved into the file. When the training is required for training or inference deployment, load (load) to the memory.
1 2 3 4 5 6 7 8 9 10 11 12 13 14 | # Save the model
model.save('./output/mnist')
# Load the model
model.load('output/mnist')
# Take out a picture from the test concentration
img, label = test_dataset[0]
# Transform the picture shape from 1*28*28 to 1*1*28*28, add a BATCH dimension to match the model input format requirements
img_batch = np.expand_dims(img.astype('float32'), axis=0)
# Perform the reasoning and print the results. Here, the Predict_batch returns a list, which is taken out of the data to get the predictive results
out = model.predict_batch(img_batch)[0]
pred_label = out.argmax()
print('true label: {}, pred label: {}'.format(label[0], pred_label))
|
After the Paddle model training, it only needs to call the paddle.onnx.export interface to convert to the onnx protocol, and the onnx model will be generated under the specified path. You can also save the Paddle model to the deployment model (static graph model), and then use the Paddle2onnx command line to convert. For the principle of conversion, please refer to <https://www.paddlepaddle.org.cn/documentation/docs/zh/guides/principle_cn.html> _.
# The path to be preserved, the current onnx directory
save_path = 'onnx/lenet'
# Specify the input shape and data type for the model
x_spec = paddle.static.InputSpec([1, 1, 28, 28], 'float32', 'x')
# Generate onnx model
paddle.onnx.export(lenet, save_path, input_spec=[x_spec], opset_version=11)
3.3.5. Complete program
1 2 3 4 5 6 7 8 9 10 11 12 13 14 15 16 17 18 19 20 21 22 23 24 25 26 27 28 29 30 31 32 33 34 35 36 37 38 39 40 41 42 43 44 45 | import paddle
import numpy as np
from paddle.vision.transforms import Normalize
transform = Normalize(mean=[127.5], std=[127.5], data_format='CHW')
# Download the dataset and initialize
train_dataset = paddle.vision.datasets.MNIST(mode='train', transform=transform)
test_dataset = paddle.vision.datasets.MNIST(mode='test', transform=transform)
# Model group network and initialize the network
lenet = paddle.vision.models.LeNet(num_classes=10)
model = paddle.Model(lenet)
# Model training configuration preparation, preparation of loss functions, optimizers and evaluation indicators
model.prepare(paddle.optimizer.Adam(parameters=model.parameters()),
paddle.nn.CrossEntropyLoss(),
paddle.metric.Accuracy())
# Model training
model.fit(train_dataset, epochs=5, batch_size=64, verbose=1)
# Model assessment
model.evaluate(test_dataset, batch_size=64, verbose=1)
# Save the model
model.save('./output/mnist')
# Load the model
# model.load('output/mnist')
# Take out a picture from the test concentration
img, label = test_dataset[0]
# Transform the picture shape from 1*28*28 to 1*1*28*28, add a BATCH dimension to match the model input format requirements
img_batch = np.expand_dims(img.astype('float32'), axis=0)
# Perform the reasoning and print the results. Here, the Predict_batch returns a list, which is taken out of the data to get the predictive results
out = model.predict_batch(img_batch)[0]
pred_label = out.argmax()
print('true label: {}, pred label: {}'.format(label[0], pred_label))
# The path to be preserved
save_path = 'onnx/lenet'
# Specify the input shape and data type for the model
x_spec = paddle.static.InputSpec([1, 1, 28, 28], 'float32', 'x')
# Generate onnx model
paddle.onnx.export(lenet, save_path, input_spec=[x_spec], opset_version=11)
|
Simple test shows:
The loss value printed in the log is the current step, and the metric is the average value of previous steps.
Epoch 1/5
step 938/938 [==============================] - loss: 0.0117 - acc: 0.9368 - 19ms/step
Epoch 2/5
step 938/938 [==============================] - loss: 0.0072 - acc: 0.9778 - 18ms/step
Epoch 3/5
step 938/938 [==============================] - loss: 0.0521 - acc: 0.9814 - 19ms/step
Epoch 4/5
step 938/938 [==============================] - loss: 0.0047 - acc: 0.9848 - 19ms/step
Epoch 5/5
step 938/938 [==============================] - loss: 0.0208 - acc: 0.9857 - 19ms/step
Eval begin...
step 157/157 [==============================] - loss: 0.0011 - acc: 0.9843 - 8ms/step
Eval begin...
step 157/157 [==============================] - loss: 2.8939e-04 - acc: 0.9825 - 8ms/step
Eval samples: 10000
true label: 7, pred label: 7
I0209 16:10:02.397411  8350 interpretercore.cc:279] New Executor is Running.
2023-02-09 16:10:02 [INFO]      Static PaddlePaddle model saved in onnx/paddle_model_static_onnx_temp_dir.
[Paddle2ONNX] Start to parse PaddlePaddle model...
[Paddle2ONNX] Model file path: onnx/paddle_model_static_onnx_temp_dir/model.pdmodel
[Paddle2ONNX] Paramters file path: onnx/paddle_model_static_onnx_temp_dir/model.pdiparams
[Paddle2ONNX] Start to parsing Paddle model...
[Paddle2ONNX] Use opset_version = 11 for ONNX export.
[Paddle2ONNX] PaddlePaddle model is exported as ONNX format now.
2023-02-09 16:10:02 [INFO]      ONNX model saved in onnx/lenet.onnx.
3.3.6. Simulation reasoning and export RKNN model
Use the RKNN-Toolkit2 tool to convert and simulate the model:
1 2 3 4 5 6 7 8 9 10 11 12 13 14 15 16 17 18 19 20 21 22 23 24 25 26 27 28 29 30 31 32 33 34 35 36 37 38 39 40 41 42 43 44 45 46 47 48 49 | INPUT_SIZE = 28
IMG_PATH = 'test.jpg'
# Create RKNN execution objects, print information
#rknn = RKNN(verbose=True)
rknn = RKNN()
# Configuration model input, for the pre -processing of NPU on data input
# Mean_values: The average value of input
# STD_VALUES: The normalized value of the input
# target_platform: target platform
# More settings refer to the RKNN Toolkit2 user guidance manual
print('--> Config model')
rknn.config(mean_values=[127.5], std_values=[127.5], target_platform='rk3568')
# Load the ONNX model
print('--> Loading model')
rknn.load_onnx(model='./lenet.onnx')
print('done')
print('--> Building model')
ret = rknn.build(do_quantization=False)
print('done')
# Initialize the running environment of the RKNN, run the test
print('--> Init runtime environment')
ret = rknn.init_runtime()
print('done')
# Enter image processing
img = cv2.imread(IMG_PATH)
img = cv2.cvtColor(img, cv2.COLOR_RGB2GRAY)
img = cv2.resize(img,(28,28))
img = np.expand_dims(img, 0)
img = np.expand_dims(img, 0)
# Simulation reasoning
print('--> Running model')
outputs = rknn.inference(inputs=[img], data_format='nchw')
print("result: ", outputs)
print("The forecast number is:", np.argmax(outputs))
# Export RKNN model file
print('--> Export rknn model')
rknn.export_rknn('./lenet.rknn')
print('done')
# Release RKNN
rknn.release()
|
Simple conversion and reasoning test results:
1 2 3 4 5 6 7 8 9 10 11 12 13 14 15 16 17 18 | W __init__: rknn-toolkit2 version: 1.4.0-22dcfef4
--> Config model
--> Loading model
done
--> Building model
done
--> Init runtime environment
W init_runtime: Target is None, use simulator!
done
--> Running model
Analysing : 100%|█████████████████████████████████████████████████| 11/11 [00:00<00:00, 1931.24it/s]
Preparing : 100%|██████████████████████████████████████████████████| 11/11 [00:00<00:00, 360.11it/s]
result: [array([[-3.5175781, -4.140625 , -1.8232422, 0.5727539, 2.7480469,
-1.9824219, -7.9726562, -0.5292969, 3.46875 , 7.5039062]],
dtype=float32)]
The forecast number is: 9
--> Export rknn model
done
|
3.4. Board deployment reasoning
3.4.2. Reasoning test
Use the RKNN model transformed earlier, and then write a test program (you can also obtain files directly from the supporting example):
1 2 3 4 5 6 7 8 9 10 11 12 13 14 15 16 17 18 19 20 21 22 23 24 25 26 27 28 29 30 31 32 33 34 | IMG_PATH = '9.jpg'
RKNN_MODEL = 'lenet.rknn'
# Create RKNN
rknn_lite = RKNNLite()
# Import model
print('--> Load RKNN model')
ret = rknn_lite.load_rknn(RKNN_MODEL)
if ret != 0:
print('Load RKNN model failed')
exit(ret)
print('done')
# Init runtime environment
print('--> Init runtime environment')
ret = rknn_lite.init_runtime()
if ret != 0:
print('Init runtime environment failed!')
exit(ret)
print('done')
# load image
img = cv2.imread(IMG_PATH)
img = cv2.cvtColor(img, cv2.COLOR_RGB2GRAY)
img = cv2.resize(img,(28,28))
# runing model
print('--> Running model')
outputs = rknn_lite.inference(inputs=[img])
print("result: ", outputs)
print("The figures predicted this time are:", np.argmax(outputs))
rknn_lite.release()
|
Running program:
--> Load RKNN model
done
--> Init runtime environment
I RKNN: [11:37:03.185] RKNN Runtime Information: librknnrt version: 1.4.0 (a10f100eb@2022-09-09T09:07:14)
I RKNN: [11:37:03.185] RKNN Driver Information: version: 0.7.2
I RKNN: [11:37:03.185] RKNN Model Information: version: 1, toolkit version: 1.4.0-22dcfef4(compiler version: 1.4.0 (3b4520e4f@2022-09-05T20:52:35)), target: RKNPU lite, target platform: rk3568, framework name: ONNX, framework layout: NCHW
done
--> Running model
result:  [array([[-3.5429688 , -4.1445312 , -1.7900391 ,  0.57128906,  2.7421875 ,
        -2.015625  , -7.9882812 , -0.52734375,  3.4882812 ,  7.5234375 ]],
    dtype=float32)]
The figures predicted this time are: 9
3.5. Summarize
The above is a simple example. It is classified by writing digital data and MNIST by LENET opponents. Call the packaging and test interface to quickly complete the formation and prediction of the model for simple learning reference. If you want to build a model training step by step, you can refer to paddlepaddle zero basic practice deep learning <https://www.paddlepaddle.org.cn/tutorials/projectdetail/4676538> _.