
6. 串口通讯
本章配套视频介绍:

《30-在鲁班猫上使用UART串口》
https://www.bilibili.com/video/BV1us4y1v7fC/
本章主要讲解LubanCat系列板卡的40pin引脚中串口的基本使用。
6.1. 串口引脚关系
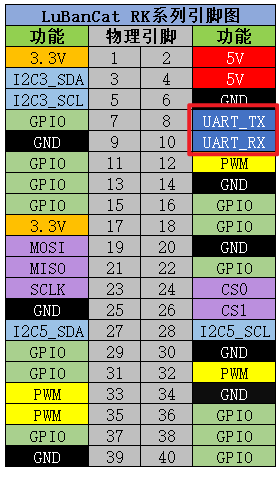
其中串口的引脚关系如下表所示:
串口 |
引脚 |
功能 |
|---|---|---|
TXD |
8 |
发送信号线 |
RXD |
10 |
接受信号线 |
对应实物的40pin接口如下:
LubanCat-Zero系列使用的是uart8。
LubanCat-1系列和LubanCat-2系列使用的是uart3。
虽然接口名字不一样,但是操作方式是一样的。
6.2. 使能串口接口
串口在默认情况是关闭状态的,需要使能才能使用。
6.2.1. 方法一
1 2 3 4 5 | #进入工具配置
sudo fire-config
#移动光标到下图的位置
#按确认键进入配置
|
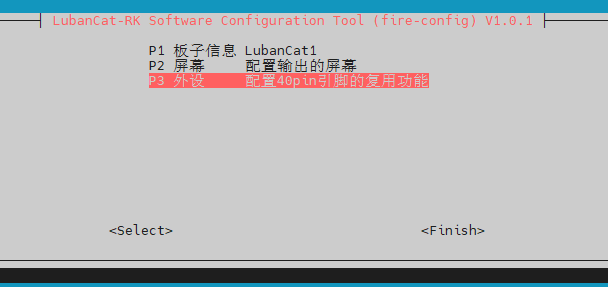
打开串口:
使用方向键移动光标到
UART。按 “空格键” 选中UART(出现 “*” ),如下图。
按 “确认键” 进行设置。
按 “Esc键” 退出到终端,运行 sudo reboot 进行重启应用。
6.2.2. 方法二
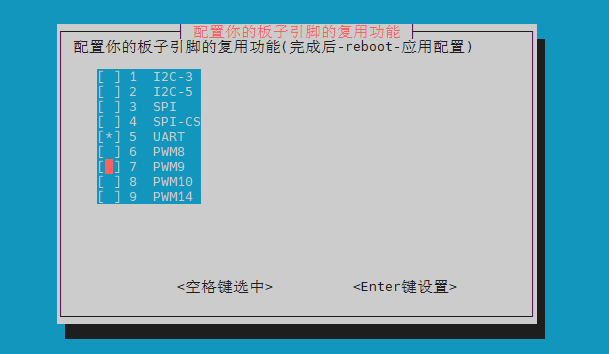
可以通过打开 /boot/uEnv/uEnv.txt ,查看是否启用了uart相关设备设备树插件。
编辑文件,将带有 uart (以uart3为例) 的那一行的注释符号去掉,如下图:
配置完成后重启激活配置。
注解
如果是直接拔电源的方式重启,会有可能出现文件没能做出修改 (原因:文件未能及时从内存同步到存储设备中,解决方法,在终端上输入 “sync” 再拔电关机)。
6.3. 检查串口设备
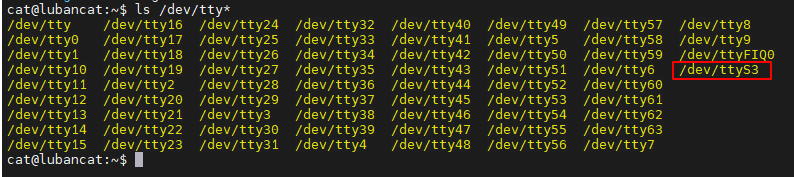
查看串口有没有成功使能
1 2 | #执行命令查看终端设备
ls /dev/tty*
|
LubanCat-Zero系列使用的是ttyS8。
LubanCat-1系列和LubanCat-2系列使用的是ttyS3。
如下图,此处为LubanCat-1对应ttyS3:
6.4. 串口通讯实验(Shell)
本次实验以LubanCat-1板卡讲解,其他板卡的操作和本实验类似,这里就不过多赘述了。 使用板卡上的串口3进行实验,对应的设备文件为/dev/ttyS3。 对tty的设备文件直接读写就可以控制设备通过串口接收或发送数据,下面我们使用板卡配合Windows下的串口调试助手或Linux下的minicom进行测试。
6.4.1. 连接串口
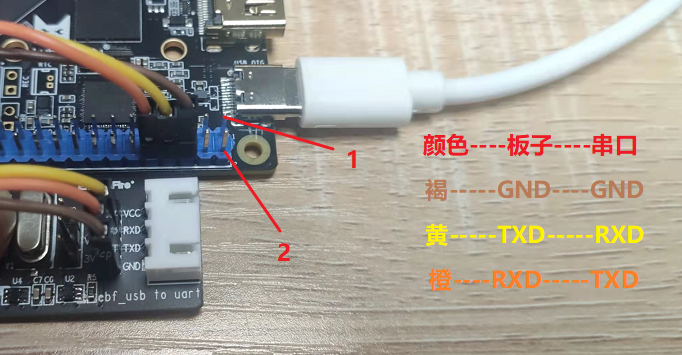
实验前需要使用串口线或USB转串口线把它与板卡与电脑连接起来。
1 2 3 4 | 板卡 - 电脑
TXD --- RXD
RXD --- TXD
GND --- GND
|
实物连接如下图:
6.4.2. 查询串口3的通信参数
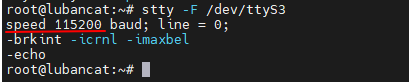
串口3外设使能后,在/dev目录下生成ttyS3设备文件,用stty工具查询其通信参数。
1 2 | #在板卡的终端执行如下命令
stty -F /dev/ttyS3
|
如下图:

6.4.3. 修改串口波特率
以修改波特率为115200为例:
1 2 | #设置通讯速率,其中ispeed为输入速率,ospeed为输出速率
stty -F /dev/ttyS3 ispeed 115200 ospeed 115200
|
如下图:
6.5. 与Windows主机通讯
配置好串口调试助手后,尝试使用以下命令测试发送数据:
1 2 3 4 5 | #在板卡上的终端执行以下指令
#使用echo命令向终端设备文件写入字符串"Hello!"、"I'm lubancat"
echo Hello! > /dev/ttyS3
echo "I'm lubancat" > /dev/ttyS3
#Windows上的串口调试助手会接收到内容
|
如下图:
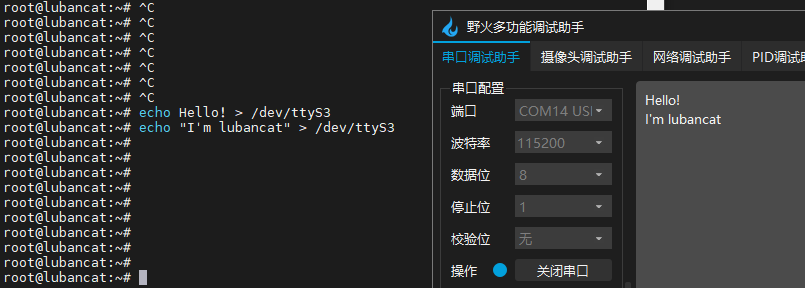
可以看到,往/dev/ttyS3设备文件写入的内容会直接通过串口线发送至Winodws的主机。
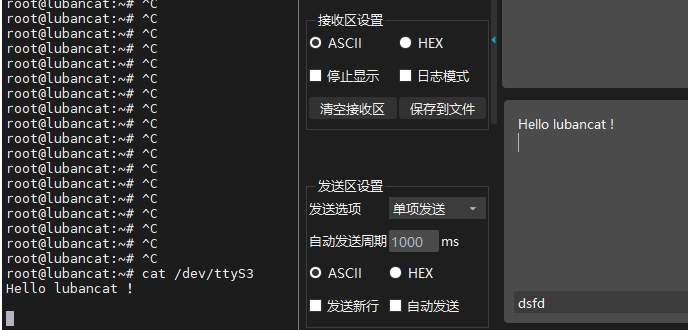
而读取设备文件则可接收Winodws主机发往板卡的内容,可以使用cat命令来读取:
1 2 3 4 5 6 7 | #在板卡上的终端执行如下指令
#使用cat命令读取终端设备文件
cat /dev/ttyS3
#cat命令会等待
#使用串口调试助手发送字符串
#字符串最后必须加回车!
#板卡的终端会输出接收到的内容
|
如下图:
6.6. 原始模式与规范模式
默认是需要发送换行符cat命令才能接收到数据的,如果要修改不需要换行符也能接收数据可使用以下命令:
1 2 3 4 5 6 7 8 9 | #切换为原始模式,关闭行缓冲,实时传输
stty -F /dev/ttyS3 raw
#更详细的命令,配置串口ttyS8 raw模式、9600波特率、8数据位、1停止位、无奇偶校验
stty -F /dev/ttyS3 raw speed 9600 cs8 -cstopb -parenb
#如需恢复,切换为规范模式
stty -F /dev/ttyS3 sane
|
Linux把串口当作“终端设备”来管理,默认启用规范模式,这个模式的核心特点是:
终端驱动会在底层缓冲输入的数据,不会立刻把数据传给cat这类读取程序。
只有当检测到换行符(n)、回车符(r)、EOF(结束符)等 “行终止符” 时,才会把缓冲的一整行数据一次性交给cat,此时才能在终端看到打印结果。
而原始模式特点是:
终端驱动不做任何缓冲、不解析任何字符,比如换行符、回车符都只是普通字节。
只要串口收到 1 个字节的数据,终端驱动就立刻把这个字节传给cat,cat读取后马上打印,实现 “实时监控”。
6.7. 使用minicom通讯
1 2 3 4 5 | #安装minicom软件包
sudo apt install minicom
#设置串口
sudo minicom -s
|
如下图:
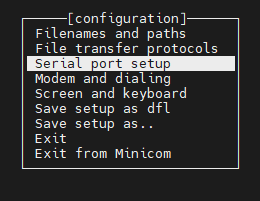
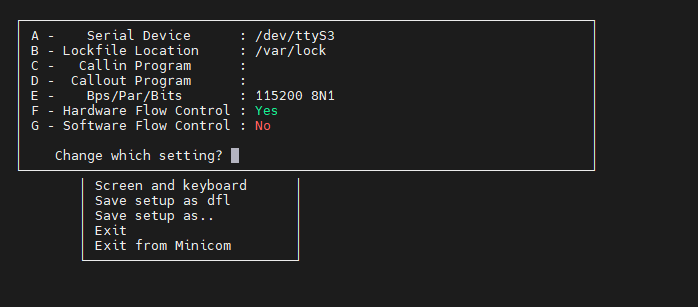
进入设置,修改串口或者波特率, 按键盘上的字母 进入各自要设置的东西,enter键确认。 如按下键盘的“A”,即可跳转到“A - Serial Device”配置行。
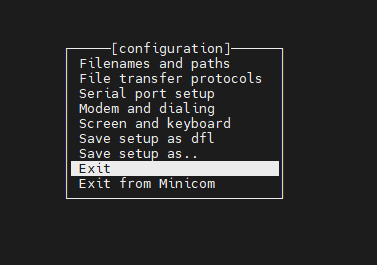
设置完成后,可以选择“Save setup as dfl”一行保存配置,保存后,以后再打开不用进行设置。
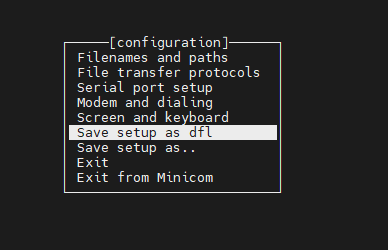
然后按exit键进入minicom的终端。
如果输入字母,屏幕上没反应,可以通过打开回显来显示, 先按“ctrl + A” 再按’z’键进入菜单。
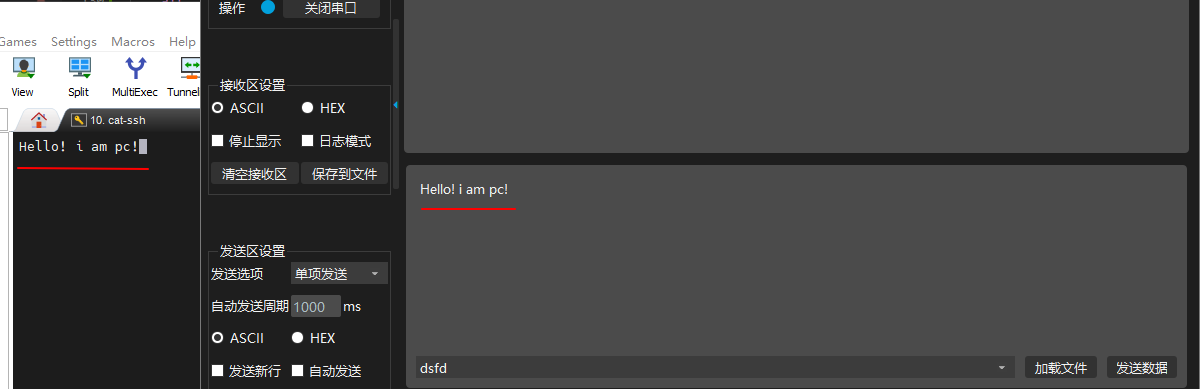
按下’e’,回显就打开成功了(左下角会有提示,打开或者关闭),可以按下按键测试一下,观察是否有回显。 我们还可以先按“ctrl + A” 再按’z’键,再按’c’键来清除屏幕, 将板卡和电脑用串口线连起来,同时设置为115200, 在板卡上,输入”Hello! i’m lubancat!’’

注意
使用minicom时,不能使用退格键把发出去的内容删掉, minicom是以单个字符的方式发送的。
在pc端发送文字,在板卡端能接收到相应信息。
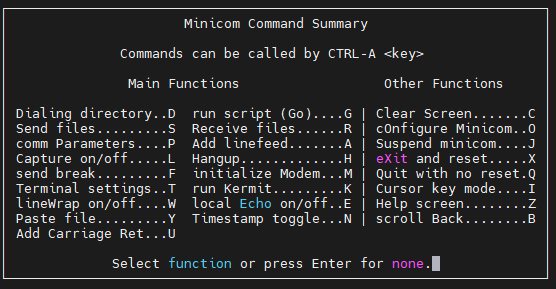
1 2 3 4 5 6 7 8 9 10 11 12 13 14 15 16 17 | minicom的菜单有很多功能,
s ---- 发送文件
p ---- 设置通讯参数,包括一些预设的波特率,数据格式,数据位等
l ---- 就可以将log信息保存到一个文件中了,方便查看
t ---- 设置终端参数,以及键位设置
w ---- 超出一行的数据后自动换行
r ---- 接收文件
a ---- 换行发送时会增加时间戳
n ---- 增加时间戳
c ---- 清除屏幕
o ---- 设置minicom,相当于sudo minicom -s
j ---- 休眠状态
x ---- 退出的同时复位
q ---- 退出
也可以不用通过按 "ctrl + a" + 'z' + '?'的方式设置
而是直接使用"ctrl + a" + '?'
|
6.8. 串口通讯实验(系统调用)
终端设备通过termios进行配置,同样串口终端也是通过termios配置。
6.8.1. termios结构体
内核源码/include/uapi/asm-generic/termbits.h 头文件中声明了串口终端相关数据结构。
termio结构体如下所示。
1 2 3 4 5 6 7 8 9 | #define NCCS 19
struct termio {
unsigned short c_iflag; /* input mode flags */
unsigned short c_oflag; /* output mode flags */
unsigned short c_cflag; /* control mode flags */
unsigned short c_lflag; /* local mode flags */
unsigned char c_line; /* line discipline */
unsigned char c_cc[NCC]; /* control characters */
};
|
termios编程相关函数如下。
1 2 3 4 5 6 7 8 9 10 11 12 13 14 15 16 17 18 19 20 21 22 23 24 25 26 27 28 29 30 31 32 33 34 35 36 37 38 | #include <termios.h>
#include <unistd.h>
//读取当前串口配置参数
int tcgetattr(int fd, struct termios *termios_p);
//设置串口配置参数
int tcsetattr(int fd, int optional_actions,const struct termios *termios_p);
//获取输入波特率
speed_t cfgetispeed(const struct termios *termios_p);
//获取输出波特率
speed_t cfgetospeed(const struct termios *termios_p);
//设置输入波特率
int cfsetispeed(struct termios *termios_p, speed_t speed);
//设置输出波特率
int cfsetospeed(struct termios *termios_p, speed_t speed);
//同时设置输入输出波特率
int cfsetspeed(struct termios *termios_p, speed_t speed);
//清空buffer数据
int tcflush(int fd, int queue_selector);
//等待所有输出都被发送
int tcdrain(int fd);
//在一个指定的时间区内发送连续的0位流
int tcsendbreak(int fd, int duration);
//用于对输入和输出流控制进行控制
int tcflow(int fd, int action);
//将终端设置为原始模式
void cfmakeraw(struct termios *termios_p);
|
6.8.2. 编写应用程序
6.8.2.1. 规范模式
根据上面介绍termios相关数据结构及函数,编写应用程序如下,以下为规范模式,需接收换行符才可打印数据:
1 | quick_start/uart/uart.c
|
代码较长复制粘贴容易乱序,可以下载我们提供的源码 uart.c
1 2 3 4 5 6 7 8 9 10 11 12 13 14 15 16 17 18 19 20 21 22 23 24 25 26 27 28 29 30 31 32 33 34 35 36 37 38 39 40 41 42 43 44 45 46 47 48 49 50 51 52 53 54 55 56 57 58 59 60 61 62 63 64 65 66 67 68 69 70 71 72 73 74 75 76 | #include <stdio.h>
#include <stdlib.h>
#include <unistd.h>
#include <fcntl.h>
#include <sys/stat.h>
#include <sys/types.h>
#include <termios.h>
#include <string.h>
#include <sys/ioctl.h>
//第一部分代码/
//根据具体的设备修改
const char default_path[] = "/dev/ttyS3";
int main(int argc, char *argv[])
{
int fd;
int res;
char *path;
char buf[1024] = "Embedfire tty send test.\n";
//第二部分代码/
//若无输入参数则使用默认终端设备
if (argc > 1)
path = argv[1];
else
path = (char *)default_path;
//获取串口设备描述符
printf("This is tty/usart demo.\n");
fd = open(path, O_RDWR);
if (fd < 0) {
printf("Fail to Open %s device\n", path);
return 0;
}
//第三部分代码/
struct termios opt;
//清空串口接收缓冲区
tcflush(fd, TCIOFLUSH);
// 获取串口参数opt
tcgetattr(fd, &opt);
//设置串口输出波特率
cfsetospeed(&opt, B9600);
//设置串口输入波特率
cfsetispeed(&opt, B9600);
//设置数据位数
opt.c_cflag &= ~CSIZE;
opt.c_cflag |= CS8;
//校验位
opt.c_cflag &= ~PARENB;
opt.c_iflag &= ~INPCK;
//设置停止位
opt.c_cflag &= ~CSTOPB;
//更新配置
tcsetattr(fd, TCSANOW, &opt);
printf("Device %s is set to 9600bps,8N1\n",path);
//第四部分代码/
do {
//发送字符串
write(fd, buf, strlen(buf));
//接收字符串
res = read(fd, buf, 1024);
if (res >0 )
//给接收到的字符串加结束符
buf[res] = '\0';
printf("Receive res = %d bytes data: %s\n",res, buf);
} while (res >= 0);
printf("read error,res = %d",res);
close(fd);
return 0;
}
|
最后使用直接使用gcc进行编译即可。
1 2 3 4 5 6 7 8 9 10 | #在板卡使用gcc编译
gcc -o uart uart.c
#运行
sudo ./uart
#如果板卡上没有安装gcc,可以使用以下命令安装
sudo apt install gcc
#也可以用交叉编译的方式编译出的文件拷贝到板卡上执行即可
|
6.8.2.2. 原始模式
根据上面介绍termios相关数据结构及函数,编写应用程序如下,以下为原始模式,无需接收换行符即可打印数据:
1 | quick_start/uart/uart_raw.c
|
代码较长复制粘贴容易乱序,可以下载我们提供的源码 uart_raw.c
1 2 3 4 5 6 7 8 9 10 11 12 13 14 15 16 17 18 19 20 21 22 23 24 25 26 27 28 29 30 31 32 33 34 35 36 37 38 39 40 41 42 43 44 45 46 47 48 49 50 51 52 53 54 55 56 57 58 59 60 61 62 63 64 65 66 67 68 69 70 71 72 73 74 75 76 77 78 79 80 81 82 83 84 85 86 87 88 89 90 91 92 93 94 95 96 97 98 99 100 101 102 103 104 105 106 107 108 109 110 | #include <stdio.h>
#include <stdlib.h>
#include <unistd.h>
#include <fcntl.h>
#include <sys/stat.h>
#include <sys/types.h>
#include <termios.h>
#include <string.h>
#include <sys/ioctl.h>
//第一部分代码/
//根据具体的设备修改
const char default_path[] = "/dev/ttyS3";
int main(int argc, char *argv[])
{
int fd;
int res;
char *path;
char buf[1024] = "Embedfire tty send test.\n";
//第二部分代码/
//若无输入参数则使用默认终端设备
if (argc > 1)
path = argv[1];
else
path = (char *)default_path;
//获取串口设备描述符
printf("This is tty/usart demo (Raw Mode).\n");
fd = open(path, O_RDWR | O_NOCTTY); // O_NOCTTY:不将串口设为控制终端
if (fd < 0) {
printf("Fail to Open %s device\n", path);
return -1;
}
//第三部分代码/
struct termios opt;
//清空串口接收缓冲区
tcflush(fd, TCIOFLUSH);
//获取串口参数opt
if (tcgetattr(fd, &opt) != 0) {
printf("Failed to get serial attributes\n");
close(fd);
return -1;
}
// -------------------------- 原始模式核心配置 --------------------------
// 关闭规范模式,取消行缓冲、回显、信号处理
// ICANON:关闭规范模式;ECHO/ECHOE:关闭回显;ISIG:关闭信号,如Ctrl+C
opt.c_lflag &= ~(ICANON | ECHO | ECHOE | ISIG);
// 关闭软件流控、回车/换行转换等输入处理
// IXON/IXOFF/IXANY:关闭软件流控;ICRNL/INLCR/IGNCR:取消回车<->换行转换
opt.c_iflag &= ~(IXON | IXOFF | IXANY | ICRNL | INLCR | IGNCR);
// 关闭输出处理,原始输出,不修改任何字符
opt.c_oflag &= ~OPOST;
// 设置读取规则:VMIN=1,至少读1个字符才返回,VTIME=0,无超时,阻塞等待
opt.c_cc[VMIN] = 1; // 最小读取字符数:有1个字符就返回
opt.c_cc[VTIME] = 0; // 超时时间:0表示无限阻塞,直到有数据
// ---------------------------------------------------------------------
//设置串口输出波特率
cfsetospeed(&opt, B9600);
//设置串口输入波特率
cfsetispeed(&opt, B9600);
// 设置数据位数:8位
opt.c_cflag &= ~CSIZE;
opt.c_cflag |= CS8;
// 校验位:无校验
opt.c_cflag &= ~PARENB;
opt.c_iflag &= ~INPCK;
// 停止位:1位
opt.c_cflag &= ~CSTOPB;
// 启用接收器,忽略调制解调器状态线
opt.c_cflag |= CREAD | CLOCAL;
// 更新配置,TCSANOW:立即生效
if (tcsetattr(fd, TCSANOW, &opt) != 0) {
printf("Failed to set serial attributes\n");
close(fd);
return -1;
}
printf("Device %s is set to 9600bps,8N1 (Raw Mode)\n", path);
//第四部分代码/
do {
// 发送字符串
write(fd, buf, strlen(buf));
// 接收字符串,原始模式下,有1个字符就会返回
res = read(fd, buf, sizeof(buf)-1); // 留1位给结束符,避免越界
if (res > 0) {
// 给接收到的字符串加结束符
buf[res] = '\0';
printf("Receive res = %d bytes data: %s\n", res, buf);
} else if (res < 0) {
perror("Read error");
break;
}
usleep(100000);
} while (res >= 0);
printf("Exit, res = %d\n", res);
close(fd);
return 0;
}
|
最后使用直接使用gcc进行编译即可。
1 2 3 4 5 6 7 8 9 10 | #在板卡使用gcc编译
gcc -o uart_raw uart_raw.c
#运行
sudo ./uart_raw
#如果板卡上没有安装gcc,可以使用以下命令安装
sudo apt install gcc
#也可以用交叉编译的方式编译出的文件拷贝到板卡上执行即可
|