1. Jupyter Notebook
1.1. Introduction to Jupyter Notebook
Jupyter Notebook is a web-based application for interactive computing. Due to the interactive nature of this tool, if we use this tool for software development, we can view the data changes after the code is executed in real time after each command is written. So in Python software development, Jupyter Notebook can be said to be a sharp tool.

The Jupyter Notebook application can run in a Linux environment, and it is also deployed on a server. Then the function of our Lubancat board is similar to that of a traditional PC, and it also works under the Linux environment. Naturally, we can also install Jupyter Notebook software on our Lubancat board and use it to develop our own Python programs.
Next, let’s install the Jupyter Notebook software.
1.2. Jupyter Notebook installation
1.2.1. Software Installation
Using the Lubancat board, you can easily install Jupyter Notebook with only two instructions.
重要
Subsequent operations are performed under the user user command.
# Enter the following command in the terminal:
sudo apt -y install ipython3
sudo apt -y install jupyter
ipython3 is a python interactive shell that we will use when using Jupyter Notebook to develop python applications.
Jupyter is the Jupyter Notebook application we are going to install.
Execute the above two commands in sequence and wait for the installation to complete.
1.2.2. Software configuration
Next we need to generate the configuration file for Jupyter Notebook. When we start Jupyter Notebook, the application starts the program according to the specific configuration.
Enter the following command in the terminal:
# Generate configuration files for Jupyter Notebook
jupyter notebook --generate-config

# After input, there will be the following prompt, and the configuration file is different according to the logged-in user:
Writing default config to: /home/cat/.jupyter/jupyter_notebook_config.py
In the prompt, the default configuration file has been generated in the currently logged in user directory --cat, then we open the corresponding configuration file to modify it according to this directory.
# Before modifying the configuration file, create the working directory of Jupyter Notebook
mkdir /home/cat/jupyter

# Open the configuration file with vim editor
vim /home/cat/.jupyter/jupyter_notebook_config.py
After opening the configuration file (press a to enter edit mode):
c.NotebookApp.allow_remote_access = True # Allow remote connections
c.NotebookApp.ip = '*' # Listen to all ip access
c.NotebookApp.notebook_dir = '/home/debian/jupyter' # The working directory of jupyter. If the directory does not exist, it must be created
c.NotebookApp.token = '' # Access without token key is not safe but convenient
In the default configuration, the options are commented by # by default, we only need to cancel the comments corresponding to the options that need to be modified. And modify the configuration according to the content of the above configuration, or directly add the above four lines and save it.
As an extra note, the directory specified in the c.NotebookApp.notebook_dir option is the working directory when Jupyter Notebook starts. This directory must exist, if it does not exist, please create it first!
1.2.3. Security Login Configuration
In the example of modifying the configuration file we provided for you, we have disabled the token login option by default, just for your convenience. This is an unsafe approach, because any user can log in to use the Jupyter Notebook service, and file security cannot be guaranteed.
If you need a safe production environment, you can follow the steps below, if not, skip this section:
# Enter the following command in the terminal:
ipython3

# In the started python editor type:
from notebook.auth import passwd

passwd()
# Enter password: appears, enter any password, and copy and save the generated key.
Out[2]: 'sha1:274e5a04060e:e65098703b7e03836b01c261b6ca6d959049a3e9'
# ctrl+z exit ipython3
# Open the configuration file with vim editor
vim /home/cat/.jupyter/jupyter_notebook_config.py

# Then comment the token configuration option
# c.NotebookApp.token = ''

# Add password to log in, fill in the password you just generated
c.NotebookApp.password = 'sha1:274e5a04060e:e65098703b7e03836b01c261b6ca6d959049a3e9'
Since the software has been installed, we can start Jupyter Notebook and use it.
1.3. Precautions before using Jupyter Notebook
重要
When using Jupyter Notebook to operate peripherals, be sure to refer to this section.
When we use Python to operate some peripheral hardware, root user privileges are required. Similarly, if you use Jupyter Notebook to operate some peripheral hardware, you also need root privileges. The solution then is to log in as root and start Jupyter Notebook as root.
It should be noted that the environment configuration will be checked when Jupyter Notebook starts, and different users have their own configuration files!
Therefore, before logging in to Jupyter Notebook as the root user, you need to go through the previous configuration process again as the root user.
That is: before starting Jupyter Notebook as the root user, you need to log in to the root user first,
And use the jupyter notebook --generate-config command as the root user to generate a configuration file and modify it to configure the Jupyter Notebook environment.
1.4. Jupyter Notebook uses
1.4.1. start software
Enter the following command to start the software.
# Enter the following command in the terminal to start Jupyter Notebook:
# Allow root users to use, do not open the browser when starting the software
jupyter notebook --no-browser --allow-root
After the software is started, the following prompt will be printed:

According to the prompt, we enter the corresponding URL in the browser to use the function of Jupyter Notebook.
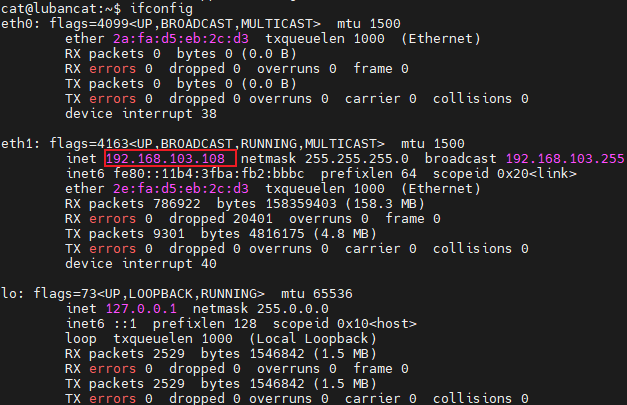
Take the LubanCat 2 board as an example: there are two network ports on the board, just plug in the network cable, and the computer and the board are in the same network segment:

Enter in the PC browser (the IP address depends on the actual board):
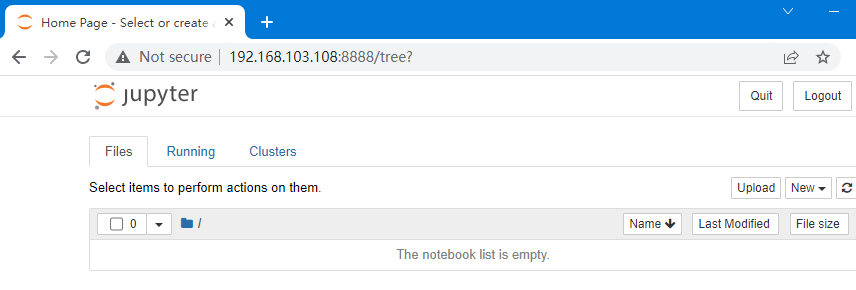
http://192.168.103.108:8888/ can visit Jupyter Notebook
Enter the created password, and then go to the login startup interface as shown in the figure:

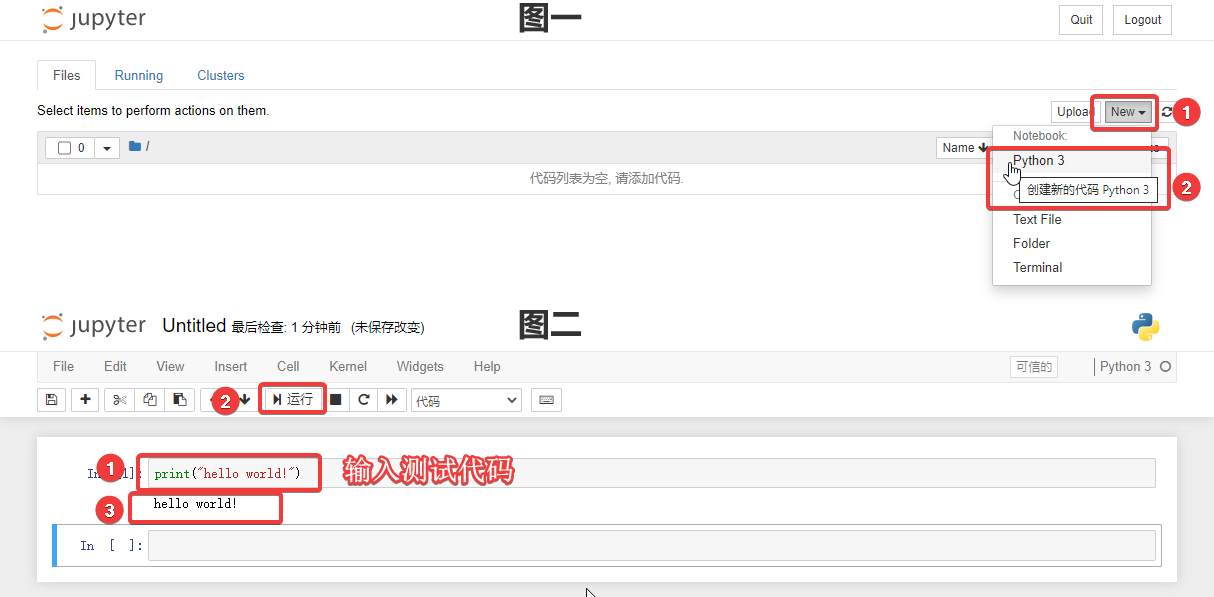
After starting, we can try to use Jupyter Notebook to write simple code for testing:

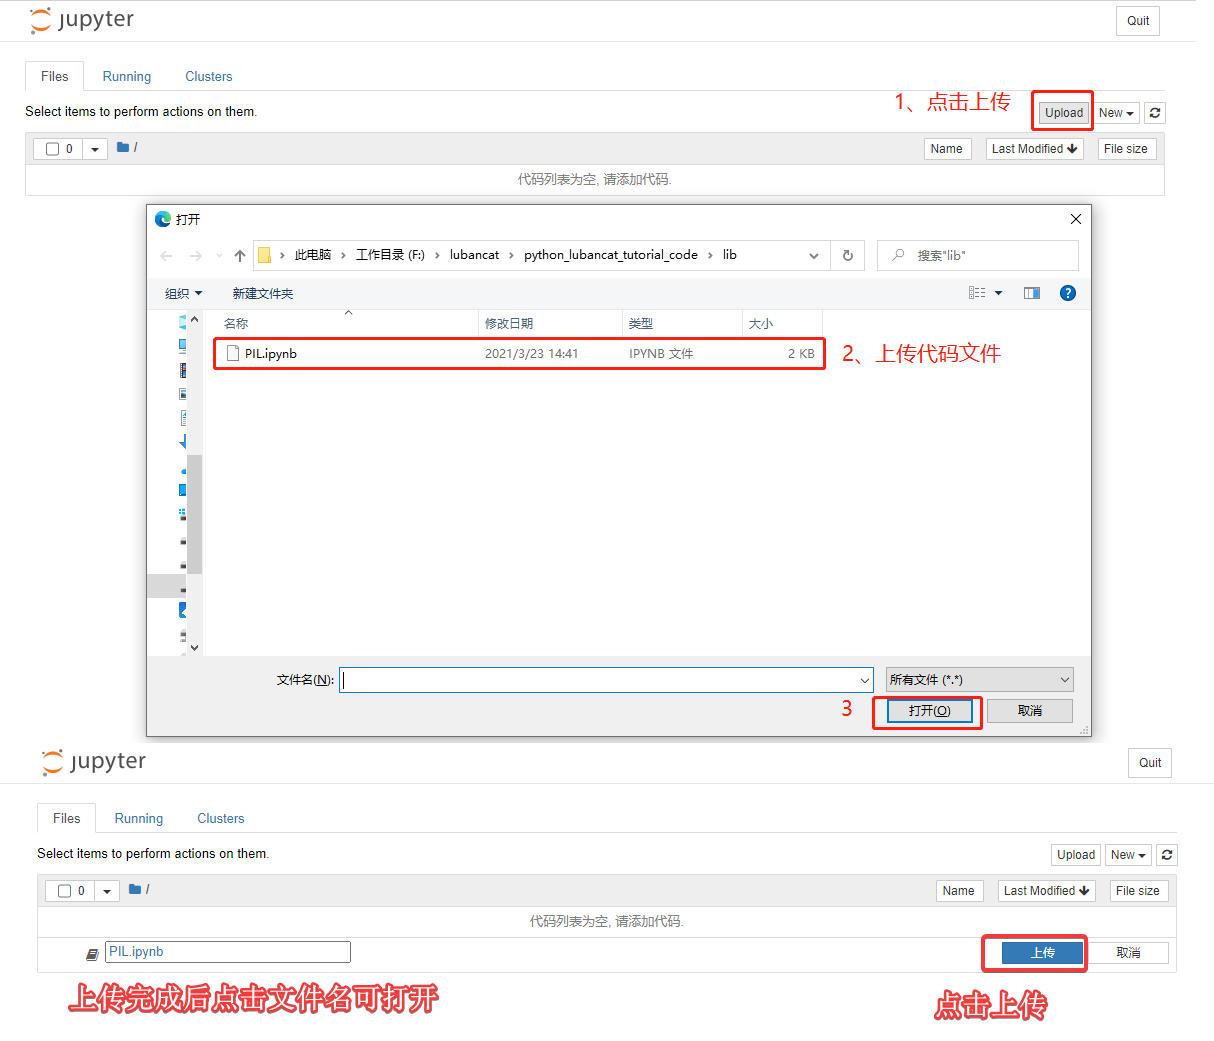
1.4.2. Upload code
Sometimes we can also use code written by others. We only need to download the corresponding file and upload it to jupyter to use it.

