
5. Web library - Flask
5.1. Introduction to the Flask library
Flask is one of the most common web frameworks for building web applications in Python, same as Django . The difference is that Flask is very lightweight, making it very easy to build basic web applications.
We can install the Python-flask library on the Lubancat board and use the library by writing some test code. Deploy a simple web page on our board.
5.2. Flask library installation
We use the apt tool to install.
# Enter the following command in the terminal to install the flask library:
sudo apt -y install python3-flask

#Or

pip3 install flask
Wait until the installation is complete.
5.3. Flask library usage
After installing the corresponding library, we can use the library to deploy a simple web page.
5.3.1. New project directory
Create a new directory first, which is convenient for project management, and the file directory is relatively simple.
# Create a new directory to store our web projects and enter the directory
mkdir webapp_flask &&  cd webapp_flask

# Create the directory of our webapp
mkdir -p app/static
mkdir app/templates
mkdir tmp
5.3.2. Add code file
5.3.2.1. __init__.py
Create a simple initialization script for our webapp_flask package, placed in the app directory we just created:
# Create a new __init__.py in the app directory
vim __init__.py
The content is as follows:
1 2 3 4 | from flask import Flask
app = Flask(__name__)
from app import view
|
5.3.2.2. views.py
In Flask, views are written as Python functions. Each view function maps to one or more requested URLs.
Let’s write the first view function views.py, the file is placed in the created app directory:
# Create a new view.py in the app directory
vim view.py
The content is as follows:
1 2 3 4 5 6 | from app import app
@app.route('/')
@app.route('/index')
def index():
return "Hello, Lubancat!"
|
5.3.2.3. run.py
The final step is to create a script that starts our application’s web server. This script is run.py, and put it in our webapp_flask directory, which is the top-level directory of the project webapp_flask:
# Create a new run.py in the webapp_flask directory
nano run.py
The content is as follows:
1 2 3 4 | #!usr/bin/python3
from app import app
# Debug mode, accessible via host address "192.168.103.108"访问
app.run(debug = True,host="192.168.103.108")
|
After run.py is created, some permissions need to be granted:
# Add permissions
chmod a+x run.py
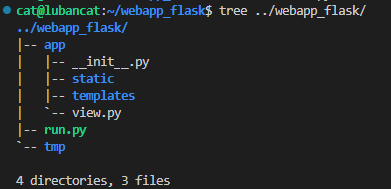
The final file directory organization is as follows:
5.3.3. Run webapp
After the above operations, one of our simplest webapps has been organized. Next, we can start the app and view the effect through the browser.
# run app
./run.py
The test code and its effects are as follows:
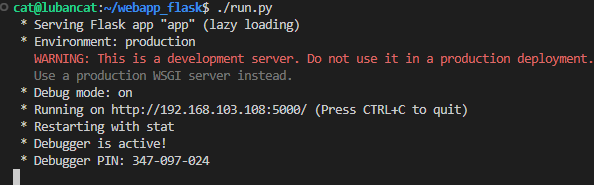
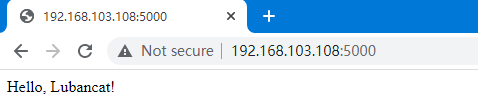
The app has started normally, and the terminal has printed out the service information. The information indicates that the web has been mapped to the host whose IP address is 192.168.103.108 and port number is 5000 that we set in the previous code. Therefore, we can access our deployed webpage http://192.168.103.108:5000/ through this URL.
You can upload the supporting code libdemo\Flask\webapp_flask directory to the lubancat board for testing.