
8. GUI library - PyQt5
This chapter will briefly introduce PyQt5, first use PyQt to create a simple desktop application, and then use Qt Creator on the Lubancat board for simple ui design. The following simple examples are for learning reference, and for more in-depth learning, see the reference materials.
Platform: Lubancat RK series board
System: Debian10 (with desktop)
Python version: Python3.7
Qt version: system default 5.11.3
PyQt version: PyQt5
8.1. Introduction to PyQt5 library
PyQt is a combination of Qt application framework and Python, and supports both Python2.x and Python3.x versions. This tutorial uses Python3.7 version and PyQt5 version.
PyQt5 is composed of a series of Python modules, more than 620 classes, 6000 functions and methods. It can run on mainstream operating systems such as Unix, Windows and MacOS. And due to the convenience of Python language development, it is more convenient than C++ when writing code. The fly in the ointment is that the execution efficiency of Python language will be slower than C++.
PyQt5 provides GPL version and commercial version certificates. Free developers can use the free GPL license. If you need to use PyQt for commercial applications, you must purchase a commercial license.
8.2. PyQt5 library installation
8.2.1. Qt library installation
We use the apt tool to install PyQt5 (or use pip to install):
# Install via the apt tool
sudo apt-get -y install python3-pyqt5

# Install via pip
pip3 install pyqt5

# qt library installation
sudo apt-get install qt5-default
After successful installation:
cat@lubancat:~$ python3
Python 3.7.3 (default, Oct 31 2022, 14:04:00)
[GCC 8.3.0] on linux
Type "help", "copyright", "credits" or "license" for more information.
>>> import PyQt5
>>>
Next, let’s test the operation of PyQt5 on the Lubancat board.
重要
It is used in the desktop system, please make sure to connect the desktop screen, HDMI or mipi screen before the experiment.
8.3. Basic use of PyQt5 library
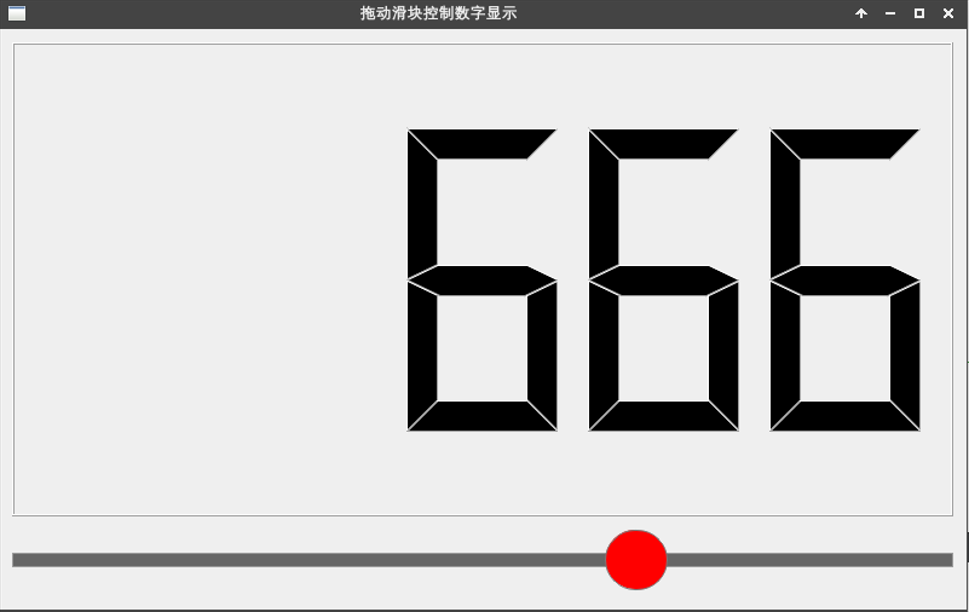
We will briefly introduce the writing of pyqt5 desktop applications through a PyQt5 application named pyqt5_demo.py. This application is mainly used to test the simple use of display, touch, signal, slot function, and some components of PyQt5 such as: QWidget, QLCDNumber, QSlider, QVBoxLayout, etc.
8.3.1. Import required modules
# Import the sys module, including some external parameters to the program, exit the program, obtain the system platform, system path and other operations
import sys
# Import some submodules of the QtWidgets module, QWidget class (user interface base class), QLCDNumber (display LCD-style numbers), QSlider (slider control)
# QVBoxLayout (vertical layout of controls, etc.) QApplication (manages control flow and main settings of GUI applications, etc.)
from PyQt5.QtWidgets import QWidget,QLCDNumber,QSlider,QVBoxLayout,QApplication
# Import PyQt5.QtCore.Qt, some basic functions and classes
from PyQt5.QtCore import Qt

# If you find it troublesome, you can replace it with ``*`` to import all the memory, for example:
from PyQt5.Qt import *
Commonly used modules include QtWidgets, QtCore, QtGui, etc. Among them, QtWidgets includes a set of UI element controls, which are used to establish an interface conforming to the system style, and the QtGui module covers a variety of basic graphic function classes (fonts, graphics, icons, colors). QtCore covers the core non-GUI interface functions (time, files, directories, data types, text streams, thread processes and other objects).
8.3.2. Create a class that will act as the main window
# Create a class called WinForm, based on QWidget
class WinForm(QWidget):
        # Initialization class
        def __init__(self):
            # Inherit the init of the parent class
            super().__init__()
            # Initialize the window itself
            self.initUI()

        def initUI(self):
            # Create the slider and LCD widgets first
            lcd = QLCDNumber(self)
            slider = QSlider(Qt.Horizontal, self)

            # Set the maximum value and default value of the slider, as well as the length and width, etc., set the default LCD style to display the value
            slider.setMaximum(1000)
            slider.setValue(666)
            slider.setMinimumWidth(200)
            slider.setFixedHeight(60)
            lcd.display(666)

            # Set the layout through QVboxLayout, vertical distribution
            vBox = QVBoxLayout()
            vBox.addWidget(lcd)
            vBox.addWidget(slider)

            self.setLayout(vBox)
            # valueChanged() is a signal function of Qslider. As long as the value of the slider changes, it will emit a signal, and then connect the receiving part of the signal through connect, which is lcd.
            slider.valueChanged.connect(lcd.display)

            style = "QSlider::groove:horizontal {border:1px solid #999999;height:10px;" \
                    "background-color:#666666;margin:2px 0;}" \
                    "QSlider::handle:horizontal {background-color:#ff0000;border:1px solid #797979;" \
                    "width:50px;margin:-20px;border-radius:25px;}" \

            # Set style
            slider.setStyleSheet(style)

            #self.setGeometry(0,0,800,480)
            # Set window title
            self.setWindowTitle("Drag the slider to control the digital display")
8.3.3. Create application
# name is the name of the current module, when the module directly runs as main, the following code block will run
if __name__ == '__main__':
    # Each application needs a QApplication instance, and sys.argv is to run the module to pass in the command line parameters, which can be empty.
    app = QApplication(sys.argv)
    # Control instance
    form = WinForm()
    # Set the size, then show the control
    form.resize(800, 480)
    form.show()
    # The program executes and enters the message event loop, and ends safely through the exit function
    sys.exit(app.exec_())
Create a QApplication instance, run the program, create a window form as the main window, and then display it.
8.3.4. Overall program
The overall code of pyqt5_demo.py is as follows:
1 2 3 4 5 6 7 8 9 10 11 12 13 14 15 16 17 18 19 20 21 22 23 24 25 26 27 28 29 30 31 32 33 34 35 36 37 38 39 40 41 42 43 44 | import sys
from PyQt5.QtWidgets import QWidget,QLCDNumber,QSlider,QVBoxLayout,QApplication
from PyQt5.QtCore import Qt
class WinForm(QWidget):
def __init__(self):
super().__init__()
self.initUI()
def initUI(self):
# Create the slider and LCD widgets first
lcd = QLCDNumber(self)
slider = QSlider(Qt.Horizontal, self)
slider.setMaximum(1000)
slider.setValue(666)
slider.setMinimumWidth(200)
slider.setFixedHeight(60)
lcd.display(666)
# Set the layout through QVboxLayout
vBox = QVBoxLayout()
vBox.addWidget(lcd)
vBox.addWidget(slider)
self.setLayout(vBox)
# valueChanged() is a signal function of Qslider. As long as the value of the slider changes, it will emit a signal, and then connect to the receiving part of the signal, which is lcd.
slider.valueChanged.connect(lcd.display)
style = "QSlider::groove:horizontal {border:1px solid #999999;height:10px;" \
"background-color:#666666;margin:2px 0;}" \
"QSlider::handle:horizontal {background-color:#ff0000;border:1px solid #797979;" \
"width:50px;margin:-20px;border-radius:25px;}" \
slider.setStyleSheet(style)
#self.setGeometry(0,0,800,480)
self.setWindowTitle("Drag the slider to control the digital display")
if __name__ == '__main__':
app = QApplication(sys.argv)
form = WinForm()
form.resize(800, 480)
form.show()
sys.exit(app.exec_())
|
The terminal directly runs our pyqt5_demo.py program:
sudo python3 pyqt5_demo.py
Display effect:
You can upload the supporting code directory ‘libdemo\PyQt5\pyqt5_demo.py’ to the development board for testing.
8.4. Qt Designer uses
In general, we use python programs to create our own interface applications, but as the application becomes larger or the interface becomes more complex, it may be cumbersome to define all widgets programmatically. In this case, Qt Designer can be used to specifically create the UI interface in the PyQt program. The following will introduce the use of Qt Designer to create a simple login UI interface.
# Install the Qt Creator tool via apt
sudo apt install qtcreator

# Install tools such as qt designer
sudo apt install qttools5-dev-tools
重要
When using Qt Creator in lubancat, when designing some complex interfaces, it will get stuck or get stuck directly, which may be due to insufficient memory. It is recommended to design ui or write pyqt5 programs in a virtual machine or PC, which can be run directly on the board.
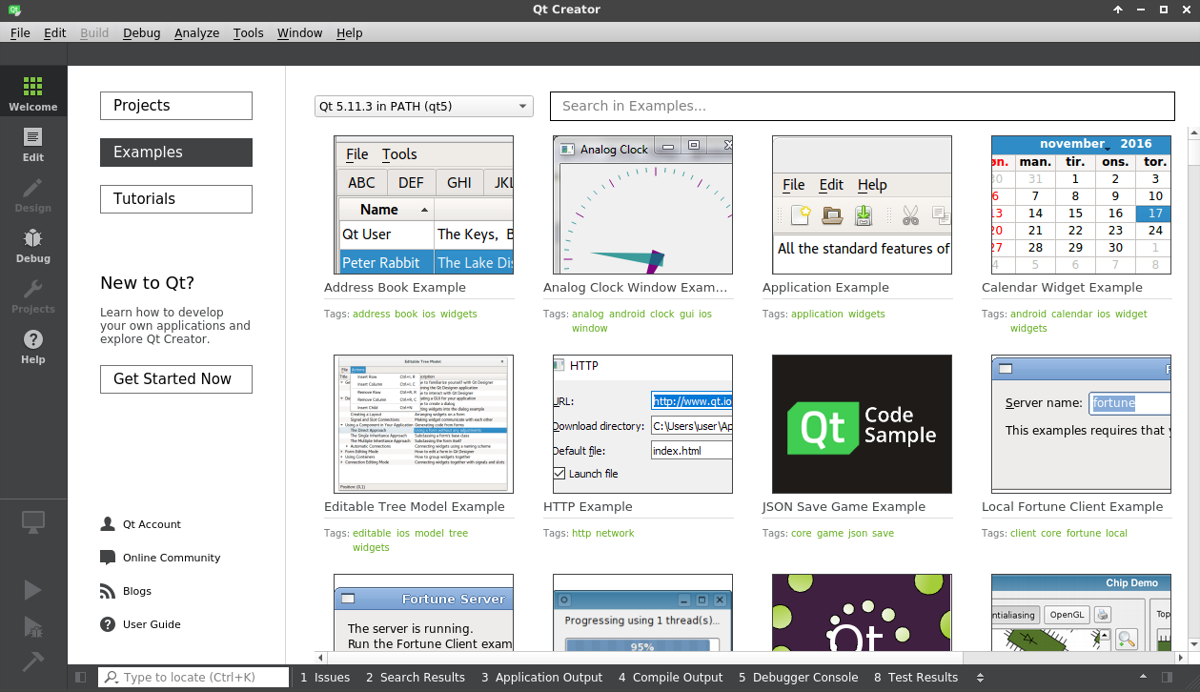
After installation, you can search for Qt Creator in the desktop menu, or open Qt Designer directly, and then open the application:
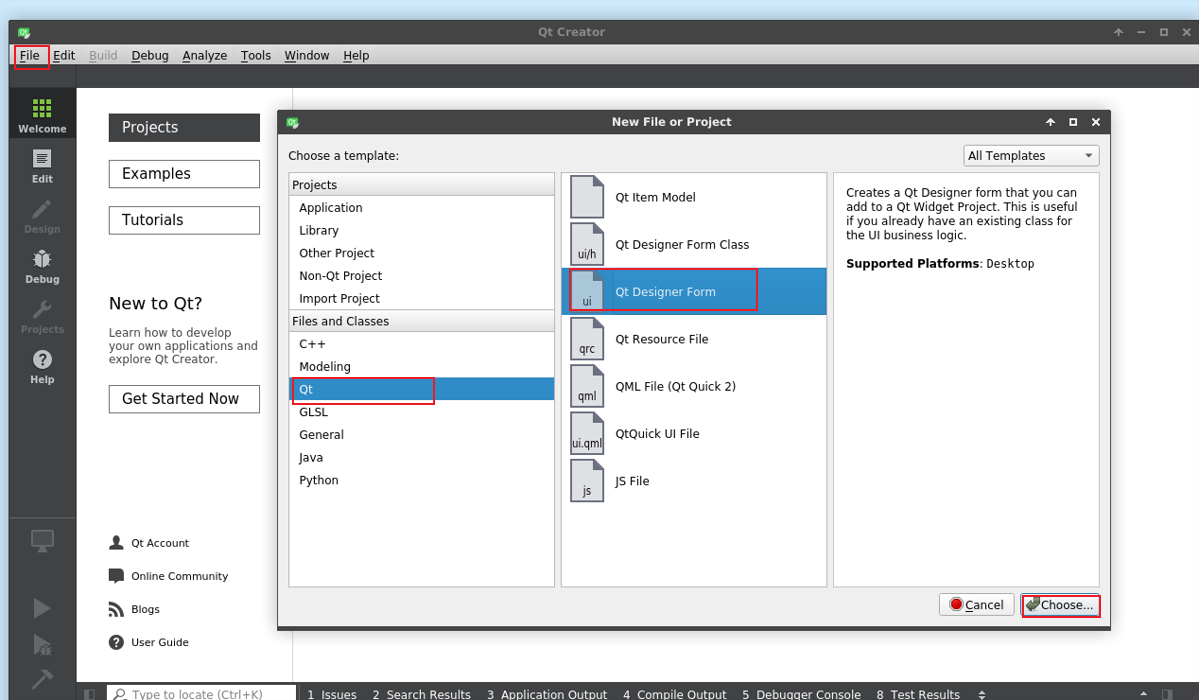
8.4.1. Create an interface UI file
Open Qt Creator and click file, select go to File -> New File or Project, in the Files and Classes column, click QT, select QT Designer Form,
Then set the created .ui file name, path, etc., as follows:
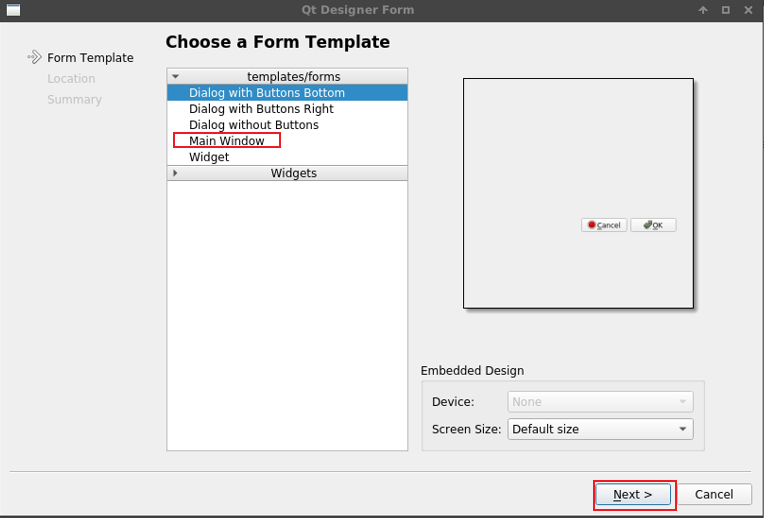
Then select Main Window or other, and finally set the file path and file name:
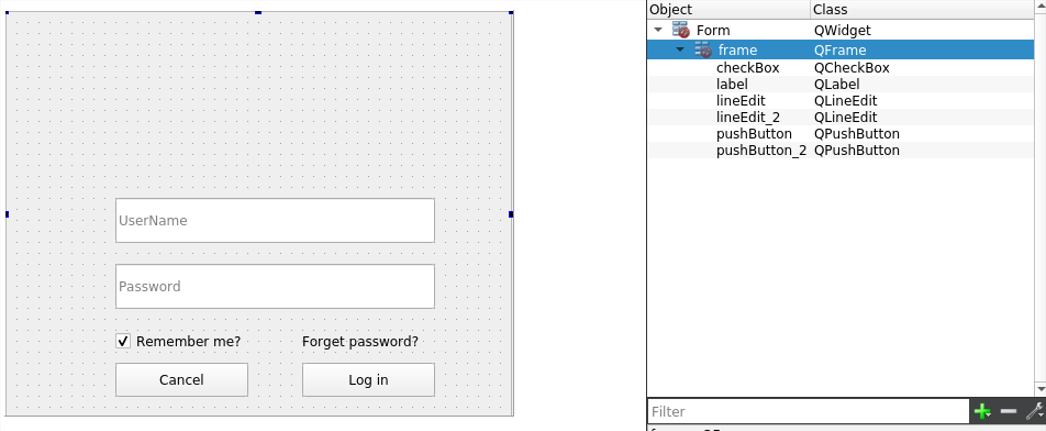
8.4.2. Interface construction
In the ui interface, add a container Frame to the canvas and adjust the size. Create a simple login interface that requires an account password field, use Input Widgets: Line Edit to log in and cancel using the button “Buttons: PushButton”. If you forget the password box, use the text field Display Widgets: TextLabe, remember the password, use Buttons: CheckBox, drag these controls to the window, set the name, and the layout is as follows:
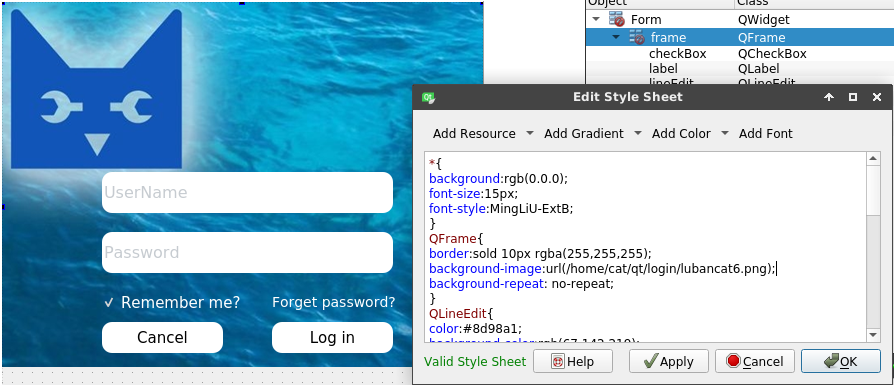
To set the style, right-click the entire container, select edit style shell, and fill in the following code. You can change the color, style, and choose the path of the background image according to your preferences. This is a simple configuration, and it looks okay:
*{
background:rgb(0, 0, 0);
font-size:15px;
font-style:MingLiU-ExtB;
}
QFrame{
border:sold 10px rgba(255,255,255);
background-image:url(/home/cat/qt/login/lubancat6.png);
}
QLineEdit{
color:#8d98a1;
background-color:rgb(0, 0, 0);
font-size:16px;
border-style:outset;
border-radius:10px;
font-style:MingLiU-ExtB;
}
QPushButton{
background:#ced1d8;
border-style:outset;
border-radius:10px;
font-style:MingLiU-ExtB;
}
QPushButton:pressed{
background-color:#405361;
border-style:inset;
font-style:MingLiU-ExtB;
}
QCheckBox{
background:rgba(85,170,255,0);
color:white;
font-style:MingLiU-ExtB;
}
QLabel{
background:rgba(85,170,255,0);
color:white;
font-style:MingLiU-ExtB;
font-size:14px;
}
提示
For the design of ui and the use of qt designer, you can refer to the Qt-related tutorials.
8.4.3. Call ui file
Using the .ui file designed by qt designer, you can directly use the uic module to import the ui file. Or convert the .ui file into a python module and import it directly.
Import the .ui file directly using the uic module:
1 2 3 4 5 6 7 8 9 10 11 12 13 14 15 16 17 | import sys
from PyQt5.QtWidgets import QApplication, QMainWindow
from PyQt5 import uic
class LoginWindow(QMainWindow):
def __init__(self, *args, **kwargs):
super().__init__(*args, **kwargs)
# Use uic.loadUi to import the .ui file in the current directory
uic.loadUi("login.ui", self)
self.setWindowTitle("Lubancat login")
if __name__ == '__main__':
app = QApplication(sys.argv)
window = LoginWindow()
window.show()
sys.exit(app.exec_())
|
Or convert to python file import
Use the pyuic5 command to convert the .ui file into a python file:
# Install the pyqt5-dev-tools tool via apt
sudo apt-get install pyqt5-dev-tools

# Use the command to convert the .ui file into a python file
pyuic5 -o login.ui login_ui.py
Convert it into a python file, which can be directly imported and used:
1 2 3 4 5 6 7 8 9 10 11 12 13 14 15 16 17 18 19 20 | import sys
from PyQt5.QtWidgets import QApplication, QMainWindow
# Import the converted Ui_Form class
from login_ui import Ui_Form
class LoginWindow(QMainWindow):
def __init__(self, parent=None):
super().__init__(parent)
# Create a ui instance
self.ui = Ui_Form()
# Run setupUi() to display ui
self.ui.setupUi(self)
self.setWindowTitle("Lubancat login")
if __name__ == "__main__":
app = QApplication(sys.argv)
win = LoginWindow()
win.show()
sys.exit(app.exec())
|
To run the program, you can use the command in the terminal:
# Run the program with the command:
sudo python3 login.py
Or add a python runtime environment in Qt Creator. You need to click Tool->Options... on the interface and select Enviroment in the pop-up window, then operate according to the picture below, and finally click apply to apply.
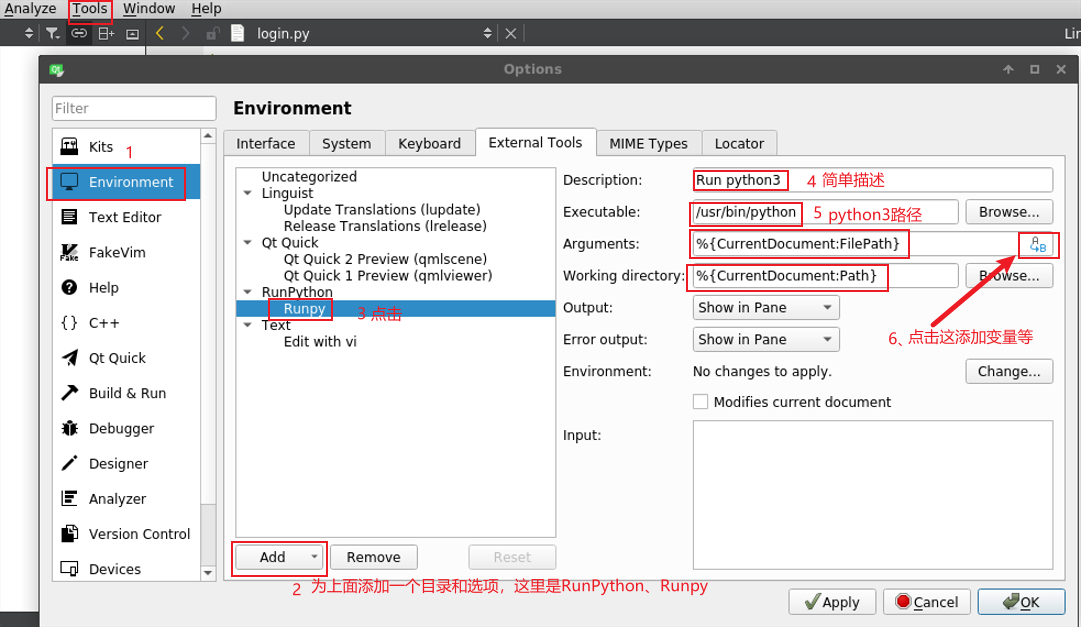
When running, open the corresponding python file, and then click Tool->Exteral->RunPython->RunPy.
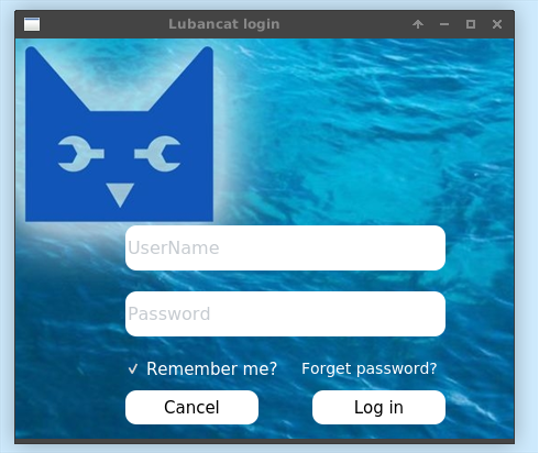
Running display effect:
For the source code of the program, refer to the files in the libdemo/PyQt5 directory of the supporting routine. Finally, if you need to package and distribute your application, you can read some documents in the reference link.
8.5. Reference
For more PyQt5 related tutorials, please refer to:
https://www.riverbankcomputing.com/static/Docs/PyQt5/introduction.html