
7. Modbus protocol - pymodbus library
In the previous section, we introduced various external connection interfaces on the Lubancat board. You can find that some of these interfaces are widely used in the industrial field. Then, can our Lubancat board expand some powerful functions on the basis of these interfaces?
In this section of the experiment, we will introduce to you a very common industrial bus protocol in the industrial field: Modbus communication protocol, the example is Modbus-RTU.
7.1. Modbus protocol experiment
Our Lubancat board system has rich open source software support. The Modbus communication protocol we will introduce in this section also has corresponding software for us to install and use.
In this section of the experiment, our goal is to use the Python language and -python3-pymodbus to complete the simple communication between the RTU master station and the slave station agreed in the Modbus protocol.
So let’s take a brief look at the python3-pymodbus library.
7.2. python3 - pymodbus library
pymodbus is a Modbus protocol Python library based on the BSD open source protocol. Its functions are very powerful, realizing all the functions agreed in the Modbus protocol, and realizing the communication host in a synchronous and asynchronous (asyncio, tornado, twisted) manner. While having good performance, it also provides more possibilities for Python developers to expand application functions when building Modbus protocol applications.
pymodbus supports Ethernet and serial interfaces to carry the physical layer transmission of the Modbus protocol. If you do not use the serial interface (the implementation of the pymodbus serial interface depends on the pyserial library package), then the python3-pymodbus library does not depend on third-party library packages at all, so the library is very lightweight.
We can install the python3-pymodbus library on the Lubancat board, And use the library through some official sample codes to complete the experiments in this section.
7.3. Experiment preparation
7.3.1. Add board uart resources
重要
In this section, the experiment uses a uart serial port (slave) and a PC (host) to adapt the connection of the Modbus underlying hardware.
Therefore, this section is to demonstrate the addition of uart resources. The pymodbus library provides a full-stack implementation of the Modbus protocol.
Therefore, the use of network port communication at the bottom layer is also supported. You can refer to the content of this section according to the actual situation.
Some GPIOs on the board may not be enabled, you can comment out the loading of some device tree nodes or device tree plug-ins, and restart the system to enable them. The pin reference of LubanCat_RK series boards is as follows: 《LubanCat-RK Series-40pin Pin Comparison Diagram》
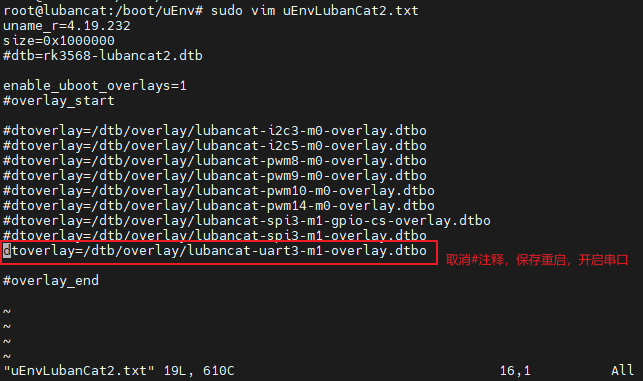
In this section of the experiment, the author uses the LubanCat 2 board as an example to demonstrate. According to the 40 pin comparison diagrams, the serial port resources can use UART3. Next, we will open the UART3 device tree plug-in:
# The configuration files of different boards are different from pwm, taking LubanCat 2 as an example, the configuration file is uEnvLubanCat 2.txt
# Use the following command:
sudo vim /boot/uEnv/uEnvLubanCat 2.txt
#Enter edit mode, cancel the comment in front of pwm, save and exit the file, restart the system
If you are using other Lubancat RK series boards, the operation is similar.
# Enter the following command in the terminal to view the UART resource:
ls /dev/ttyS*
The UART resource example on the board is for reference only:

Among them, /dev/ttyS3 corresponds to the uart3 resource on the board.
提示
If Permission denied or similar words appear, please pay attention to user permissions.
Most of the functions of operating hardware peripherals almost require root user privileges.
The simple solution is to add sudo or run the program as root before executing the statement.
7.3.2. Hardware connection
For the hardware connection section, you need to make reference adjustments to the content of this chapter according to your own development environment and other conditions. This chapter will use a serial port in LubanCat 2: uart3 to complete the demonstration of data transmission. The connection is as follows (the connection is the same as in UART Communication chapter):
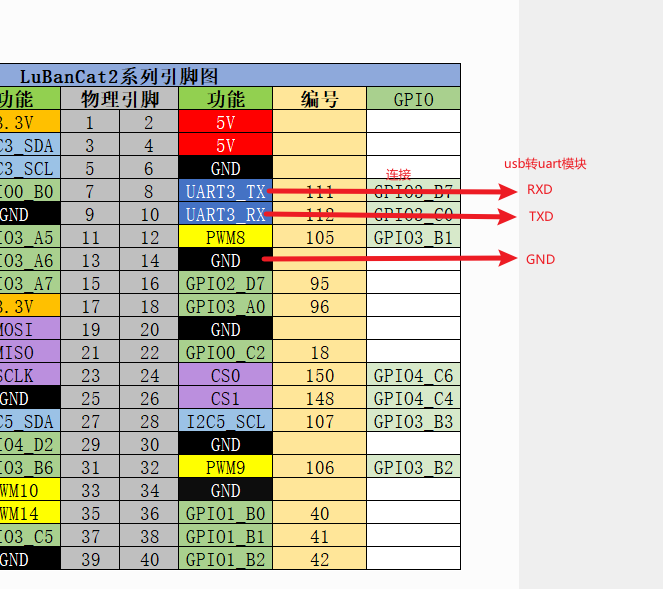
Connect to computer via USB to TTL.
重要
The pymodbus library’s support for serial devices is based on the pyserial library. The default serial device support of this library is based on uart, so this section also uses uart for demonstration experiments. If you want pymodbus to use the rs485 underlying electrical connection method, you need to modify the underlying source code of the pymodbus library by yourself.
7.3.3. pymodbus library installation
# Enter the following command in the terminal:
sudo pip3 install -U pymodbus

#Or directly pull the warehouse source code, use the setuptools tool to install, etc., refer to the previous chapter on installing python
git clone https://github.com/riptideio/pymodbus.git
7.4. Test code
After installing the pymodbus library, you can use the pymodbus library to program. Here we directly modify the examples provided by the official, and then conduct a simple test. This Demo uses pymodbus based on the asyncio asynchronous library to implement Modbus protocol RTU communication and serial port asynchronous host. In the code, we set the external communication port, which is the serial port ‘/dev/ttyS3’ opened in the hardware configuration section, with a baud rate of 115200.
7.4.1. RTU slave slave_server.py
Code show as below:
1 2 3 4 5 6 7 8 9 10 11 12 13 14 15 16 17 18 19 20 21 22 23 24 25 26 27 28 29 30 31 32 33 34 35 36 37 38 39 40 41 42 43 44 45 46 47 48 49 50 51 52 53 54 55 56 57 58 59 60 61 62 63 64 65 66 67 68 69 70 71 72 73 74 75 76 77 78 79 80 81 82 83 84 85 86 87 88 89 90 91 92 93 94 95 96 97 98 99 100 101 102 103 104 105 106 107 108 109 110 111 112 113 114 115 116 117 118 119 120 121 122 123 124 125 126 127 128 129 130 131 132 133 134 135 136 137 138 139 140 141 142 143 144 145 146 147 148 149 150 151 152 153 154 155 156 157 | def get_commandline(server=False, description=None, extras=None):
"""Read and validate command line arguments"""
parser = argparse.ArgumentParser(description=description)
parser.add_argument(
"--comm",
choices=["serial"],
help="set communication",
default="serial",
type=str,
)
parser.add_argument(
"--framer",
choices=["rtu"],
help="set framer, default depends on --comm",
type=str,
)
parser.add_argument(
"--log",
choices=["critical", "error", "warning", "info", "debug"],
help="set log level, default is info",
default="info",
type=str,
)
parser.add_argument(
"--port",
help="set port",
type=str,
)
if server:
parser.add_argument(
"--store",
choices=["sequential"],
help="set type of datastore",
default="sequential",
type=str,
)
parser.add_argument(
"--slaves",
help="set number of slaves, default is 0 (any)",
default=0,
type=int,
nargs="+",
)
if extras:
for extra in extras:
parser.add_argument(extra[0], **extra[1])
args = parser.parse_args()
# set defaults
comm_defaults = {
"serial": ["rtu", "/dev/ptyp0"],
}
framers = {
"rtu": ModbusRtuFramer,
}
pymodbus_apply_logging_config()
_logger.setLevel(args.log.upper())
args.framer = framers[args.framer or comm_defaults[args.comm][0]]
args.port = args.port or comm_defaults[args.comm][1]
if args.comm != "serial" and args.port:
args.port = int(args.port)
return args
def setup_server(args):
"""Run server setup."""
# The datastores only respond to the addresses that are initialized
# If you initialize a DataBlock to addresses of 0x00 to 0xFF, a request to
# 0x100 will respond with an invalid address exception.
# This is because many devices exhibit this kind of behavior (but not all)
_logger.info("### Create datastore")
# Define the co coil register, the storage start address is 0, the length is 10, and the content is 5 True and 5 False
co_block = ModbusSequentialDataBlock(0, [True]*5 + [False]*5)
# Define the di discrete input register, the storage start address is 0, the length is 10, and the content is 5 True and 5 False
di_block = ModbusSequentialDataBlock(0, [True]*5 + [False]*5)
# Define the ir input register, the storage start address is 0, the length is 10, and the content is a list of increasing values from 0 to 10
ir_block = ModbusSequentialDataBlock(0, [0, 1, 2, 3, 4, 5, 6, 7, 8, 9])
# Define the hr holding register, the storage start address is 0, the length is 10, and the content is a list of decreasing values from 0 to 10
hr_block = ModbusSequentialDataBlock(0, [9, 8, 7, 6, 5, 4, 3, 2, 1, 0])
if args.slaves:
# The server then makes use of a server context that allows the server
# to respond with different slave contexts for different unit ids.
# By default it will return the same context for every unit id supplied
# (broadcast mode).
# However, this can be overloaded by setting the single flag to False and
# then supplying a dictionary of unit id to context mapping::
#
# The slave context can also be initialized in zero_mode which means
# that a request to address(0-7) will map to the address (0-7).
# The default is False which is based on section 4.4 of the
# specification, so address(0-7) will map to (1-8)::
context = {
0x01: ModbusSlaveContext(
di=di_block,
co=co_block,
hr=hr_block,
ir=ir_block,
zero_mode=True
),
0x02: ModbusSlaveContext(
di=di_block,
co=co_block,
hr=hr_block,
ir=ir_block,
),
0x03: ModbusSlaveContext(
di=di_block,
co=co_block,
hr=hr_block,
ir=ir_block,
),
}
single = False
else:
context = ModbusSlaveContext(
di=di_block, co=co_block, hr=hr_block, ir=ir_block, unit=1
)
single = True
# Build data storage
args.context = ModbusServerContext(slaves=context, single=single)
return args
async def run_async_server(args):
"""Run server."""
txt = f"### start ASYNC server, listening on {args.port} - {args.comm}"
_logger.info(txt)
# socat -d -d PTY,link=/tmp/ptyp0,raw,echo=0,ispeed=9600
# PTY,link=/tmp/ttyp0,raw,echo=0,ospeed=9600
server = await StartAsyncSerialServer(
context=args.context, # Data storage
#identity=args.identity, # server identify
timeout=1, # waiting time for request to complete
port=args.port, # serial port
# custom_functions=[], # allow custom handling
framer=args.framer, # The framer strategy to use
# handler=None, # handler for each session
stopbits=1, # The number of stop bits to use
bytesize=8, # The bytesize of the serial messages
# parity="N", # Which kind of parity to use
baudrate=115200, # The baud rate to use for the serial device
# handle_local_echo=False, # Handle local echo of the USB-to-RS485 adaptor
# ignore_missing_slaves=True, # ignore request to a missing slave
# broadcast_enable=False, # treat unit_id 0 as broadcast address,
# strict=True, # use strict timing, t1.5 for Modbus RTU
# defer_start=False, # Only define server do not activate
)
return server
if __name__ == "__main__":
cmd_args = get_commandline(
server=True,
description="Run asynchronous server.",
)
run_args = setup_server(cmd_args)
asyncio.run(run_async_server(run_args), debug=True)
|
Using pymodbus to simulate the function of a Modbus slave device requires constructing a slave context environment. The environment is specified by the Modbus protocol, and it is necessary to realize various functions of the Modbus slave, such as various registers. In the end, the server is responsible for scheduling the operation of the context, and realizes the storage, reading and maintenance of the data of the slave by the master. On this basis, pymodbus also realizes the interface of the database. Interested you can check the source code and examples of pymodbus.
7.4.2. Experimental procedure
1. From the machine side, upload the supporting test code to the LubanCat 2 board system. Log in to the system terminal and start the slave service:
# Enter the following command in the terminal:
sudo python slave_server.py --comm serial --framer rtu --port /dev/ttyS3 --store sequential --log debug --slaves 1
# --comm specifies the serial communication method,,, --framer, specifies the use of rtu frames, --port specifies the serial port, --log specifies the debug information
#You can use the command sudo python slave_server.py -h to view the help
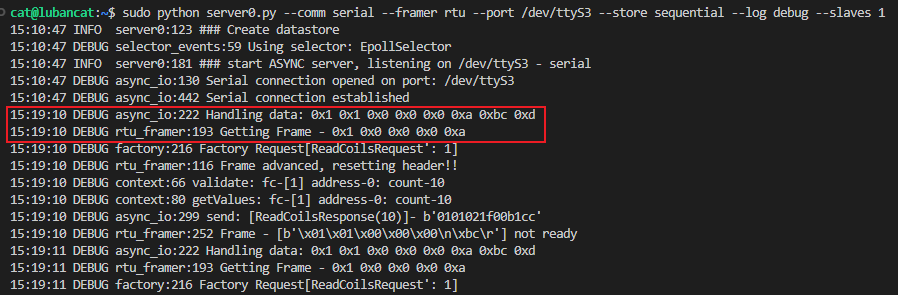
# After using the command, you can see in the terminal:
cat@lubancat:~$ sudo python server0.py --comm serial --framer rtu --port /dev/ttyS3 --store sequential --log debug --slaves 1
15:10:47 INFO server0:123 ### Create datastore
15:10:47 DEBUG selector_events:59 Using selector: EpollSelector
15:10:47 INFO server0:181 ### start ASYNC server, listening on /dev/ttyS3 - serial
15:10:47 DEBUG async_io:130 Serial connection opened on port: /dev/ttyS3
15:10:47 DEBUG async_io:442 Serial connection established
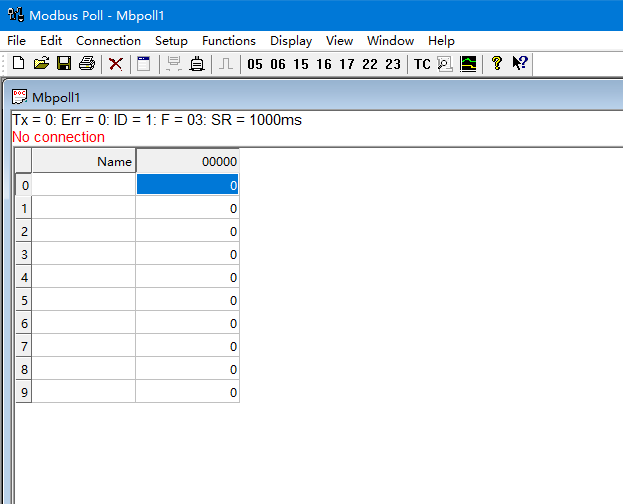
2. On the host side, connect according to the previous hardware, and use the Modbus Poll software on the computer side (trial for 30 days). The download address is as follows: https://modbustools.com/download.html After installation, open the software:
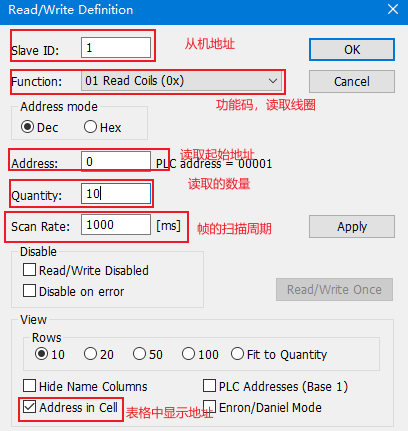
Right-click on the blank space, select “Read/write Definition”, and then set the slave address, read and write, etc. Here we set the address to 1 and start reading 10 coils from address 0:
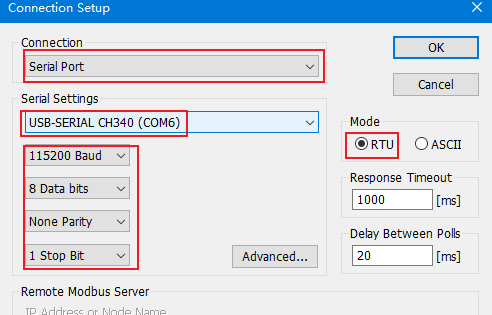
After the setting is complete, click “connection” in the main window, and then select the serial port. Here is COM6, the specific settings are as follows:
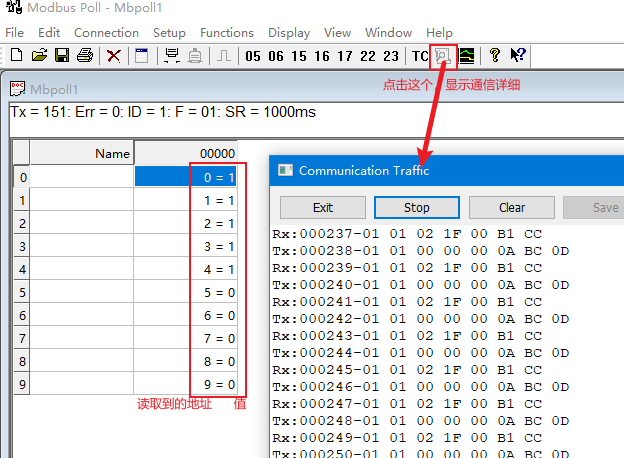
After the connection is successful, you can see the read value:
At the same time, the information printed by the board terminal is as follows (specify - -log debug when executing):
After the above is in the connected state, we can also perform operations such as reading and writing other registers. Right-click the blank to enter “Read/write Definition”, and reset the following values:
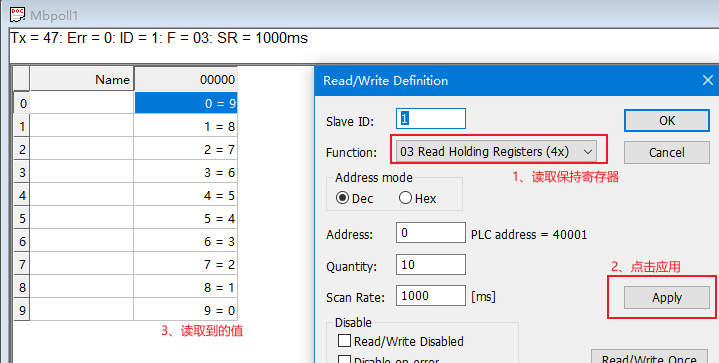
Modify the value of the holding register:
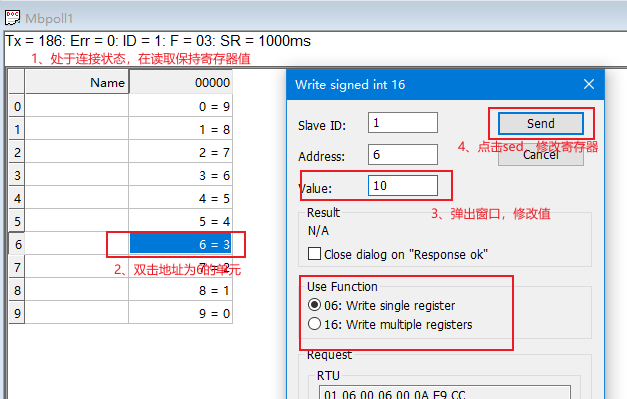
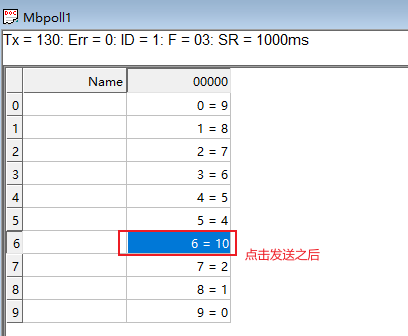
After clicking Send, read the value of the register:
For more detailed operations such as reading, writing and debugging of some registers, you can refer to the help of the Modbus Poll software. In the above test process, it can be seen that the command sent by the host to the slave, the response information received from the slave, and various test results, etc.
7.4.3. Analysis of the phenomenon
We can simply look at some requests and responses that occur during the communication process of the Modbus-RTU master and slave through a picture.
Take Read Multiple Coil Test as an example (click the image to enlarge):
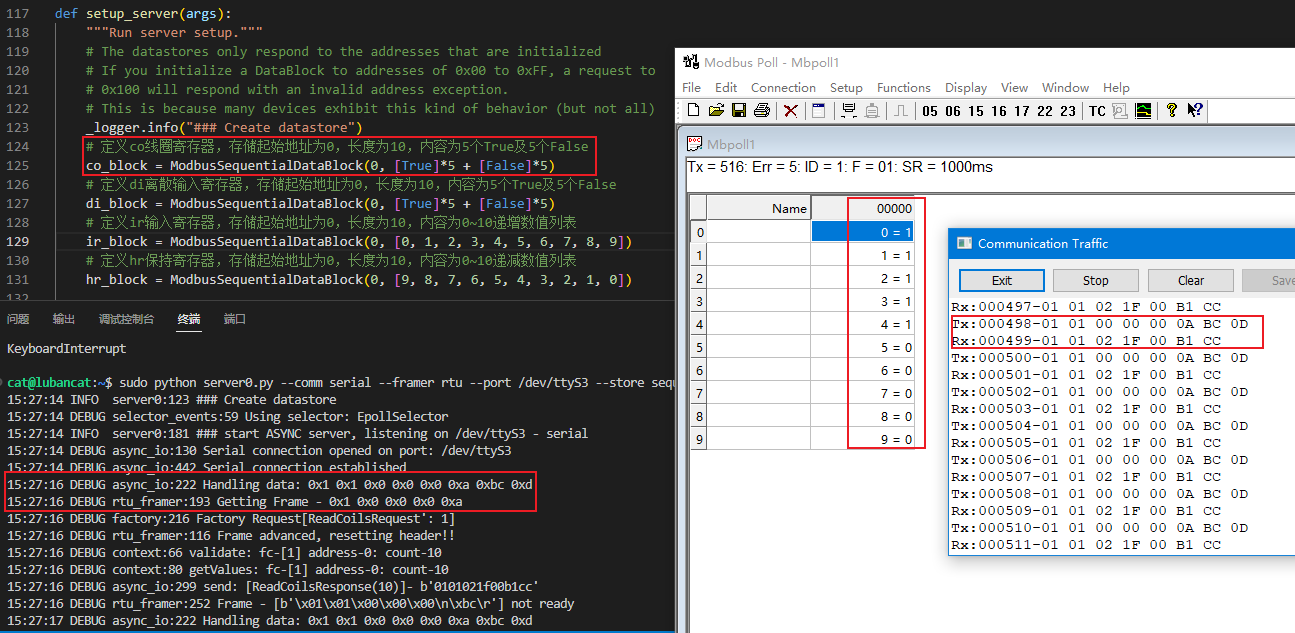
In the figure, on the upper computer side of the computer, modbus Poll is used to read and write single or multiple registers and corresponding parameters. When the board slave receives the command, it will make a corresponding response, and the log information of the response can be seen after enabling debug.
The pymodbus library also supports user-defined requests and responses, that is, the content related to user-defined function codes agreed in the Modbus protocol. In addition, the pymodbus library still implements some server functions, such as data persistence, which allows users to store the contents of slave registers through some common databases.
Earlier, we mentioned that the pymodbus library is a full-stack implementation of the Modbus protocol written in the Python language. In the sample code we provide you, only a part of the functionality of the library is shown. To test more, you can follow the Github repository of pymodbus .
7.4.4. Reference
Official sample code pymodbus-examples .
Official package and documentation description pymodbus-doc .