
7. YOLOv5
Yolov5 is a target detection algorithm that belongs to a single-stage target detection method. It is an object detection architecture and model series pre-trained on the COCO dataset. It represents Ultralytics’ open source research on future visual AI methods. It contains lessons learned and best practices that have been developed through thousands of hours of research and development. The latest YOLOv5 v7.0 includes YOLOv5n, YOLOv5s, YOLOv5m, YOLOv5l, YOLOv5x, etc. In addition to target detection, there are also application scenarios such as segmentation and classification.
The basic principle of YOLOv5 is simply: divide the whole picture into several networks, each grid predicts the type and position information of the object in the grid, and then performs the calculation according to the intersection ratio between the predicted frame and the real frame. The screening of the target box, and finally output the prediction box.
This chapter will simply use YOLOv5, and simply deploy and test it on the Lubancat board.
提示
Test environment: Lubancat RK board system is Debian10, PC is WSL2 (ubuntu20.04), PyTorch is 1.10.1, rknn-Toolkit2 version 1.4.0, YOLOv5 v7.0, airockchip/yolov5 v6.2.
7.1. YOLOv5 environment installation
Install python and other environments, as well as related dependent libraries, and then clone the source code of the YOLOv5 warehouse.
# Install python and other environments, as well as related dependent libraries, and then clone the source code of the YOLOv5 warehouse.
sudo python3 -m venv .yolov5_env
source .toolkit2_env/bin/activate

# Pull the latest yolov5 warehouse, pytorch version
git clone https://github.com/ultralytics/yolov5
cd yolov5

# Install dependent libraries
pip3 install -r requirements.txt

# Enter the python command line to detect the installed environment
import torch
import utils
display = utils.notebook_init()

# The test environment here shows:
Checking setup...
YOLOv5 🚀 2023-2-20 Python-3.8.10 torch-1.10.1+cpu CPU
Setup complete ✅ (6 CPUs, 12.4 GB RAM, 77.3/251.0 GB disk)
7.2. YOLOv5 is easy to use
7.2.1. Get the pre-trained weights file
Download yolov5s.pt, yolov5m.pt, yolov5l.pt, yolov5x.pt weight files, which can be directly obtained from here. Among them, n, s, m, l, and x represent the width and depth of the network, and the smallest is n, which has the fastest speed and the lowest precision.
7.2.2. YOLOv5 simple test
Enter the yolov5 source code directory, put the previously downloaded weight file in the current directory, and the two test pictures are located in /data/images/
# simple test
# --source specifies the test data, which can be pictures or videos, etc.
# --weights specifies the weight file path, which can be trained by yourself, or directly use the official website.
sudo python3 detect.py --source ./data/images/ --weights yolov5s.pt
Test Results:
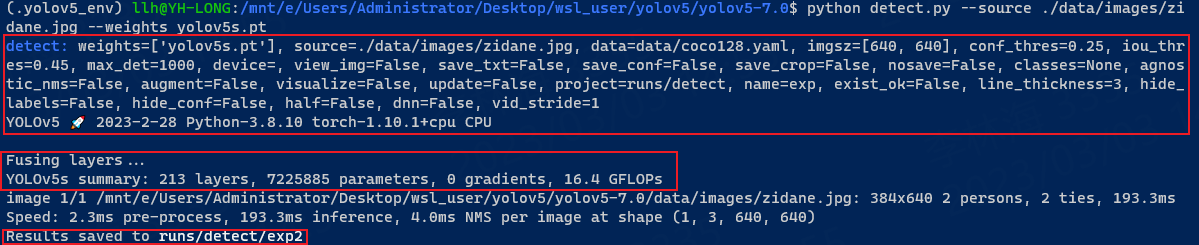
The above displays in sequence: basic configuration, network parameters, detection results, processing speed, and finally the saved location. We switch to the runs/detect/exp2 directory to view the detection results:
7.2.3. Convert to rknn model
Next, rknn will be exported based on yolov5s.pt:
1、Convert it to yolov5s.onnx (it can also be a model such as torchscript), first install the onnx installation dependent environment:
# Install the ambient light of onnx
pip3 install -r requirements.txt coremltools onnx onnx-simplifier onnxruntime

# Obtain weight file,and use yolov5s.pt
# Here we use the following command to export the onnx model
sudo python3 export.py --weights yolov5s.pt --include  onnx

# Or use the following command to export Torchscript
sudo python3 export.py --weights yolov5s.pt --include  torchscript
Export display:
(.yolov5_env) llh@YH-LONG:/mnt/e/Users/Administrator/Desktop/wsl_user/yolov5/yolov5-7.0$ python export.py --weights yolov5s.pt --include  onnx
export: data=data/coco128.yaml, weights=['yolov5s.pt'], imgsz=[640, 640], batch_size=1, device=cpu, half=False, inplace=False, keras=False, optimize=False, int8=False, dynamic=False, simplify=False, opset=12, verbose=False, workspace=4, nms=False, agnostic_nms=False, topk_per_class=100, topk_all=100, iou_thres=0.45, conf_thres=0.25, include=['onnx']
YOLOv5 🚀 2023-2-28 Python-3.8.10 torch-1.10.1+cpu CPU

Fusing layers...
YOLOv5s summary: 213 layers, 7225885 parameters, 0 gradients, 16.4 GFLOPs

PyTorch: starting from yolov5s.pt with output shape (1, 25200, 85) (14.1 MB)

ONNX: starting export with onnx 1.13.1...
ONNX: export success ✅ 1.8s, saved as yolov5s.onnx (28.0 MB)

Export complete (2.3s)
Results saved to /mnt/e/Users/Administrator/Desktop/wsl_user/yolov5/yolov5-7.0
Detect:          python detect.py --weights yolov5s.onnx
Validate:        python val.py --weights yolov5s.onnx
PyTorch Hub:     model = torch.hub.load('ultralytics/yolov5', 'custom', 'yolov5s.onnx')
Visualize:       https://netron.app
Yolov5s.onnx files will be generated in the current directory. We can use Netron <https://netron.app/> _ visible model:
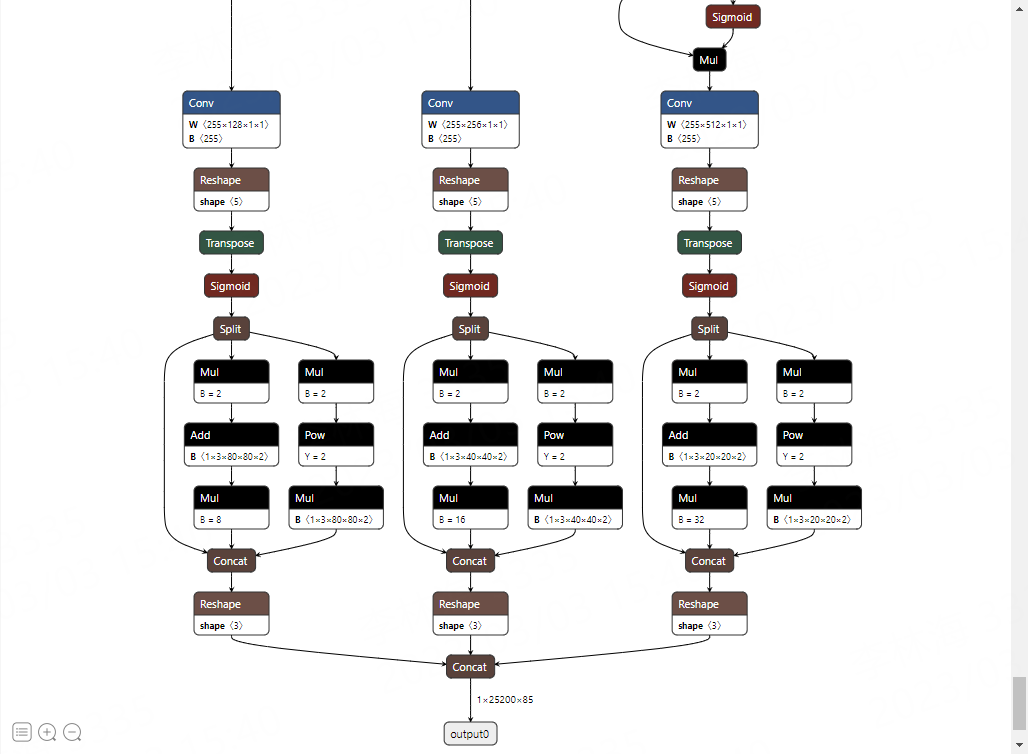
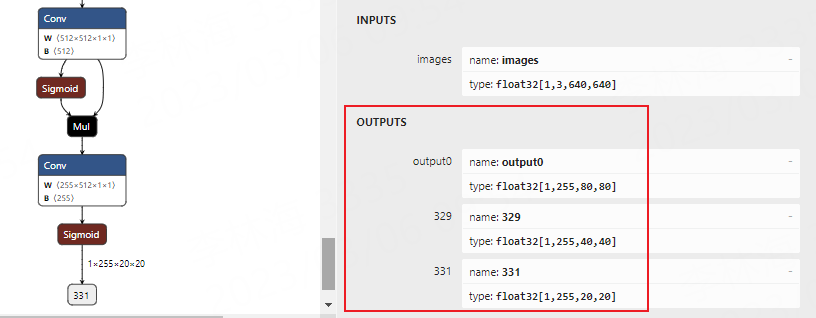
2、Export Looking at the picture above, the rear of the onnx model is finally passed through the DETECT layer to adapt to the RKNN for appropriate processing. Here, remove this network structure (but the Sigmoid function at the rear of the model structure is not deleted), and the three feature maps are directly output. For details, here
You need to modify the Yolov5 file source code:
def forward(self, x):
    z = []  # inference output
    for i in range(self.nl):
        z.append(torch.sigmoid(self.m[i](x[i])))

    return z
#shape = tuple((y[0] if isinstance(y, tuple) else y).shape)  # model output shape
shape = tuple((y[0] if (isinstance(y, tuple) or (isinstance(y, list))) else y).shape)  # model output shape
After modification, re -execute the command conversion: `` python export.py -weights yolov5s.pt -found onnx`` Use Netron <https://netron.app/> _ visible model:
3、Converted to RKNN model
The front of the Angnx model is converted into the RKNN model. You need to install the environment such as RKNN-Toolkit2, and refer to the chapter of “NPU”.
Use Rknn-Toolkit2 model conversion function:
1 2 3 4 5 6 7 8 9 10 11 12 13 14 15 16 17 18 19 20 21 22 23 24 25 26 27 28 29 30 31 32 33 34 35 36 37 38 39 40 41 42 43 44 45 46 47 48 49 50 51 52 53 54 55 56 57 58 59 60 61 62 63 64 65 66 67 68 69 70 71 72 | if __name__ == '__main__':
# Create RKNN
# If the test encounters a problem, turn on Verbose = TRUE and check the debugging information.
# rknn = RKNN(verbose=True)
rknn = RKNN()
# Enter image processing
img = cv2.imread(IMG_PATH)
# img, ratio, (dw, dh) = letterbox(img, new_shape=(IMG_SIZE, IMG_SIZE))
img = cv2.cvtColor(img, cv2.COLOR_BGR2RGB)
img = cv2.resize(img, (IMG_SIZE, IMG_SIZE))
# pre-process config
print('--> Config model')
rknn.config(mean_values=[[0, 0, 0]], std_values=[[255, 255, 255]], target_platform="rk3568")
print('done')
# If the previous conversion is TORCHScript, renamed .pt files, cancel the following annotation, and then load the model.
#print('--> Loading model')
#ret = rknn.load_pytorch(model=PYTORCH_MODEL, input_size_list=[[1,3,IMG_SIZE,IMG_SIZE]])
#if ret != 0:
# print('Load model failed!')
# exit(ret)
#print('done')
# Load the ONNX model
print('--> Loading model')
ret = rknn.load_onnx(model=ONNX_MODEL)
if ret != 0:
print('Load model failed!')
exit(ret)
print('done')
# Build a model and open the quantification by default
print('--> Building model')
ret = rknn.build(do_quantization=True, dataset=DATASET)
#ret = rknn.build(do_quantization=False)
if ret != 0:
print('Build model failed!')
exit(ret)
print('done')
# Quantitative accuracy analysis. Turn off by default, cancel the annotation to open
#print('--> Accuracy analysis')
#Ret = rknn.accuracy_analysis(inputs=[img])
#if ret != 0:
# print('Accuracy analysis failed!')
# exit(ret)
#print('done')
# Export the RKNN model
print('--> Export rknn model')
ret = rknn.export_rknn(RKNN_MODEL)
#if ret != 0:
# print('Export rknn model failed!')
# exit(ret)
print('done')
# Initialize the operating environment, the default is not configured with device_id, etc., you need to turn on when you need to debug.
print('--> Init runtime environment')
ret = rknn.init_runtime()
# ret = rknn.init_runtime(target='rk3568', device_id='192.168.103.115:5555', perf_debug=True)
if ret != 0:
print('Init runtime environment failed!')
exit(ret)
print('done')
# Debug, evaluate the performance of the model, cancel the annotation and open it
# rknn.eval_perf(inputs=[img], is_print=True)
rknn.release()
|
# Run the conversion program
sudo python3 test.py

# Display the result and generate yolov5s.rknn in the current directory
W __init__: rknn-toolkit2 version: 1.4.0-22dcfef4
--> Config model
done
--> Loading model
done
--> Building model
Analysing : 100%|███████████████████████████████████████████████| 145/145 [00:00<00:00, 2992.56it/s]
Quantizating : 100%|█████████████████████████████████████████████| 145/145 [00:00<00:00, 320.39it/s]
W build: The default input dtype of 'images' is changed from 'float32' to 'int8' in rknn model for performance!
                    Please take care of this change when deploy rknn model with Runtime API!
W build: The default output dtype of 'output0' is changed from 'float32' to 'int8' in rknn model for performance!
                    Please take care of this change when deploy rknn model with Runtime API!
W build: The default output dtype of '329' is changed from 'float32' to 'int8' in rknn model for performance!
                    Please take care of this change when deploy rknn model with Runtime API!
W build: The default output dtype of '331' is changed from 'float32' to 'int8' in rknn model for performance!
                    Please take care of this change when deploy rknn model with Runtime API!
done
--> Export rknn model
done

# Cancel the above EVAL_PERF and rknn.init_runtime comments, turn on performance evaluation, simple debugging
--> Init runtime environment
W init_runtime: Target is None, use simulator!
W init_runtime: Flag perf_debug has been set, it will affect the performance of inference!
I NPUTransfer: Starting NPU Transfer Client, Transfer version 2.1.0 (b5861e7@2020-11-23T11:50:36)
D RKNNAPI: ==============================================
D RKNNAPI: RKNN VERSION:
D RKNNAPI:   API: 1.4.0 (bb6dac9 build: 2022-08-29 16:17:01)(null)
D RKNNAPI:   DRV: rknn_server: 1.3.0 (121b661 build: 2022-04-29 11:11:47)
D RKNNAPI:   DRV: rknnrt: 1.4.0 (a10f100eb@2022-09-09T09:07:14)
D RKNNAPI: ==============================================
done
===================================================================================================================
                            Performance
        #### The performance result is just for debugging, ####
        #### may worse than actual performance!            ####
===================================================================================================================
Total Weight Memory Size: 7312768
Total Internal Memory Size: 7782400
Predict Internal Memory RW Amount: 138880000
Predict Weight Memory RW Amount: 7312768
ID   OpType           DataType Target InputShape                                   OutputShape            DDR Cycles     NPU Cycles     Total Cycles   Time(us)       MacUsage(%)    RW(KB)         FullName

0    InputOperator    UINT8    CPU    \                                            (1,3,640,640)          0              0              0              9              \              1200.00        InputOperator:images
1    Conv             UINT8    NPU    (1,3,640,640),(32,3,6,6),(32)                (1,32,320,320)         687110         691200         691200         8407           9.14           4409.25        Conv:Conv_0
2    exSwish          INT8     NPU    (1,32,320,320)                               (1,32,320,320)         997336         0              997336         3737           \              6400.00        exSwish:Sigmoid_1_2swish
.....(Omitted)
145  Sigmoid          INT8     NPU    (1,255,80,80)                                (1,255,80,80)          498668         0              498668         1895           \              3200.00        Sigmoid:Sigmoid_199
146  OutputOperator   INT8     CPU    (1,255,80,80),(1,80,80,256)                  \                      0              0              0              165            \              3200.00        OutputOperator:output0
147  OutputOperator   INT8     CPU    (1,255,40,40),(1,40,40,256)                  \                      0              0              0              52             \              800.00         OutputOperator:329
148  OutputOperator   INT8     CPU    (1,255,20,20),(1,20,20,256)                  \                      0              0              0              34             \              220.00         OutputOperator:331
Total Operator Elapsed Time(us): 77776

===================================================================================================================
The RKNN model will be exported in the current directory. If the EVAL_PERF interface annotation is canceled, the performance evaluation will be performed and simply debug.
7.2.4. Deploy to LubanCat Card
After exporting the RKNN model, use the RKNN Toolkit Lite2 to make a simple deployment on the end of the board.
1 2 3 4 5 6 7 8 9 10 11 12 13 14 15 16 17 18 19 20 21 22 23 24 25 26 27 28 29 30 31 32 33 34 35 36 37 38 39 40 41 42 43 44 45 | if __name__ == '__main__':
# Create Rknnlite object
rknn_lite = RKNNLite()
# Import RKNN model
print('--> Load RKNN model')
ret = rknn_lite.load_rknn(rknn_model)
if ret != 0:
print('Load RKNN model failed')
exit(ret)
print('done')
# Initialized operating environment
print('--> Init runtime environment')
ret = rknn_lite.init_runtime()
if ret != 0:
print('Init runtime environment failed!')
exit(ret)
print('done')
# Enter image processing
img = cv2.imread(IMG_PATH)
img, ratio, (dw, dh) = letterbox(img, new_shape=(640, 640)) # 灰度填充
img = cv2.cvtColor(img, cv2.COLOR_BGR2RGB)
# reasoning
print('--> Running model')
outputs = rknn_lite.inference(inputs=[img])
print('done')
# Post -treatment
boxes, classes, scores = yolov5_post_process(outputs)
img_1 = cv2.cvtColor(img, cv2.COLOR_RGB2BGR)
if boxes is not None:
draw(img_1, boxes, scores, classes)
# Show or save pictures
cv2.imwrite("out.jpg", img_1)
# cv2.imshow("post process result", img_1)
# cv2.waitKey(0)
# cv2.destroyAllWindows()
rknn_lite.release()
|
Simple test shows:
--> Load RKNN model
done
--> Init runtime environment
I RKNN: [11:59:53.211] RKNN Runtime Information: librknnrt version: 1.4.0 (a10f100eb@2022-09-09T09:07:14)
I RKNN: [11:59:53.211] RKNN Driver Information: version: 0.7.2
I RKNN: [11:59:53.213] RKNN Model Information: version: 1, toolkit version: 1.4.0-22dcfef4(compiler version: 1.4.0 (3b4520e4f@2022-09-05T20:52:35)), target: RKNPU lite, target platform: rk3568, framework name: PyTorch, framework layout: NCHW
done
--> Running model
done
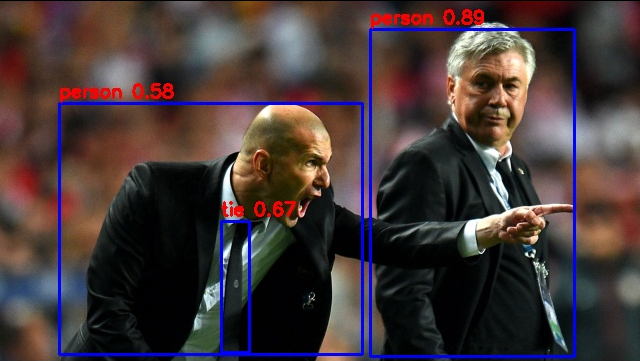
class: person, score: 0.8889630436897278
box coordinate left,top,right,down: [370, 168, 574, 495]
class: person, score: 0.5832323431968689
box coordinate left,top,right,down: [59, 242, 362, 493]
class: tie, score: 0.668832540512085
box coordinate left,top,right,down: [221, 360, 249, 491]
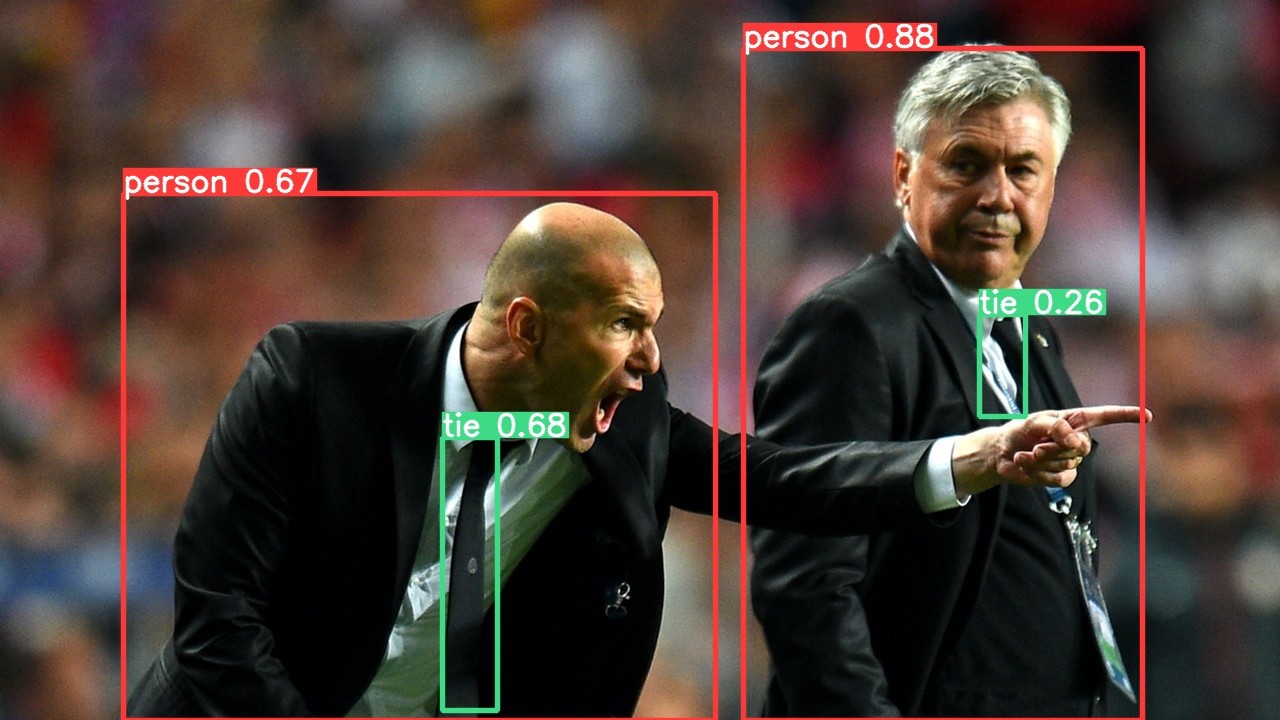
The result will be stored in the out.jpg in the current directory. View the picture:
7.3. airockchip/yolov5 Simple test
The above is a simple test using the official YOLOV5 V7.0. Next, we use AirockChip/YOLOV5. The Yolov5 of the warehouse is optimized to deploy the RKNPU device. The tutorial test is V6.2.
Pull the latest AirockChip/YOLOV5 warehouse, install similar, refer to the previous front:
# The V6.2 version was tested
git clone https://github.com/airockchip/yolov5.git
cd yolov5
To obtain a weight document, we need to re -train:
# Re-training and obtain the optimized weight file. This is based on weight Yolov5s.pt, or uses--CFG specified configuration file
sudo python3 train.py --data coco128.yaml --weights yolov5s.pt  --img 640

# There are a lot of output information after the training, and the output will be out:
...
Optimizer stripped from runs/train/exp/weights/last.pt, 14.9MB
Optimizer stripped from runs/train/exp/weights/best.pt, 14.9MB

Validating runs/train/exp/weights/best.pt...
...
# Training some analysis and weights stored in runs/train/exp
It will save files in Runs/Train/EXP/Weights/Save. We renamed yolov5s_relu.pt and copied it to the source code root directory.
Next export TORCHScript and use the command:
# --Weights specify the path of the weight file,
# --Rknpu specified platform (RK_Platform supports RK1808, RV1109, RV1126, RK3399Pro, RK3566, RK3568, RK3588, RV1103, RV1106)
# --include specifies the exported onnx model, and the default is TORCHSCRIPT

sudo python3 export.py --weights yolov5s_relu.pt --rknpu rk3568

# Normal conversion will output:
export: data=data/coco128.yaml, weights=['yolov5s.pt'], imgsz=[640, 640], batch_size=1, device=cpu, half=False, inplace=False, train=False, keras=False, optimize=False, int8=False, dynamic=False, simplify=False, opset=12, verbose=False, workspace=4, nms=False, agnostic_nms=False, topk_per_class=100, topk_all=100, iou_thres=0.45, conf_thres=0.25, include=['torchscript'], rknpu=rk3568
YOLOv5 🚀 2022-10-28 Python-3.8.10 torch-1.10.1+cpu CPU

Fusing layers...
YOLOv5s summary: 213 layers, 7225885 parameters, 0 gradients, 16.4 GFLOPs
---> save anchors for RKNN
[[10.0, 13.0], [16.0, 30.0], [33.0, 23.0], [30.0, 61.0], [62.0, 45.0], [59.0, 119.0], [116.0, 90.0], [156.0, 198.0], [373.0, 326.0]]

PyTorch: starting from yolov5s.pt with output shape (1, 255, 80, 80) (14.1 MB)

TorchScript: starting export with torch 1.10.1+cpu...
TorchScript: export success, saved as yolov5s.torchscript (27.8 MB)

Export complete (1.92s)
Results saved to /mnt/e/Users/Administrator/Desktop/wsl_user/yolov5/yolov5-master
Detect:          python detect.py --weights yolov5s.torchscript
Validate:        python val.py --weights yolov5s.torchscript
PyTorch Hub:     model = torch.hub.load('ultralytics/yolov5', 'custom', 'yolov5s.torchscript')
Visualize:       https://netron.app


# Or use the following command to export the onnx model to generate the YOLOV5S.onnx file in the current directory.
python export.py --weights yolov5s.pt --include onnx --rknpu rk3568
Export torchscript, will generate yolov5s_relu.torchscript files in the current directory, and rename it .pt file.
7.3.1. Converted to the RKNN model and deployed to LubanCat RK356X board
Test using the previous conversion file, directly run the program to export the RKNN file,or use the tools here for model conversion, model evaluation, model deployment, etc.
# Run the test, export the RKNN model:
W __init__: rknn-toolkit2 version: 1.4.0-22dcfef4
--> Config model
done
--> Loading model
PtParse: 100%|███████████████████████████████████████████████████| 698/698 [00:01<00:00, 602.67it/s]
done
--> Building model
Analysing : 100%|████████████████████████████████████████████████| 145/145 [00:00<00:00, 381.87it/s]
Quantizating : 100%|█████████████████████████████████████████████| 145/145 [00:00<00:00, 518.54it/s]
W build: The default input dtype of 'x.1' is changed from 'float32' to 'int8' in rknn model for performance!
                    Please take care of this change when deploy rknn model with Runtime API!
W build: The default output dtype of '172' is changed from 'float32' to 'int8' in rknn model for performance!
                    Please take care of this change when deploy rknn model with Runtime API!
W build: The default output dtype of '173' is changed from 'float32' to 'int8' in rknn model for performance!
                    Please take care of this change when deploy rknn model with Runtime API!
W build: The default output dtype of '174' is changed from 'float32' to 'int8' in rknn model for performance!
                    Please take care of this change when deploy rknn model with Runtime API!
done
--> Export rknn model
done
--> Init runtime environment
W init_runtime: Target is None, use simulator!
W init_runtime: Flag perf_debug has been set, it will affect the performance of inference!
I NPUTransfer: Starting NPU Transfer Client, Transfer version 2.1.0 (b5861e7@2020-11-23T11:50:36)
D RKNNAPI: ==============================================
D RKNNAPI: RKNN VERSION:
D RKNNAPI:   API: 1.4.0 (bb6dac9 build: 2022-08-29 16:17:01)(null)
D RKNNAPI:   DRV: rknn_server: 1.3.0 (121b661 build: 2022-04-29 11:11:47)
D RKNNAPI:   DRV: rknnrt: 1.4.0 (a10f100eb@2022-09-09T09:07:14)
D RKNNAPI: ==============================================
done
===================================================================================================================
                            Performance
        #### The performance result is just for debugging, ####
        #### may worse than actual performance!            ####
===================================================================================================================
Total Weight Memory Size: 7312768
Total Internal Memory Size: 6144000
Predict Internal Memory RW Amount: 86931200
Predict Weight Memory RW Amount: 7312768
ID   OpType           DataType Target InputShape                                   OutputShape            DDR Cycles     NPU Cycles     Total Cycles   Time(us)       MacUsage(%)    RW(KB)         FullName

0    InputOperator    UINT8    CPU    \                                            (1,3,640,640)          0              0              0              8              \              1200.00        InputOperator:x.1
1    ConvRelu         UINT8    NPU    (1,3,640,640),(32,3,6,6),(32)                (1,32,320,320)         687110         691200         691200         8387           9.16           4409.25        Conv:input.4_Conv
2    ConvRelu         INT8     NPU    (1,32,320,320),(64,32,3,3),(64)              (1,64,160,160)         750885         921600         921600         2247           45.57          4818.50        Conv:input.6_Conv
.....(Omitted)
80   Conv             INT8     NPU    (1,512,20,20),(255,512,1,1),(255)            (1,255,20,20)          66931          102000         102000         180            62.96          429.50         Conv:1189_Conv
81   Sigmoid          INT8     NPU    (1,255,20,20)                                (1,255,20,20)          31167          0              31167          141            \              200.00         Sigmoid:1190_Sigmoid
82   OutputOperator   INT8     CPU    (1,255,80,80),(1,80,80,256)                  \                      0              0              0              161            \              3200.00        OutputOperator:172
83   OutputOperator   INT8     CPU    (1,255,40,40),(1,40,40,256)                  \                      0              0              0              46             \              800.00         OutputOperator:173
84   OutputOperator   INT8     CPU    (1,255,20,20),(1,20,20,256)                  \                      0              0              0              24             \              220.00         OutputOperator:174
Total Operator Elapsed Time(us): 44412

===================================================================================================================
提示
The CPU frequency of the previous test is 1.8GHz, the DDR frequency is 1.056GHz, and the NPU frequency is 900MHz.
The deployment test in the future is not listed as the previous.