
6. Resnet18 network – PyTorch
ResNet18 is a convolutional neural network, which has 18 layers of depth, including a heavy convolutional layer and full connection layer with weights. It is a variant of the RESNET series network, using the residual connection to solve the degradation problem of the deep network.
This chapter will briefly introduce PyTorch and the installation environment, and then briefly analyze the next resnet neural network and the source code of PyTorch. Finally, we simply build a resnet18 network with PyTorch to classify the CIFAR-10 and deploy it on the LubanCat board.
提示
Test environment: The Lubancat board uses Debian10, PC is WSL2 (Ubuntu20.04). PyTorch is 1.10.1 CPU version, RKNN-Toolkit2 version 1.4.0.
6.1. PyTorch and ResNet18
Pytorch is an open source deep learning framework that was developed by the TORCH7 team of Facebook Artificial Intelligence Research Institute. It is based on TORCH, but the implementation and application are completed by Python. This framework is mainly used for scientific research and application development in the field of artificial intelligence.
6.1.1. Pytorch installation
Pytorch needs to be installed according to your own environment to enter the official website of PyTorch and check the detailed installation tutorial. The following example is simply installed on Ubuntu20.04:
First go to the pytorch official website <https://pytorch.org/> _, and select your corresponding environment, such as the pytorch of the Linux system, Python language, and CPU version.
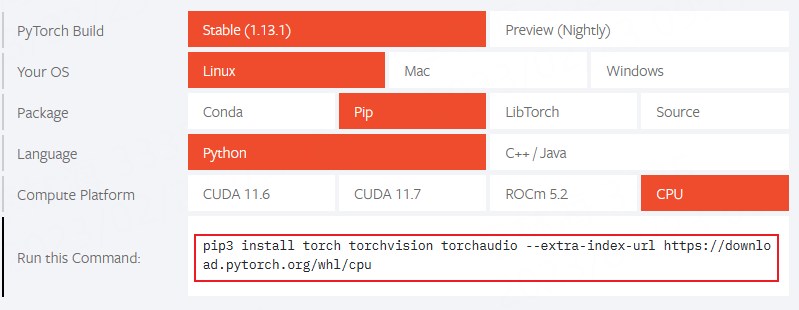
The default on the page is the latest stable version of PyTorch. If you install the previous version, you can click on the page previous version of pytorch
Or click here <https://pytorch.org/get-started/previous- versions/> _.
# With PyTorch, you need to install the Python3 and PIP basic environment first, which can be searched by yourself.
# CPU version:
pip3 install torch torchvision torchaudio --extra-index-url https://download.pytorch.org/whl/cpu

# GPU version(CUDA 11.6):
pip3 install torch torchvision torchaudio --extra-index-url https://download.pytorch.org/whl/cu116
Install the GPU version (Nvida GPU graphics card), you need to install it according to your own graphics card or update graphics driver . Then install the CUDA toolkit , cuDNN .Look at your own situation to install. Finally click here to check the version of the pyctorch and CUDA.
Verify whether the installation is successful:
# Test installation, the terminal input python,
>>> import torch
>>> torch.__version__
'1.10.1+cu102'

# If you install the CUDA version of PyTorch, you can use the command to detect the installation version of PyTorch and the binding CUDA version.
>>> torch.version.cuda
'10.2'
>>> torch.cuda.is_available()
True
# Pytorch installation can also use environment and other environments according to its actual environment and needs.
Regarding program editing tools, you can use Sublime Text, PyCharm, Vim, etc.Here the test environment is to use WSL2 (Ubuntu20.04) . Edit Tools use the Jupyter Notebook. You can refer to the installation tutorial. You can refer to it (`<https://doc.embedfire.com/linux/rk356x/Python/zh/toolpackages/jupyter.html> `_). It is similar to using on the Linux system.
6.1.2. ResNet18 Structure Introduction
Residual Neural Network was proposed by the Microsoft Research Institute’s Kaiming He and others in 2015. The structure of the resnet can accelerate the training of neural networks very quickly, and the accuracy of the model has also improved.
Resnet is a residual network that can understand it as a sub -network. This sub -network can form a deep network after stacking. There are many variants in the resnet series, such as ResNet18, ResNet34, ResNet50, ResNet101 and ResNet152. Its network structure is as follows (Reference paper <https://arxiv.org/abs/1512.03385> _):
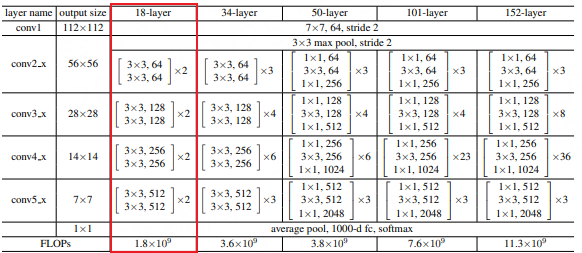
Here we mainly look at ResNet18. The basic meaning of ResNet18 is that the basic architecture of the network is ResNet. The depth of the network is 18 layers. It is 18 layers with weights, excluding BN layers and pooling layers. The basic residual units used in ResNet18 are composed of two 3X3 convolutional layers. There is a BN layer and a RELU activation function in the middle.
6.1.3. Resnet18 in pytorch implementation
Resnet18 source code in pytorch: https://github.com/pytorch/vision/blob/main/torchvision/models/resnet.py
6.2. Resnet18 implementation
6.2.1. Data set preparation and data pre -processing
Next, we will customize a resnet18 network structure and use the CIFAR-10 dataset for a simple test. The CIFAR-10 dataset consists of 10 categories of 60,000 32X32 color images. Each category has 6,000 images, which are divided into 50,000 trained images and 10,000 test images.
1 2 3 4 5 6 7 8 9 | # Import the downloaded data set and use TORCHVISION to load training sets and test sets.
# The parameter Download = True indicates that downloading data from the Internet, stored to the ./data directory can also download it by yourself in the specified directory.
train_dataset = torchvision.datasets.CIFAR10('./data', download=True, train=True, transform=transform_train)
test_dataset = torchvision.datasets.CIFAR10('./data', download=True, train=False, transform=transform_test)
train_loader = torch.utils.data.DataLoader(train_dataset, batch_size=batch_size, shuffle=True)
test_loader = torch.utils.data.DataLoader(test_dataset, batch_size=batch_size, shuffle=False)
# classes = ('plane', 'car', 'bird', 'cat','deer', 'dog', 'frog', 'horse', 'ship', 'truck')
|
Prepare the divided dataset
1 2 3 4 5 6 7 8 9 10 11 12 13 14 | # Pre -processing
transform_train=torchvision.transforms.Compose([
torchvision.transforms.Pad(4),
torchvision.transforms.RandomHorizontalFlip(), #The probability of the image is half, and the probability of half does not flip.
torchvision.transforms.RandomCrop(32), #Image random cut into 32*32
torchvision.transforms.ToTensor(), #Turn to Tensor to transform the gray range from 0-255 to 0-1, and normalize
#torchvision.transforms.Normalize((0.4914, 0.4822, 0.4465),(0.2023, 0.1994, 0.2010))
torchvision.transforms.Normalize([0.5,0.5,0.5], [0.5,0.5,0.5]) #The average value and variance used in normalization
])
transform_test=torchvision.transforms.Compose([
torchvision.transforms.ToTensor(),
#torchvision.transforms.Normalize((0.4914, 0.4822, 0.4465), (0.2023, 0.1994, 0.2010))
torchvision.transforms.Normalize([0.5,0.5,0.5], [0.5,0.5,0.5])#The average value and variance used in normalization
])
|
6.2.2. Build a model
1 2 3 4 5 6 7 8 9 10 11 12 13 14 15 16 17 18 19 20 21 22 23 24 25 26 27 28 29 30 31 32 33 34 35 36 37 38 39 40 41 42 43 44 45 46 47 48 49 50 51 52 53 54 55 56 57 58 59 60 61 62 63 64 65 66 67 68 69 70 71 72 73 74 75 76 | # Residual block implementation
class ResidualBlock(nn.Module):
def __init__(self, in_channels, out_channels, stride=1, downsample=None):
super(ResidualBlock, self).__init__()
self.conv1 = conv3x3(in_channels, out_channels, stride)
self.bn1 = nn.BatchNorm2d(out_channels)
self.relu = nn.ReLU(inplace=True) # Replace in place to save memory overhead
self.conv2 = conv3x3(out_channels, out_channels)
self.bn2 = nn.BatchNorm2d(out_channels)
self.downsample = downsample # shortcut
def forward(self, x):
residual=x
out = self.conv1(x)
out = self.bn1(out)
out = self.relu(out)
out = self.conv2(out)
out = self.bn2(out)
if(self.downsample):
residual = self.downsample(x)
out += residual
out = self.relu(out)
return out
# Custom a neural network, use nn.model, and initialize each layer of neural network through __init__.
# Use Forward to connect data
class ResNet(torch.nn.Module):
def __init__(self, block, layers, num_classes):
super(ResNet, self).__init__()
self.in_channels = 16
self.conv = conv3x3(3, 16)
self.bn = torch.nn.BatchNorm2d(16)
self.relu = torch.nn.ReLU(inplace=True)
self.layer1 = self._make_layers(block, 16, layers[0])
self.layer2 = self._make_layers(block, 32, layers[1], 2)
self.layer3 = self._make_layers(block, 64, layers[2], 2)
self.layer4 = self._make_layers(block, 128, layers[3], 2)
self.avg_pool = torch.nn.AdaptiveAvgPool2d((1, 1))
self.fc = torch.nn.Linear(128, num_classes)
# _make_layers function repeats the residual difference, and the ShortCut part
def _make_layers(self, block, out_channels, blocks, stride=1):
downsample = None
if (stride != 1) or (self.in_channels != out_channels): # The convolution nucleus is 1 for lift dimensions for 1
downsample = torch.nn.Sequential( # When stride == 2, it is when the output channel is raised at each output channel
conv3x3(self.in_channels, out_channels, stride=stride),
torch.nn.BatchNorm2d(out_channels)
)
layers = []
layers.append(block(self.in_channels, out_channels, stride, downsample))
self.in_channels = out_channels
for i in range(1, blocks):
layers.append(block(out_channels, out_channels))
return torch.nn.Sequential(*layers)
def forward(self, x):
out = self.conv(x)
out = self.bn(out)
out = self.relu(out)
out = self.layer1(out)
out = self.layer2(out)
out = self.layer3(out)
out = self.layer4(out)
out = self.avg_pool(out)
out = out.view(out.size(0), -1)
out = self.fc(out)
return out
# Make model,use cpu
model=ResNet(ResidualBlock, [2,2,2,2], num_classes).to(device=device)
# Print the Model structure
print(f"Model structure: {model}\n\n")
# Loss and optimizer
criterion = nn.CrossEntropyLoss() #Cross entropy loss function
optimizer = torch.optim.Adam(model.parameters(), lr=learning_rate) #Optimal random gradient decrease
|
Export model structure during testing:
Model structure: ResNet(
    (conv): Conv2d(3, 16, kernel_size=(3, 3), stride=(1, 1), padding=(1, 1), bias=False)
    (bn): BatchNorm2d(16, eps=1e-05, momentum=0.1, affine=True, track_running_stats=True)
    (relu): ReLU(inplace=True)
    (layer1): Sequential(
        (0): ResidualBlock(
        (conv1): Conv2d(16, 16, kernel_size=(3, 3), stride=(1, 1), padding=(1, 1), bias=False)
        (bn1): BatchNorm2d(16, eps=1e-05, momentum=0.1, affine=True, track_running_stats=True)
        (relu): ReLU(inplace=True)
        (conv2): Conv2d(16, 16, kernel_size=(3, 3), stride=(1, 1), padding=(1, 1), bias=False)
        (bn2): BatchNorm2d(16, eps=1e-05, momentum=0.1, affine=True, track_running_stats=True)
        )
        (1): ResidualBlock(
        (conv1): Conv2d(16, 16, kernel_size=(3, 3), stride=(1, 1), padding=(1, 1), bias=False)
        (bn1): BatchNorm2d(16, eps=1e-05, momentum=0.1, affine=True, track_running_stats=True)
        (relu): ReLU(inplace=True)
        (conv2): Conv2d(16, 16, kernel_size=(3, 3), stride=(1, 1), padding=(1, 1), bias=False)
        (bn2): BatchNorm2d(16, eps=1e-05, momentum=0.1, affine=True, track_running_stats=True)
        )
    )
    (layer2): Sequential(
        (0): ResidualBlock(
        (conv1): Conv2d(16, 32, kernel_size=(3, 3), stride=(2, 2), padding=(1, 1), bias=False)
        (bn1): BatchNorm2d(32, eps=1e-05, momentum=0.1, affine=True, track_running_stats=True)
        (relu): ReLU(inplace=True)
        (conv2): Conv2d(32, 32, kernel_size=(3, 3), stride=(1, 1), padding=(1, 1), bias=False)
        (bn2): BatchNorm2d(32, eps=1e-05, momentum=0.1, affine=True, track_running_stats=True)
        (downsample): Sequential(
            (0): Conv2d(16, 32, kernel_size=(3, 3), stride=(2, 2), padding=(1, 1), bias=False)
            (1): BatchNorm2d(32, eps=1e-05, momentum=0.1, affine=True, track_running_stats=True)
        )
        )
        (1): ResidualBlock(
        (conv1): Conv2d(32, 32, kernel_size=(3, 3), stride=(1, 1), padding=(1, 1), bias=False)
        (bn1): BatchNorm2d(32, eps=1e-05, momentum=0.1, affine=True, track_running_stats=True)
        (relu): ReLU(inplace=True)
        (conv2): Conv2d(32, 32, kernel_size=(3, 3), stride=(1, 1), padding=(1, 1), bias=False)
        (bn2): BatchNorm2d(32, eps=1e-05, momentum=0.1, affine=True, track_running_stats=True)
        )
    )
    (layer3): Sequential(
        (0): ResidualBlock(
        (conv1): Conv2d(32, 64, kernel_size=(3, 3), stride=(2, 2), padding=(1, 1), bias=False)
        (bn1): BatchNorm2d(64, eps=1e-05, momentum=0.1, affine=True, track_running_stats=True)
        (relu): ReLU(inplace=True)
        (conv2): Conv2d(64, 64, kernel_size=(3, 3), stride=(1, 1), padding=(1, 1), bias=False)
        (bn2): BatchNorm2d(64, eps=1e-05, momentum=0.1, affine=True, track_running_stats=True)
        (downsample): Sequential(
            (0): Conv2d(32, 64, kernel_size=(3, 3), stride=(2, 2), padding=(1, 1), bias=False)
            (1): BatchNorm2d(64, eps=1e-05, momentum=0.1, affine=True, track_running_stats=True)
        )
        )
        (1): ResidualBlock(
        (conv1): Conv2d(64, 64, kernel_size=(3, 3), stride=(1, 1), padding=(1, 1), bias=False)
        (bn1): BatchNorm2d(64, eps=1e-05, momentum=0.1, affine=True, track_running_stats=True)
        (relu): ReLU(inplace=True)
        (conv2): Conv2d(64, 64, kernel_size=(3, 3), stride=(1, 1), padding=(1, 1), bias=False)
        (bn2): BatchNorm2d(64, eps=1e-05, momentum=0.1, affine=True, track_running_stats=True)
        )
    )
    (layer4): Sequential(
        (0): ResidualBlock(
        (conv1): Conv2d(64, 128, kernel_size=(3, 3), stride=(2, 2), padding=(1, 1), bias=False)
        (bn1): BatchNorm2d(128, eps=1e-05, momentum=0.1, affine=True, track_running_stats=True)
        (relu): ReLU(inplace=True)
        (conv2): Conv2d(128, 128, kernel_size=(3, 3), stride=(1, 1), padding=(1, 1), bias=False)
        (bn2): BatchNorm2d(128, eps=1e-05, momentum=0.1, affine=True, track_running_stats=True)
        (downsample): Sequential(
            (0): Conv2d(64, 128, kernel_size=(3, 3), stride=(2, 2), padding=(1, 1), bias=False)
            (1): BatchNorm2d(128, eps=1e-05, momentum=0.1, affine=True, track_running_stats=True)
        )
        )
        (1): ResidualBlock(
        (conv1): Conv2d(128, 128, kernel_size=(3, 3), stride=(1, 1), padding=(1, 1), bias=False)
        (bn1): BatchNorm2d(128, eps=1e-05, momentum=0.1, affine=True, track_running_stats=True)
        (relu): ReLU(inplace=True)
        (conv2): Conv2d(128, 128, kernel_size=(3, 3), stride=(1, 1), padding=(1, 1), bias=False)
        (bn2): BatchNorm2d(128, eps=1e-05, momentum=0.1, affine=True, track_running_stats=True)
        )
    )
    (avg_pool): AdaptiveAvgPool2d(output_size=(1, 1))
    (fc): Linear(in_features=128, out_features=10, bias=True)
)
6.2.3. Training and test model
1 2 3 4 5 6 7 8 9 10 11 12 13 14 15 16 17 18 19 | if __name__ == "__main__":
# Training model
total_step = len(train_loader)
for epoch in range(0,num_epoches):
for i, (images, labels) in enumerate(train_loader):
images = images.to(device=device)
labels = labels.to(device=device)
outputs = model(images)
loss = criterion(outputs, labels)
# Gradient clearing
optimizer.zero_grad()
# Reverse propagation
loss.backward()
# Update parameter
optimizer.step()
if (i+1) % total_step == 0:
print('Epoch [{}/{}], Step [{}/{}], Loss: {:.4f}'
.format(epoch+1, num_epoches, i+1, total_step, loss.item()))
print("Finished Tranining")
|
print('\nTest the model')
# Convert to `Eval` Mode
model.eval()  # eval mode (batchnorm uses moving mean/variance instead of mini-batch mean/variance)
with torch.no_grad():

    correct = 0
    total = 0

    for images, labels in test_loader:

        images = images.to(device=device)
        labels = labels.to(device=device)
        outputs = model(images)

        _, predicted = torch.max(outputs.data, 1)

        total += labels.size(0)
        correct += (predicted == labels).sum().item()

    print('Accuracy of the network on the 10000 test images: {} %'.format(100 * correct / total))
The training model, then the test accuracy on the test set reaches 89.8400%:
Epoch [88/100], Step [391/391], Loss: 0.0820
Epoch [89/100], Step [391/391], Loss: 0.0185
Epoch [90/100], Step [391/391], Loss: 0.0166
Epoch [91/100], Step [391/391], Loss: 0.0334
Epoch [92/100], Step [391/391], Loss: 0.0641
Epoch [93/100], Step [391/391], Loss: 0.0359
Epoch [94/100], Step [391/391], Loss: 0.0994
Epoch [95/100], Step [391/391], Loss: 0.0069
Epoch [96/100], Step [391/391], Loss: 0.0722
Epoch [97/100], Step [391/391], Loss: 0.0182
Epoch [98/100], Step [391/391], Loss: 0.2182
Epoch [99/100], Step [391/391], Loss: 0.0657
Epoch [100/100], Step [391/391], Loss: 0.0501
Finished Tranining

Test the model
The accuracy rate in the test set picture picture :89.8400 %
6.2.4. Save as onnx model
Here we use torch.onnx.export to save the model as the onnx model (can also export PT models, etc.):
1 2 3 | # export onnx (rknn-toolkit2 only support to opset_version=12)
x = torch.randn((1, 3, 32, 32))
torch.onnx.export(model, x, './resnet18_pytorch_100.onnx', opset_version=12, input_names=['input'], output_names=['output'])
|
6.2.5. Export the RKNN model and simulation test
1 2 3 4 5 6 7 8 9 10 11 12 13 14 15 16 17 18 19 20 21 22 23 24 25 26 27 28 29 30 31 32 33 34 35 36 37 38 39 40 41 42 43 44 45 46 47 48 49 50 51 52 53 54 55 56 57 58 59 60 61 62 63 64 65 66 67 68 69 | def show_perfs(perfs):
perfs = 'perfs: {}\n'.format(perfs)
print(perfs)
def softmax(x):
return np.exp(x)/sum(np.exp(x))
if __name__ == '__main__':
MODEL = './resnet18_pytorch.onnx'
# Create RKNN
# If the test encounters a problem, turn on Verbose = TRUE and check the debugging information.
# rknn = RKNN(verbose=True)
rknn = RKNN()
# Configuration model, pre -processing
print('--> Config model')
rknn.config(mean_values=[125.307, 122.961, 113.8575], std_values=[51.5865, 50.847, 51.255], target_platform='rk3568')
print('done')
# Loading model
print('--> Loading model')
#ret = rknn.load_pytorch(model=model, input_size_list=input_size_list)
ret = rknn.load_onnx(model=MODEL)
if ret != 0:
print('Load model failed!')
exit(ret)
print('done')
# Build a model
print('--> Building model')
ret = rknn.build(do_quantization=False)
if ret != 0:
print('Build model failed!')
exit(ret)
print('done')
# Export the RKNN model
print('--> Export rknn model')
ret = rknn.export_rknn('./resnet_18_100.rknn')
if ret != 0:
print('Export rknn model failed!')
exit(ret)
print('done')
# Enter image processing
img = cv2.imread('./0_125.jpg')
img = cv2.cvtColor(img, cv2.COLOR_BGR2RGB)
img = cv2.resize(img,(32,32))
img = np.expand_dims(img, 0)
# Initialized operating environment
print('--> Init runtime environment')
ret = rknn.init_runtime()
if ret != 0:
print('Init runtime environment failed!')
exit(ret)
print('done')
# Simulation reasoning
print('--> Running model')
outputs = rknn.inference(inputs=[img])
np.save('./pytorch_resnet18_qat_0.npy', outputs[0])
#show_outputs(softmax(np.array(outputs[0][0])))
print(outputs)
print('done')
rknn.release()
|
6.2.6. Board deployment test
6.2.6.1. Simple test
1 2 3 4 5 6 7 8 9 10 11 12 13 14 15 16 17 18 19 20 21 22 23 24 25 26 27 28 29 30 31 32 33 34 35 36 37 38 39 40 | IMG_PATH = '0_125.jpg'
RKNN_MODEL = './resnet_18_100.rknn'
img_height = 32
img_width = 32
class_names = ["plane","car","bird","cat","deer","dog","frog","horse","ship","truck"]
# Create RKNN object
rknn_lite = RKNNLite()
# load RKNN model
print('--> Load RKNN model')
ret = rknn_lite.load_rknn(RKNN_MODEL)
if ret != 0:
print('Load RKNN model failed')
exit(ret)
print('done')
# Init runtime environment
print('--> Init runtime environment')
ret = rknn_lite.init_runtime()
if ret != 0:
print('Init runtime environment failed!')
exit(ret)
print('done')
# load image
img = cv2.imread(IMG_PATH)
img = cv2.resize(img,(32,32))
img = cv2.cvtColor(img, cv2.COLOR_BGR2RGB)
img = np.expand_dims(img, 0)
# runing model
print('--> Running model')
outputs = rknn_lite.inference(inputs=[img])
print("result: ", outputs)
print(
"This image most likely belongs to {}."
.format(class_names[np.argmax(outputs)])
)
rknn_lite.release()
|
Test Results:
--> Load RKNN model
done
--> Init runtime environment
I RKNN: [16:02:15.992] RKNN Runtime Information: librknnrt version: 1.4.0 (a10f100eb@2022-09-09T09:07:14)
I RKNN: [16:02:15.992] RKNN Driver Information: version: 0.7.2
I RKNN: [16:02:15.992] RKNN Model Information: version: 1, toolkit version: 1.4.0-22dcfef4(compiler version: 1.4.0 (3b4520e4f@2022-09-05T20:52:35)), target: RKNPU lite, target platform: rk3568, framework name: ONNX, framework layout: NCHW
done
--> Running model
result:  [array([[ -2.0566406, -15.234375 ,   6.6835938,  -6.828125 ,  -9.9921875,
        -6.5390625,  -5.671875 , -15.8515625, -17.96875  , -11.90625  ]],
    dtype=float32)]
This image most likely belongs to bird.
6.2.6.2. Use test set image test
First change the test set in the .jpg format, and then transmit it to the board for deployment test:
1 2 3 4 5 6 7 8 9 10 11 12 13 14 15 16 17 18 19 20 21 22 23 24 25 26 27 28 29 | # The absolute path where the CIFAR-10 dataset is located, modify according to the specific path
base_dir = "/mnt/e/Users/Administrator/Desktop/wsl_user/pytorch/"
data_dir = os.path.join(base_dir, "data", "cifar-10-batches-py")
test_o_dir = os.path.join( base_dir, "Data", "cifar-10-png", "raw_test")
# unzip
def unpickle(file):
with open(file, 'rb') as fo:
dict_ = pickle.load(fo, encoding='bytes')
return dict_
# Generate test set pictures
if __name__ == '__main__':
print("start...")
test_data_path = os.path.join(data_dir, "test_batch")
test_data = unpickle(test_data_path)
for i in range(0, 10000):
img = np.reshape(test_data[b'data'][i], (3, 32, 32))
img = img.transpose(1, 2, 0)
label_num = str(test_data[b'labels'][i])
o_dir = os.path.join(test_o_dir, label_num)
if not os.path.isdir(o_dir):
os.makedirs(o_dir)
img_name = label_num + '_' + str(i) + '.jpg'
img_path = os.path.join(o_dir, img_name)
imwrite(img_path, img)
print("done.")
|
Then modify the board test file to add:
1 2 3 4 5 6 7 8 9 10 11 12 13 14 15 | def rknn_inference(root):
total=0
correct=0
for path in os.listdir(root):
image_filenames = os.listdir(root + '/' + path)
for image_filename in image_filenames:
img = cv2.imread(root + '/' + path + '/' + image_filename)
img = cv2.cvtColor(img, cv2.COLOR_BGR2RGB)
outputs = rknn_lite.inference(inputs=[img])
total += 1
if np.argmax(outputs) == int(path[:1]) :
correct += 1
print("corrorect={}, total={}".format(correct,total))
print('在{}张测试集图片上的准确率:{:.2f} %'.format(total,100 * correct / total))
#The accuracy rate on the test set picture
|
Simple test results:
1 2 3 4 5 6 7 8 9 10 11 | --> Load RKNN model
done
--> Init runtime environment
I RKNN: [10:23:15.384] RKNN Runtime Information: librknnrt version: 1.4.0 (a10f100eb@2022-09-09T09:07:14)
I RKNN: [10:23:15.385] RKNN Driver Information: version: 0.7.2
I RKNN: [10:23:15.385] RKNN Model Information: version: 1, toolkit version: 1.4.0-22dcfef4(compiler version: 1.4.0 (3b4520e4f@2022-09-05T20:52:35)), target: RKNPU lite, target platform: rk3568, framework name: ONNX, framework layout: NCHW
done
--> Running model
在10000张测试集图片上的准确率:71.21
# The accuracy rate on the 10,000 test set pictures: 71.21
done
|