
3. Network connection and static configuration
LubanCat-RK series boards are equipped with Ethernet ports or WIFI modules, and can also be connected to 4G modules, PCIE-to-Ethernet modules, USB-to-Ethernet modules, etc.. So that our network needs are not only as simple as providing boards to access the Internet. Different combinations can produce countless changes.
3.1. ping command
ping (Packet Internet Groper), Internet packet explorer, a program used to test the amount of network connection. It is a command used to check whether the network is smooth or the speed of the network connection.
The principle of ping: Send a data packet of a certain length to the specified network address. According to the agreement, if the specified network address exists, it will return a data packet of the same size. If not return in the specific time, the network address is considered not to exist.
3.1.1. Local area communication
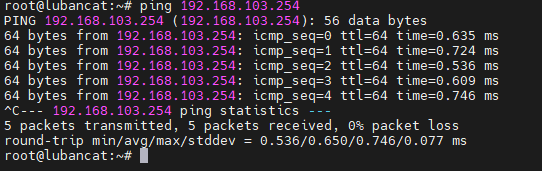
A gateway is necessary in a LAN. We can check whether our IP can be used successfully by pinging the gateway. If the gateway cannot be pinged, it proves that the LAN is not connected.
1 2 | #ping command
sudo ping + ip address
|
After successful networking, you can see a series of data, as shown in the figure below
If there is no successful networking, an error will be reported, as shown below

3.1.2. Connect to the internet
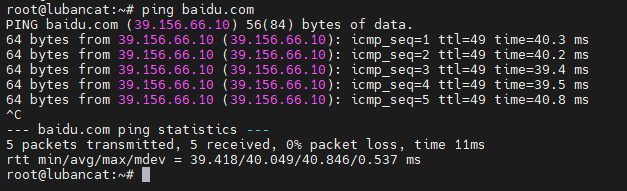
We can check whether our board is connected to the Internet by pinging the website.
1 2 | #ping Command
sudo ping xxx.com
|
Take www.baidu.com as an example
After successful networking, you can see a series of data, as shown in the figure below.
If the network is not successful, it will be as follows

3.2. Internet connection
Connecting to the Internet or forming a local area network needs to meet a prerequisite - the device needs to obtain ip, ip can be understood as the name of the device, and devices in the local area network can communicate through ip in the local area network.
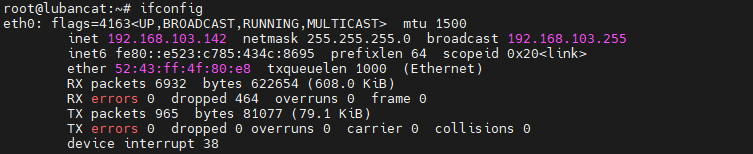
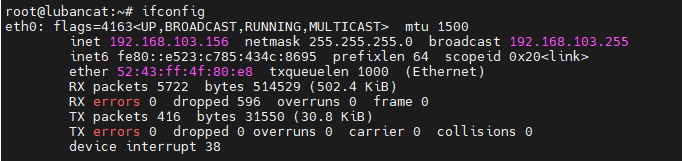
1 2 3 | #view ip
ifconfig
|

3.2.1. Network port connection
Except for LubanCat-Zero-W which does not have network ports in LubanCat-RK series boards, other boards will have 1-4 network ports. The network ports look like this.
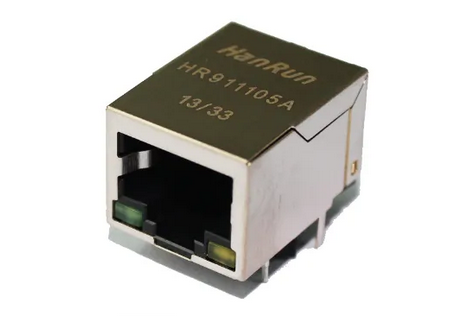
To connect to the network, you need to insert the network cable into the network port. Our boards support 10/100/1000M self-adaptation. Readers can choose the corresponding network cable connection according to their own network.
1 2 3 4 | Cat5 ----- 100M
Cat5E ----- 1000M (recommended)
Cat6 ----- 1000M (recommended)
Cat6E ----- 1000M (recommended)
|
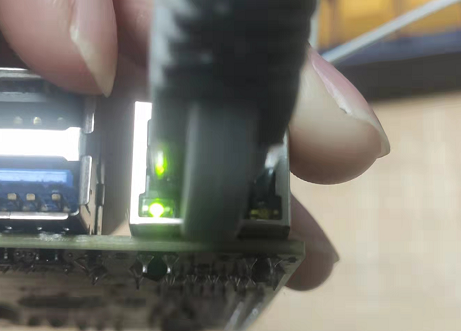
If you use a network cable suitable for gigabit, the light of the network port will be on after the connection is successful.
3.2.2. Wireless connections
Video introduction to this chapter:

“15-Wireless Network Card Connecting WiFi and Bluetooth”
https://www.bilibili.com/video/BV1Y24y1A7xH/
You can go to “Module Support List” chapter to view.
Support usb network card
Support pcie network card
3.2.2.1. Command line graphical connection
Enter graphics configuration
1 | sudo nmtui
|
Move the keyboard arrow keys to
Active a connectionPressEnter keyto enter wifi settings.

Then move the arrow keys to the wifi you want to connect to, press
EnterIf you are connected to an unconnected WIFI hotspot with a password, enter the password input interface
If there is no password or the connected WIFI hotspot, connect to the WIFI hotspot or cancel the connection to the WIFI hotspot.

注解
Using some network cards (such as rtl8821cu), the system will generate two network access points p2p0 and wlan0, which node can be used for wifi connection. Using p2p0 will be convenient for setting, and using wlan0 will be more in line with the habits of netizens.
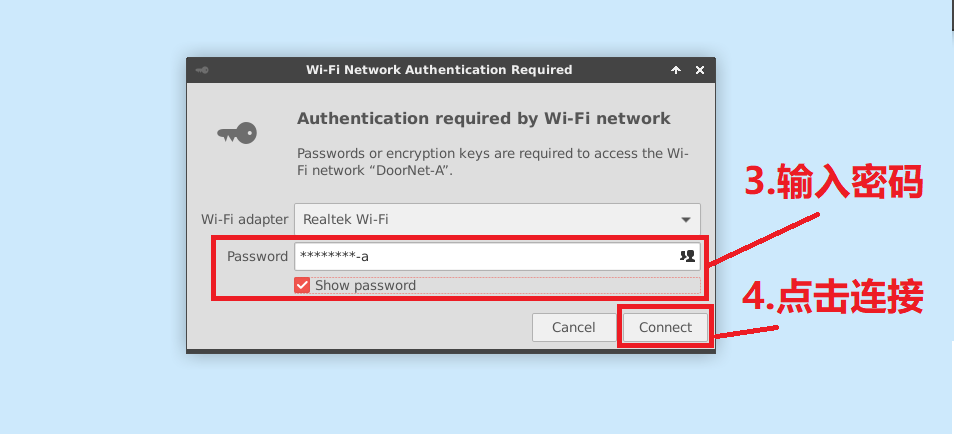
When connecting to a hotspot with a password for the first time, as shown below

After entering the password, you can see that the wifi is connected.
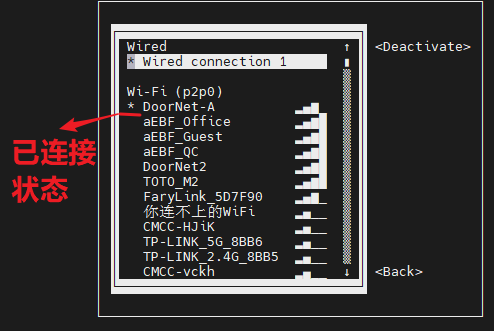
If you want to disconnect wifi, press the Enter in the connected state to disconnect
3.2.2.2. Command line connection
List wifi
1 | nmcli dev wifi list
|
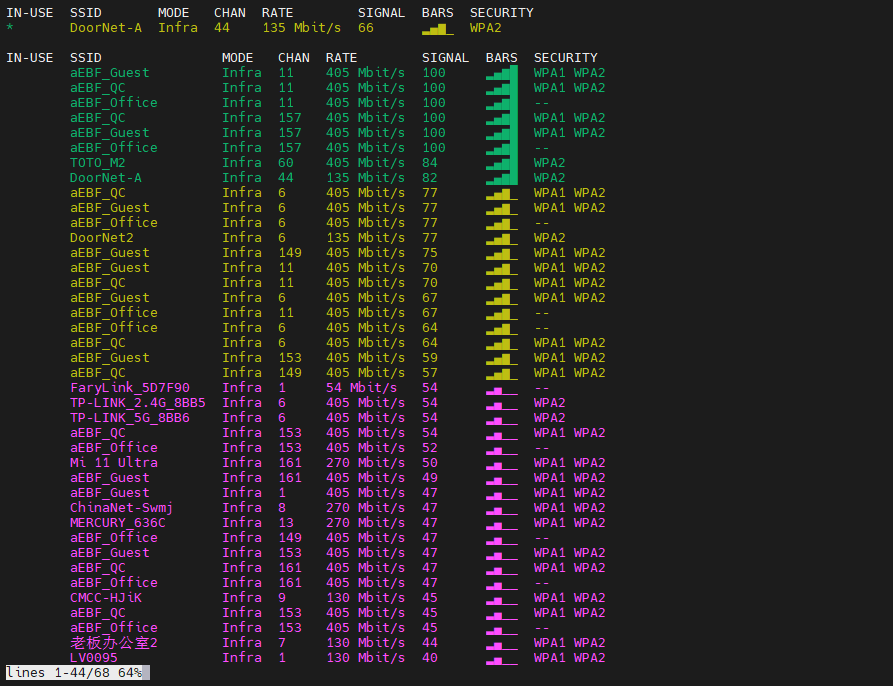
Press the arrow keys to view the wifi list, press q to exit
Connect wifi
Take hotspot: PPP password: 00000000 using interface wlan0 as an example
1 2 3 4 5 | #First connection
sudo nmcli dev wifi connect PPP password '00000000' ifname wlan0
#After the first connection is successful, after connecting or switching wifi.
sudo nmcli dev wifi connect PPP
|
For specific operations, please go to 《nmcli》 to view.
3.2.2.3. Desktop connection
Since the network setting methods of Ubuntu and debian systems are almost the same, here only demonstrates the wifi configuration of debain system.
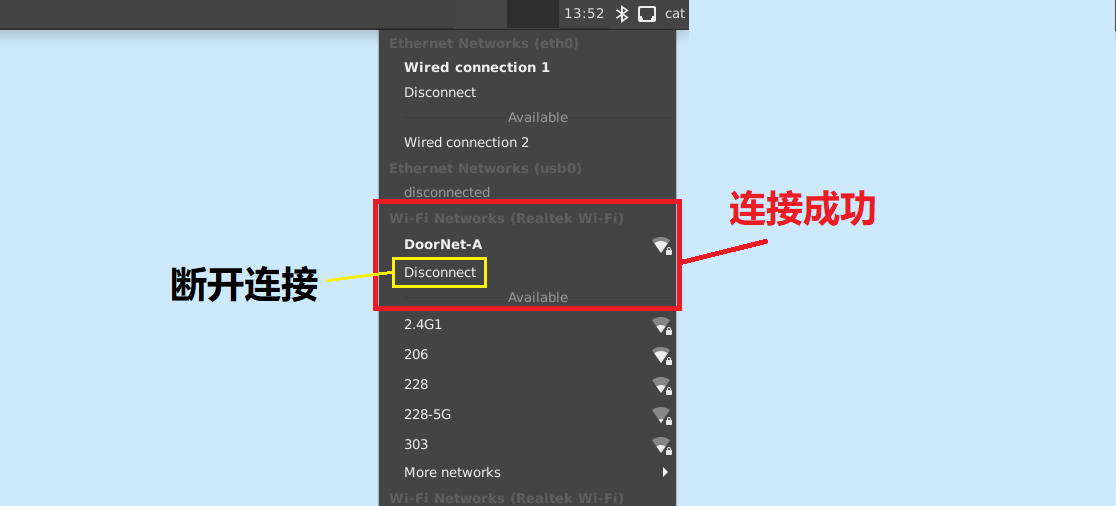
Step 1: Click Network Management in the upper right corner.
Step 2: Select the wifi to connect to.

Step 3: Enter wifi password
Step 4: Click Connect
The picture below shows that the connection is successful.
3.2.3. USB shared network
Video introduction to this chapter:
“14-Connect to the network via USB”
https://www.bilibili.com/video/BV1vh4y1x7av/
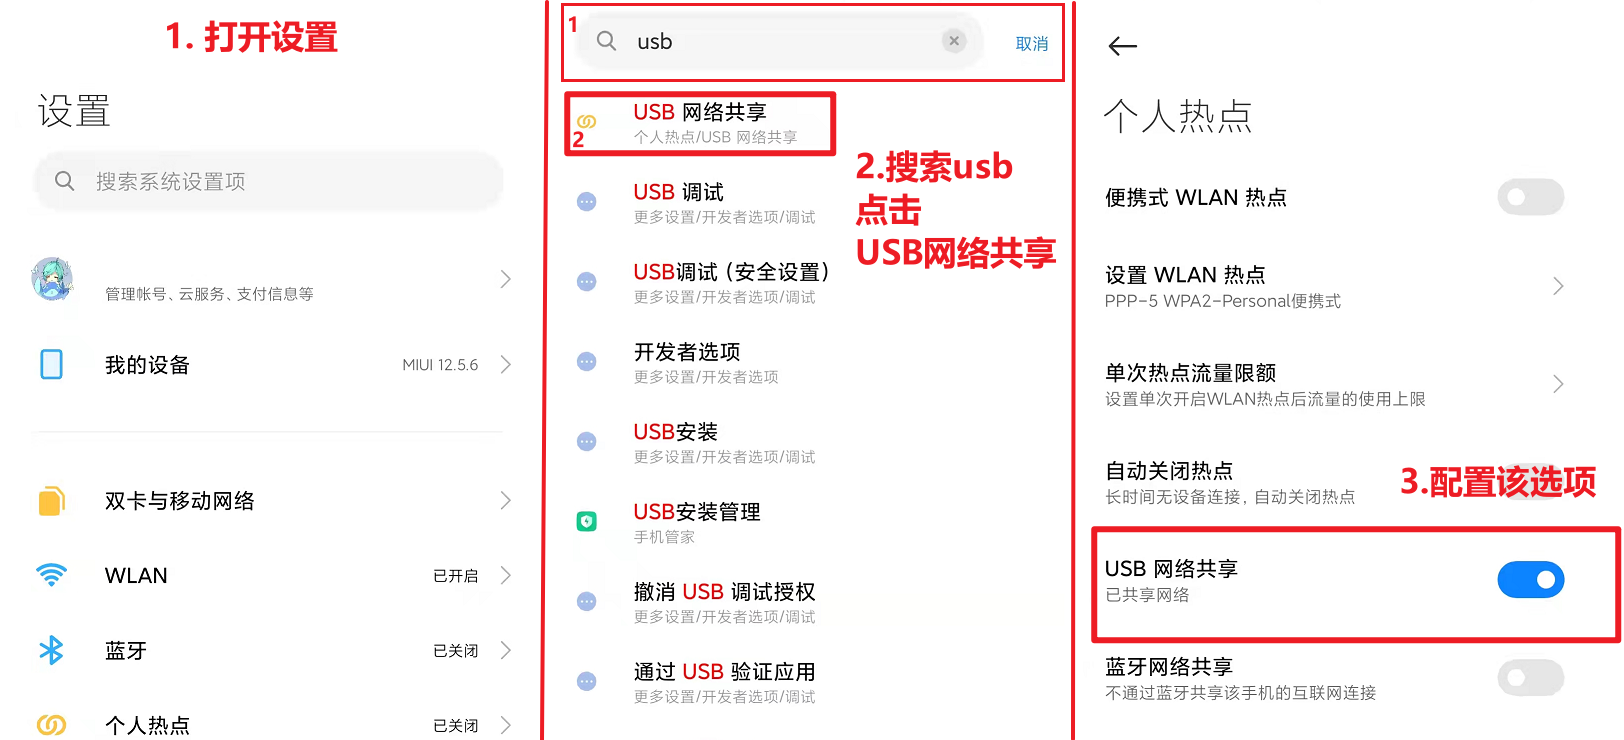
3.2.3.1. Mobile phone USB sharing network
Steps to share network using USB
注意
Before using this function, you need to check whether your mobile phone model supports USB network sharing.
Steps:
The mobile phone needs to be connected to the Internet
Connect the mobile phone and the board with USB
Turn on the USB sharing function on the mobile phone
After completing the above steps, the board can share the network on the mobile phone
You can go to Baidu to check the USB sharing function of the mobile phone, because different mobile phones and different system versions have different settings, so I won’t go into details here.
Here we take Redmi K20 Pro as an example, the operation method of Xiaomi system should be similar.
Use TYPE-C cable (can transmit data) to connect board and mobile phone
Turn on the USB sharing function on the mobile phone, as shown in the figure below
The method of sharing the network with other mobile phones (not tested, it is possible in theory, if unsuccessful, you can search online)
3.2.3.2. Computer USB sharing network-Windows
注意
To enable this function, you need to use the OTG interface of the board, and the computer can provide enough current to maintain the normal operation of the board (except LubanCat2 N). You can try to use the computer USB to power the board directly. If there is a restart, you can reduce some peripherals try again, if the restart does not appear, the function can be used.
Operation method:
Use a cable that can transmit data to connect the USB port of the computer and the OTG port of the board (usually the power supply port).
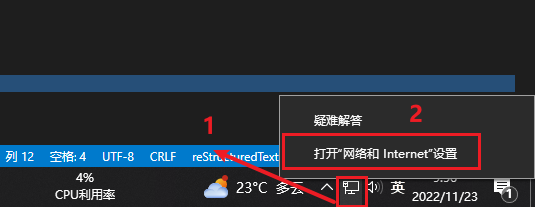
Turn on network sharing on the computer, the specific method is as follows.
Open network settings
View current network status
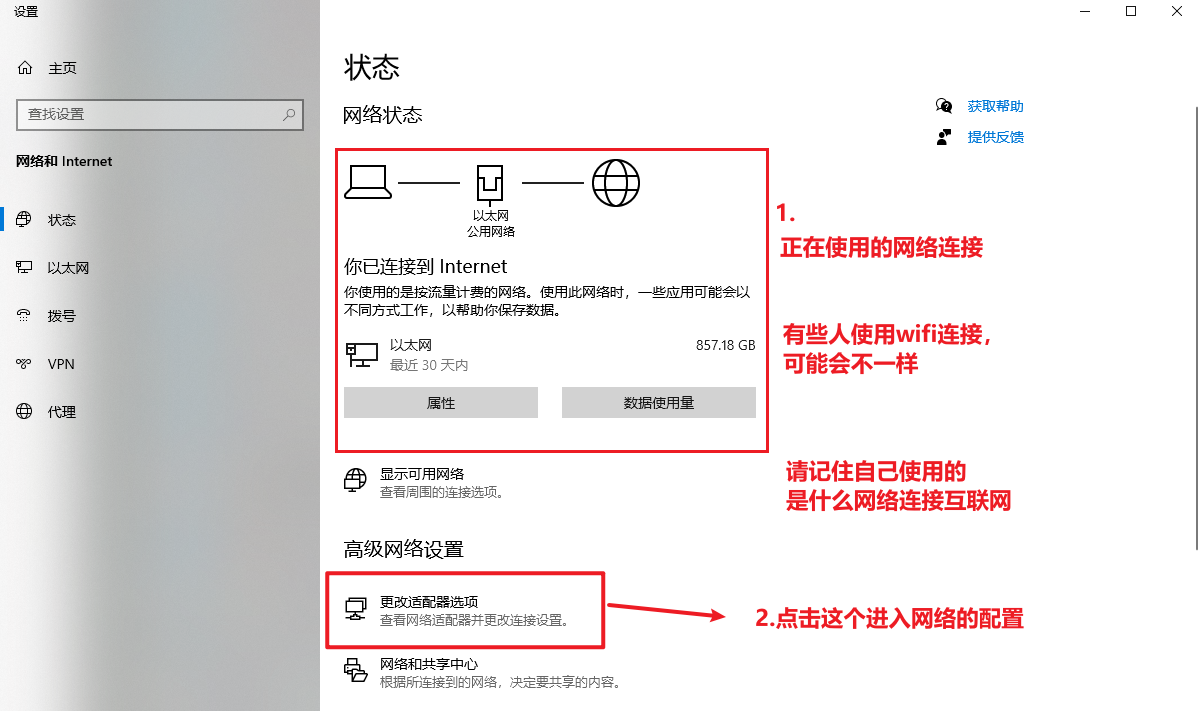
View all current network connections
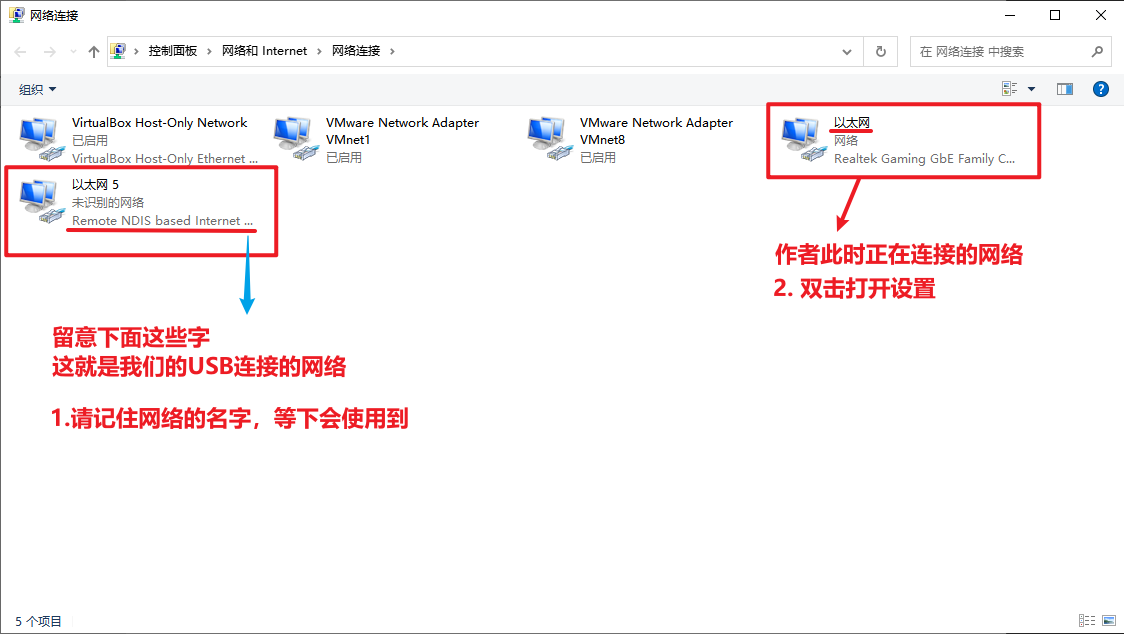
Configure network shares
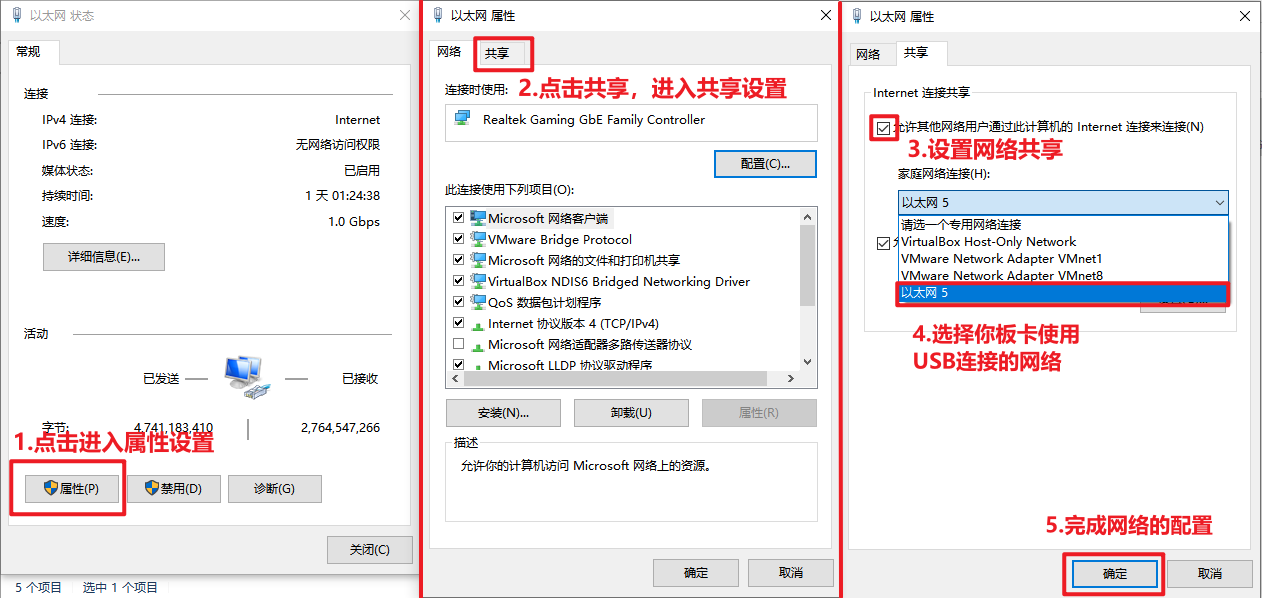
Check whether to obtain ip automatically
1 2 3 | #wait a few seconds
#Check whether to get ip
ifconfig
|
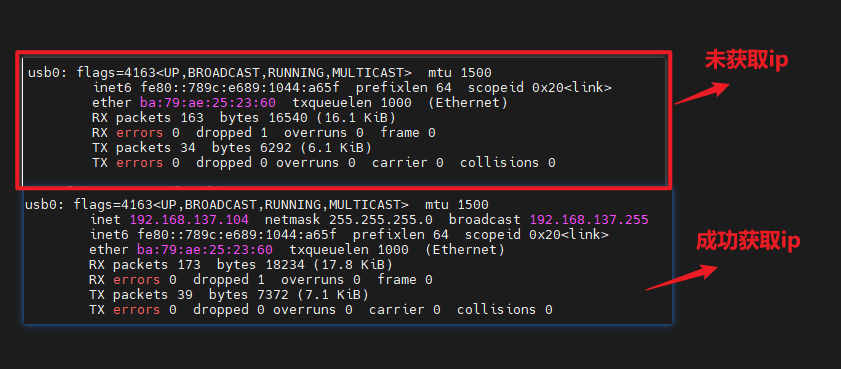
If the network sharing is turned on on the computer, if usb0 does not automatically obtain the ip after 20 seconds, you need to obtain the ip manually.
1 2 | #Manual configuration to automatically obtain ip
dhclient usb0
|
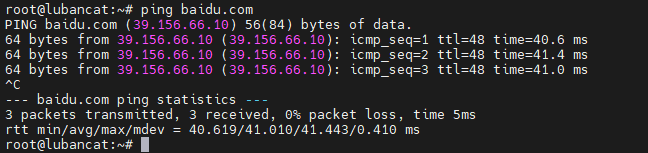
After successfully obtaining the ip, you can use this command to check whether you have successfully connected to the network
1 | ping baidu.com
|
Success as shown below
3.2.3.3. Computer USB Shared Network-Linux
注意
To enable this function, you need to use the OTG interface of the board and the computer can provide enough current to maintain the normal operation of the board (except LubanCat2 N). You can try to use the computer USB to power the board directly. If there is a restart, you can reduce some peripherals and try again. If the restart does not appear, the function can be used.
注解
The following uses Ubuntu20.04 for demonstration, and the operation process of other Linux distributions is similar.
Operation method:
Use a cable that can transmit data to connect the USB port of the computer and the OTG port of the board (usually the power supply port)
Turn on network sharing on the computer, the specific method is as follows
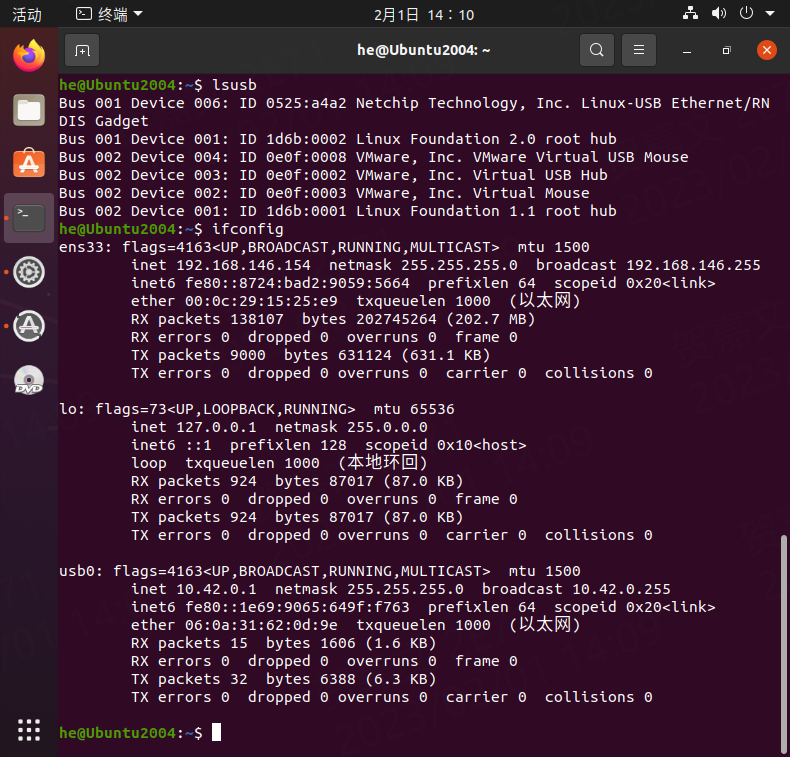
Connect the LubanCat board to the computer correctly through the OTG interface
When the connection is complete, use the lsusb command in the terminal to see a Linux-USB Ethernet/RNDIS Gadget device, and use the ifconfig command to see the usb0 network card.
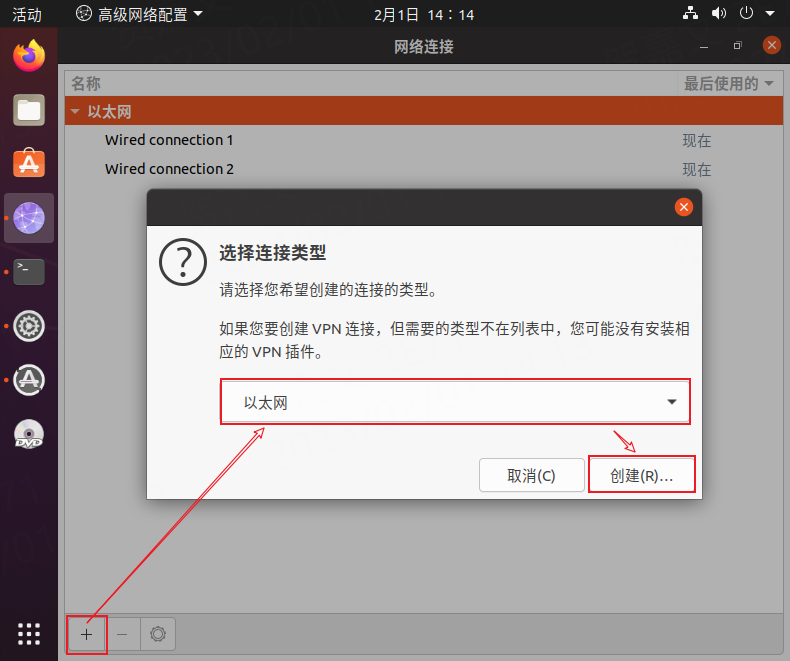
Open network settings and create a new interface
Use the nm-connection-editor command in the terminal to open the network manager and create a new Ethernet (Ethernet) connection.
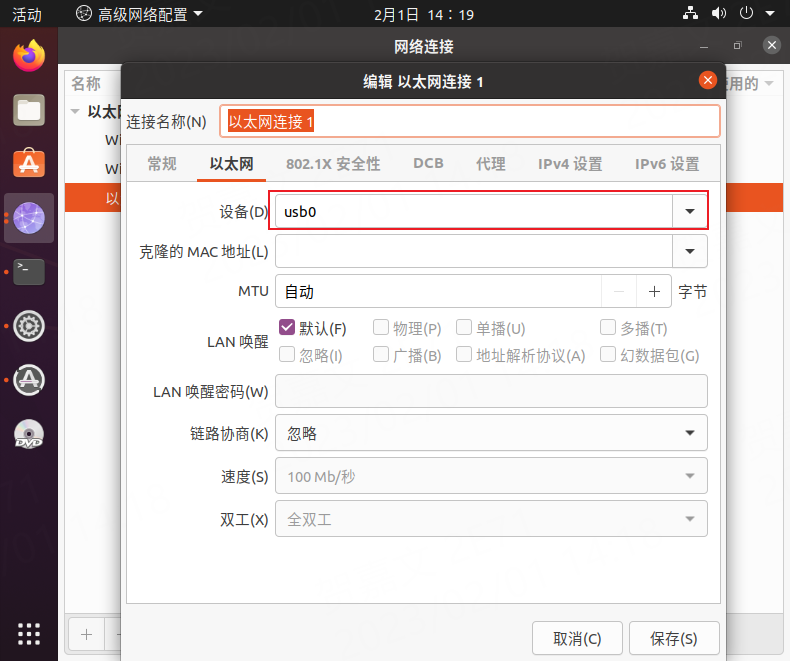
Configure network shares
Modify the configuration of the Ethernet tab and set the device to usb0, which is the network device connected to LubanCat.
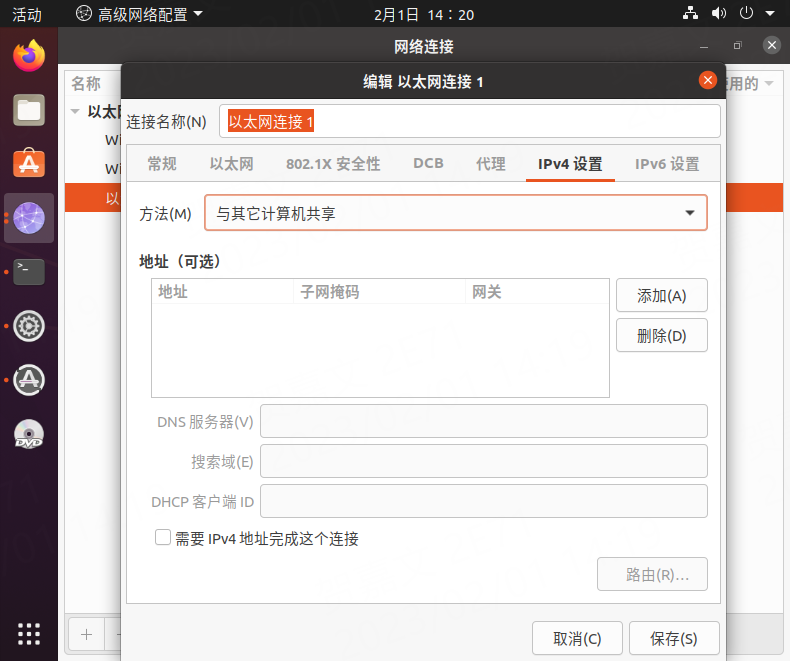
Modify the IPv4 Settings tab, set the method to share with other computers, and save the settings
Check whether to obtain ip automatically
Run the following command on the terminal of the LubanCat board.
1 2 3 | #Wait a few seconds
#Check whether to get ip
ifconfig
|
As shown in the figure, the IP obtained by LubanCat is 10.42.0.12

If usb0 still does not automatically obtain ip after 20 seconds of network sharing on the computer, you need to re-plug the USB or obtain ip manually.
1 2 | #Get ip manually
dhclient usb0
|
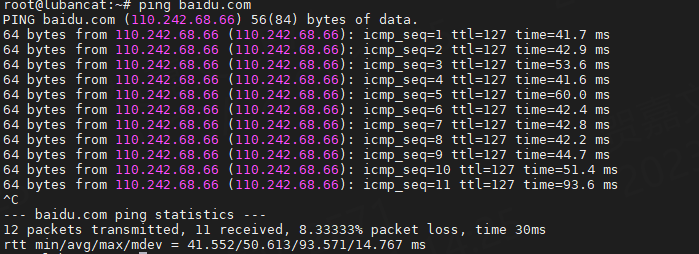
After successfully obtaining the ip, you can use this command to check whether you have successfully connected to the network.
1 | ping baidu.com
|
Success as shown below
3.3. Static network configuration
Video introduction to this chapter:
《16-Set network static IP》
https://www.bilibili.com/video/BV16h4y1x7k8/
Here is an article related to the Internet. The article introduces the basic structure of our Internet in life. It can also let us know about addresses gateway4 nameservers below, which can help set static IP
ps:The article is a bit long, it may take more than ten minutes to read and understand
注解
If the static ip is not set correctly, it will cause the network to fail to connect to the network normally.
注意
If you are a beginner, it is recommended to set the dynamically obtained IP to static
3.3.1. Static IP cannot connect to the network troubleshooting
This section is to troubleshoot the problem of not being able to connect to the network when you set a static ip. If the troubleshooting fails to solve the problem, it is recommended to output the contents of the Baidu command line.
1 |
|
Static IP cannot connect to the network troubleshooting
1. Unable to connect to the network —-> check whether the dynamic ip connection can be connected to the network correctly Yes —-> check below, not —-> there is a problem with the network link
2. Check if your gateway is set correctly —–> View the gateway automatically set during dynamic connection Same —-> check below, different —–> reset the gateway
3. Check that the set static ip address has been occupied by other devices —-> ping the gateway Yes —-> check below, not —-> change static ip or set dynamic allocation ip
4. Set DNS servers —-> set to 114.114.114.114 or 8.8.8.8 Yes —-> end, no —–> go to google search according to debug information
3.3.2. nmtui
Set the ip address before the static address
If you want to successfully set the static address, you need to pay attention to whether the ip address you want to set is occupied by other devices. You can use the static address set by ping. If there is data returned, it proves that the ip is occupied by other devices.
注意
It is suggested here that Mengxin who does not understand network configuration can set the static address as the ip address obtained during dynamic connection
The following are detailed steps
Enter graphics configuration
1 | nmtui
|
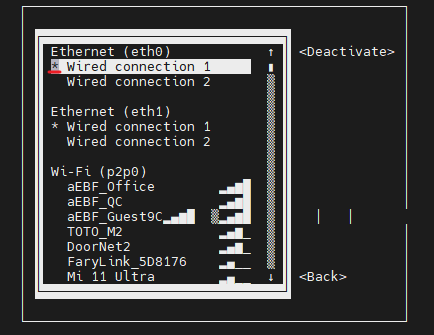
Move the keyboard arrow keys to
Edit a connectionPressEnter keyto enter wifi settings.
Select the network you want to edit, here we take eth0 as an example.
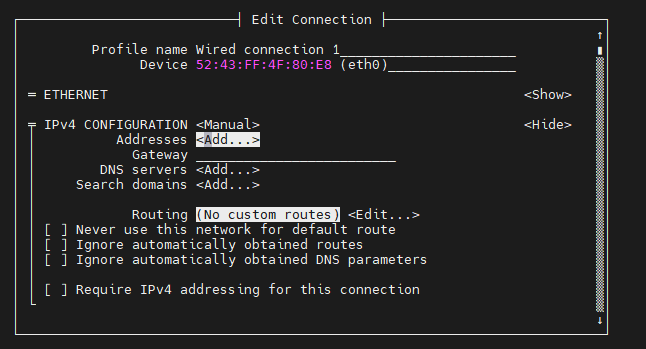
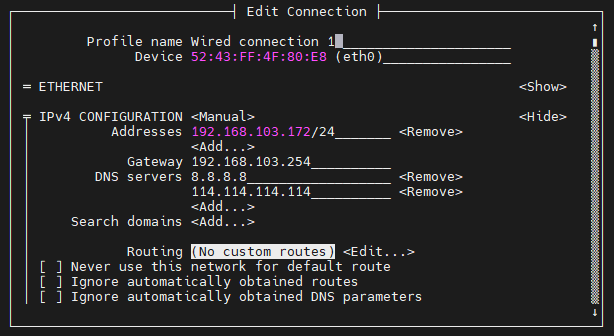
Enter to see the default configuration of the network
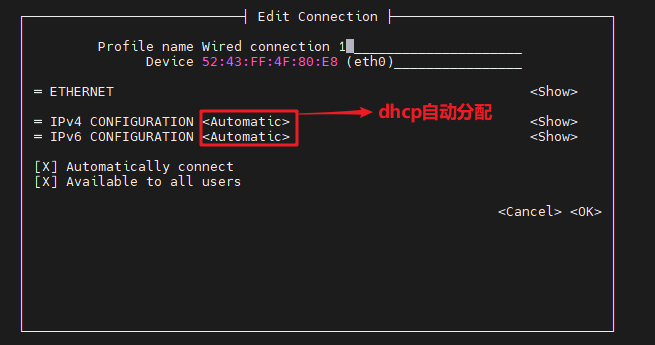
The following operations are to configure static ip
Need to set
IPV4 CONFIGURATIONto Manual
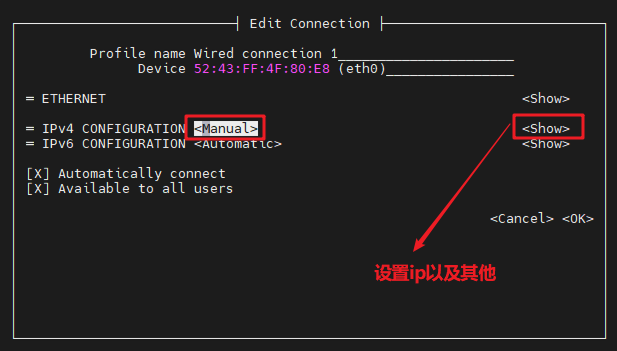
Then move the cursor to
showand press enter to enter the detailed configuration
Move the cursor to address
<Add...>to add an ip addressHere take ip address 192.168.103.172 and gateway 192.168.103.254 as an example
注意
The ip address and gateway need to be configured according to your actual network conditions. If you copy the configuration here, there is a high probability that your board will not be able to connect to the Internet. Rookie recommends changing the static ip to a dynamically obtained ip
How to get the gateway
1 2 3 4 5 6 7 8 9 10 11 12 13 14 15 16 17 18 19 20 21 22 23 | #1.Set the network to automatically obtain ip
#2.After successfully obtaining the ip, use the command
route
#Result
root@lubancat:~# route
Kernel IP routing table
Destination Gateway Genmask Flags Metric Ref Use Iface
default _gateway 0.0.0.0 UG 100 0 0 eth0
default FusionWrt.lan 0.0.0.0 UG 600 0 0 wlan0
#3.Gateway is our gateway, use the following command
route -n
#Result
root@lubancat:~# route -n
Kernel IP routing table
Destination Gateway Genmask Flags Metric Ref Use Iface
0.0.0.0 192.168.103.254 0.0.0.0 UG 100 0 0 eth0
0.0.0.0 192.168.25.1 0.0.0.0 UG 600 0 0 wlan0
#You can see our gateway address ---- 192.168.103.254
|
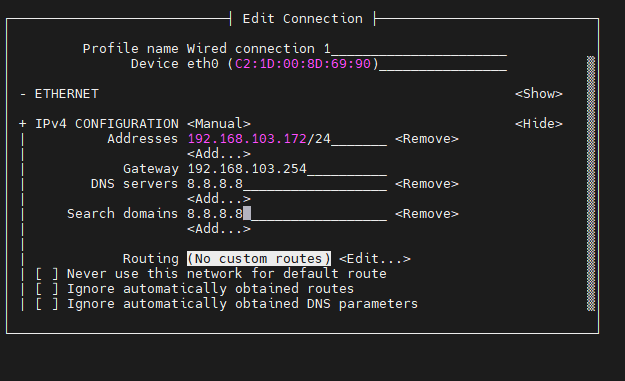
192.168.103.172/24 where /24 represents the mask 255.255.255.0,
DNS servers National(China) common DNS–>114.114.114.114 Global common DNS–>8.8.8.8
The search domain can follow the DNS servers settings.
Multiple
DNS serversandsearch domaincan be set.After setting, you can move to the back and click ok to complete the setting.
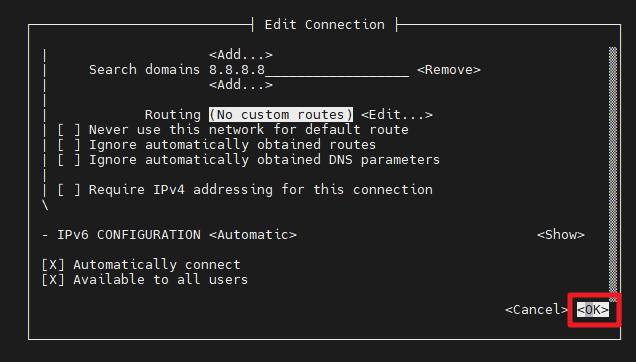
After completing the settings, you need to activate the settings to make the network take effect.
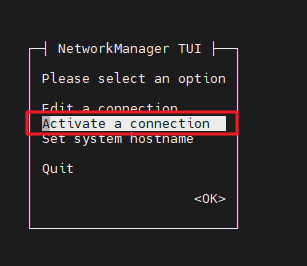
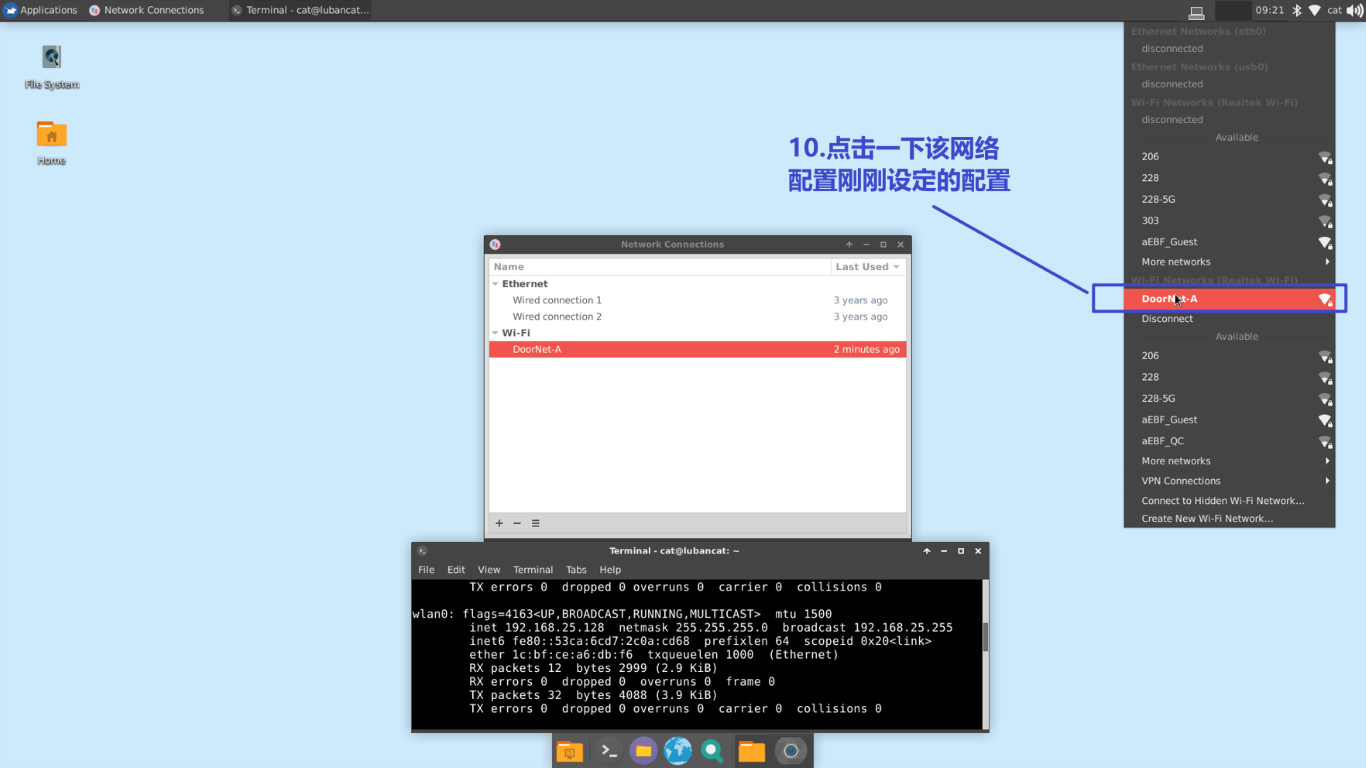
Click
Activate a connectionto enter the connectionThe state in the figure below is network activation
Press enter once to cancel the connection, press enter again to reconnect
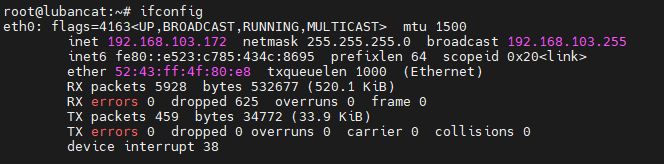
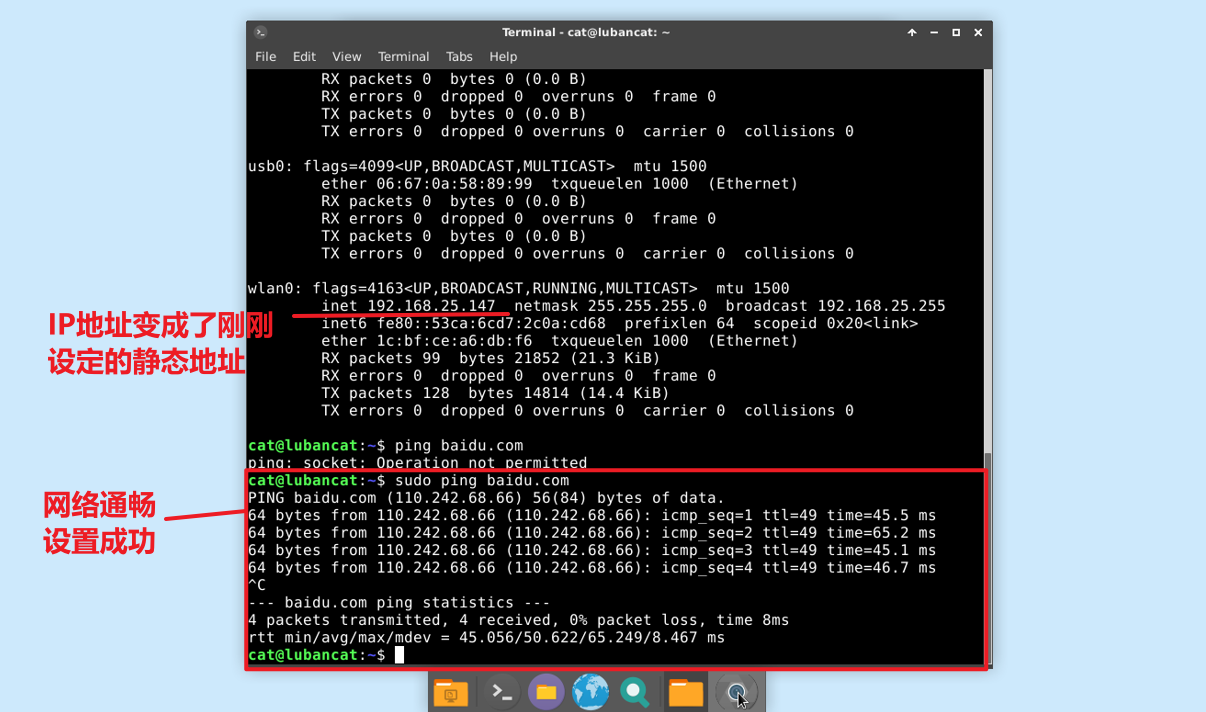
The IP after reconnection becomes the IP we set

We can also use ping baidu.com to check whether the external network is successfully connected.

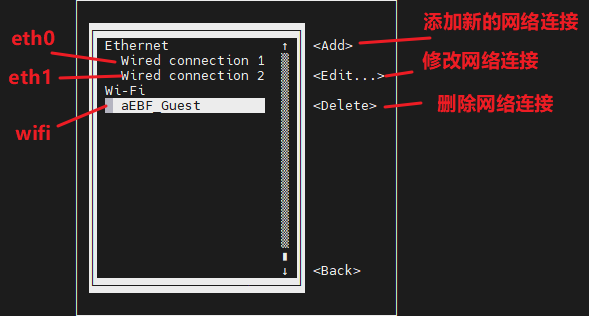
3.3.3. nmcli
Taking eth0 as an example, this step is the same as editing the network in nmtui, except that the operation changes from the graphical interface to the command line. There are various names in the command line. Here we only introduce some of them. If you are interested, you can explore it by yourself.
1 2 3 4 5 6 7 | #First list the configuration of the connection, eth0 is now connected to Wired connection 1
root@lubancat:~# nmcli c s
NAME UUID TYPE DEVICE
Wired connection 1 35ecb023-3194-3edb-bf90-4198f82329a8 ethernet eth0
Wired connection 2 45f86cca-f8df-376e-8aad-37e10d2a65ce ethernet --
aEBF_Guest fb1d506e-6dc7-4c5b-a4ce-339f3349d26d wifi --
|
Then modify Wired connection 1
1 2 3 4 5 6 7 8 9 10 11 12 13 | #Static ip setting
sudo nmcli c modify 'Wired connection 1' [ + | - ]option option value #
sudo nmcli c m 'Wired connection 1' ipv4.address 192.168.103.172/24 # Modify the IP address and subnet mask
sudo nmcli c m 'Wired connection 1' ipv4.method manual # Modify to static configuration, the default is auto
sudo nmcli c m 'Wired connection 1' ipv4.gateway 192.168.103.254 # Modify the default gateway
sudo nmcli c m 'Wired connection 1' ipv4.dns 8.8.8.8 # Modify DNS
sudo nmcli c m 'Wired connection 1' +ipv4.dns 114.114.114.114 # Add a DNS
sudo nmcli c m 'Wired connection 1' ipv6.method disabled # Disable IPv6
sudo nmcli c m 'Wired connection 1' connection.autoconnect yes # boot
Note that ipv4.address must be modified before ipv4.method can be modified!
Replace the value of the option with empty quotes "" to set the option back to the default value (using ipv4.method as an example):
|
You can enter nmtui to view the configuration, you can see that the configuration has been modified, and the configuration has not been activated at this time
1 2 | #activate configuration
sudo nmcli c up ifname eth0
|
After configuration, the ip is changed
3.3.4. netplan (for Ubuntu only)
file location : /etc/netplan/
This tool is limited to the use of Ubuntu system, and the debian system uses this tool to support wireless networks very badly, so it is not recommended to use it in debian.
3.3.4.1. Get ip automatically
1 2 3 4 5 6 7 8 9 10 11 12 13 14 | network:
version: 2
renderer: NetworkManager
ethernets:
eth0:
dhcp4: true
eth1:
dhcp4: true
wifis:
wlan0:
dhcp4: true
access-points:
$wifi_name:
password:"$wifi_password"
|
$wifi_name fill in the wifi name to be connected
$wifi_password fill wifi password
注意
“:”A space must be added after, otherwise an error will be reported
3.3.4.2. Use a static IP
1 2 3 4 5 6 7 8 9 10 11 12 13 14 15 16 17 18 19 20 | network:
version: 2
renderer: NetworkManager # Designated network management tool
ethernets:
eth0:
dhcp4: no
addresses: [192.168.103.172/24]
gateway4: 192.168.103.254
nameservers:
addresses: [8.8.4.4,8.8.8.8]
wifis:
wlan0:
dhcp4: no
addresses: [192.168.25.190/24]
gateway4: 192.168.25.1
nameservers:
addresses: [8.8.8.8,114.114.114.114]
access-points:
DoorNet-A:
password: "********-a"
|
dhcp4: no turn off automatic ip acquisition
addresses: Set the ip address. It is best to choose the value obtained by automatically obtaining the ip. If you set it casually, it may lead to failure to connect to the network correctly.
gateway4: gateway settings
1 2 3 4 5 6 7 8 9 10 11 12 13 14 15 16 17 18 19 20 21 | #1. Use automatic IP
#2. After successfully obtaining ip, use the command
route
#Result
root@lubancat:~# route
Kernel IP routing table
Destination Gateway Genmask Flags Metric Ref Use Iface
default _gateway 0.0.0.0 UG 100 0 0 eth1
default FusionWrt.lan 0.0.0.0 UG 600 0 0 wlan0
#3.Gateway is our gateway, use the following command
route -n
#Result
root@lubancat:~# route -n
Kernel IP routing table
Destination Gateway Genmask Flags Metric Ref Use Iface
0.0.0.0 192.168.103.254 0.0.0.0 UG 100 0 0 eth1
0.0.0.0 192.168.25.1 0.0.0.0 UG 600 0 0 wlan0
#You can see our gateway address
|
nameservers: dns-Domain Name System, which can convert the input URL into an IP address for access
1
2
3
4
5
Global DNS address (this DNS address is the free DNS server address provided by Google)
    Primary dns server: 8.8.8.8, backup dns server: 8.8.4.4
###################################################################
National common DNS address (recommended for domestic users, common DNS for China Mobile, China Telecom and China Unicom)
    Primary dns server 114.114.114.114, backup dns server: 114.114.115.115
3.3.4.3. Application configuration
After the modification is complete, use the following command to apply the configuration
1 2 3 4 5 6 7 8 | #If there is a problem with the configuration file, it will be restored to the original configuration, and if there is no problem, it will be applied.
sudo netplan try
#Set the configuration file, if the file format is not standardized, you can print debug information.
sudo netplan apply
#Print network configuration
sudo netplan get
|
3.3.5. Desktop
Ubuntu
Click the network icon to enter the network settings
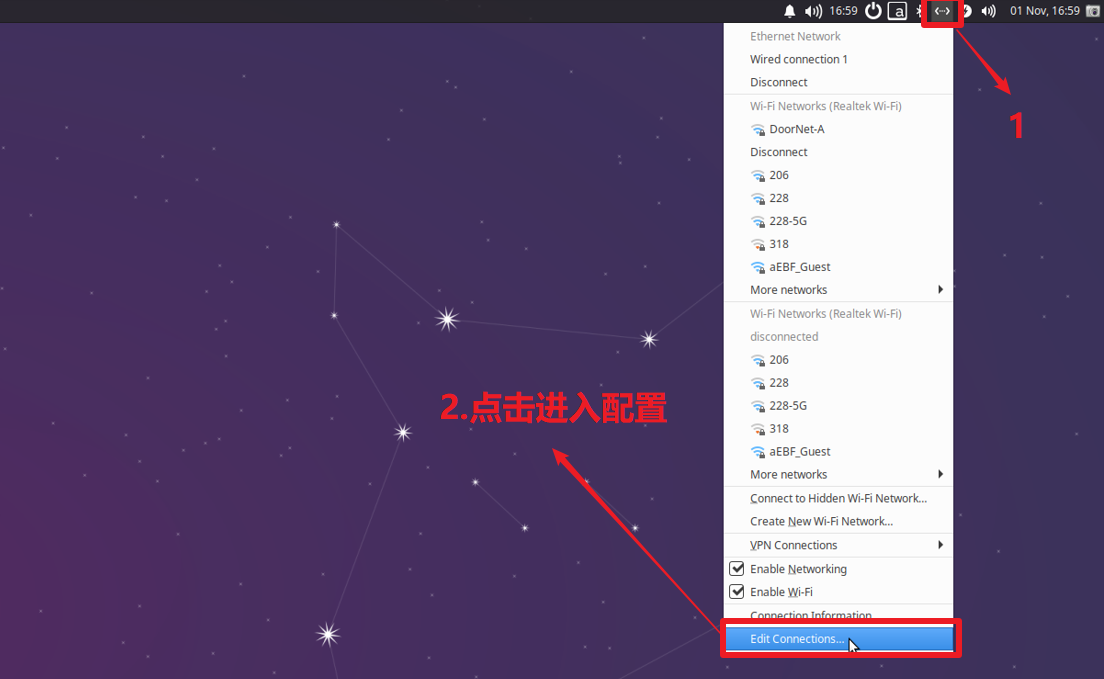
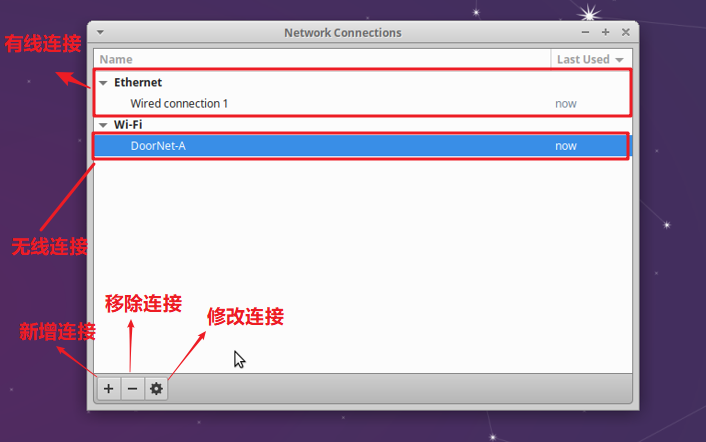
Select the network you need to modify and click the button to modify the connection.
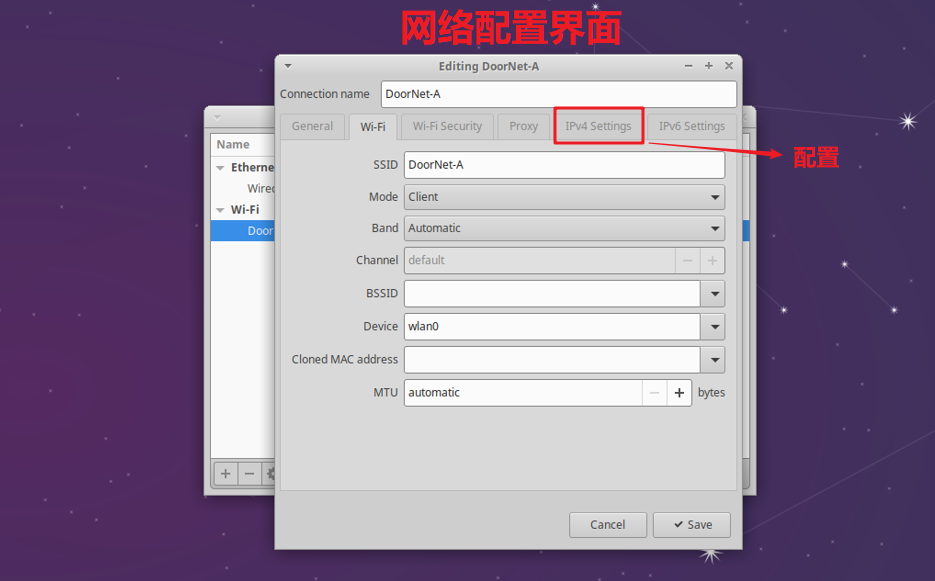
Enter the configuration page, click
ipv4 settings
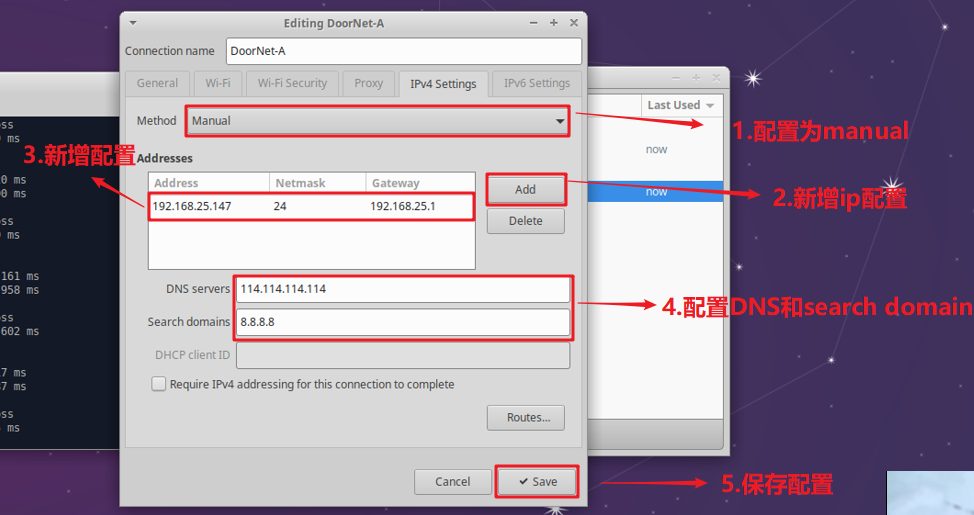
Set your own ip according to the steps and the actual situation of your own network.
DNS serversandsearch domaincan be configured according to the following figure.
After saving, you can restart or reconnect to update your configuration.
debian
Click the software directory in the lower left corner, select
Prefrencesand then selectAdvanced Network Configurationto enter the configuration.
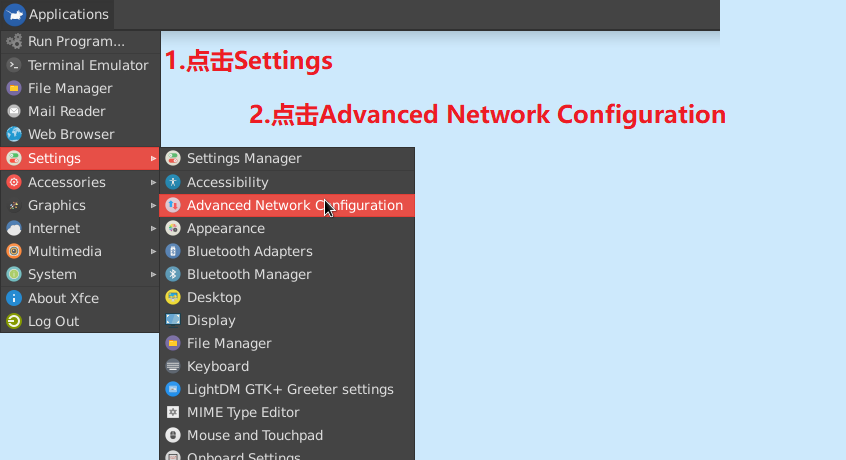
Select the network you need to modify and click the button to configure the connection.
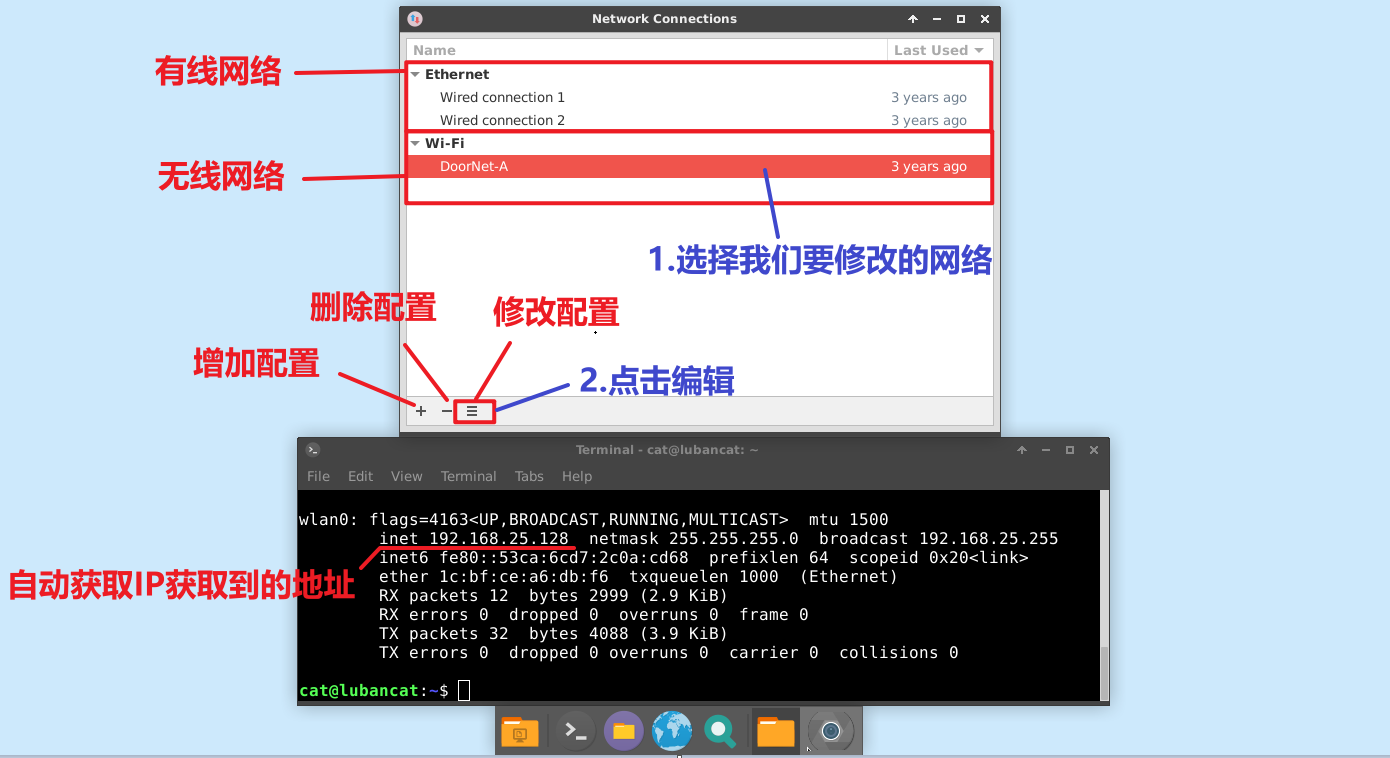
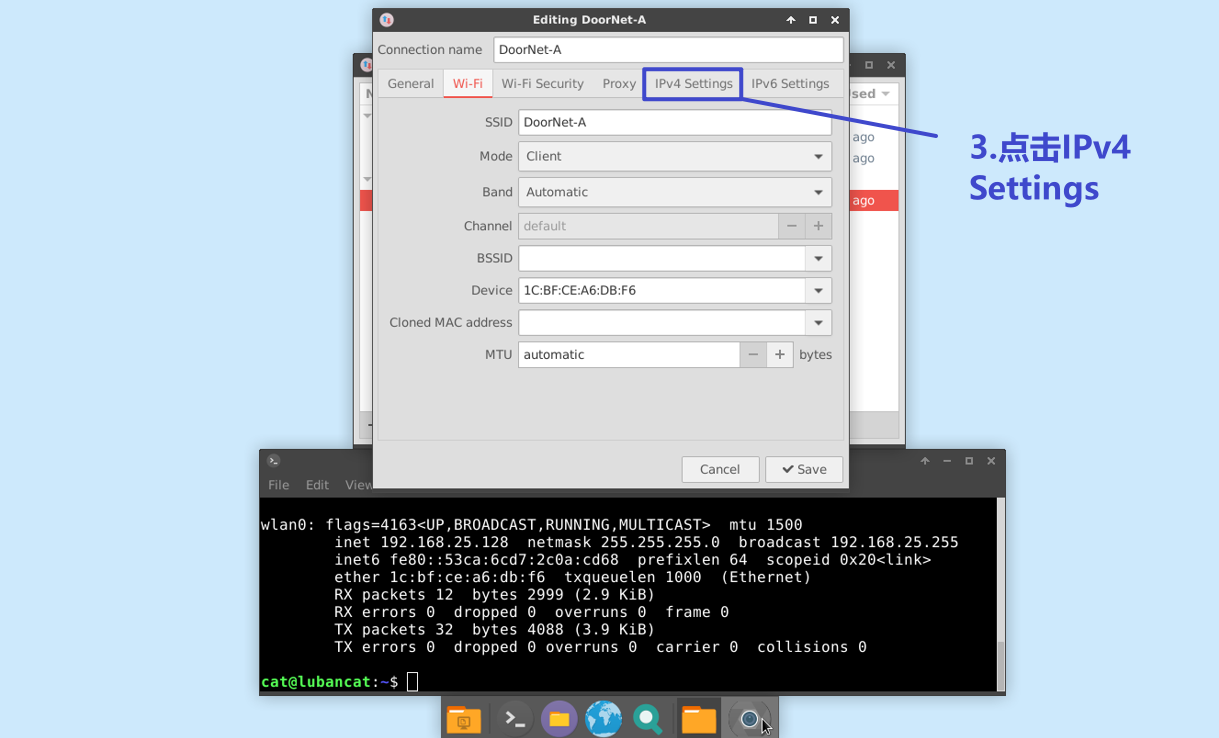
Enter the configuration page, click
ipv4 settings
Set your own ip according to the steps and the actual situation of your own network.
DNS serversandsearch domaincan be configured according to the following figure.
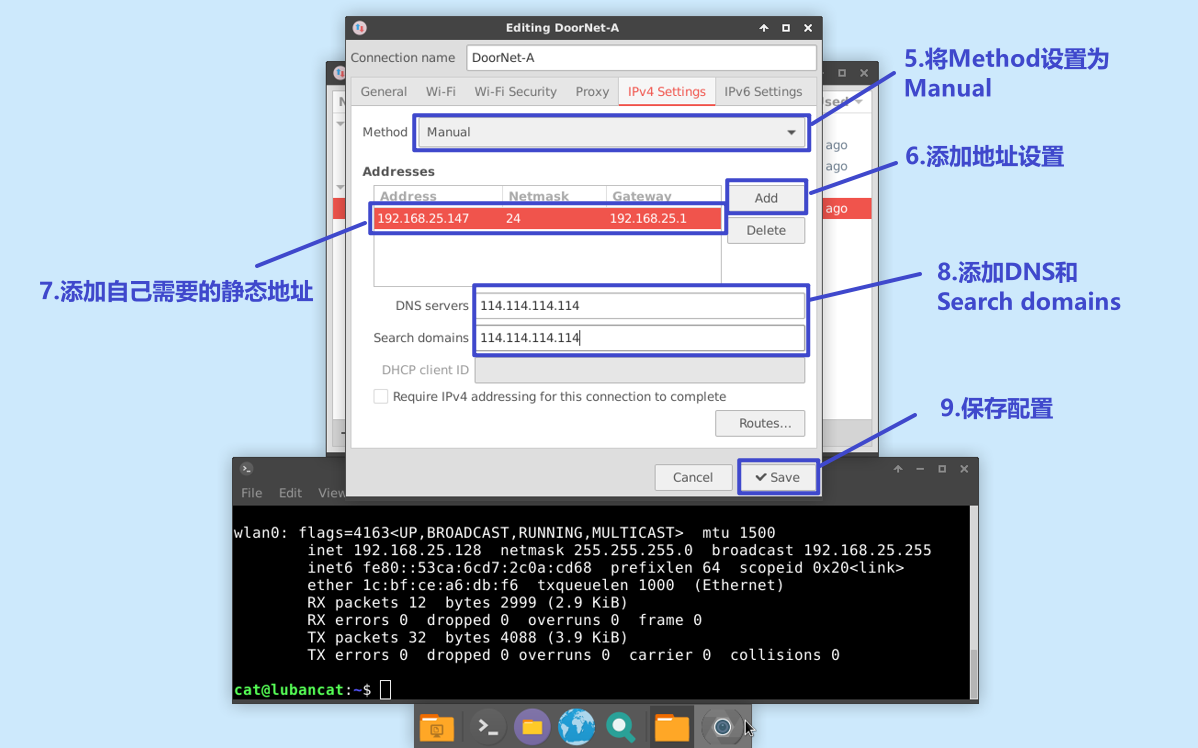
After saving, you can restart or reconnect to update your configuration
After updating the configuration, check whether the network is normal.
3.3.6. network (debian only)
Since the effect of using this tool to configure the network is relatively poor, we do not recommend using this tool in the debian 10 system of LubanCat-RK series boards. (Because the static ip configured by this method cannot be hot-swapped, and the network interface will be occupied after the network interface is unplugged)
In the debian 10 system, if /etc/network/interfaces contains network interfaces, then nmtui, nmcli and desktop cannot be used to configure the network.
Therefore, it is not recommended for novices to use
3.3.6.1. Usage
This tool mainly edits the files in /etc/network/interfaces and /etc/network/interfaces.d to configure the network.
Since this tool is not very useful compared to NetworkManager, the official documentation is released here for everyone to learn to use.