
9. File transfer and NFS network file system
Video introduction to this chapter:

“21-File transfer protocols and tools”
https://www.bilibili.com/video/BV1Es4y1T7fV/
This chapter mainly describes how to transfer files between the PC host and the board.
The content of this chapter depends on network transmission, and we need to configure the network environment of the board. For details, please refer to the following chapters to configure the board and computer.
This chapter focuses on the following methods to use.
MobaXterm
FileZilla
nfs
tftp
9.1. MobaXterm
This method requires the download of MobaXterm software.
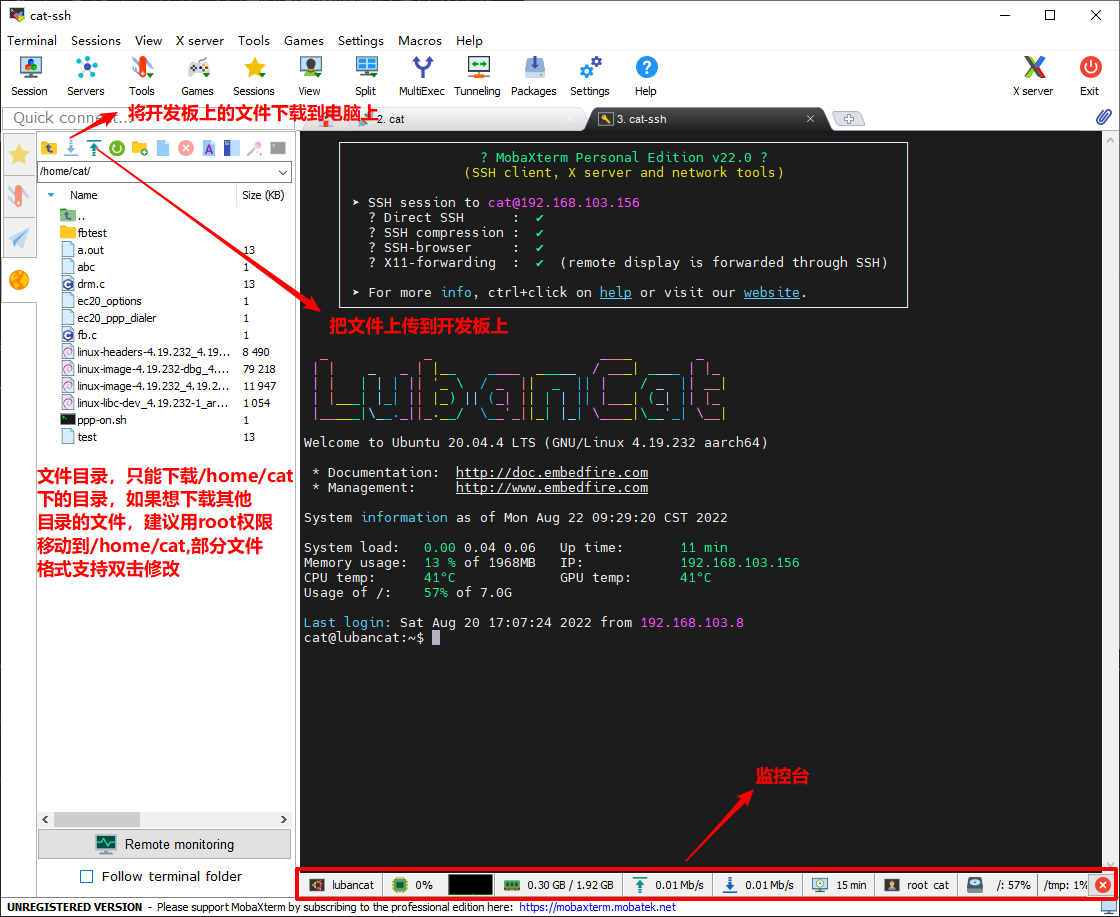
Advantages: You can easily transfer files while controlling linux.
Disadvantage: only the folders in the /home/cat directory can be transferred, and link files cannot be transferred correctly, which will hinder source code transplantation.
9.2. FileZilla
After installing FileZilla, open FileZilla.
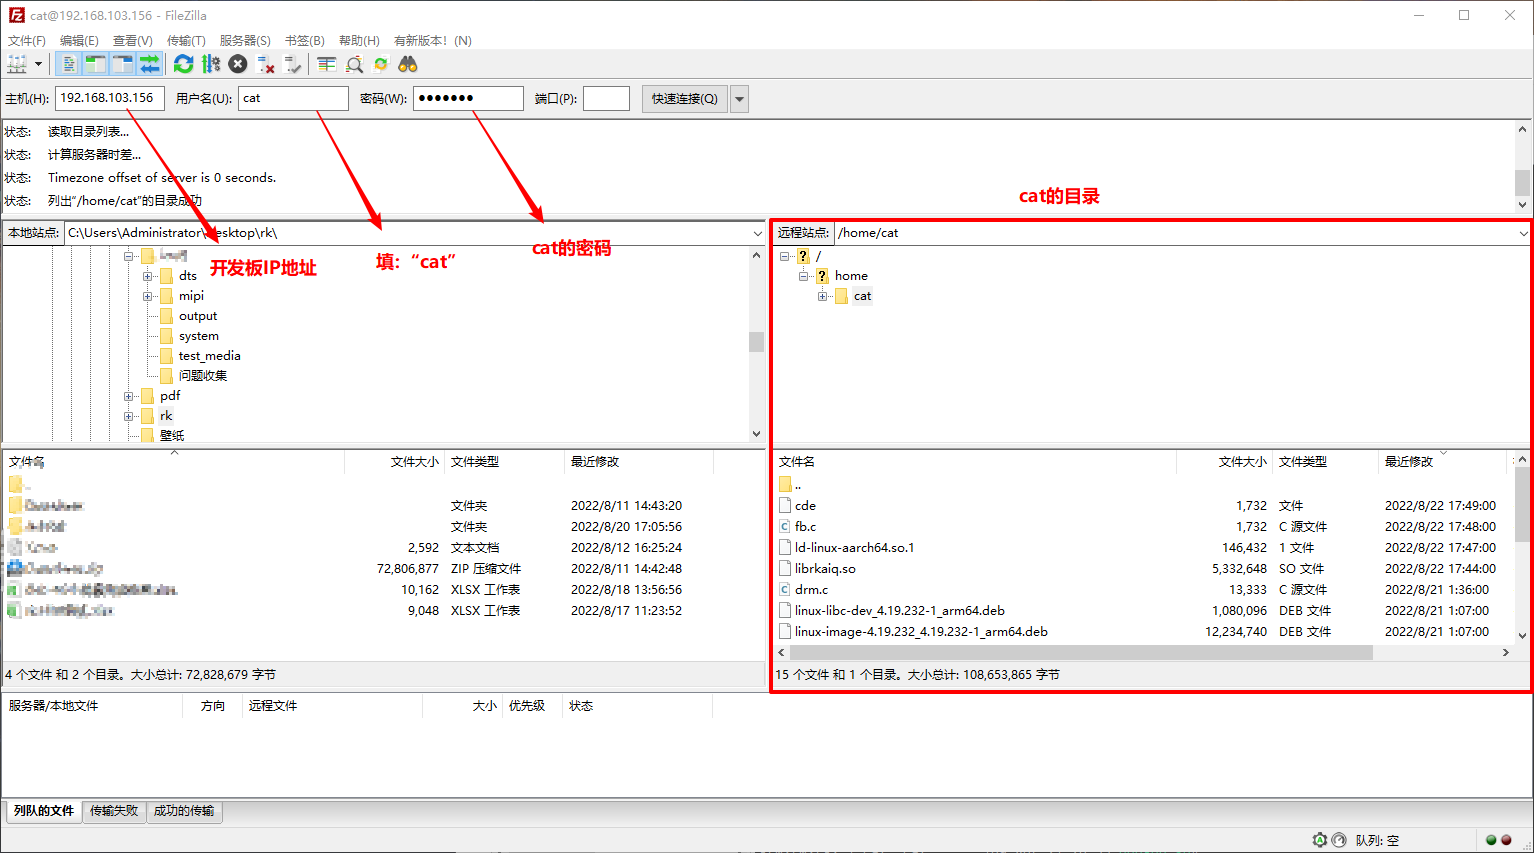
Advantages: A finer directory structure can make file transfer more convenient.
Disadvantage: only the folders in the /home/cat directory can be transferred, and link files cannot be transferred correctly, which will hinder source code transplantation.
9.3. NFS network file system
Video introduction to this chapter:
“22-NFS Network File System”
https://www.bilibili.com/video/BV1XM4y1v76k/
9.3.1. Build NFS environment
Next, we will introduce how to use NFS to build the above experimental environment. It mainly includes connecting to the network and enabling the NFS service on the host. And three steps to mount the file system on the board.
Our goal is to have the development host map the following directories with the board:
Development host shared directory:/home/zerok/workdir
The mount directory of the board:/mnt
9.3.1.1. Connect to lan
9.3.1.1.1. Network Configuration
In this application scenario, the development host and the board need to access each other through the network. In addition, because the NFS file system is exposed to the public network, many security issues need to be dealt with. In order to simplify the operation, we connect the development host and the board to the LAN, that is, use Network cables connect them to the same switch (router), as shown in the picture above.
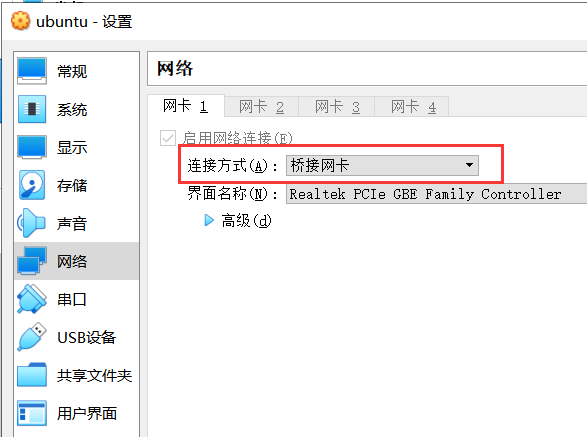
If the development host is installed on a virtual machine, pay attention to change the network configuration of the virtual machine to “bridge network card” mode in VirtualBox, as shown in the figure below. If the configuration is modified, the virtual machine needs to be restarted to take effect.
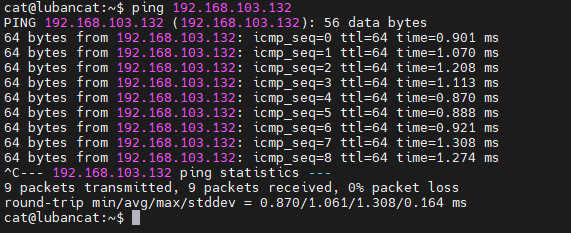
9.3.1.1.2. Mutual ping test
We can use the “ifconfig” command to view their ip addresses and subnet masks.
The known host IP address is: 192.168.103.132
The address of the board is: 192.168.103.156
Note: If you use ifconfig on the development host to prompt that the command cannot be found, please use the following command to install:
1 2 | #The following command is run on the host
sudo apt install net-tools
|
According to the ip and subnet mask of the development host, we can judge that the development motherboard is in the network segment of 192.168.100.*. We only need to ensure that the development host network is also in the same LAN segment, so that they can communicate.
If you cannot check the IP address using the ifconfig command, or the IP address is not in the same network segment as the development host’s IP, please check the network connection.
host pings board
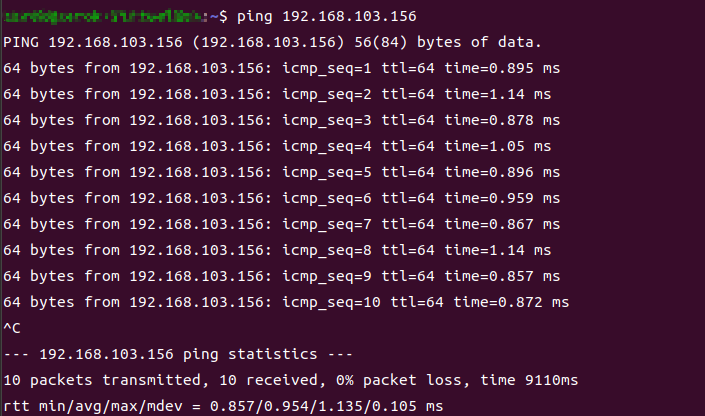
board ping host
9.3.1.2. Enable the NFS service on the development host
After confirming the network and knowing the IP address information of the LAN, you can configure the NFS service of the development host. The following steps are all performed on the development host.
9.3.1.2.1. Install NFS service
The Ubuntu system of the host does not have the NFS service installed by default. You need to use the following command to install the NFS server software:
1 2 | #The following command is run on the host
sudo apt install nfs-kernel-server
|
9.3.1.2.2. View user id
When configuring NFS, user uid and group gid need to be used. You can use the id command to view them. Enter the following command on the terminal on the development host:
1 2 | #The following command is run on the host
id
|
See the figure below for details.

The above figure uses the id command user id and group id. From the above figure, we can see that the user uid and group gid of this development host are both 998. Please use this command to check your own development host related id, which will be used in the following configuration files.
9.3.1.2.3. Configure NFS
After installing the NFS service, a new /etc/exports file (that is, a file named exports in the /etc directory) will be added, and the NFS service will run according to its configuration
Use vim to open the /etc/exports file command as follows:
1 2 | #The following commands are run on the host, and vim can be replaced by gedit.
sudo vim /etc/exports
|
Add the following statement at the end of the /etc/exports file and save it. Note that the following statement is written to the /etc/exports file on the same line.
1 2 3 | #Add the following content to the end of the /etc/exports file, note that the following content is on the same line.
#The IP address, uid and gid of the following content need to be modified according to your own environment
/home/zerok/workdir 192.168.103.0/24(rw,sync,all_squash,anonuid=1000,anongid=1000,no_subtree_check)
|
Note that the specific configuration needs to be configured according to your own experimental environment. Please understand the following instructions to modify according to your own experimental environment:
/home/zerok/workdir: The development host directory to be shared. Pay attention to use a space to separate it from the subsequent configuration.
192.168.103.0/24: Configure who can access. /24 is the mask. Here means 24 1s, namely 11111111.11111111.11111111.00000000, That is, the mask is 255.255.255.0. Combined with the previous 192.168.103.0, it means that all hosts configured with IP 192.168.103.* here can access this directory, that is, all hosts on the LAN.
If the LAN is another network segment, please refer to the configuration here, and you cannot directly use an asterisk to indicate it. If you want to configure 192.168.1.* to be accessible to all machines in the LAN, then configure it as 192.168.1.0/24.
rw: Indicates the permissions of the client, rw means readable and writable, and the specific permissions are also affected by the rwx of the file system and user identity.
sync: The data is synchronously written to the memory and hard disk.
anonuid=1000: Map the user on the client computer to the specified local user ID, where 1000 is the uid of the zerok user on the development host, please configure it according to the specific host user uid.
anongid=1000: Map the users on the client computer to belong to the specified local user group ID, where 1000 is the development host embedfire user group gid, here please configure according to the specific host user group gid.
no_subtree_check: Do not check subdirectory permissions, default configuration.
The anonuid and anongid in this configuration map the user of the client computer to a user whose local uid/gid is 1000, that is, the zerok of the development host. Then when a user different from the development host is used on the board to access the NFS shared directory, there will be zerok permissions, to facilitate mutual access. If the root user on the board creates a file, it will be considered created by zerok on the development host; The file that only zerok can read and write on the development host can also be read by root or other users on the board Write (recognized as zerok). Of course, this is not a safe access setting method, but it is a very convenient configuration for our development.
9.3.1.2.5. Update the exports configuration
After modifying the /etc/exports file and saving it, you can use the exportfs command to update the configuration:
1 2 | #The following command is run on the host
sudo exportfs -arv
|
The parameters of this command are described as follows:
-a: All contents in the mount or umount file /etc/exports.
-r: Re-mount the shared content in the file /etc/exports.
-u: umount directory.
-v: When exportfs, output detailed information to the screen.
If the configuration is normal, the shared directory items will be listed after the command is executed. The execution result of this example is shown in the figure below.

9.3.1.2.6. View NFS shares
Use showmount –e to view the current loading status of the NFS server, as shown in the figure below.
1 2 | #The following command is run on the host
showmount -e
|

9.3.1.3. Install NFS client
After the development host starts the NFS service, we also need to install the NFS client on the board to allow the board to use the NFS service.
Execute the command to install the NFS client:
1 | sudo apt install nfs-common -y
|
View NFS server shared directory
Execute the “showmount -e” +”NFS server IP”” command on the board. **Note that in different network environments, the IP of the NFS server may be different, the actual situation shall prevail. **
1 | showmount -e 192.168.103.132
|
As shown below:

9.3.1.3.1. Temporarily mount NFS file system
Use the mount command to mount the shared directory of the NFS server to the /mnt directory of the board:
Note: The following 192.168.103.132 needs to be set as the NFS server IP in the user’s actual network environment.
1 2 | #The following commands are run on the board
sudo mount -t nfs 192.168.103.132:/home/zerok/workdir /mnt
|
The parameters used in the above command are as follows:
-t nfs: Specify the format of the mounted file system as nfs.
192.168.103.132: Specifies the IP address of the NFS server.
/home/zerok/workdir: Specifies the shared directory of the NFS server.
/mnt: Mount the directory locally, that is, map the shared directory of the NFS server to the /mnt directory of the board.
If the mount is successful, there will be no output on the terminal. The philosophy of Linux is “no news is good news”.
Mounting the directory in this way is only temporary, and the board needs to remount the NFS directory to access it after restarting.
9.3.1.3.2. Test NFS shared directory
After the mount is successful, enter the “sudo touch hello_world.txt” command in the shared directory of the NFS server, Then create a hello_world.txt file in the shared directory, as shown below:

Enter the /mnt directory of the board, and you can view the hello_world.txt file in the shared directory of the NFS server. As shown below:

9.3.1.3.3. Unmount
When the client cannot find the NFS shared directory on the network, such as when the development host is shut down, the terminal of the NFS client will often output some prompts, or using the ls command to view the shared directory will cause a long wait. At this time, you can Use the umount command to unmount the directory. The example is as follows:
1 2 | #The following commands are run on the board
sudo umount /mnt
|
When using this command, the directory to be unmounted can be used as a parameter, and no output indicates that the execution is normal. If the umount operation is performed on the currently mounted directory, it will prompt “device is busy”. It is recommended to switch to the home directory “~” when canceling the mount, and perform the umount operation.
Advantages: files with soft links can be transferred, like a removable hard disk, scalable and easy to use.
Disadvantage: no graphical interface, only transfer between Linux-linux.
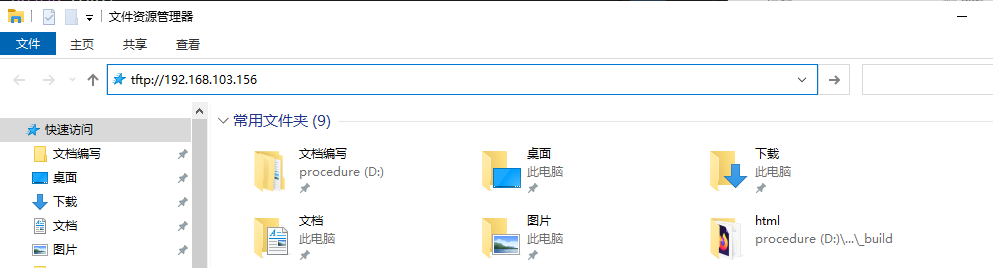
9.4. tftp
This method does not need to download any software, just use the file explorer
Open the folder and enter
1 2 3 4 5 | #tcp connection, it is recommended to use this
tftp://192.168.103.156/
#udp connection
ftp://192.168.103.156/
|
Then enter username and password
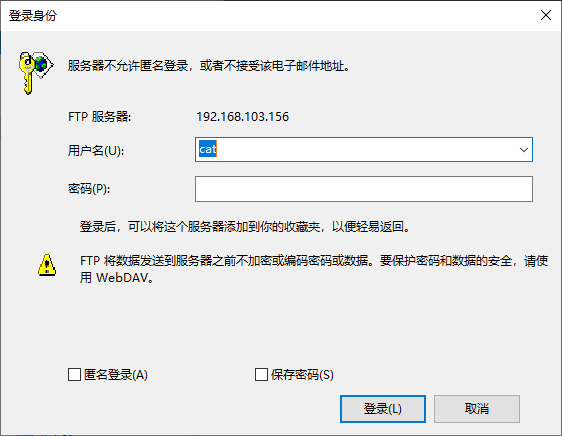
success

Advantages: the system comes with direct
Disadvantage: only the folders in the /home/cat directory can be transferred, and link files cannot be transferred correctly, which will hinder source code transplantation