
10. Camera
Video introduction to this chapter:

“40-Using the Camera on LubanCat”
https://www.bilibili.com/video/BV1q14y1275u/
The camera interface used by LubanCat-RK series boards is a 24pin mipi interface, which is currently compatible with ov5648/ov8858 cameras and Raspberry Pi OV5647 cameras (need to be used with an adapter board)
In addition to the mipi camera, LubanCat-RK series boards also support UVC cameras. If you want to buy a uvc camera, you can go to the recommended module list to choose
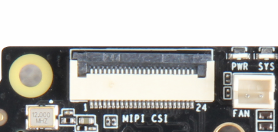
There will be mipi csi near the interface, the interface diagram is as follows.
注意
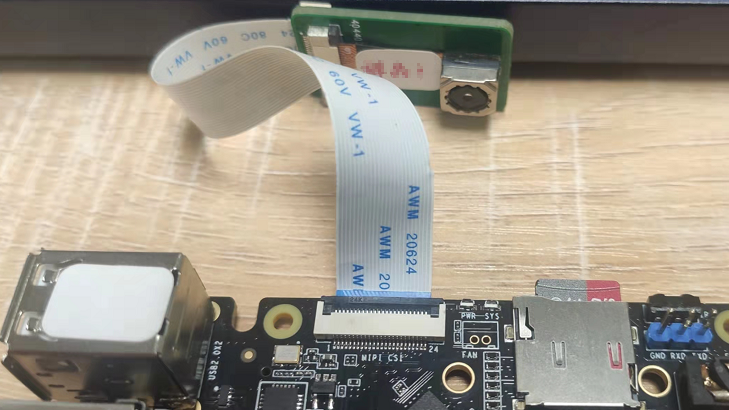
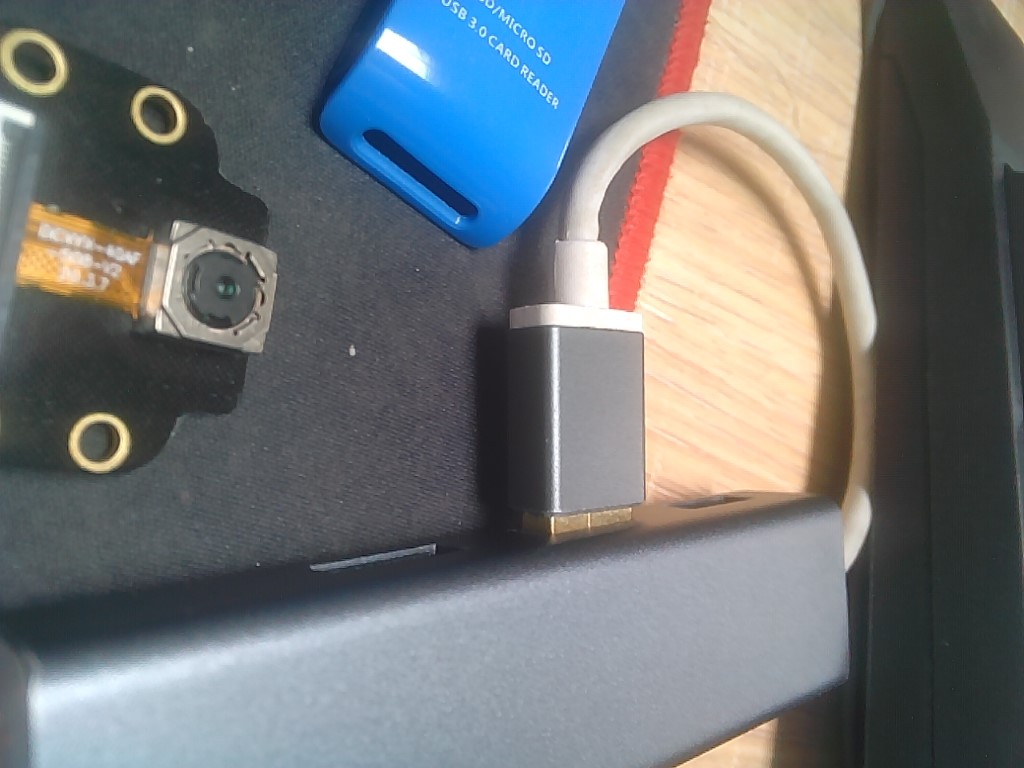
The metal pin of the cable needs to face the board
The connection diagram is as follows.
10.1. Configure camera
注解
The image after June 8th supports the camera device tree plug-in.But hte old image doesn’t have the camera device tree plug-in,which you can directly use the camera without configure.
This section explains how to use the device tree plug-in to configure the camera for images after June 8.
10.1.1. Single camera
Open the configuration file of Lubancat
1 2 3 4 | #Modify the configuration file
vi /boot/uEnv/uEnv.txt
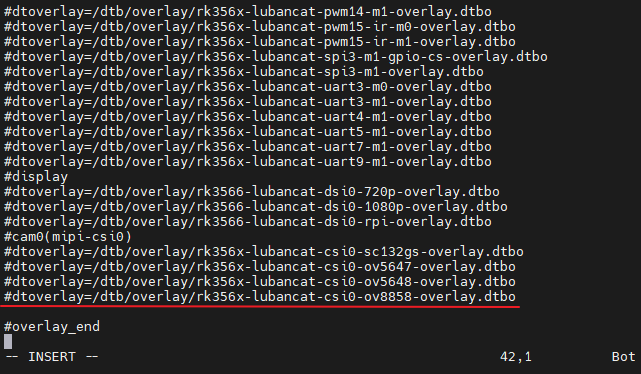
#Move the cursor to see the following picture
|
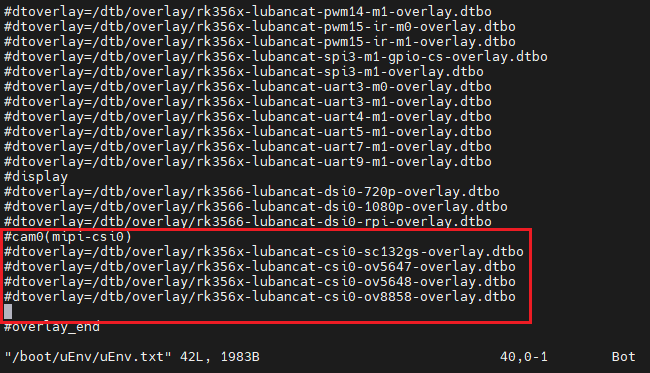
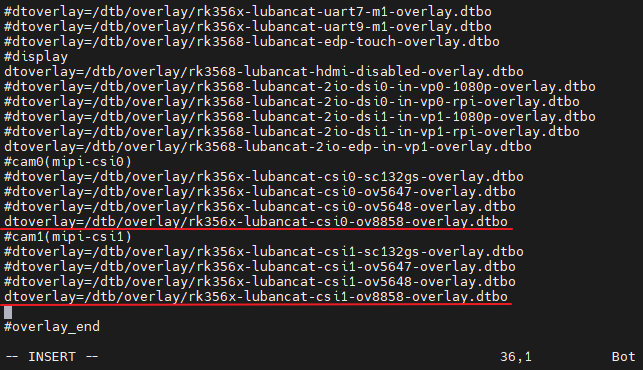
You can see that there are currently four devices that support the device tree plug-in, ov5647, ov5648, ov8858 and sc132gs. 2. Turn on the camera
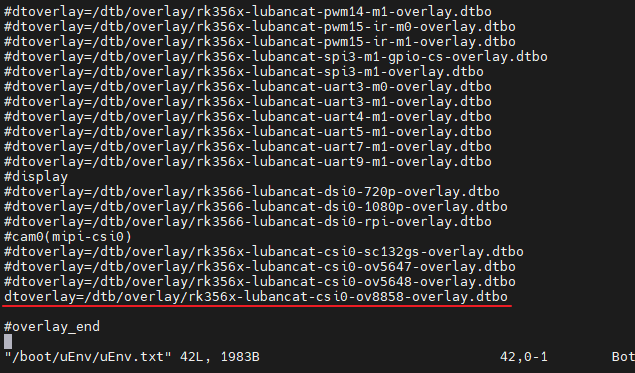
To open the camera, you only need to delete
#in front of the device tree plug-in, as shown in the figure below to open the camera of ov8858.
Turn off camera
To enable the camera, you only need to add
#in front of the device tree plug-in, as shown in the figure below to disable the camera of ov8858.
After modifying the configuration file, you need to save the configuration file first, and then restart it to take effect.
10.1.2. Dual camera
Currently, devices that support dual cameras include LubanCat2IO, which is the base plate of BTB and the base plate of Card Edge Connector.
10.1.2.1. Only enable cam0
Open the configuration file of LubanCat
1 2 3 4 | #Modify the configuration file
vi /boot/uEnv/uEnv.txt
#Move the cursor to see the following picture
|
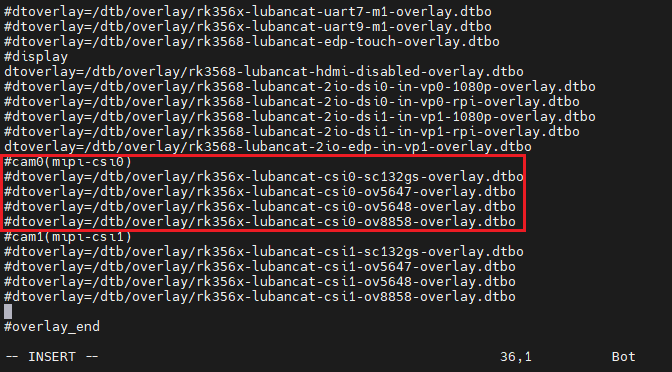
You can see that there are currently four devices that support the device tree plug-in, ov5647, ov5648, ov8858 and sc132gs.
Turn on the camera
To open the camera, you only need to delete
#in front of the device tree plug-in, as shown in the figure below to open the camera of ov8858.
Turn off camera
To enable the camera, you only need to add
#in front of the device tree plug-in, as shown in the figure below to disable the camera of ov8858.
After modifying the configuration file, you need to save the configuration file first, and then restart it to take effect.
10.1.2.2. Only turn on cam1
注解
Currently cam1 only supports ov5648 and ov8858
Open the configuration file of Lubancat
1 2 3 4 | #Modify the configuration file
vi /boot/uEnv/uEnv.txt
#Move the cursor to see the following picture
|
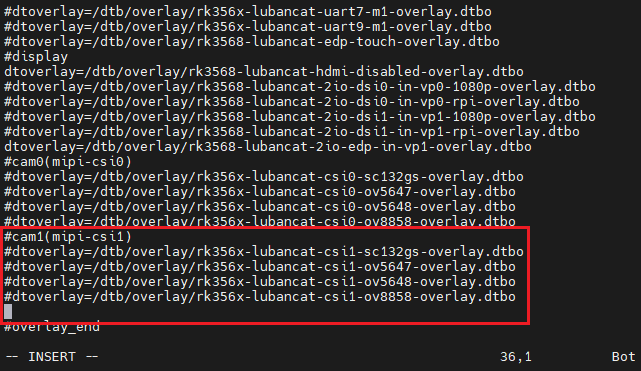
Although the device tree plugin can see four device tree plugins, only ov5648 and ov8858 are actually supported.
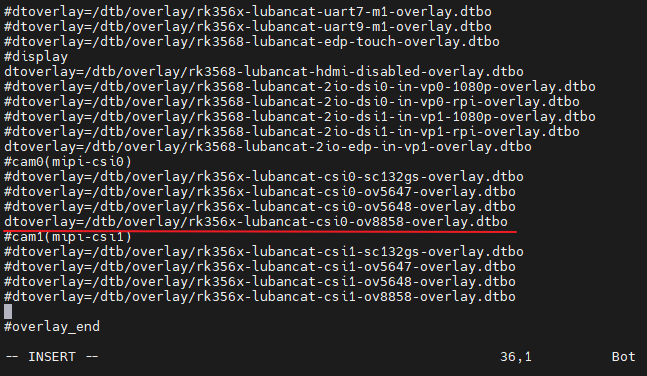
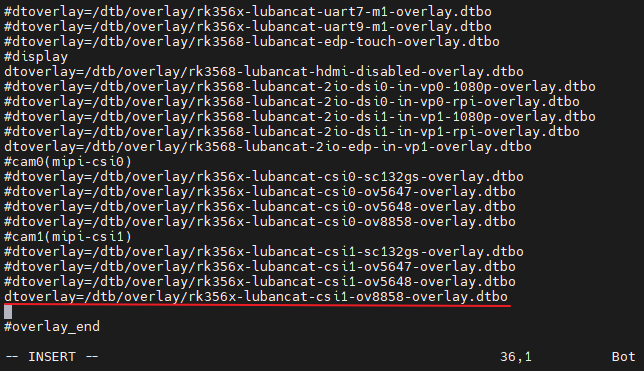
Turn on the camera
To open the camera, you only need to delete
#in front of the device tree plug-in, as shown in the figure below to open the camera of ov8858
Turn off camera
To enable the camera, you only need to add
#in front of the device tree plug-in, as shown in the figure below to disable the camera of ov8858
After modifying the configuration file, you need to save the configuration file first, and then restart it to take effect
10.1.2.3. Dual cameras open at the same time
注意
At present, the simultaneous opening of dual cameras is only applicable to ov5648 and ov8858
Open the configuration file of LubanCat
1 2 3 4 | #Modify the configuration file
vi /boot/uEnv/uEnv.txt
#Move the cursor to see the following picture
|
Although the device tree plugin can see four device tree plugins, only ov5648 and ov8858 are actually supported.
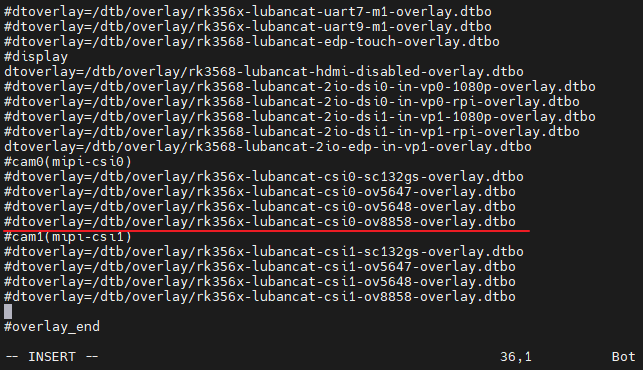
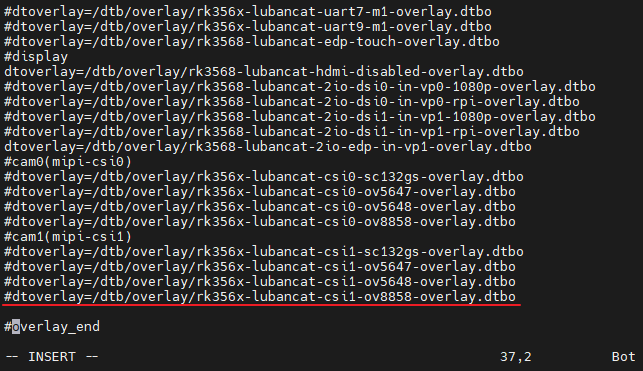
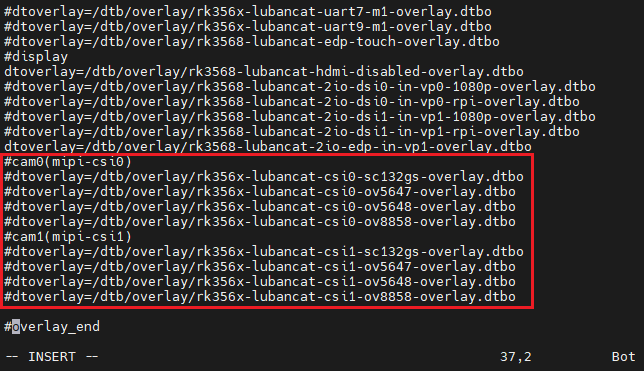
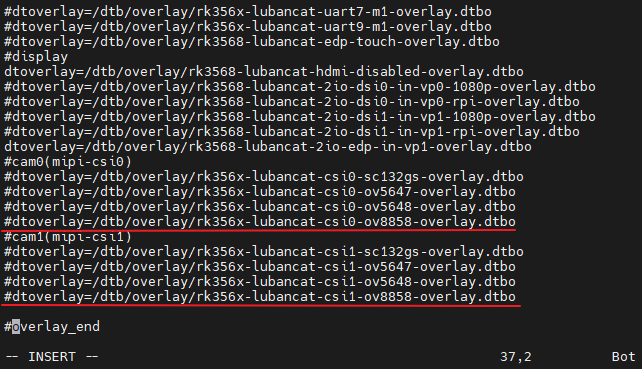
Turn on the camera
To open the camera, you only need to delete the
#in front of the device tree plug-in, as shown in the figure below to open the ov8858 camera at the same time.
Turn off camera
To enable the camera, you only need to add
#in front of the device tree plug-in, as shown in the figure below, the camera of the ov8858 is turned off at the same time.
After modifying the configuration file, you need to save the configuration file first, and then restart it to take effect.
10.2. View camera information
10.2.1. List camera devices
1 | v4l2-ctl --list-devices
|
A single camera as shown below
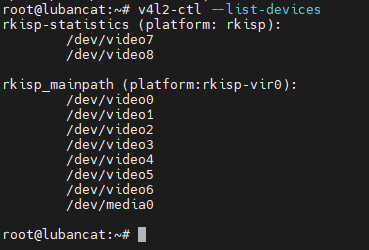
Where “/dev/video0” is the device of this camera
Dual cameras open at the same time as shown below

Among them, “/dev/video5” is the device of cam0, and “/dev/video14” is the device of cam1
10.2.2. Check camera format and resolution
1 2 | #View supported formats
v4l2-ctl --list-formats-ext --device=/dev/video0
|
The command output is as follows:
1 2 3 4 5 6 7 8 9 10 11 12 13 14 15 16 17 18 19 20 21 22 23 24 25 26 27 | cat@lubancat:~$ v4l2-ctl --list-formats-ext --device=/dev/video0
ioctl: VIDIOC_ENUM_FMT
Type: Video Capture Multiplanar
[0]: 'UYVY' (UYVY 4:2:2)
Size: Stepwise 32x16 - 1296x972 with step 8/8
[1]: '422P' (Planar YUV 4:2:2)
Size: Stepwise 32x16 - 1296x972 with step 8/8
[2]: 'NV16' (Y/CbCr 4:2:2)
Size: Stepwise 32x16 - 1296x972 with step 8/8
[3]: 'NV61' (Y/CrCb 4:2:2)
Size: Stepwise 32x16 - 1296x972 with step 8/8
[4]: 'YM16' (Planar YUV 4:2:2 (N-C))
Size: Stepwise 32x16 - 1296x972 with step 8/8
[5]: 'NV21' (Y/CrCb 4:2:0)
Size: Stepwise 32x16 - 1296x972 with step 8/8
[6]: 'NV12' (Y/CbCr 4:2:0)
Size: Stepwise 32x16 - 1296x972 with step 8/8
[7]: 'NM21' (Y/CrCb 4:2:0 (N-C))
Size: Stepwise 32x16 - 1296x972 with step 8/8
[8]: 'NM12' (Y/CbCr 4:2:0 (N-C))
Size: Stepwise 32x16 - 1296x972 with step 8/8
[9]: 'YU12' (Planar YUV 4:2:0)
Size: Stepwise 32x16 - 1296x972 with step 8/8
.
.
.
|
It can be seen that the current camera supports UYVY, 422P, NV16 and other formats, and the maximum supported resolution is 1296x972.
重要
Regardless of whether the camera is connected or not, /dev/video0 exists in the system. If the camera is connected and the maximum resolution of the camera is 800*600, but the actual parameter is not the value, the current camera may not be video0, or the hardware of the camera There is a problem with the connection or driver.
10.2.3. View the configuration parameters supported by the camera
1 2 | #View the configuration parameters supported by the camera
v4l2-ctl -d /dev/video0 -L
|
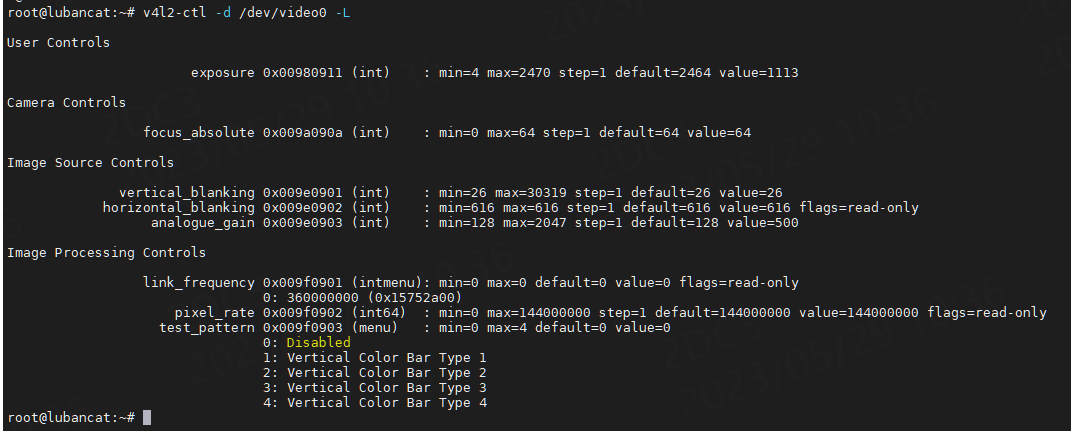
The parameters are described as follows:
Parameter |
Illustrate |
|---|---|
exposure |
Exposure, used to control the exposure level of the camera. |
focus_absolute |
Focus level, used to adjust the focus state of the camera。 |
vertical_blanking |
Vertical blanking time refers to the time between vertical synchronization signals of camera image frames, and is generally used to calculate the image frame rate. |
horizontal_blanking |
Horizontal blanking time refers to the time between horizontal synchronization signals of camera image frames, and is generally used to calculate the image frame rate. |
analogue_gain |
Analog gain, used to enhance the camera’s ability to capture light. |
link_frequency |
Link frequency, used to control the speed at which data is transmitted between different devices. |
pixel_rate |
Pixel rate, used to indicate the data transfer rate of the camera output image. |
test_pattern |
Test pattern for testing with the camera turned off to make sure the camera is functioning properly. |
The above parameters are configurable parameters of ov8858. Each parameter has a default value (default) and a current value (value). If different cameras are used, the configurable parameters may be different from the default configuration.
The ov8858 camera supports automatic adjustment of focal length, white balance and other parameters through Rockchip’s 3A service. If you need to manually adjust the above parameters, refer to the following commands.
1 2 | #Adjust the camera analog gain to 500
v4l2-ctl -d /dev/video0 -c analogue_gain=500
|
注意
Some cameras do not support automatic parameter adjustment, and we need to manually adjust the parameters to an appropriate value, otherwise the image acquired by the camera will be abnormal. For parameter adjustment of this type of camera, refer to Section 7-5 of this chapter.
10.3. Shoot video from the command line
1 2 3 4 5 6 7 8 | #shoot video
v4l2-ctl --verbose -d /dev/video0 --set-fmt-video=width=800,height=600,pixelformat='NV12' --stream-mmap=4 --set-selection=target=crop,flags=0,top=0,left=0,width=800,height=600 --stream-to=out.yuv
#Play video
ffplay -f rawvideo -video_size 800x600 -pixel_format nv12 out.yuv
#out.yuv is the captured video
|
10.4. Take a photo from the command line
1 2 3 4 | #Taking Pictures
sudo gst-launch-1.0 v4l2src num-buffers=1 device=/dev/video0 ! jpegenc ! filesink location=picture.jpg
#picture.jpg is the photo taken
|
10.5. Desktop shooting-guvcview
guvcview is a very powerful camera preview and shooting software.
1 2 3 | #install software
sudo apt update
sudo apt install guvcview
|
10.5.1. How to use dual camera preview
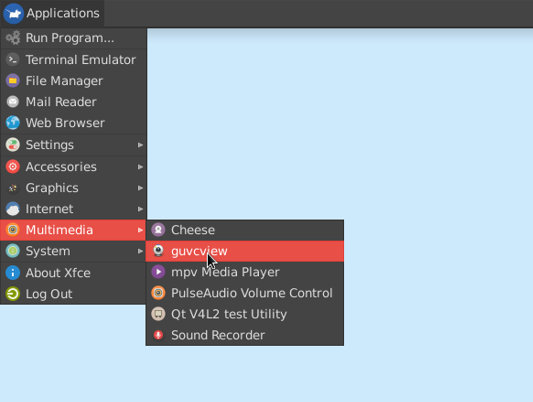
Open guvcview on the desktop, as shown below
Then you will encounter that the device cannot be found, click the option of the device, and select it automatically, as shown below.
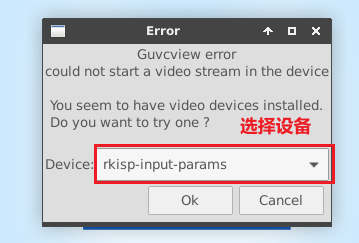
Among the listed devices, there are two real camera devices, and their names are
rkisp_mainpath. You can only judge which device they are by order. The first one is CAM0, and the second one is CAM1, select one of the devices, and turn it on.

After turning on the device, you will see the prosperous scene in the picture below.
image_control, You can adjust the display of the preview image and indirectly control the driver of the camera.
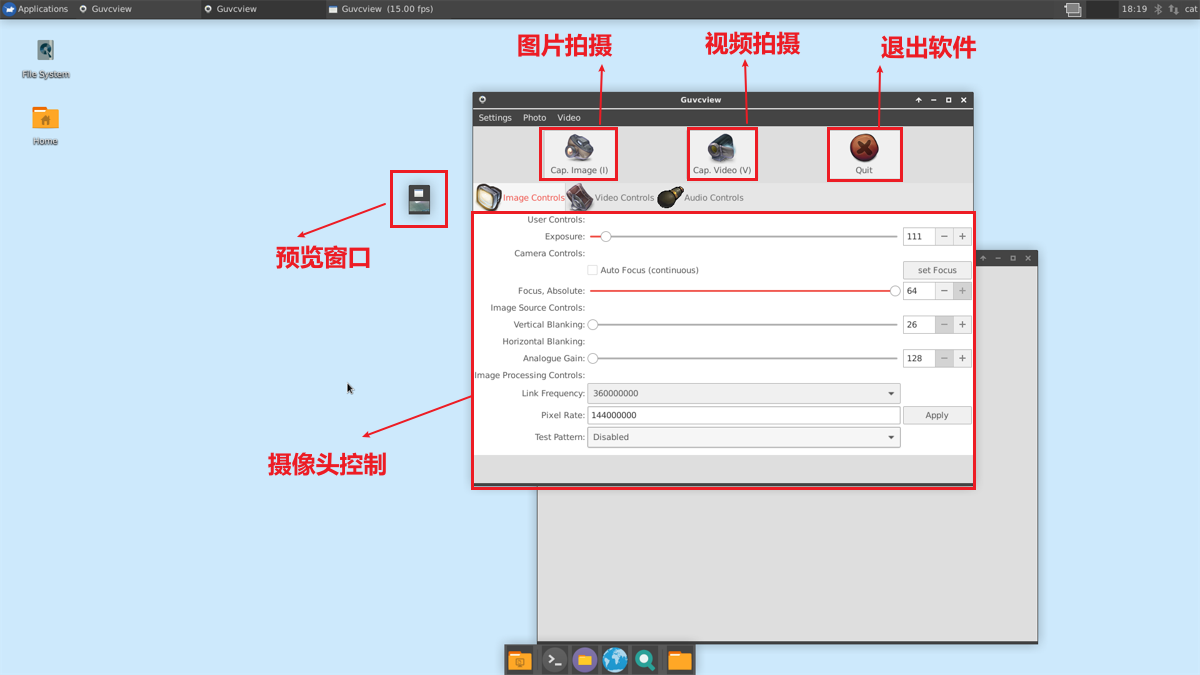
When the device is turned on for the first time, the resolution of the image preview window will be very low, which needs to be modified in
video_controlThe use of
video_controlis as follows.
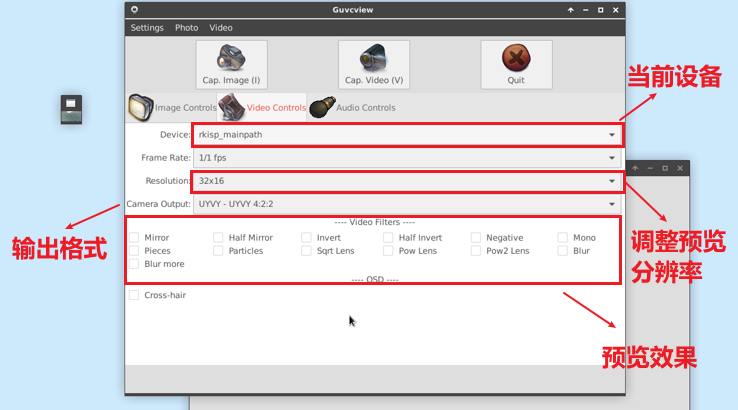
After the adjustment is completed, one camera is adjusted, and then you can repeat the above operation to open another camera.
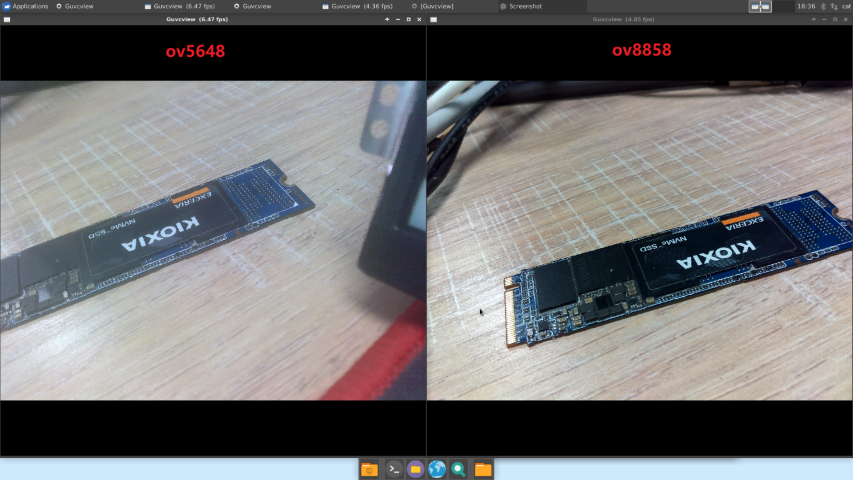
The renderings of the simultaneous preview of the two cameras are as follows.
10.6. Desktop shooting-cheese
注意
The function of cheese is relatively simple, and there is no way to preview the dual camera.
The software we want to use is the system’s own—-cheese, which is a software that includes preview and shooting.
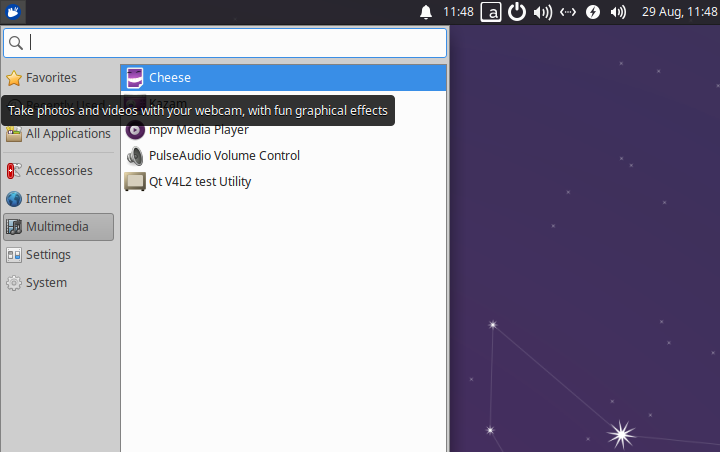
10.6.1. Open method
Enter the desktop system, click the button on the upper left, find the cheese.
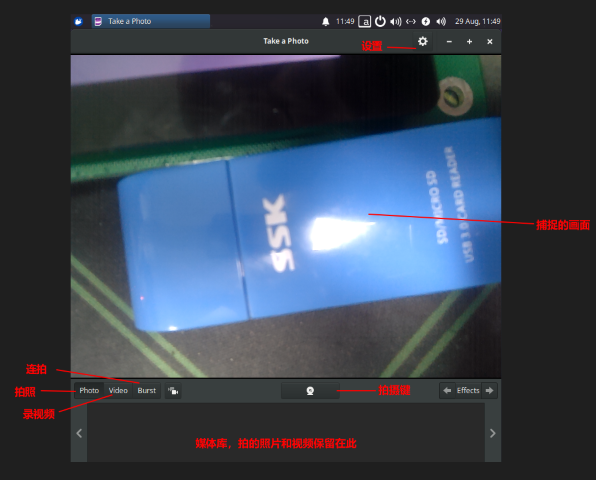
The interface of cheese is shown in the figure below:
We can modify the shooting resolution by changing the settings.
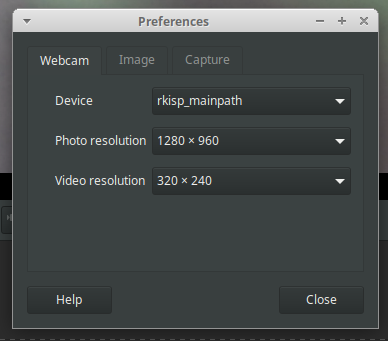
Photo sample display:
10.7. Manually adjust camera parameters
Some cameras do not support automatic parameter adjustment, and we need to manually adjust the parameters to an appropriate value, otherwise the image acquired by the camera will be abnormal.
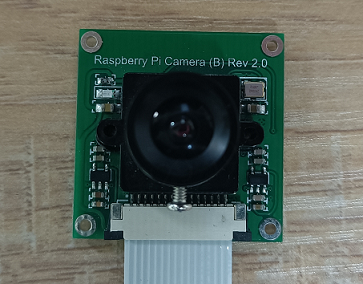
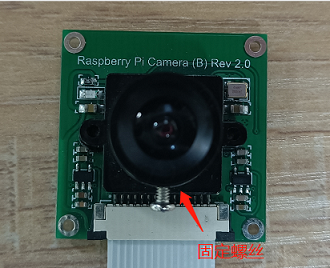
The following uses the Raspberry Pi ov5647 as an illustration, and the specific model used is Camera(B) Rev2.0. The physical picture is as follows:
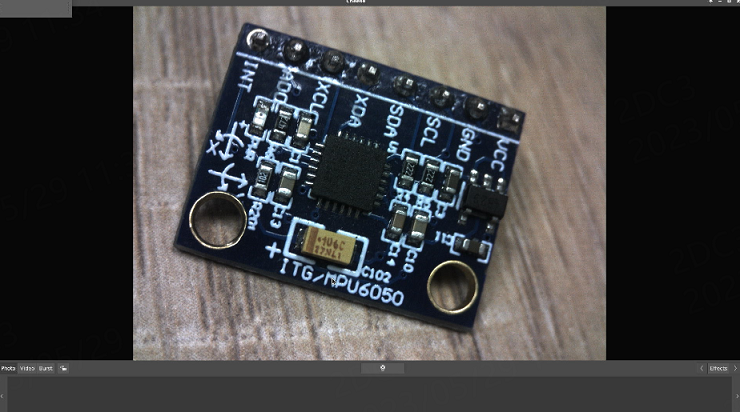
The camera does not support automatic parameter adjustment by default. If the default configuration is used, the acquired image will be darker and greener, as shown in the following figure:
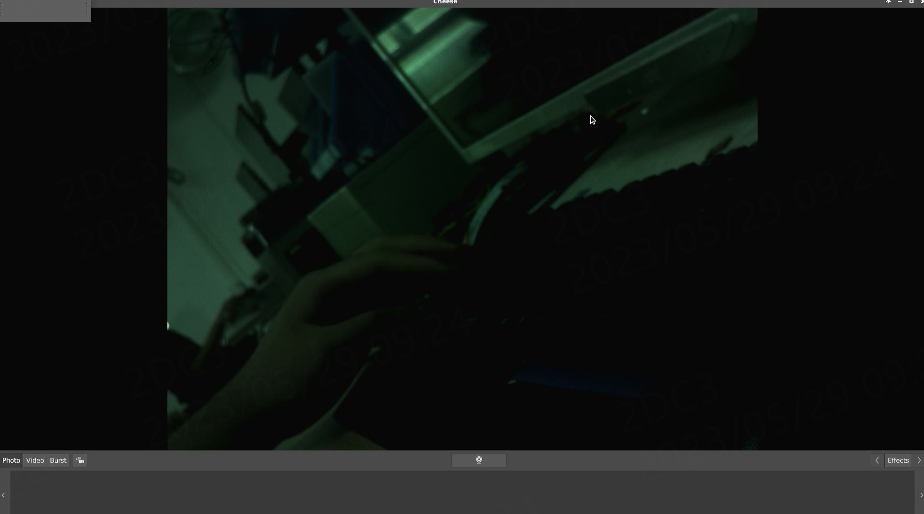
The reason is that the camera does not support 3A service, and the parameters need to be manually configured, and the original default parameters are bad, resulting in abnormal images.
10.7.1. View the configuration parameters supported by the camera
1 2 | #View the configuration parameters supported by the camera
v4l2-ctl -d /dev/video0 -L
|
The configurable parameters of the camera are shown in the figure below:
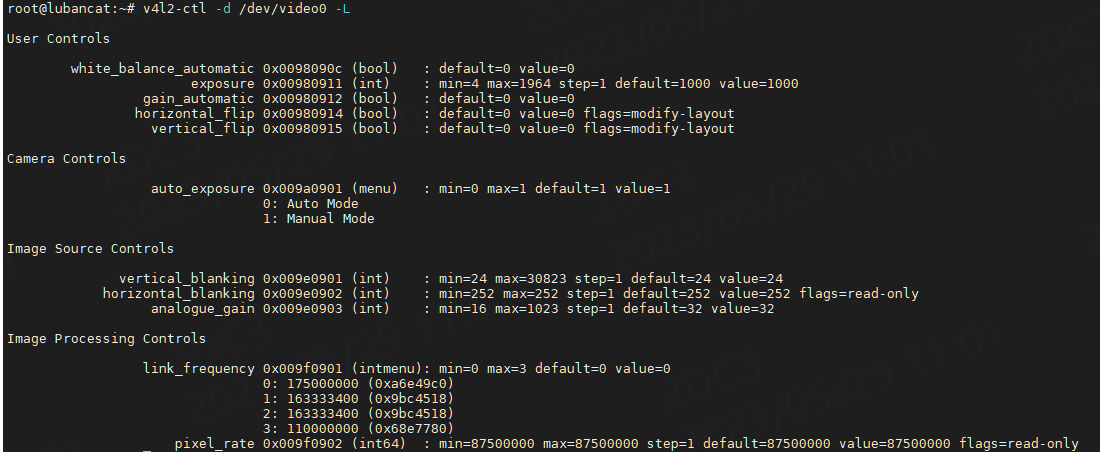
The parameters are described as follows:
Parameter |
Illustrate |
|---|---|
white_balance_automatic |
White balance automatic control switch, 0 means off, 1 means on. |
exposure |
Exposure time, in microseconds. The brightness of the image can be changed by adjusting the exposure time appropriately. |
gain_automatic |
Gain automatic control switch, 0 means off, 1 means on. |
horizontal_flip |
Horizontal toggle switch, 0 for off, 1 for on. |
vertical_flip |
Vertical flip switch, 0 for off, 1 for on. |
auto_exposure |
Automatic exposure mode switch, 0 means automatic mode, 1 means manual mode. |
vertical_blanking |
Vertical blanking time, the unit is the number of lines. |
horizontal_blanking |
Horizontal blanking time, in pixels. |
analogue_gain |
Analog gain control, you can change the brightness of the image by adjusting this parameter. |
link_frequency |
The interface frequency affects the video transmission rate, and different transmission rates can be selected according to different frequencies. |
It can be found that the parameters of this camera are different from those of the aforementioned ov8858 camera, and there are several more control switches as follows:
white_balance_automatic : White balance automatic control switch
gain_automatic : Gain automatic control switch
auto_exposure : Automatic exposure mode switching
And we can find that the values of the above automatic control switches are all 0, which is off by default.
It is worth noting that the greenish image is caused by not turning on the white balance adjustment, and the dark image is caused by incorrect gain and exposure time parameters.
Turn on these automatic control switches, and then try to get the camera image, use the following command to modify the configuration:
1 2 3 4 5 6 | #Turn on the white balance automatic control switch
v4l2-ctl -d /dev/video0 -c white_balance_automatic=1
#Turn on the automatic gain control switch
v4l2-ctl -d /dev/video0 -c gain_automatic=1
# Turn on automatic exposure mode switching
v4l2-ctl -d /dev/video0 -c auto_exposure=1
|
The retrieved images are as follows:
It can be found that the color of the image is normal, but slightly blurred. We can adjust the focal length of the lens to make the object we want to shoot clear. The camera used by the author needs to loosen the fixing screw, and then rotate the lens to adjust the focal length.
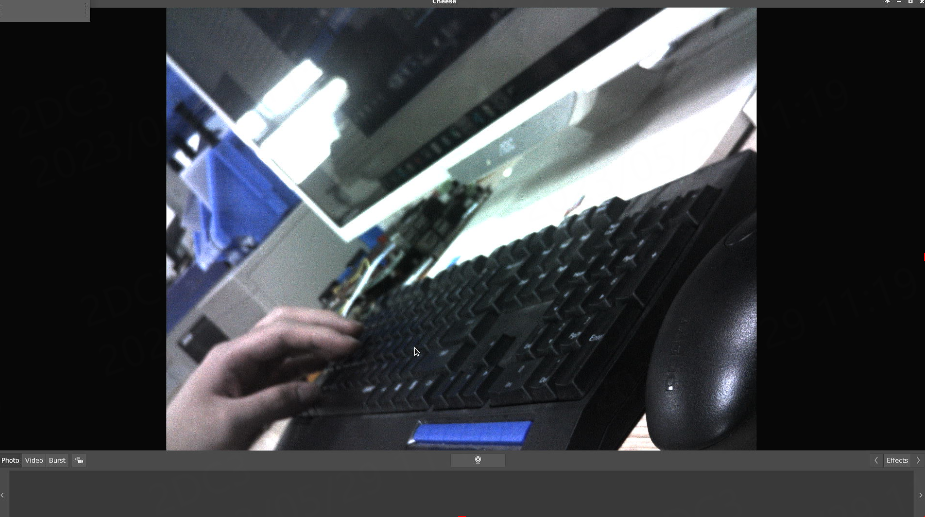
Adjust the focal length and shoot an object for actual testing, as shown in the figure below:
In addition to the automatic control switch that can be turned on above, we can also manually adjust the parameters for fine-tuning.
Use the following commands to turn off the gain and exposure automatic control switch, but the white balance automatic control switch cannot be turned off because there is no white balance related setting.
1 2 3 4 5 6 7 8 9 | #Turn off the automatic gain control switch
v4l2-ctl -d /dev/video0 -c gain_automatic=0
#Turn off auto exposure mode toggle
v4l2-ctl -d /dev/video0 -c auto_exposure=0
#Set exposure time
v4l2-ctl -d /dev/video0 -c exposure=1964
#Set analog gain
v4l2-ctl -d /dev/video0 -c analogue_gain=150
|
It is necessary to continuously adjust the parameters according to the actual situation to obtain a clear image.