
7. CAN
Controller Area Network, The controller LAN bus is a serial communication protocol bus developed by the German BOSCH (Bosch). It can use twisted pair wires to transmit signals and is one of the most widely used field buses in the world.
注意
The CAN FD bit filling function of RK3568 is different from the CAN FD standard protocol, and CAN FD is not recommended.
7.1. CAN hardware connection
Wiring between CAN modules: CAN_H to CAN_H, CAN_L to CAN_L
7.2. CAN
7.2.1. CAN configuration
Turning on and off CAN fd requires a restart to take effect
Modify the clock frequency on the device tree plugin,
kernel/arch/arm64/boot/dts/rockchip/overlay/rk3568-lubancat-canX-mY-overlay.dts(X, Y are their respective numbers)
1 2 3 4 5 6 7 8 9 10 11 12 13 14 15 16 17 18 19 20 21 | /dts-v1/;
/plugin/;
#include <dt-bindings/clock/rk3568-cru.h>
/ {
compatible = "rockchip,rk3568";
fragment@0 {
target = <&can1>;
__overlay__ {
status = "okay";
compatible = "rockchip,can-1.0";
assigned-clocks = <&cru CLK_CAN1>;
assigned-clock-rates = <200000000>;
pinctrl-names = "default";
pinctrl-0 = <&can1m0_pins>;
};
};
};
|
‘assigned-clock-rates’ The clock frequency can be modified. If the CAN bit rate is 1M, it is recommended to modify the CAN clock to 300M, the signal is more stable. If the bit rate is lower than 1M, the clock can be set to 200M, and the default is 200M
Open the device tree plug-in (here take opening CAN1 as an example)
1 2 | #Modify the configuration file
vi /boot/uEnv/uEnv.txt
|
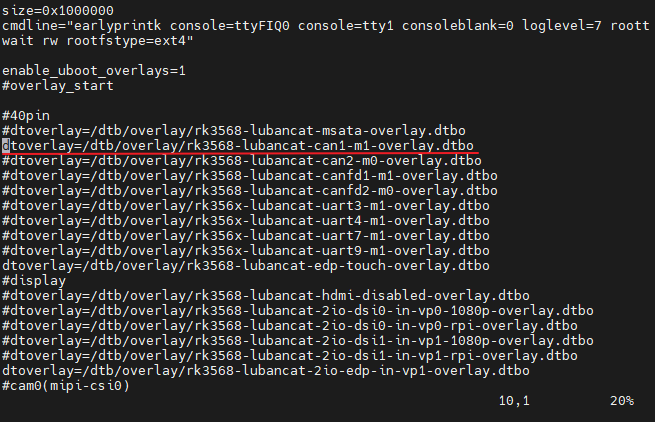
Delete the # in front of
#dtoverlay=/dtb/overlay/rk3568-lubancat-can1-m1-overlay.dtbo, as shown below
注意
can1 and canfd1 cannot be opened at the same time
Close the device tree plug-in (here to open CAN1 as an example)
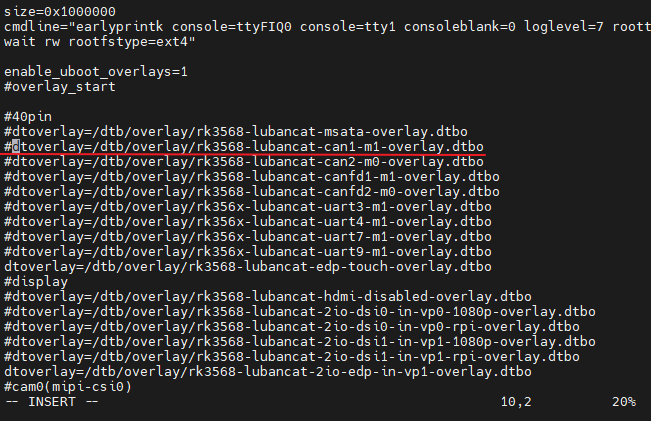
Add # before
dtoverlay=/dtb/overlay/rk3568-lubancat-can1-m1-overlay.dtbo, as shown below
7.2.2. CAN communication test
1 2 3 4 5 6 7 8 9 10 11 12 13 14 15 16 17 18 19 20 21 22 23 24 25 26 27 28 29 30 31 32 | Query the current network device:
ifconfig -a
CAN start:
#Close CAN:
ip link set can0 down
#Set the bit rate to 500KHz:
ip link set can0 type can bitrate 500000
#Print CAN0 information:
ip -details link show can0
#Start CAN:
ip link set can0 up
CAN send:
#send(standard frame, data frame,ID:123,date:DEADBEEF):
cansend can0 123#DEADBEEF
#send(standard frame, data frame,ID:123):
cansend can0 123#R
#Send (extended frame, data frame, ID: 00000123, date: DEADBEEF):
cansend can0 00000123#12345678
#Send(ext frame, remote frame, ID: 00000123):
cansend can0 00000123#R
CAN reception:
#Start printing and wait to receive:
candump can0
|
7.2.3. More instructions
1 2 3 4 5 6 7 8 9 10 11 12 13 14 15 16 17 18 19 20 21 22 23 | #Close CAN device
ip link set canX down
#Open CAN device
ip link set canX up
#Display CAN device details
ip -details link show canX
#Receive data from can bus
candump canX
#Close the CAN device for configuration
ifconfig canX down
#Set CAN baud rate
ip link set canX up type can bitrate 250000
#Send data
cansend canX --identifier=ID+data
#Use a filter to receive data matching an ID
candump canX --filter=ID:mask
|
7.3. CAN FD
注意
The CAN FD bit filling function of RK3568 is different from the CAN FD standard protocol, and CAN FD is not recommended.
7.3.1. CAN fd configuration
-Turning on and off CAN fd requires a restart to take effect
Modify the clock frequency on the device tree plugin,
kernel/arch/arm64/boot/dts/rockchip/overlay/rk3568-lubancat-canfdX-mY-overlay.dts(X, Y are their respective numbers)
1 2 3 4 5 6 7 8 9 10 11 12 13 14 15 16 17 18 19 20 | /dts-v1/;
/plugin/;
#include <dt-bindings/clock/rk3568-cru.h>
/ {
compatible = "rockchip,rk3568";
fragment@0 {
target = <&can1>;
__overlay__ {
status = "okay";
pinctrl-names = "default";
assigned-clocks = <&cru CLK_CAN1>;
assigned-clock-rates = <100000000>;
pinctrl-0 = <&can1m0_pins>;
};
};
};
|
‘assigned-clock-rates’ The clock frequency can be modified. If the CAN bit rate is lower than or equal to 3M, it is recommended to modify the CAN clock to 100M, and the signal is more stable. If the bit rate is higher than 3M, the clock can be set to 200M, and the default is 100M.
Open the device tree plug-in (here to open CAN1 FD as an example)
1 2 | #Modify the configuration file
vi /boot/uEnv/uEnv.txt
|
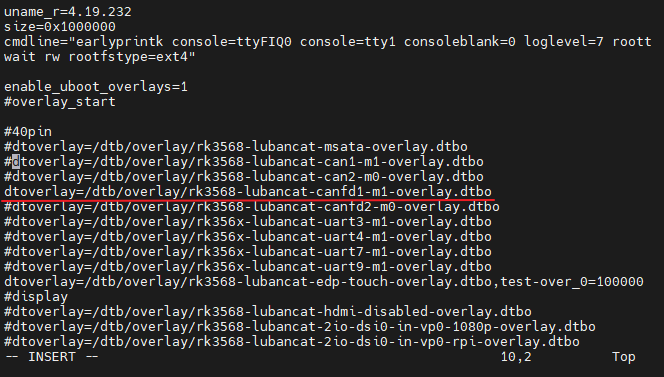
Delete the # in front of
#dtoverlay=/dtb/overlay/rk3568-lubancat-canfd1-m1-overlay.dtbo, as shown below
注意
can1 and canfd1 cannot be opened at the same time
Close the device tree plug-in (here take opening CANFD1 as an example)
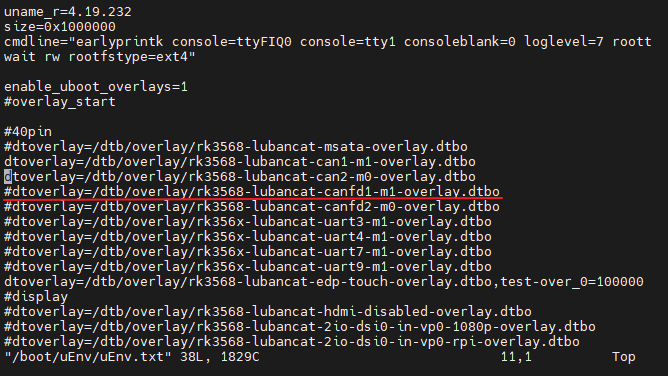
Add # before
dtoverlay=/dtb/overlay/rk3568-lubancat-canfd1-m1-overlay.dtbo, as shown below
7.3.2. CAN fd communication test
1 2 3 4 5 6 7 8 9 10 11 12 13 14 15 16 17 18 19 20 21 22 23 24 25 26 | Query the current network device:
ifconfig -a
CAN FD start:
#Close CAN:
ip link set can0 down
#Set the 1M baud rate of the arbitration segment and the 3M baud rate of the data segment:
ip link set can0 type can bitrate 1000000 dbitrate 3000000 fd on
#Print CAN0 information:
ip -details link show can0
#Start CAN:
ip link set can0 up
#CAN FD sending:
#Send (standard frame, data frame, ID: 123, date: DEADBEEF):
cansend can0 123##1DEADBEEF
#Send (extended frame, data frame, ID: 00000123, date: DEADBEEF):
cansend can0 00000123##1DEADBEEF
#CAN FD reception:
#Start printing and wait to receive:
candump can0
|
7.3.3. More instructions
1 2 3 4 5 6 7 8 9 10 11 12 13 14 15 16 17 18 19 20 21 22 23 | #Close CAN device
ip link set canX down
#Open the CAN device
ip link set canX up
#Display CAN device details
ip -details link show canX
#Receive data from CAN bus
candump canX
#Close the CAN device for configuration
ifconfig canX down
#Set the 1M baud rate of the arbitration segment and the 3M baud rate of the data segment:
ip link set can0 type can bitrate 1000000 dbitrate 3000000 fd on
#Send data
cansend canX --identifier=ID+data
#Use a filter to receive data matching an ID
candump canX --filter=ID:mask
|