
2. System startup and system login
Video introduction to this chapter:
“05-LubanCat 0 Series Introduction and Launch”

https://www.bilibili.com/video/BV1Vh4y1b7qd/
“06-LubanCat 1 Series Introduction and Launch”
https://www.bilibili.com/video/BV1jT41187sZ/
“07-LubanCat 2 Series Introduction and Launch”
https://www.bilibili.com/video/BV1GL411h72f/
There are three steps required to start running the board: burn the system, start the system and log in the system.
Let me explain to you how to start the system and log in to the system:
To start the system, you need to correctly connect the storage device and perform operations such as power-on and start-up. For details, please refer to the following summary of this article.
The system login can be logged in through the serial port or Ssh. If we have connected to the screen, we can directly enter the desktop system through the manager displayed on the screen.
2.1. How to start the board
LubanCat-RK series boards support a variety of boot methods, and our matching boards mainly use eMMC and SD cards to boot.
For the board without onboard eMMC, it can only support SD card as one boot method, and boot from the SD card when the system image is burnt in the SD card.
For boards with onboard eMMC and TF card slots, both eMMC and SD card are supported.
Boot from eMMC when the image is burned in the eMMC and no SD card is inserted or the inserted SD card does not have a system image
Boot from the SD card when the image is not burned in the eMMC and the system image is burned in the inserted SD card
When the system image is burned in the eMMC and the system image is also burned in the inserted SD card, the uboot and kernel will be booted from the SD card first, but the root file system in the eMMC is used, which is a wrong combination . In order to boot from the SD card first, we can use the following two methods.
Press the MR button or short-circuit the MR contact when booting. The advantage of this method is that the system image in the eMMC can be preserved. The disadvantage is that the content in the eMMC cannot be read after booting from the SD card.
Use the following command to erase the partition table of eMMC, so that the system image in eMMC is destroyed. The advantage of this method is that eMMC can be read and written to store data after booting from SD card, but the original image has been damaged.
If you can start the system normally from eMMC to enter the desktop or log in from the serial port:
1
2
3
4
5
# Erase the first 16M content of eMMC
sudo dd if=/dev/zero of=/dev/mmcblk0 bs=1M count=16

# reboot
reboot
If you can boot into uboot normally from eMMC, you can press Ctrl+c to enter the command line mode when starting uboot through the debug serial port and perform the following operations.
1
2
3
4
5
6
7
8
# Switch to eMMC
mmc dev 0

# Erase eMMC from 0x0 to 0x8000
mmc erase 0x0 0x8000

# reboot
reset
You can also use the advanced functions of RKDevTool to erase eMMC, but RKDevTool will not erase the loader, see the specific method RKDevTool(Windows)
警告
For the onboard eMMC board, the image is burned by default when leaving the factory. If you need to boot from the SD card, please refer to the above method of booting from the SD card first.
2.2. Start attention
The emmc or SD card burns the image of the Linux system, and the board will automatically run when it is powered on.
The following are the precautions for starting the board:
- Correctly connect the peripherals on the board according to your own board,
And use the matching screws to fix it firmly. Especially for devices that do not support hot plugging (mipi display, mipi camera, pcie-wifi network card, pcie-4G network card, hard disk, etc.), If you unplug and plug in the case of power on, it may damage the device and make the device unable to work normally
- Pay attention when using the display screen, the mipi screen interface does not support hot swapping,
HDMI interface has two forms, one is standard HDMI interface, the other is micro-HDMI, There is no way to directly connect the two interfaces, you need to use an adapter to convert the connection. If it is a monitor with a VGA or DP interface, it can also be displayed by using an adapter.
The board supports mouse and keyboard, if necessary, it can be connected to the board through the USB interface.
Use the power supply to power the board. Note: The marked power supply specification is the minimum specification. If there are many peripheral devices connected, please use a power supply with the same voltage and higher power.
注意
Use the general image to restart the system at the first startup after burning, and it will take a minute or two to install the firmware of the system after the restart (you can do other work at this time).
2.3. SSHLog in(USB)
Video introduction to this chapter:
“13-SSH terminal connected to LubanCat”
https://www.bilibili.com/video/BV1to4y1G7MK/
2.3.1. Foreword
If you want to experience the content of this chapter, you need to have the following conditions:
Image, the board with emmc will burn the image before leaving the factory. If you use an sd card or do not have a desktop image and need to burn the image, you can go to “Image Burning” burn image.
Communication software, we recommend
MobaXterm.The computer needs to support the RNDIS function (win10 supports it by default, other systems may need to install the RNDIS driver).
A type-c cable with communication function.
The power supply capacity of the computer’s power supply interface is greater than 5V@1A. It is recommended to use the USB port on the back of the computer case: the power supply capacity is stronger, and the power supply capacity of the expansion dock without power supply and the front of the case is weak (not recommended).
Skip this chapter if you do not have the conditions.
注意
If the power supply capacity of the computer is insufficient, it may cause the board to restart continuously and cannot enter the system. If there is continuous restart, you can reduce the use of peripherals and try again.
To determine whether the boot is normal: 1. The green light beats like a heartbeat — normal. 2. The green light is dim or there is no continuous beating within two seconds—-restart.
2.3.2. Preparations before starting
2.3.2.1. software preparation
MobaXterm installation and use
Download link: https://mobaxterm.mobatek.net/download.html
MobaXterm for detailed usage of terminal software, please refer to the document:
“Linux basics and application development practical guide - based on i.MX6ULL series”
Except for different parameter configurations, the usage methods are the same.
2.3.2.2. Power-on
Use the Type-C cable to connect the Type-C interface on the board that says pwr or OTG,
If you are using LubanCat-2 or LubanCat-2N, you can use the DC interface to power them.
Power supply type |
Board model |
|---|---|
DC5V(5V@3A) |
LubanCat-2 |
DC12V(12V@2A) |
LubanCat-2N |
When you are ready, you can power up the board (plug in the USB or plug in the DC male connector).
2.3.3. Start up
注意
This part requires the board to be turned on normally before it can be used.
After the board is burned for the first time, you need to wait for about one minute before observing the status light of the board
If it is not the first time to start, just wait for 20 seconds
The green light beats like a heartbeat —–> normal boot
The green light is very dim or fails to jump continuously within two seconds —-> it may be restarting (the usb interface of your computer may not be suitable for high current power supply, you can try again with less peripherals)
If the board can start normally, you can proceed further
2.3.3.1. Configure computer network
Video introduction to this chapter:
“14-Connect to the network via USB”
https://www.bilibili.com/video/BV1vh4y1x7av/
注意
The computer needs to support the RNDIS function (win10 supports it by default, other systems may need to install the RNDIS driver)
The first startup after the board is burned needs to wait for about one minute to complete the initialization operation
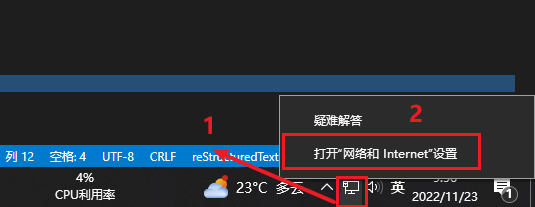
Open network settings
View current network status
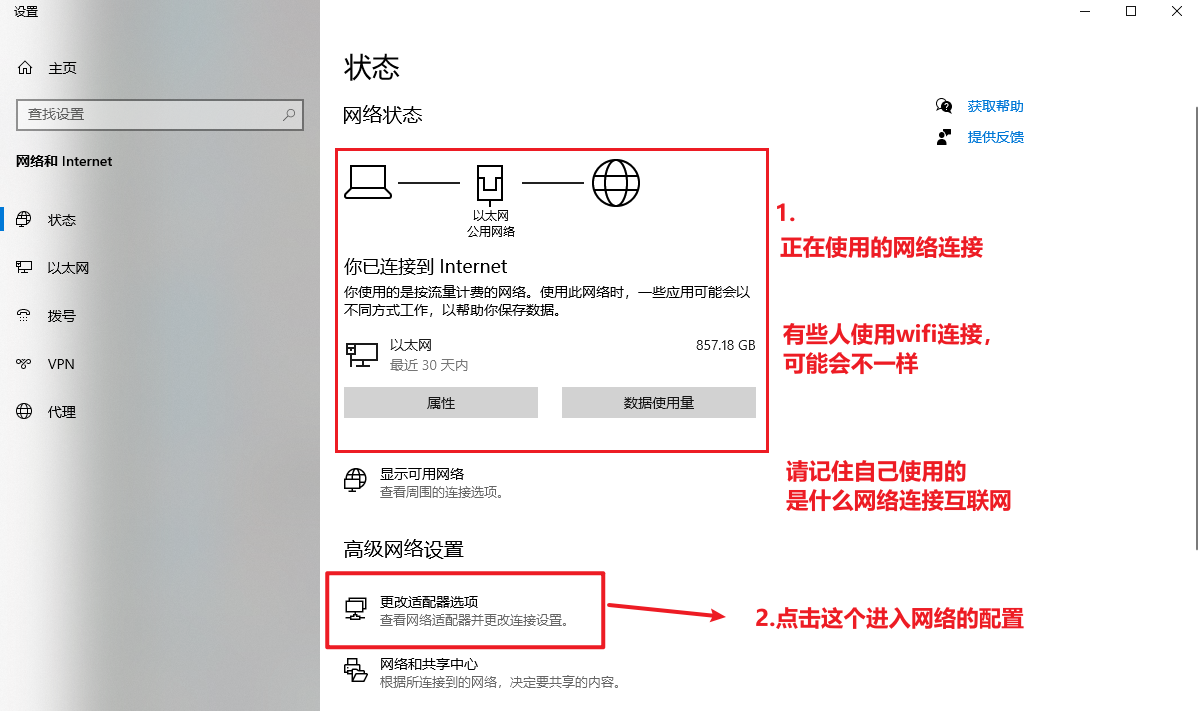
View all current network connections (marked “Remote NDIS based Internet” is our board)

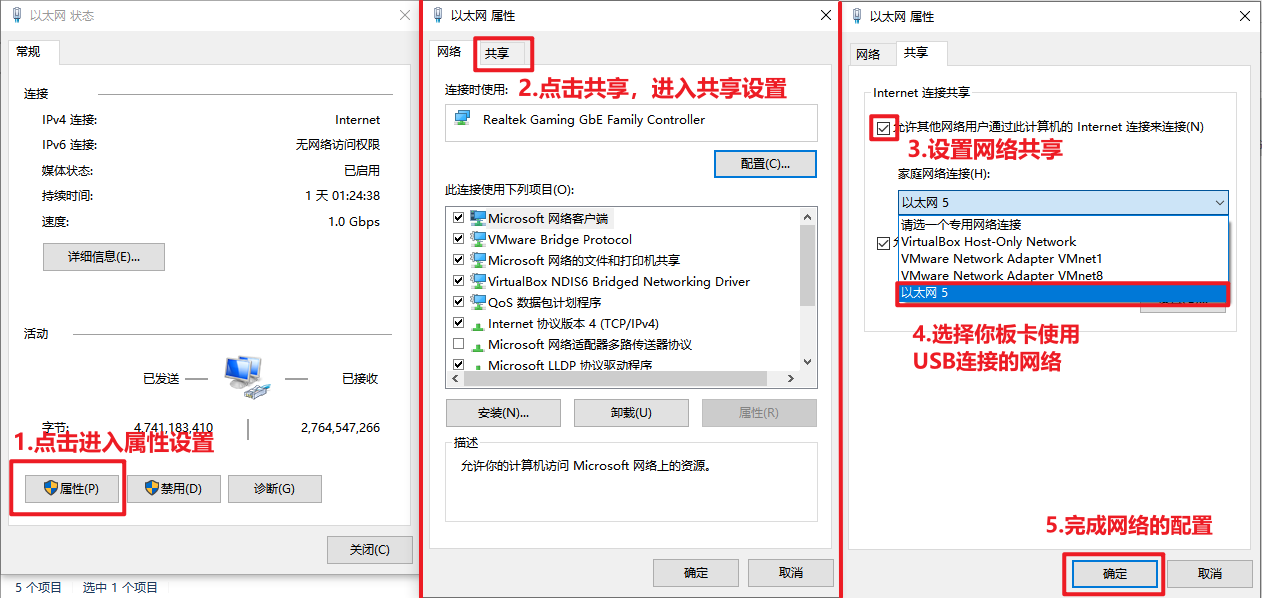
Configure network shares
After completion, we can use MobaXterm to connect our board
Open MobaXterm software, click “Session” to create a connection

Then enter the following configuration
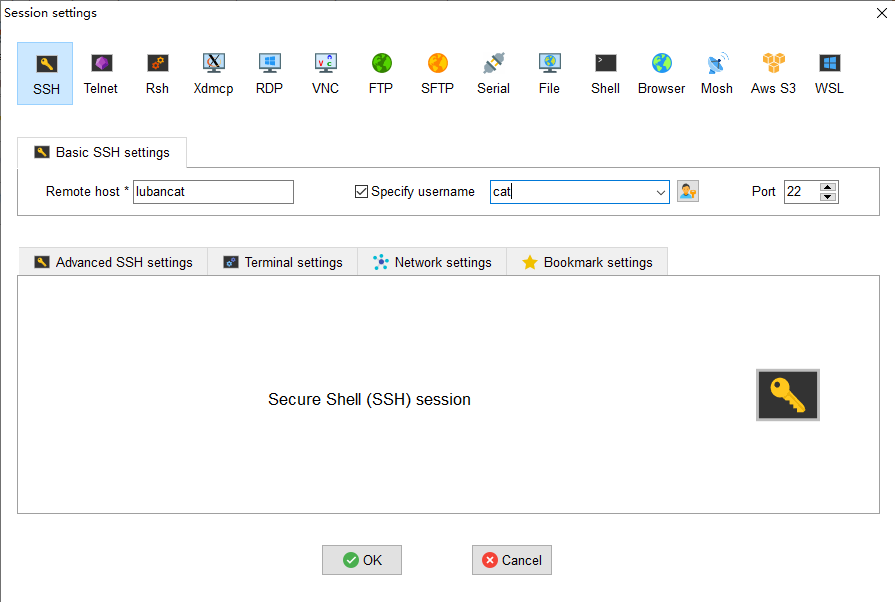
Click “OK” to complete the configuration
Then enter the password:
temppwdto enter the terminal (the password will not be displayed in plain text, after the input is complete, press the Enter key)
2.4. Serial terminal login
Video introduction to this chapter:
“12-MobaXterm installation and serial port terminal login”
https://www.bilibili.com/video/BV1cX4y1y7sX/
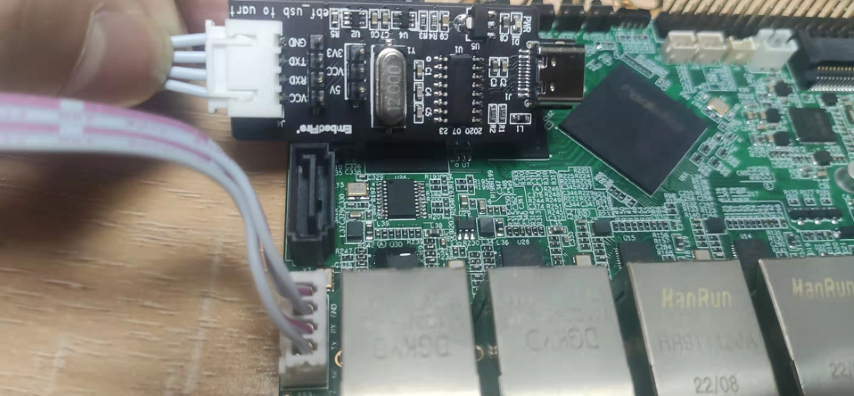
2.4.1. Connect peripherals
Must be connected before booting: serial port module and SD card (if you use SD card to log in)
2.4.2. Serial connection
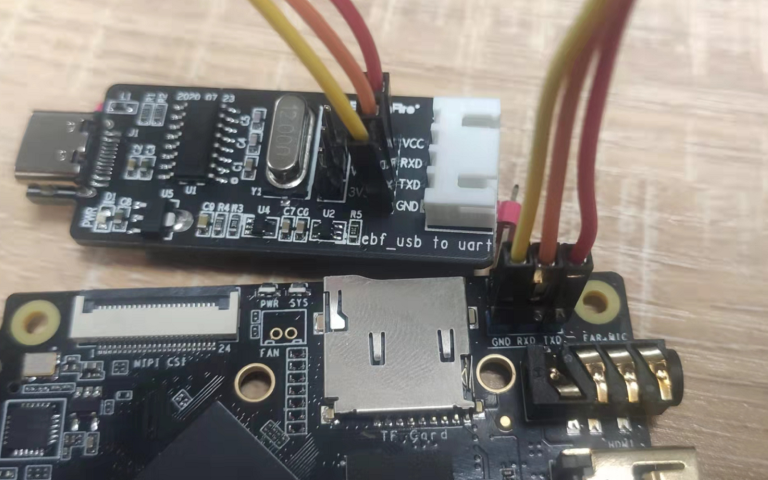
The LubanCat board has two serial ports
One is the way of three pin headers, so we can use Dupont wires to connect and use
Board with this interface
LubanCat-Zero-W
LubanCat-Zero-N
LubanCat-1
LubanCat-1N
LubanCat-2
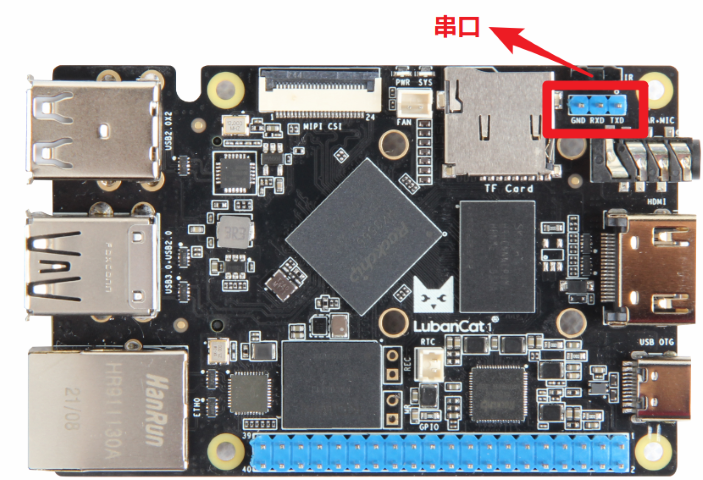
1 2 3 4 5 6 | #cable to cable
Board ----- Serial cable
GND ----- GND
TXD ----- RXD
RXD ----- TXD
|
or
注意
The silk screen position of the pin may be on the back, pay attention to the connection position when using it.
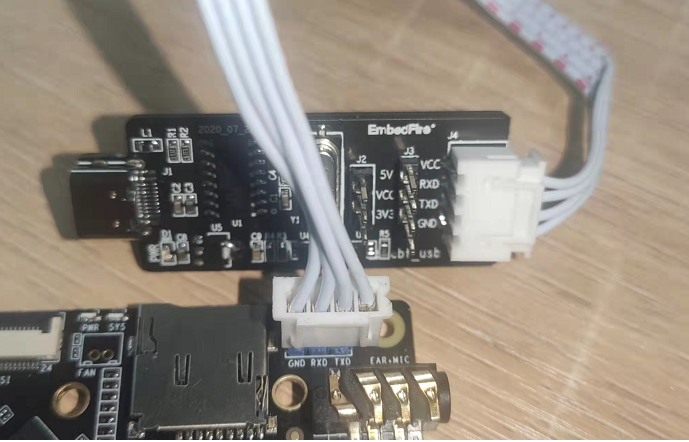
The second is to use XR 2.5mm 1x4P socket
Board with this interface
LubanCat2N
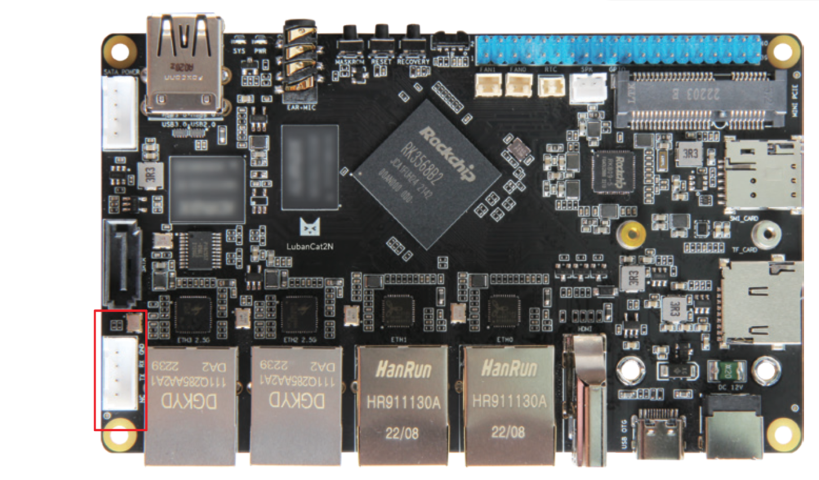
The wiring diagram is as follows:
2.4.3. software preparation
MobaXterm installation and use
Download link: https://mobaxterm.mobatek.net/download.html
MobaXterm For detailed usage of terminal software, please refer to the document:
“Linux basics and application development practical guide - based on i.MX6ULL series”
Except for different parameter configurations, the usage methods are the same.
Connect the serial port module with a computer, then open the device manager of the computer, and check the name of the port.
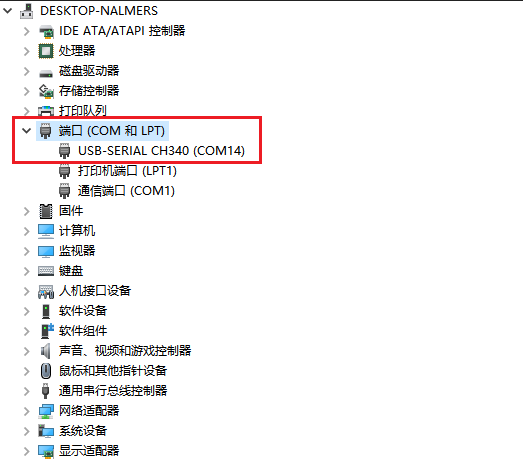
You can see that my port is using COM14
Then open the MobaXterm software, click the icon sessions to pop up the session setting, select Serial.
We choose the correct serial port, set the baud rate to 1500000, and close the flow control. The specific settings are shown in the figure below

Select your own serial port, and then configure your own software as shown above
Then click OK to enter the communication. Now the board is not turned on, so there is no response
2.4.4. Power on
Most of our boards support 5V Type-C power supply, and a small part is powered by DC12V or DC5V. Therefore, you should choose a suitable power supply according to the model of your own board.
Power supply type |
Board model |
|---|---|
Type-C(5V@3A) |
LubanCat-Zero系列,LubanCat-1系列,LubanCat-2 |
DC5V(5V@3A) |
LubanCat-2 |
DC12V(12V@2A) |
LubanCat-2N |
After having the power supply corresponding to the board, we need to choose the correct interface to connect
Some boards have two Type-C interfaces, we need to check the words near the Type-C interface, If it says
pwrorOTG, you can use this interface to power onwe plug it in and we’re ready to go
2.4.5. Start up
注意
The first boot after burning will do a restart, this is normal, this is a better option for our board configuration
You will see a lot of printed information after booting, this is normal, this is a sign of the system running
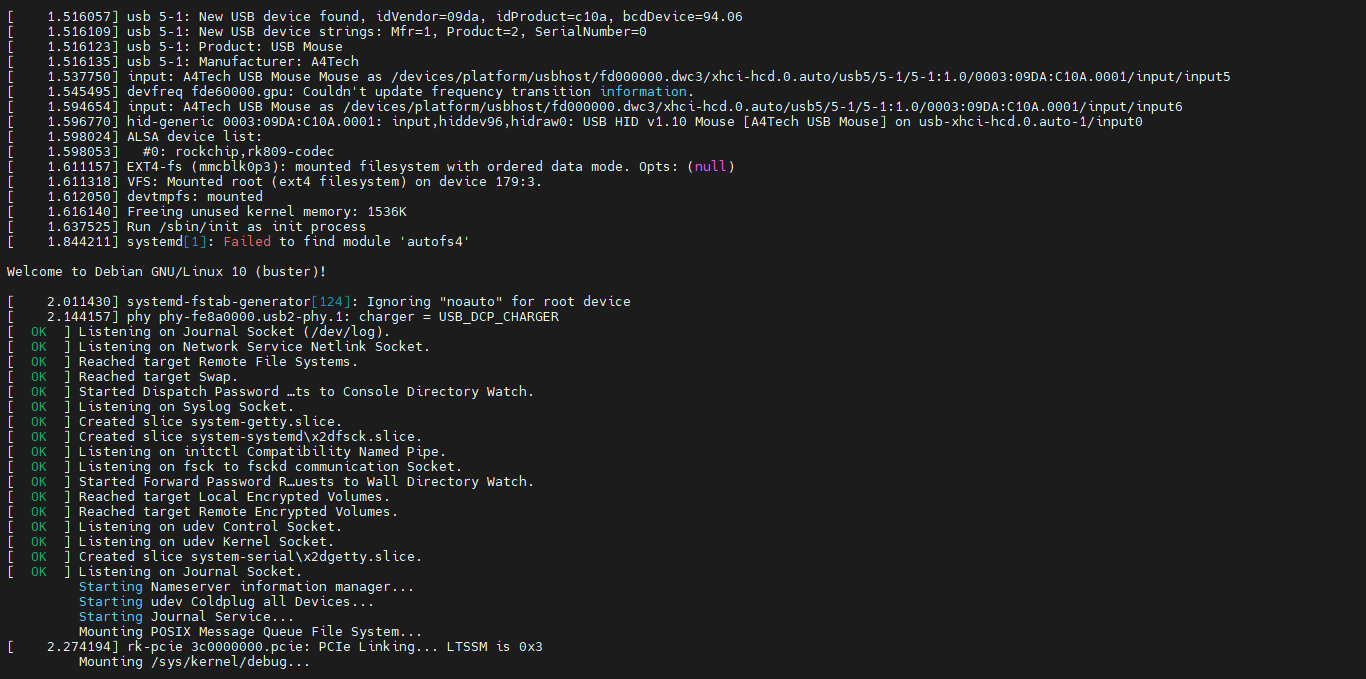
After waiting for a while, you can log in, as shown below
注解
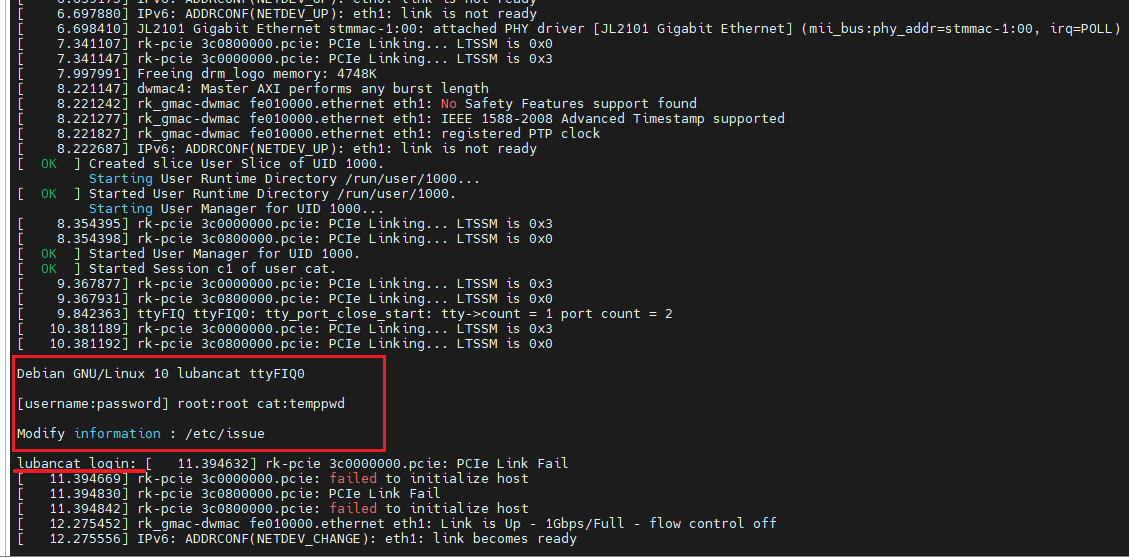
You can enter the login interface when you see the text that appears on the picture. Sometimes there may be some error reports, but this does not affect our use
Login requires username and password
1 2 3 | User - Username - Password
root - root - root
general user - cat - temppwd
|
Enter username first (case sensitive) Then enter the password (there will be no text prompt when entering the password, so you need to pay attention to the Chinese input method and capitalization)
If the username and password are correct, you will enter the terminal
To modify the username, you can use the usermod command, and to change the password, you can use the passwd command.
2.4.6. Modify the pre-login information of the serial port terminal.
Sometimes we hope that the account password information will not be displayed when logging in to the serial port terminal, or the information we need will be displayed. We can use the command
1 | sudo vi /etc/issue
|
Open the /etc/issue file, modify the content in it, save it, restart the board, and the modified information will be displayed before logging in to the terminal.
2.4.7. Serial terminal automatic login
If you want to automatically log in when the board is powered on, you only need to modify /lib/systemd/system/serial-getty@.service file, For example, the cat user is automatically logged in after power-on, open /lib/systemd/system/serial-getty@.service file Find the line starting with ExecStart as shown below
1 | ExecStart=-/sbin/agetty -o '-p -- \\u' --keep-baud 115200,38400,9600 %I $TERM
|
modify it to
1 | ExecStart=-/sbin/agetty --autologin cat --noclear %I $TERM
|
If you want to log in automatically as the root user, just replace the above cat with root.
2.5. Desktop Manager Login
If you want to use the desktop to log in, you need to prepare the following materials:
mipi screen (login after setting) or HDMI screen and the corresponding connection line with the board
- With the image of the desktop, the board with emmc will burn the image before leaving the factory. If you use an sd card or do not have a desktop image and need to burn the image, you can go to
“Image Burning” chapter burn image
Mouse, keyboard, our board desktop system is similar to Windows, it needs the interaction of mouse and keyboard to work normally
Power supply, we need to supply enough power for the board to work normally, here we recommend our official adapted power supply
Expansion dock (not required), some boards only have one type-c port, if you need to use multiple usb devices, you can use the expansion dock to expand the interface
注意
If the mipi screen is set, you can also log in to the desktop on the mipi screen
注解
Buildroot system does not apply
2.6. Start up
After booting, you will see our LubanCat logo in the middle of the screen, After waiting for a period of time to load, you can see the mouse and the entire lock screen interface loaded.

2.6.1. lock screen
The lock screen interface can be seen as follows
debian lock screen
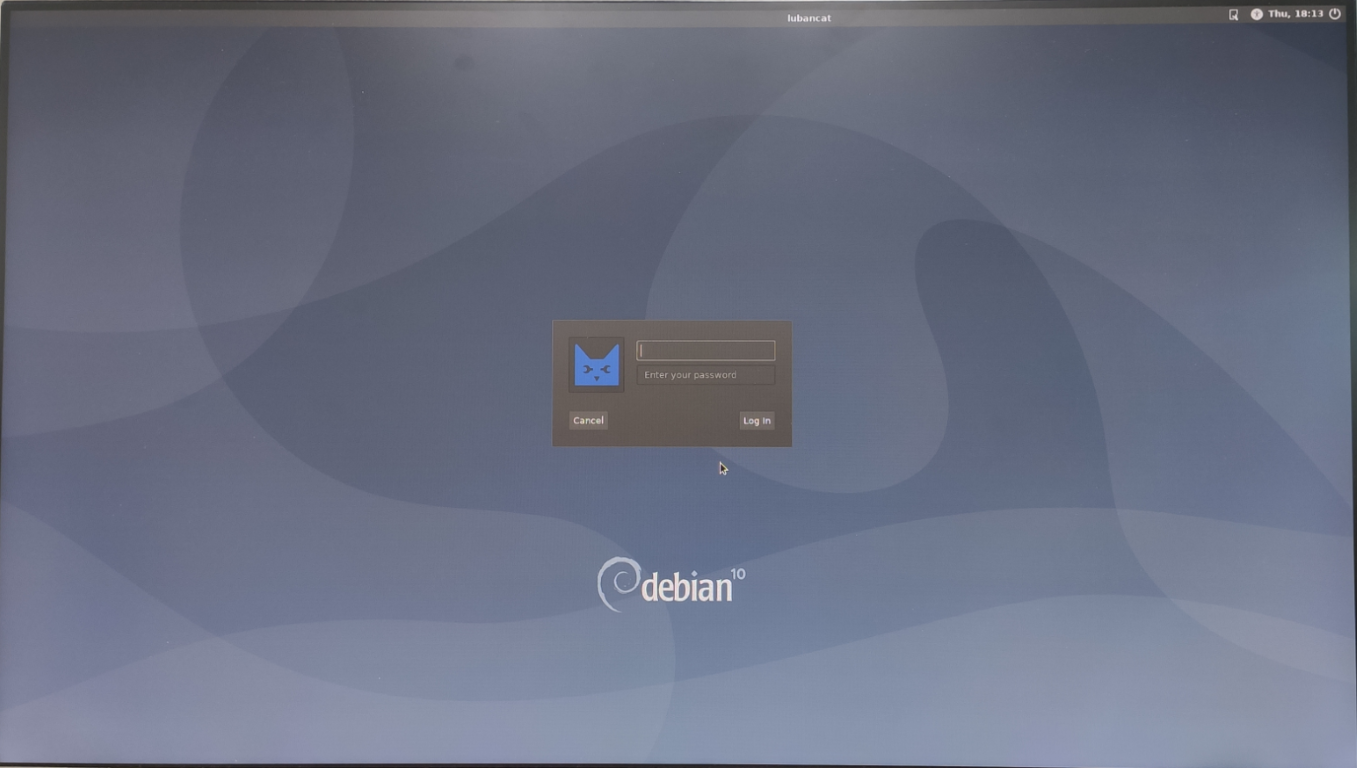
We need to use the keyboard to enter the username here:
catWe need to use the keyboard to enter the password here:
temppwdThen press enter to enter the desktop
Ubuntu lock screen
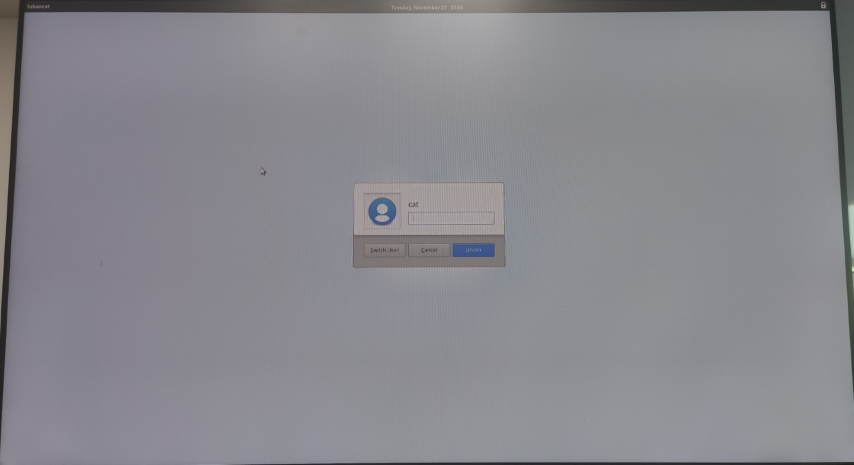
We need to use the keyboard to enter the password here:
temppwdThen press enter to enter the desktop
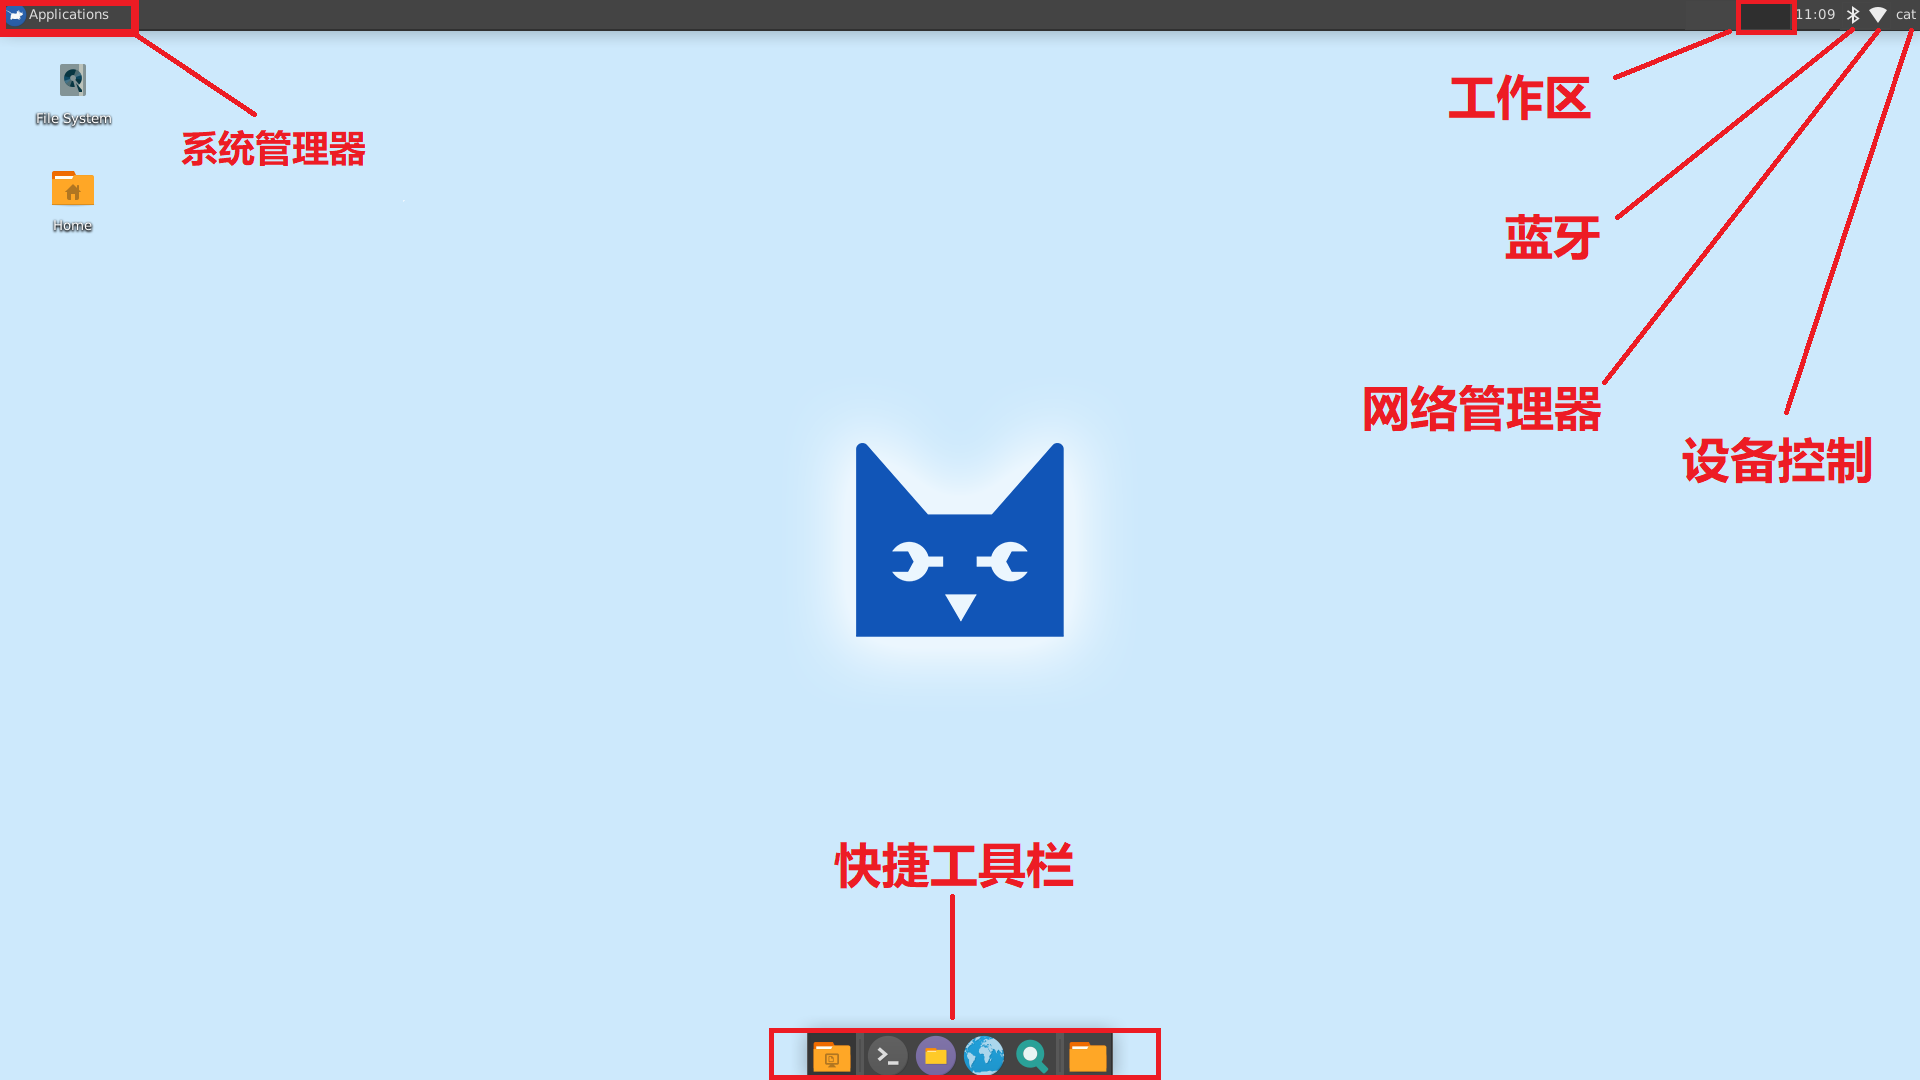
2.6.2. enter desktop
After entering the desktop, we can see that the entire layout of the desktop is similar to that of Windows. The difference is that the status bar is located above the desktop
debian main interface
ubuntu main interface

2.6.3. Automatic desktop login
Open or create a new file /etc/lightdm/lightdm.conf and modify or add the following
1 2 3 4 | [Seat:*]
autologin-guest=false
autologin-user=cat
autologin-user-timeout=0
|
autologin-user: account name for automatic login
autologin-user-timeout: how long to automatically log in, in seconds
2.6.4. Serial terminal automatic login
If you want to log in the serial port terminal automatically, you only need to modify the “/lib/systemd/system/serial-getty@.service” file. For example, the cat user is automatically logged in after power on, open “/lib/systemd/system/serial-getty@.service” and find a line starting with ExecStart as shown below
1 | ExecStart=-/sbin/agetty -o '-p -- \\u' --keep-baud 115200,38400,9600 %I $TERM
|
modify it to:
1 | ExecStart=-/sbin/agetty --autologin cat --keep-baud 115200,38400,9600 --noclear %I vt220
|
If you want to automatically log in as the root user, just replace the above cat with root.