
1. System image burning
Video introduction to this chapter:

“09-Comparison of several Linux system images of Lubancat”
https://www.bilibili.com/video/BV1Mg4y1V7bX/
Three steps are required to run the board: burn the system, start the system and log in the system.
The LubanCat-RK series boards with emmc have been burned with a system image by default when leaving the factory. If you do not need to burn a new image, you can skip this chapter.
The system image of LubanCat-RK series boards contains a variety of root file systems, we can choose the corresponding image to download according to our needs.
注意
System image is the core of LubanCat-RK board. It includes the linux kernel, basic programs, etc. It is necessary to run the LubanCat-RK board. So we need to install the image for the board before running the board.
注解
OpenWrt image burning does not apply to this document, please refer to the specific burning process OpenWrt User Manual
1.1. Image acquisition
Video introduction to this chapter:
“Introduction to Common Software Packages for 10-Debian Desktop Image”
https://www.bilibili.com/video/BV1T24y1T7EL/
“11-Introduction to Common Software Packages for Ubuntu Desktop Image”
https://www.bilibili.com/video/BV1hM4y1q7se/
Visit the BaiduNetdisk resource introduction page to obtain the system image: 3-Linux image
We can enter the Linux image folder
1 2 3 4 5 6 7 8 9 10 11 | Linux image
.
├── Ubuntu system image
| ├── Root file system image - used for compiling images
| └── Universal image (extboot) - for all boards
|
├── Debian system image
| ├── Root file system image - used for compiling images
| └── Universal image (extboot) - for all boards
|
└── OpenWrt system image
|
1.1.1. Image naming rules
lubancat-(processor model)-(root file system)-(desktop type)-(update time)_update
1.1.1.1. Processor model
rk3566 : LubanCat boards using rk3566 processors, such as LubanCat-1 series and LubanCat-Zero series.
rk3568 : LubanCat board using rk3568 processor, such as LubanCat-2 series
1.1.1.2. Root file system
debian10 : means that the root file system used by the system is debian10.
ubuntu18.04 : Indicates that the root file system used by the system is ubuntu18.04.
ubuntu20.04: The root file system used by the system is ubuntu20.04.
ubuntu22.04: The root file system used by the system is ubuntu22.04.
1.1.1.3. Desktop type
xfce : Use the desktop image of the xfce4 suite.
xfce-full : use the xfce4 package + the desktop image of the recommended installation package, the default language is Chinese, and the Chinese input method is installed.
lite : command line version, no desktop.
1.1.1.4. Updated
The updated date is in the format: yyyymmdd_update
1.1.1.5. For example
Let’s take the general image of LubanCat-rk3566 debian10 as an example
lubancat-rk3566-debian10-xfce-20230419_update
Applicable model of the board: suitable for LubanCat using rk3566 processor board
Root file system: debian10
System type: xfce·desktop version
Date of update: April 19, 2023
1.2. Burn image on Windows platform
The RK format in this article refers to the partition format of the system image applicable to the RockChip chip packaged with the GPT partition. We provide Buildroot, Ubuntu, and Debian images adapted to LubanCat boards, all of which are complete images in RK format. If we use the supporting SDK to compile the image, it will be saved in rockdev/update.img by default.
1.2.1. eMMC Burning
Video introduction to this chapter:
“04-Burn Lubancat image to EMMC”
https://www.bilibili.com/video/BV19L41187Re/
1.2.1.1. Install burning tool
The burning of the image needs to use the burning tool RKDevTool and the driver DriverAssitant
1.2.1.1.1. Install DriverAssitant
Download and decompress the software package, double-click DriverInstall.exe to enter the driver installation interface.
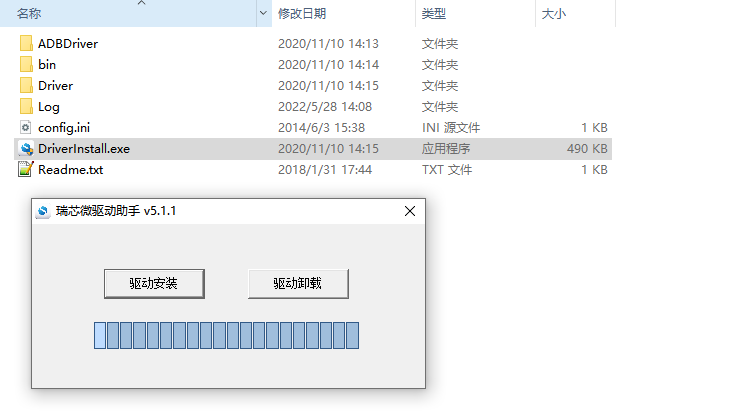
Click Driver Installation to start installing the driver. If you are not sure whether the old version of the driver has been installed before, first click Uninstall the driver to remove the old version driver, and then click Install the driver.
1.2.1.1.2. Install RKDevTool
Rockchip dedicated USB programming tool, Windows platform, can use the USB interface to download the system image to the board.
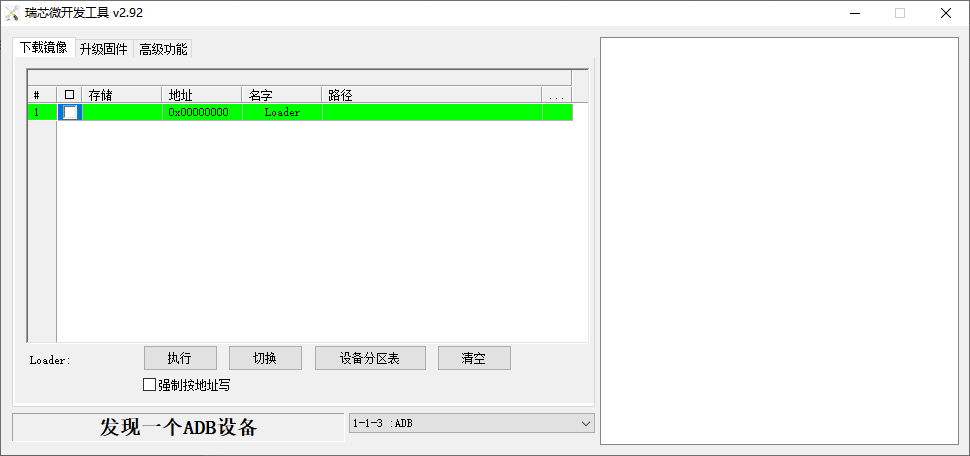
After decompressing the compressed package, it can be used without installation. Double-click RKDevTool.exe to enter the software interface.
There are three main parts of the software, which are download image, upgrade firmware and advanced functions.
1.2.1.2. Recovery mode burning image
This mode is suitable for the board has not been burned into the system or the burned system is damaged and cannot run
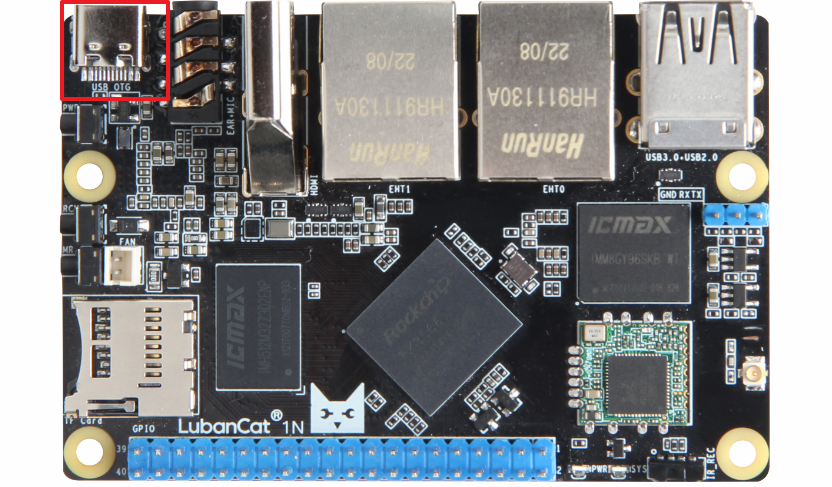
Each piece of LubanCat-RK series will have a USB-OTG interface, which is specially used for power supply and burning image.
There will be a clear silk screen display on the board OTG USB OTG etc.
Here take LubanCat-1N as an example, as shown below:
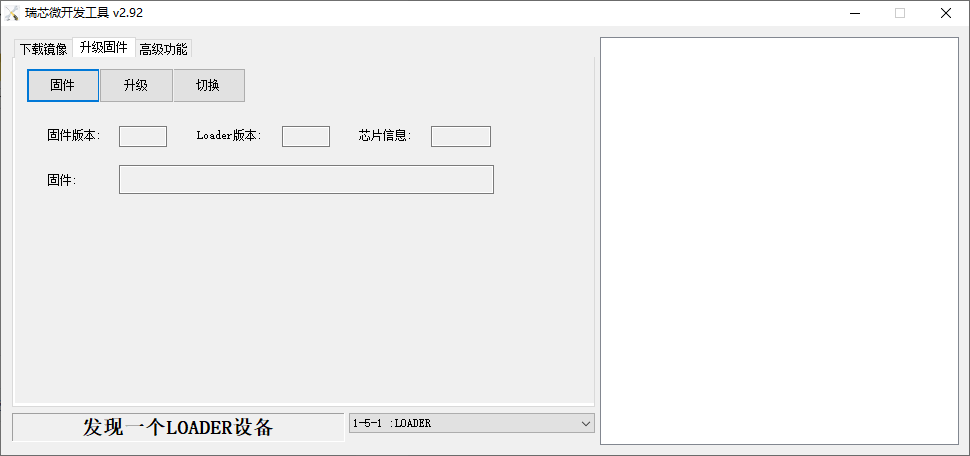
We open the RKDevTool burning tool and set the board into burning mode.
1 2 3 4 5 | 1. Prepare a Type-C cable, connect one end to the computer, and reserve the other end for spare.
2. Disconnect all connections that may supply power to the board, such as power cables, USB cables, etc.
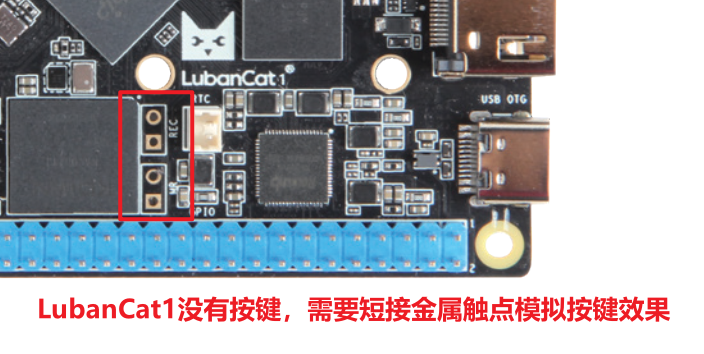
3. Press and hold the REC button (RECOVERY), first insert the reserved USB cable into the USB-OTG interface of the board, and then plug in the power supply.
4. Wait for the software prompt to find a LOADER device, then release the button.
5. If unsuccessful, repeat steps 2-3.
|
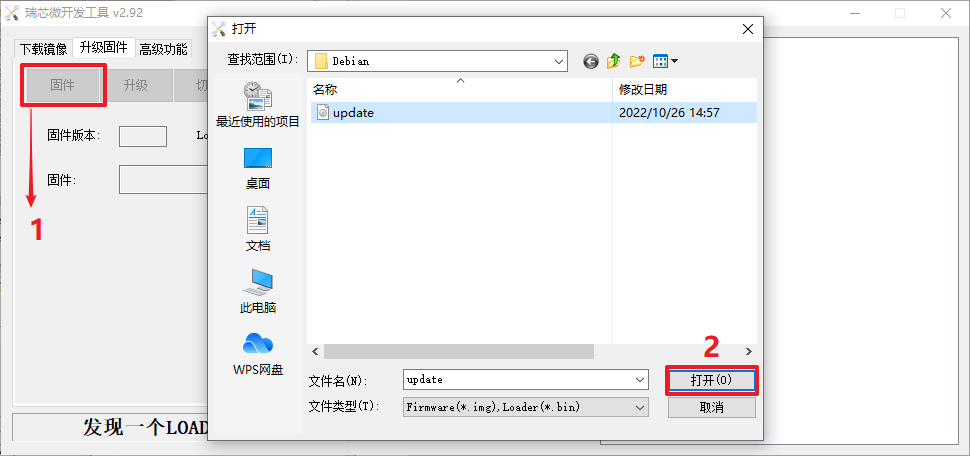
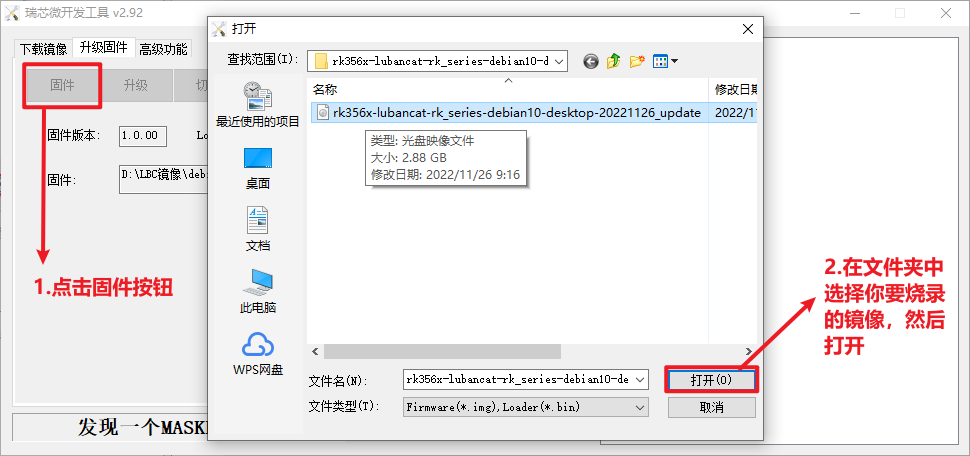
Then you can click Firmware to select the image to be burned, such as update.img and open it.
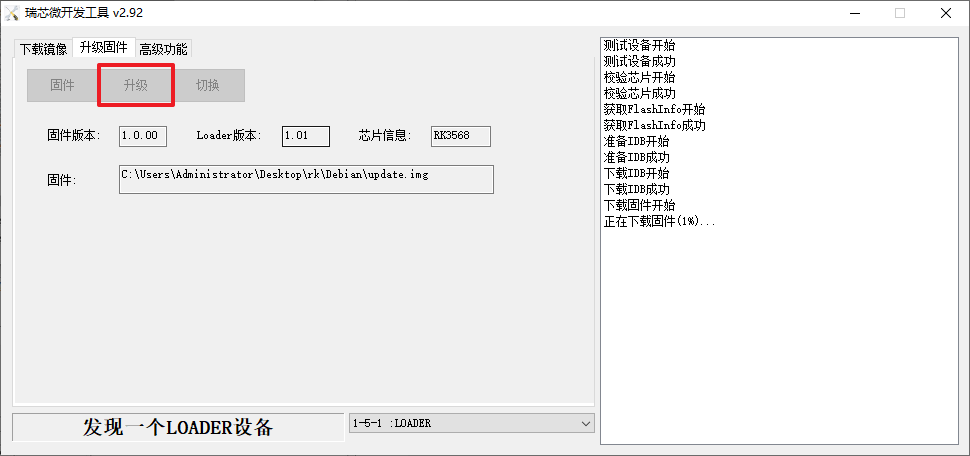
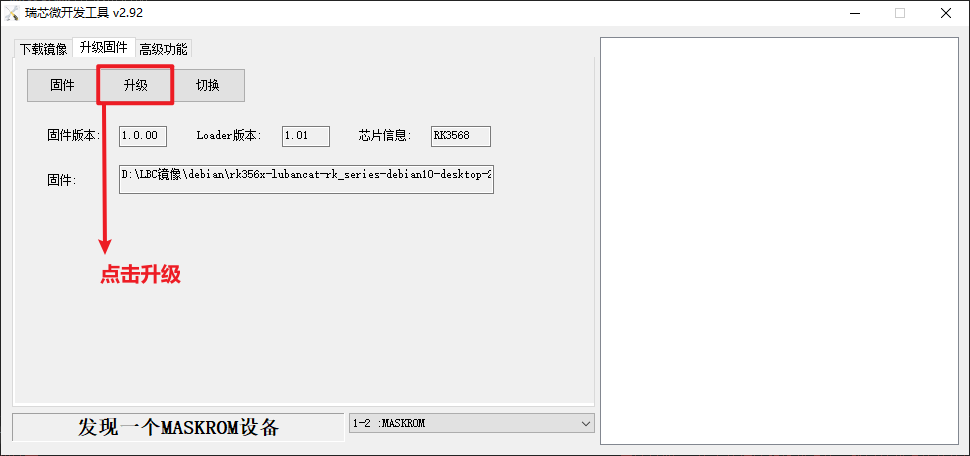
Wait for the firmware loading to complete, then click Upgrade to start burning the firmware.
1.2.1.3. Burn image in MASKROM mode
This mode is suitable for the board has not been burned into the system or the burned system is damaged and cannot run
Each piece of LubanCat-RK series will have a USB-OTG interface, which is specially used for power supply and burning image.
There will be a clear silk screen display on the board OTG USB OTG etc.
Here take LubanCat-1N as an example, as shown below
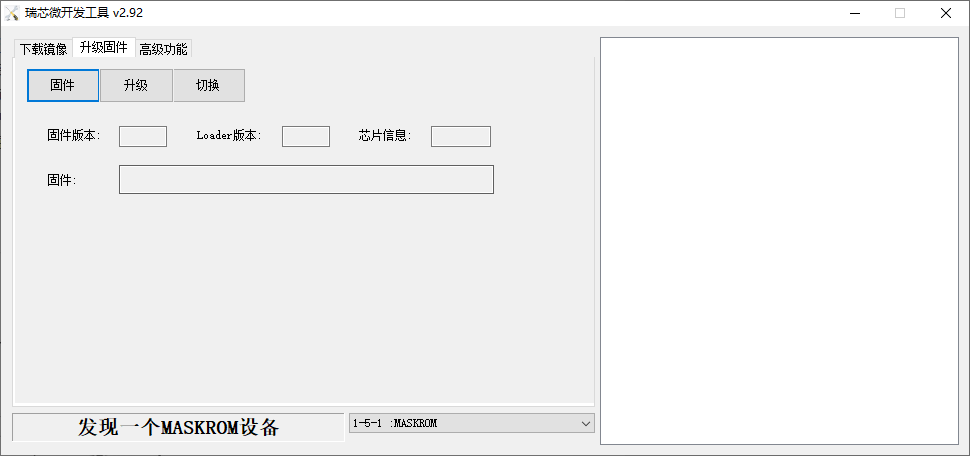
We open the RKDevTool burning tool and set the board into burning mode.
1 2 3 4 5 | 1. Prepare a Type-C cable, connect one end to the computer, and reserve the other end for spare
2. Disconnect all connections that may supply power to the board, such as power cables, USB cables, etc.
3. Press and hold the MR button (MASKROM) without releasing it, first insert the reserved USB cable into the USB-OTG interface of the board, and then plug in the power supply
4. Wait for the software prompt to find a MASKROM device, and then release the button
5. If unsuccessful, repeat steps 2-4.
|
Then you can click Firmware to select the image to be burned, such as update.img and open it.
Wait for the firmware loading to complete, then click Upgrade to start burning the firmware
1.2.2. Burn SD card
Video introduction to this chapter:
“03-Burn Lubancat image to SD card”
https://www.bilibili.com/video/BV1mc411N7wp/
Image burning to SD card requires special burning software and SD card reader
1.2.2.1. Install SDDiskTool
Rockchip SD card image creation tool, Windows platform, only supports the burning of complete images in RK format.
After decompressing the compressed package, it can be used without installation. Double-click SD_Firmware_Tool.exe to enter the software interface.
1.2.2.2. Burn image
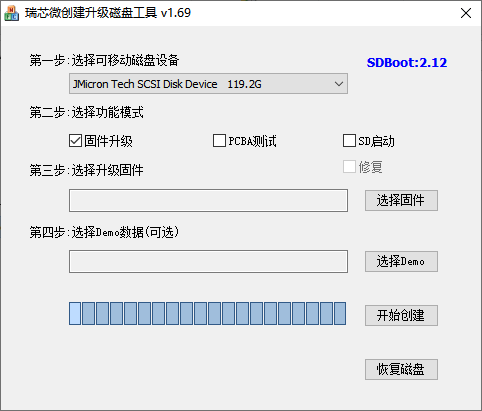
Open the executable file SD_Firmware_Tool.exe for burning SDDiskTool and insert the SD card.
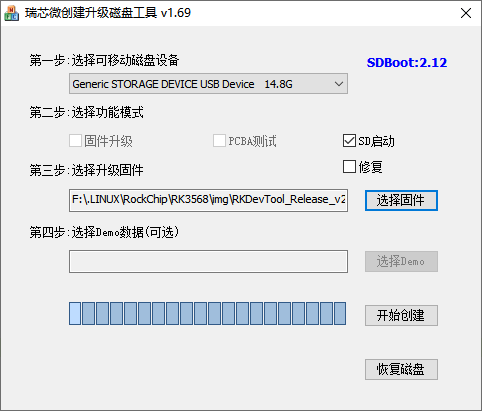
First select the correct SD card to be burned, then set the function mode selection to SD start , then select the complete image in RK format to be burned, and finally click to start creating the burned image to the SD card.
Wait patiently for the SD card to be burned completely. When the image is larger, the burning time will be longer accordingly.
注意
Click to start creating, there will be a certain probability that an error will be reported saying that it cannot be burned, you can close the error window and start creating.