
20. 4G
Video introduction to this chapter:

“37-Use of 4G and 5G Modules”
https://www.bilibili.com/video/BV12c411M7Gt/
LubanCat-RK series boards support usb interface connection and mini-pcie interface connection. Although they are two different interfaces, the principle of the two connection methods is to communicate through usb.
The difference between usb interface connection and mini-pcie interface connection.
For usb interface connection, you need to insert the sim card into the usb-4G module, the size of the sim card used is standard sim.
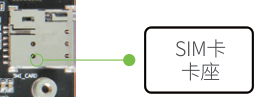
mini-pcie interface connection, you need to insert the sim card on the board, the size of the sim card used is nano sim.
This chapter will introduce the use of the following 4G modules:
EC20
EC200N-CN(Theoretically applicable to EC100N-CN, EC200S series, EC200N-CN, EC200M-CN, EC600M-CN, EC600N-CN, EC800M-CN, EC800N-CN, EG912N-EN, EG915N series)
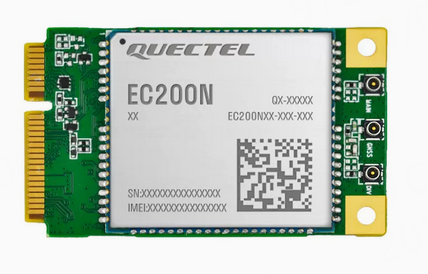
20.1. EC20
The Embedfire EC20 4G module is composed of an EC20 Pcie interface module plus a USB adapter board, which can be easily plugged into a Linux motherboard with a USB interface. There are many models of EC20, the model we choose is CEHCLG, full Netcom, 7-mode, pure data, single antenna version.
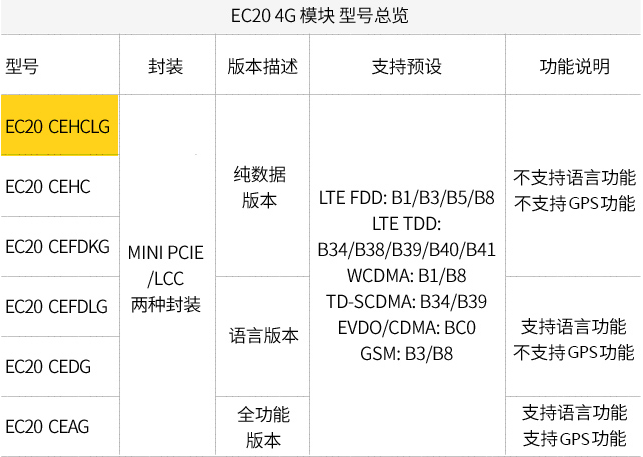
EC20_4G_module.png
EC20 is a 4G module of Quectel, available in Mini PCle and LCC packages, and the communication protocol with the processor is USB. That is to say, the boards and cards that you see on the market that are connected to EC20 through the onboard PCle interface also communicate through USB. It is not through PCle communication that some novice users say, PCle is just a package, and the final communication All via USB.

EC20_4G_module_front.png
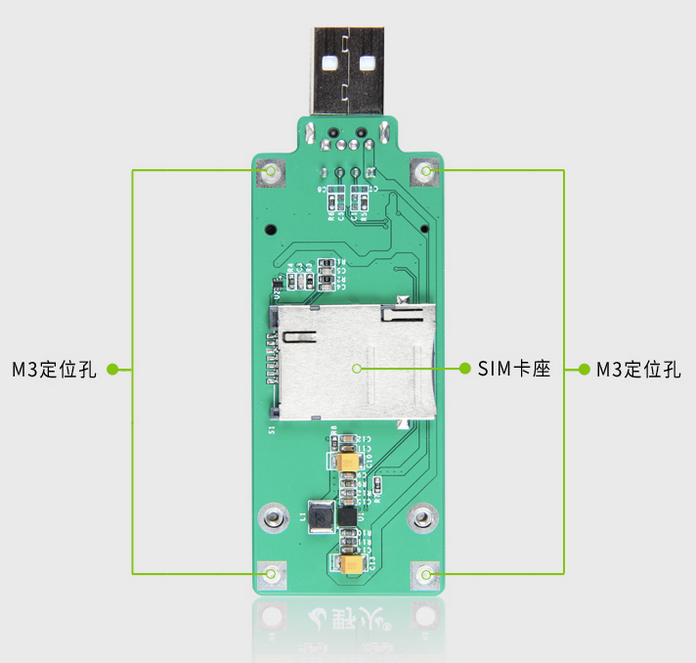
EC20_4G_module_back.png
20.1.1. Module installation

20.1.1.2. SIM card
If you want to run 4G, in addition to installing a 4G module, you must also install a SIM card.
20.1.2. graphic interface
This method is suitable for Ubuntu
First install the wireless module, pcie does not support hot swap (need to be installed before booting)
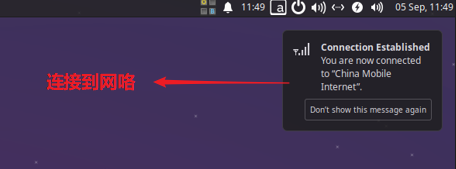
After booting, click the network icon in the upper right corner of the desktop
You will see that the 4G signal is loaded

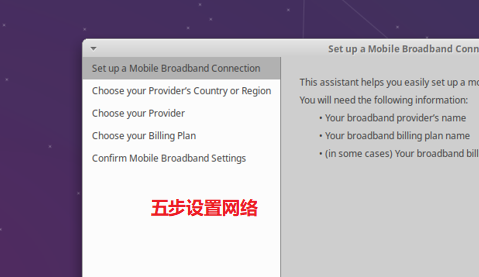
Click to connect, you will enter the connection interface, you need to set up the connection in 5 steps.
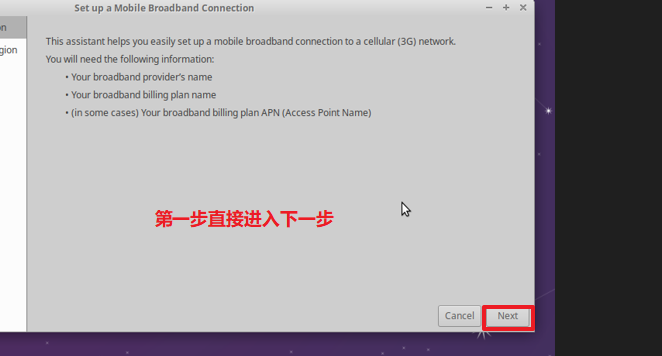
Press next directly to enter the next step
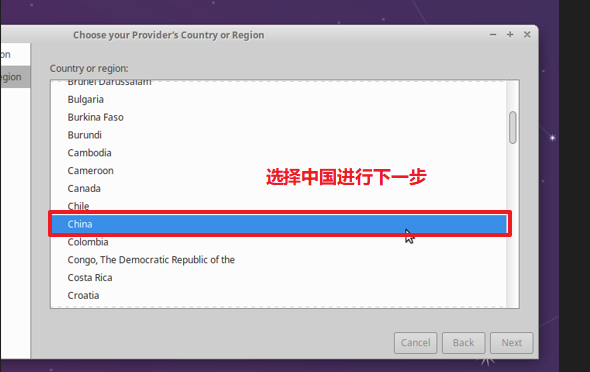
Set the region, select China
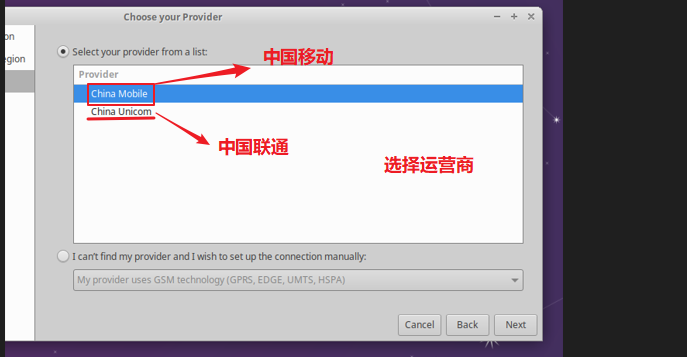
Choose your card carrier
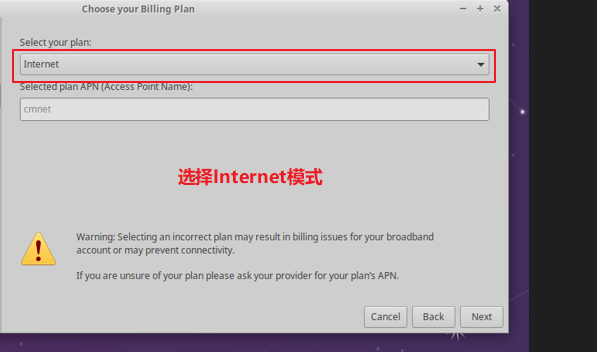
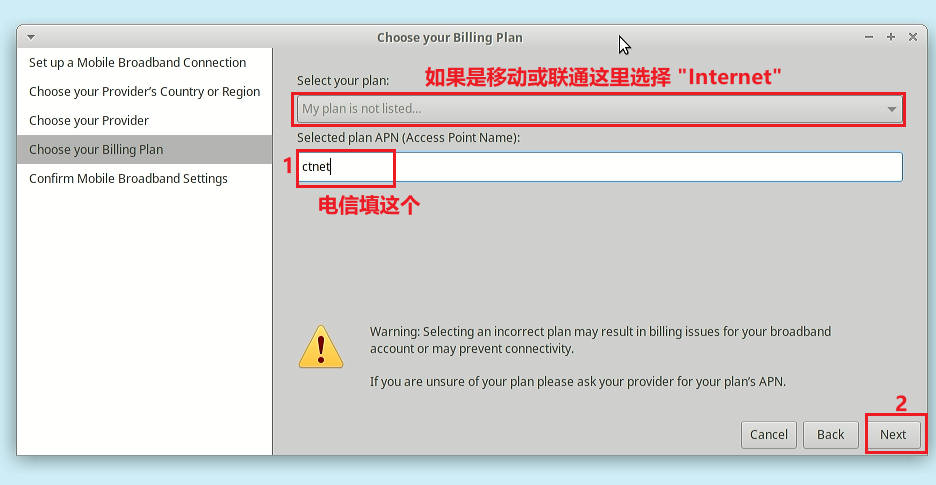
Select the operating mode of the card, select the option of Internet.
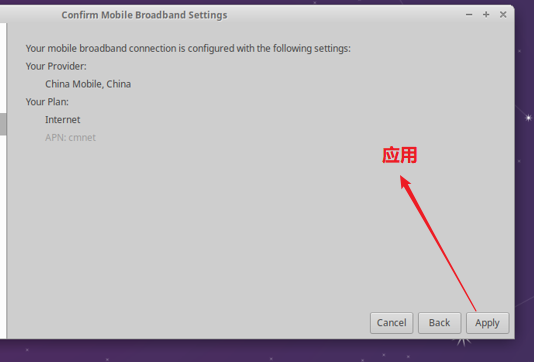
Click Apply to complete the setup
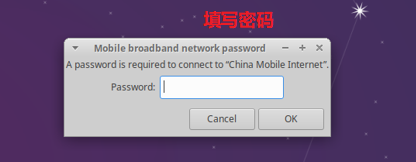
Set the mobile broadband network password. The password may be 123456, 000000. The last 6 digits of the mobile phone and the last 6 digits of the ID card. If it fails, it is recommended to call customer service
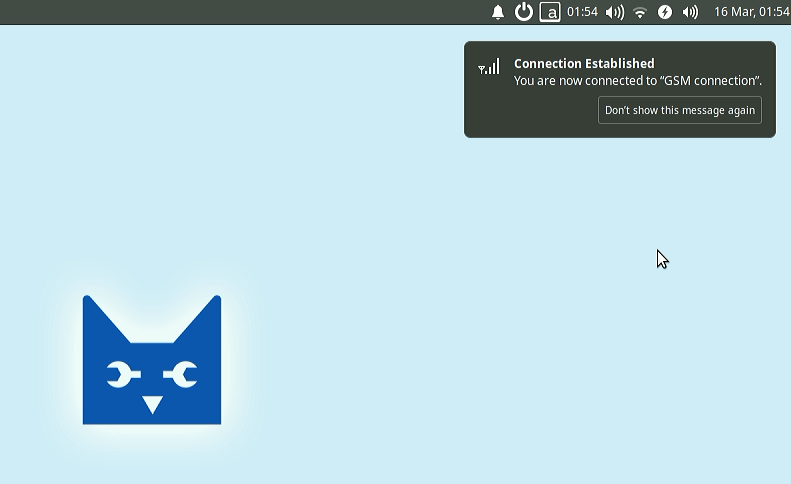
After the setting is successful, you will see that there is a successful connection display
Check network status

ifconfig view

check network connection

If you cannot ping the network, the following occurs
1 2 | root@lubancat:~# ping mi.com
ping: unknown host
|
Maybe you are connected to the network cable (assuming the eth0 interface is used), but the default routing table is not a 4G module. If you want to use the network card to access the Internet, you need to update the routing table. The solution is as follows:
1 2 | route del -net 0.0.0.0 eth0
route add -net 0.0.0.0 ppp0
|
20.1.3. Command Line
The factory firmware of the LubanCat-RK series board already supports the 4G module, so it can be used directly after receiving the board. The method of use is also very simple. First, insert a 4G phone card into the SIM card holder. This phone card must be able to access the Internet. Then connect the IPX antenna (the 4G module has been connected to the antenna when it is shipped), and finally connect to the board. Follow the steps below.
Wait for about 6 seconds, you can see that the blue LED light of the 4G module is flashing, and then you can enter the dmesg command in the terminal. If you can see the following content, it means that the module starts successfully:
1 2 3 4 5 6 7 8 9 10 11 12 13 14 15 16 | dmesg
···
[ 7045.607736] usbcore: registered new interface driver usbserial_generic
[ 7045.614387] usbserial: USB Serial support registered for generic
[ 7045.687710] usbcore: registered new interface driver option
[ 7045.697962] usbserial: USB Serial support registered for GSM modem (1-port)
[ 7045.706058] option 1-1.1:1.0: GSM modem (1-port) converter detected
[ 7045.719742] usb 1-1.1: GSM modem (1-port) converter now attached to ttyUSB0
[ 7045.732624] option 1-1.1:1.1: GSM modem (1-port) converter detected
[ 7045.745153] usb 1-1.1: GSM modem (1-port) converter now attached to ttyUSB1
[ 7045.758280] option 1-1.1:1.2: GSM modem (1-port) converter detected
[ 7045.771023] usb 1-1.1: GSM modem (1-port) converter now attached to ttyUSB2
[ 7045.779959] option 1-1.1:1.3: GSM modem (1-port) converter detected
[ 7045.795461] usb 1-1.1: GSM modem (1-port) converter now attached to ttyUSB3
|
20.1.3.1. Install the necessary dependencies
1 2 3 4 5 | #update software
sudo apt update
#Get dependent software
sudo apt install make gcc git busybox udhcpc
|
20.1.3.2. Obtain and compile quectel-CM source code
1 2 3 4 5 6 | #Get quectel-CM source code
git clone https://github.com/kmilo17pet/quectel-cm.git
#Enter the source code directory
cd quectel-cm/
#Compile the source code
make
|
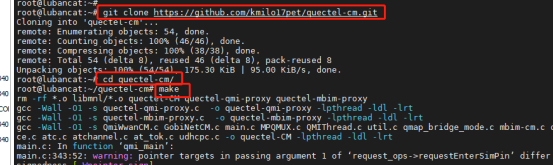
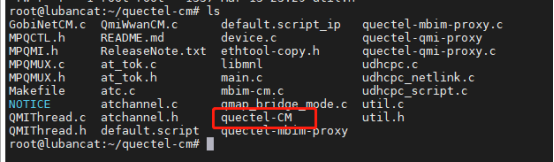
There will be many warnings during the compilation process, and finally get quectel-CM.
20.1.3.3. Dial
The dialing command is as follows, where the APN depends on the mobile phone card operator.
1 2 3 4 5 6 7 | #-s the parameter specifies the APN of the data connection
sudo ./quectel-CM -s ANP &
#APN:
Mobile:"cmnet"
Telecom:"3gnet"
Unicom:"ctnet"
|
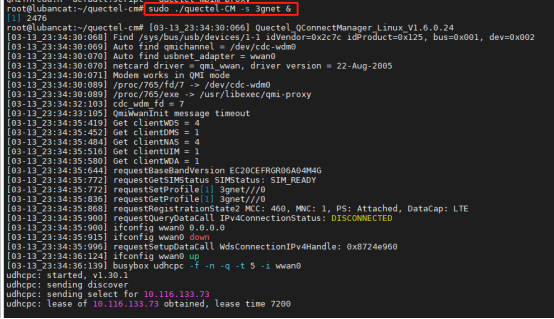
The test uses a Unicom card, so the commands used are as follows.
1 2 | #Specify China Unicom's APN
sudo ./quectel-CM -s 3gnet &
|
20.1.3.4. Network test
20.1.3.5. 4G auto start
For future convenience, copy quectel-CM to /usr/bin/
1 | sudo cp quectel-CM /usr/bin/ -f
|

Add autostart script
1 | sudo vi /opt/auto_4G.sh
|
Add the following content, 3gnet is determined by APN according to your mobile phone card operator.
1 2 3 4 | #Be careful not to add &, otherwise it may fail to start
#!/bin/bash
sudo quectel-CM -s 3gnet
|

Add execute permission
1 | sudo chmod 0755 /opt/auto_4G.sh
|
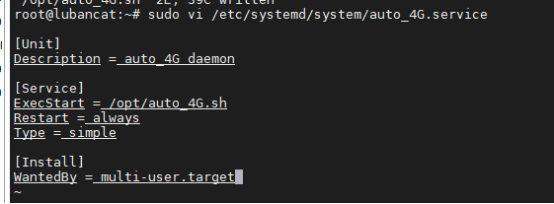
Create a configuration file, create an auto_4G.service configuration file in the /etc/systemd/system/ directory. The content is as follows
1 2 3 4 5 6 7 8 9 10 | [Unit]
Description = auto_4G daemon
[Service]
ExecStart = /opt/auto_4G.sh
Restart = always
Type = simple
[Install]
WantedBy = multi-user.target
|
Enable auto_4G.service
1 2 | sudo systemctl enable auto_4G
sudo systemctl start auto_4G
|
Restart the development board and test
20.1.4. Dial Script
In addition to the above-mentioned use of quectel-CM for dialing, dial scripts can also be used for dialing.
This method does not work on Ubuntu
20.1.4.1. Install the necessary dependencies
1 2 3 4 5 | #update software
sudo apt update
#Get dependent software
sudo apt install ipppd
|
20.1.4.2. Load the three necessary files
ec20_options
ec20_ppp_dialer
ppp-on.sh
ppp-on.sh is the dial-up script. Run it directly to dial-up. ec20_options is the dial-up configuration file, and ec20_ppp_dialer is some dial-up instructions.
The contents of the three files are as follows:
The content of the ec20_options file is as follows:
1 2 3 4 5 6 7 8 9 10 11 12 13 14 15 16 17 18 19 20 21 | /dev/ttyUSB2
115200
crtscts
modem
persist
lock
noauth
noipdefault
debug
nodetach
user Anyname
password Anypassword
ipcp-accept-local
ipcp-accept-remote
#replacedefaultroute
defaultroute
usepeerdns
noccp
nobsdcomp
novj
#Dump
|
The content of the ec20_ppp_dialer file is as follows:
1 2 3 4 5 6 7 8 9 10 11 12 | ABORT "NO CARRIER"
ABORT "ERROR"
TIMEOUT 120
"" ATE
SAY "ATE"
ECHO ON
OK ATH
OK ATP
OK AT+CGDCONT=1,\"IP\",\"CMNET\"
#OK AT+ZSNT=0,0,0
OK ATD*98*1#
CONNECT
|
The contents of the ppp-on.sh file are as follows:
1 2 3 4 5 6 | #!/bin/sh
#clear
#ppp-on.sh
OPTION_FILE="ec20_options"
DIALER_SCRIPT="ec20_ppp_dialer"
pppd file $OPTION_FILE connect '/usr/sbin/chat -v -f ec20_ppp_dialer' &
|
20.1.4.3. Run 4G module
1 2 3 4 5 6 7 8 9 10 11 12 13 14 15 16 17 18 19 20 21 22 23 24 25 26 27 28 29 30 31 32 33 34 35 36 37 38 39 40 41 42 43 44 45 46 47 48 49 50 | #Give permission to run
sudo chmod +x ppp-on.sh
#Run the script as root
sudo ./ppp-on.sh
#Operation result
ATE
OK
ATH
OK
ATP
OK
AT+CGDCONT=1,"IP","CMNET"
OK
ATD*98*1#
CONNECT
Script /usr/sbin/chat -v -f ec20_ppp_dialer finished (pid 3212), status = 0x0
Serial connection established.
using channel 1
Using interface ppp0
Connect: ppp0 <--> /dev/ttyUSB2
sent [LCP ConfReq id=0x1 <asyncmap 0x0> <magic 0xb20ad31b> <pcomp> <accomp>]
rcvd [LCP ConfReq id=0x0 <asyncmap 0x0> <auth chap MD5> <magic 0x3331db1f> <pcomp> <accomp>]
sent [LCP ConfAck id=0x0 <asyncmap 0x0> <auth chap MD5> <magic 0x3331db1f> <pcomp> <accomp>]
rcvd [LCP ConfAck id=0x1 <asyncmap 0x0> <magic 0xb20ad31b> <pcomp> <accomp>]
sent [LCP EchoReq id=0x0 magic=0xb20ad31b]
rcvd [LCP DiscReq id=0x1 magic=0x3331db1f]
rcvd [CHAP Challenge id=0x1 <c572f22c913258ae462be0b73b58937c>, name = "UMTS_CHAP_SRVR"]
sent [CHAP Response id=0x1 <f5676d5cae1f8da564d629fb335728ab>, name = "Anyname"]
rcvd [LCP EchoRep id=0x0 magic=0x3331db1f b2 0a d3 1b]
rcvd [CHAP Success id=0x1 ""]
CHAP authentication succeeded
CHAP authentication succeeded
sent [IPCP ConfReq id=0x1 <addr 0.0.0.0> <ms-dns1 0.0.0.0> <ms-dns2 0.0.0.0>]
rcvd [IPCP ConfReq id=0x0]
sent [IPCP ConfNak id=0x0 <addr 0.0.0.0>]
rcvd [IPCP ConfNak id=0x1 <addr 10.86.xxx.xxx> <ms-dns1 120.196.165.7> <ms-dns2 221.179.38.7>]
sent [IPCP ConfReq id=0x2 <addr 10.86.xxx.xxx> <ms-dns1 120.196.165.7> <ms-dns2 221.179.38.7>]
rcvd [IPCP ConfReq id=0x1]
sent [IPCP ConfAck id=0x1]
rcvd [IPCP ConfAck id=0x2 <addr 10.86.xxx.xxx> <ms-dns1 120.196.165.7> <ms-dns2 221.179.38.7>]
Could not determine remote IP address: defaulting to 10.64.64.64
not replacing default route to eth0 [192.168.103.254]
local IP address 10.86.xxx.xxx
remote IP address 10.64.64.64
primary DNS address 120.196.165.7
secondary DNS address 221.179.38.7
Script /etc/ppp/ip-up started (pid 3221)
Script /etc/ppp/ip-up finished (pid 3221), status = 0x0
|
When you see the IP address after the content returned by dialing, it proves that the dialing is successful.
1 2 | rcvd [IPCP ConfNak id=0x1 <addr 10.86.xxx.xxx> <ms-dns1 120.196.165.7> <ms-dns2 221.179.38.7>]
sent [IPCP ConfReq id=0x2 <addr 10.86.xxx.xxx> <ms-dns1 120.196.165.7> <ms-dns2 221.179.38.7>]
|
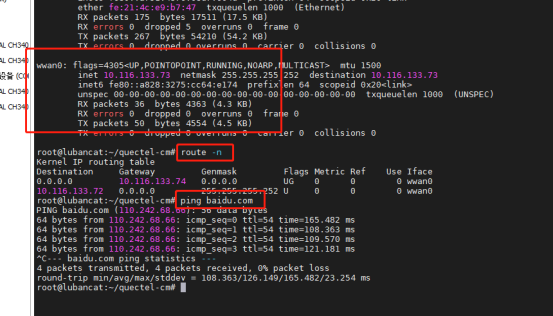
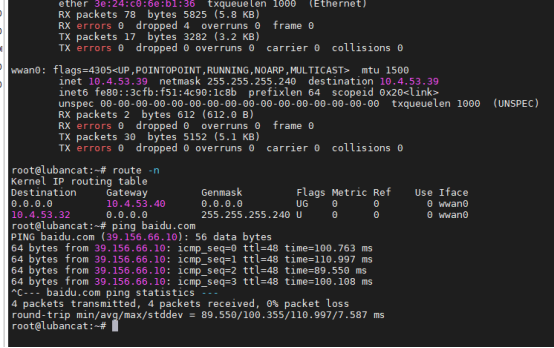
20.1.4.4. Verify 4G network card
1 2 | #view ip
ifconfig
|

Then we can verify the ping function and whether we can access the Internet (here we take ping baidu.com as an example):
1 2 3 4 5 6 | root@lubancat:~# ping baidu.com
PING baidu.com (110.242.68.66) 56(84) bytes of data.
64 bytes from 110.242.68.66 (110.242.68.66): icmp_seq=1 ttl=48 time=82.2 ms
64 bytes from 110.242.68.66 (110.242.68.66): icmp_seq=2 ttl=48 time=131 ms
64 bytes from 110.242.68.66 (110.242.68.66): icmp_seq=3 ttl=48 time=113 ms
64 bytes from 110.242.68.66 (110.242.68.66): icmp_seq=4 ttl=48 time=117 ms
|
If you cannot ping the network, the following occurs
1 2 | root@lubancat:~# ping mi.com
ping: unknown host
|
Maybe you are connected to the network cable (assuming the eth0 interface is used), but the default routing table is not a 4G module. If you want to use the network card to access the Internet, you need to update the routing table. The solution is as follows:
1 2 | route del -net 0.0.0.0 eth0
route add -net 0.0.0.0 ppp0
|
20.1.5. Problems that may arise
After actual testing, the current script can be connected to China Mobile, China Unicom, and China Telecom. If there are some other problems, you can refer to the following:
APN settings:
1 2 3 | Mobile:at+cgdcont=1,"ip","cmnet"
Unicom:at+cgdcont=1,"ip","3gnet"
Telecom:at+cgdcont=1,"ip","ctnet"
|
Dial:
1 2 | Mobile:*99***1#or *98*1#
Unicom:*99# Telecom:#777
|
20.2. Quectel cat1 series 4G module (verified: EC200N-CN)
This section is suitable for EC100N-CN/ EC200S series/ EC200N-CN/ EC200M-CN/ EC600M-CN/ EC600N-CN/ EC800M-CN/ EC800N-CN/ EG912N-EN/ EG915N series/ EC200A series/ UC200A-GL/ EG912Y series// EC100Y series EC600E-CN/ EC800E-CN/
注意
If the above modules cannot achieve the following functions, you can contact technical support to remove the unsuitable ones.
Currently verified modules are: EC200N-CN
20.2.1. command line
Simple process:
Connect the module and insert the sim card
Wait for the module to load successfully
Check if the sim card is working normally
Configure the module network card mode
Dial-up Internet access
20.2.1.1. Connect the module, insert the sim card
Refer to the installation of EC20 above and the insertion of the sim card
20.2.1.2. Wait for the module to load successfully
Use the following command to see if the module is loaded
1 2 3 4 5 6 | ls /dev/ttyUSB*
#If it is the following situation, it is successfully loaded
root@lubancat:~# ls /dev/ttyUSB*
/dev/ttyUSB0 /dev/ttyUSB1 /dev/ttyUSB2
root@lubancat:~# ^C
|
20.2.1.3. Check if the sim card is working
1 2 3 4 5 6 7 8 9 10 11 12 13 14 15 16 | #Display the information returned by /dev/ttyUSB2 in the background (if you want to exit the background display, use the following command: pkill cat)
cat /dev/ttyUSB2 &
#Check the status of the sim card
echo -e "AT+CPIN?\r\n" > /dev/ttyUSB2
#If the return value is as follows, the sim card is obtained successfully
+CPIN: READY
OK
#If the return value is as follows, it means that the acquisition of the sim card failed
+CME ERROR: 10
+CME ERROR: 13
|
注解
If you encounter the problem of not being able to read the card, it may be that the electric shock of the card is not in close contact with the card holder of the module, or it may be that the module does not support this type of card. The best solution is to contact the provider of the module and let them solve your problem
20.2.1.4. Configure the module network card mode
注解
If the network card mode has been successfully configured before, the network card will save the successfully configured network card mode, and there is no need to configure the network card mode additionally (you can skip this step if you use the network)
ECM and RNDIS are two different USB tethering protocols.
ECM (Ethernet Networking Control Model) uses the standard Ethernet II frame format. In ECM mode, the 4G network card will be recognized as a network interface, and the IP address can be obtained directly through DHCP.
RNDIS (Remote Network Driver Interface Specification) uses the Microsoft Remote NDIS (RNDIS) protocol to encapsulate data packets, and in RNDIS mode, the 4G network card will be recognized as a USB device, and the corresponding driver needs to be installed to use it.
Command |
Function |
|---|---|
AT+QCFG=”usbnet” |
Query network card mode |
AT+QCFG="usbnet",1 |
Set the network card to ECM mode |
AT+QCFG="usbnet",3 |
Set the network card to RNDIS mode |
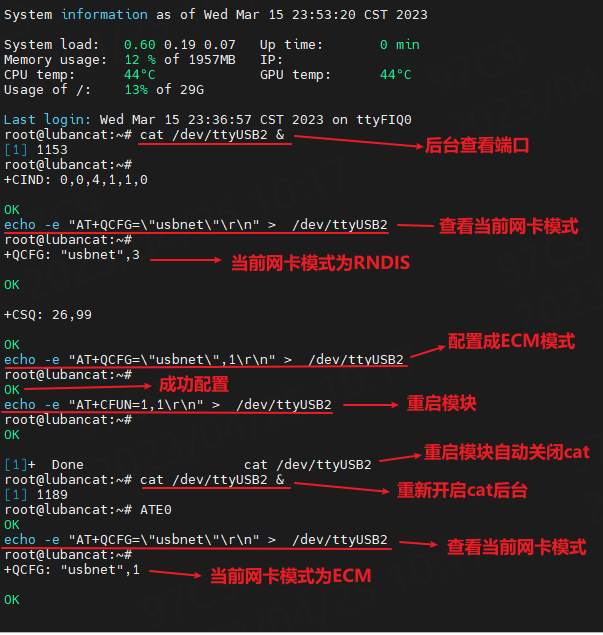
20.2.1.4.1. Get the current network card mode
Since the module is operated using AT commands. So you can use minicom to operate. In order to simplify the operation, minicom is not used here, but directly on the command line.
port location:/dev/ttyUSB2
1 2 3 4 5 6 7 8 9 10 11 12 13 14 15 16 17 | #Query the current mode
#Display the information returned by /dev/ttyUSB2 in the background (if you want to exit the background display, use the following command: pkill cat)
cat /dev/ttyUSB2 &
#Query the mode of the current network card
echo -e "AT+QCFG=\"usbnet\"\r\n" > /dev/ttyUSB2
#Example:
root@lubancat:~# cat /dev/ttyUSB2 &
[1] 1155
root@lubancat:~# echo -e "AT+QCFG=\"usbnet\"\r\n" > /dev/ttyUSB2
root@lubancat:~#
+QCFG: "usbnet",3
#Analyze
You can see that 3 is returned, this is the network card in RNDIS mode
|
+QCFG: "usbnet",3: RNDIS mode+QCFG: "usbnet",1: ECM mode
20.2.1.4.2. Configure the module network card mode as ECM
1 2 3 4 5 6 7 8 9 10 | #Display the information returned by /dev/ttyUSB2 in the background (if you want to exit the background display, use the following command: pkill cat)
cat /dev/ttyUSB2 &
#Configured as ECM mode (return: OK means the configuration is successful)
echo -e "AT+QCFG=\"usbnet\",1\r\n" > /dev/ttyUSB2
#Restart the module (restart the module to take effect)
echo -e "AT+CFUN=1,1\r\n" > /dev/ttyUSB2
#After restarting, you can check whether the configuration is successfully generated.
|
Example
20.2.1.4.3. Configure the module network card mode as RNDIS
1 2 3 4 5 6 7 8 9 10 | #Display the information returned by /dev/ttyUSB2 in the background (if you want to exit the background display, use the following command: pkill cat)
cat /dev/ttyUSB2 &
#Configured as ECM mode (return: OK means the configuration is successful)
echo -e "AT+QCFG=\"usbnet\",3\r\n" > /dev/ttyUSB2
#Restart the module (restart the module to take effect)
echo -e "AT+CFUN=1,1\r\n" > /dev/ttyUSB2
#After restarting, you can check whether the configuration is successfully generated
|
Example
The detailed process is similar to the ECM mode, just change one of the items.
20.2.1.5. Dial up
If you have completed the previous configuration and successfully configured the network card in ECM mode or RNDIS mode, you can dial up to access the Internet.
20.2.1.5.1. Prepare before dialing
Before dialing up to access the Internet, you need to check whether the network card has successfully generated a network node.
1 2 3 | #List information about the current network
ifconfig
|
As shown below:
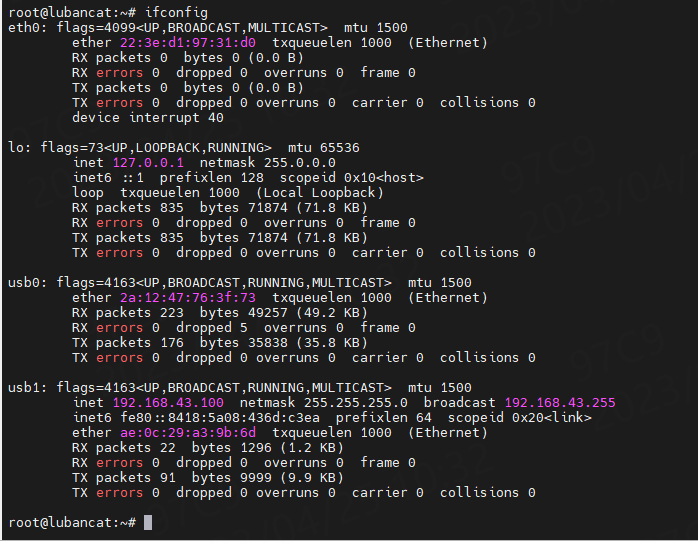
If the network card can successfully obtain the ip, it can perform dial-up operation like usb1 in the above picture.
If the network card fails to obtain the ip, like usb0 in the above picture, you need to reset the module or restart the machine.
1 2 | #Reset module command
echo -e "AT+CFUN=1,1\r\n" > /dev/ttyUSB2
|
注解
After the reset is successful, the ip can usually be displayed. If not, please check whether the configuration mode of the network card mode is correct and whether the module can work normally.
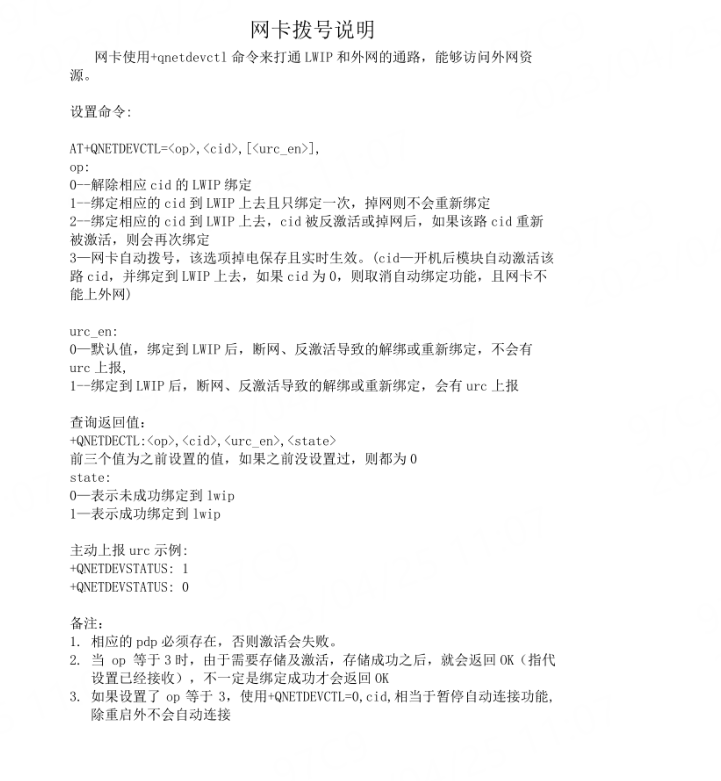
20.2.1.5.2. Dial-up
Before proceeding with this step, you need to pay attention to
Whether the network card has successfully obtained the ip
Whether the SIM card inserted
Command |
Function |
|---|---|
AT+qnetdevctl=1,1,1 |
Dial now |
AT+qnetdevctl=3,1,1 |
Automatic dialing (automatic dialing when power on) |
AT+qnetdevctl=0,1,1 |
Disconnect dial |
AT+QICSGP=1,”apn”,”username”,”password”,2 |
Dedicated network card dial-up |
Dial-up Internet operation process
1 2 3 4 5 6 7 8 | #Display the information returned by /dev/ttyUSB2 in the background (if you want to exit the background display, use the following command: pkill cat)
cat /dev/ttyUSB2 &
#Dial immediately (return: OK means the configuration is successful)
echo -e "AT+qnetdevctl=1,1,1\r\n" > /dev/ttyUSB2
#Get network automatically
dhclient
|
Example:
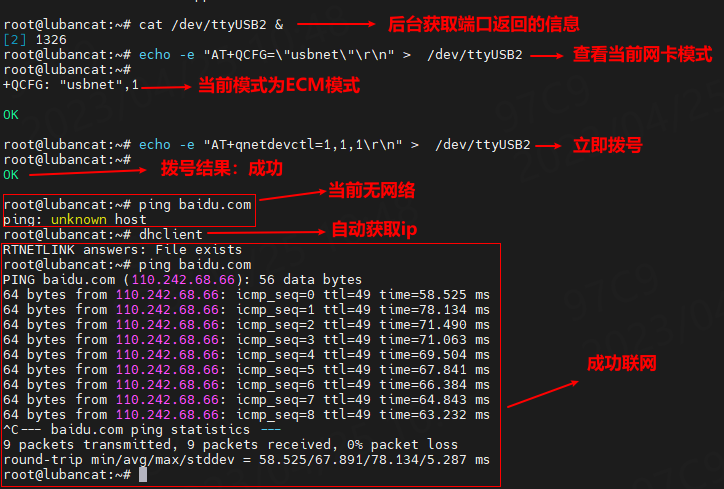
Problem analysis:
If ERROR is returned when dialing: your card may be a dedicated network card, and the dialing command needs to be replaced.
1 2 | #Need to fill in according to your actual situation
AT+QICSGP=1,"apn","username","password",2
|
If you cannot connect to the network after automatically obtaining the network, you need to check whether the SIM card can be used normally.
Network card dial-up instructions
20.2.2. Desktop Control
The principle of the desktop side is to dial up the Internet through ipppd. After dialing up, a new network node will be added, and you can use this node to connect to the Internet.
step:
Install ipppd
Install the module
Check if the sim card is working normally
Configure 4G network card
Configure the network on the desktop
Modify the routing table and configure the egress network
20.2.2.1. Install ipppd
1 2 3 4 5 | #update software sources
sudo apt update
#Instal ipppd
sudo apt install ipppd
|
20.2.2.2. Install module
This process can refer to the module installation above, so I won’t go into details here.
20.2.2.3. Check if the sim card is working
1 2 3 4 5 6 7 8 9 10 11 12 13 14 15 16 | #Display the information returned by /dev/ttyUSB2 in the background (if you want to exit the background display, use the following command: pkill cat)
cat /dev/ttyUSB2 &
#Check the status of the sim card
echo -e "AT+CPIN?\r\n" > /dev/ttyUSB2
#If the return value is as follows, the sim card is obtained successfully
+CPIN: READY
OK
#If the return value is as follows, it means that the acquisition of the sim card failed
+CME ERROR: 10
+CME ERROR: 13
|
注解
If you encounter the problem of not being able to read the card, it may be that the electric shock of the card is not in close contact with the card holder of the module, or it may be that the module does not support this type of card. The best solution is to contact the provider of the module and let them solve your problem.
20.2.2.4. Configure 4G network card
When configuring the 4G network card, the network card needs to be in the non-dial-up state or the non-automatic dial-up state.
1 2 3 4 5 | #Display the information returned by /dev/ttyUSB2 in the background (if you want to exit the background display, use the following command: pkill cat).
cat /dev/ttyUSB2 &
#Disconnect dialing (return: OK means the configuration is successful)
echo -e "AT+qnetdevctl=0,1,1\r\n" > /dev/ttyUSB2
|
20.2.2.5. Configure the network on the desktop
When the module is turned on and inserted, the following figure will be seen. (Note that the module must be equipped with an antenna. If there is no picture below, you can check whether the mobile phone card can be used. This signal picture needs to be turned on and wait for a while to appear)
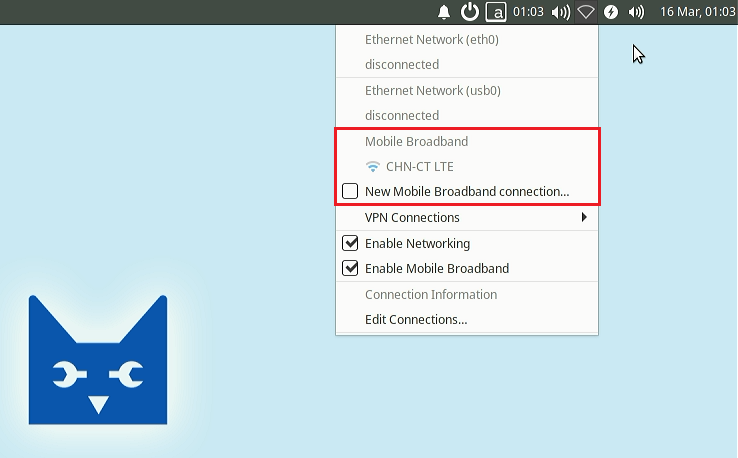
Then click “New Mobile Broadband connection” to configure the network.
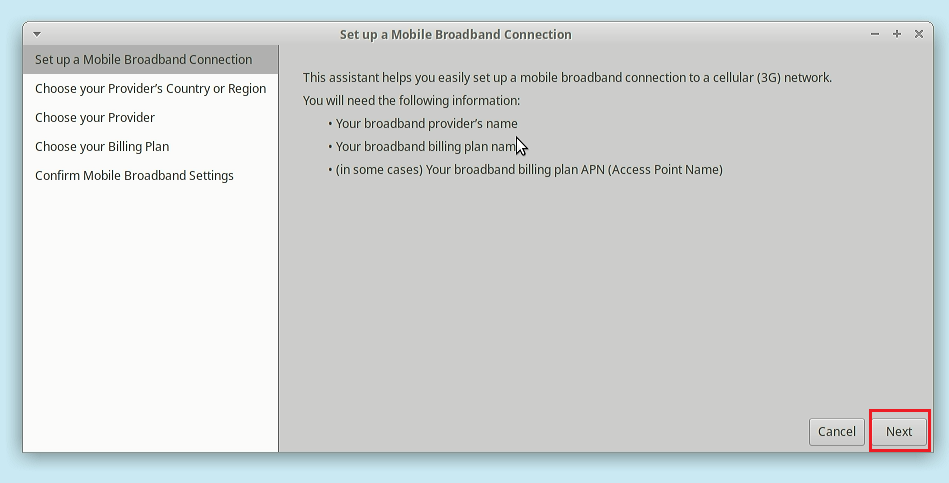
Click next
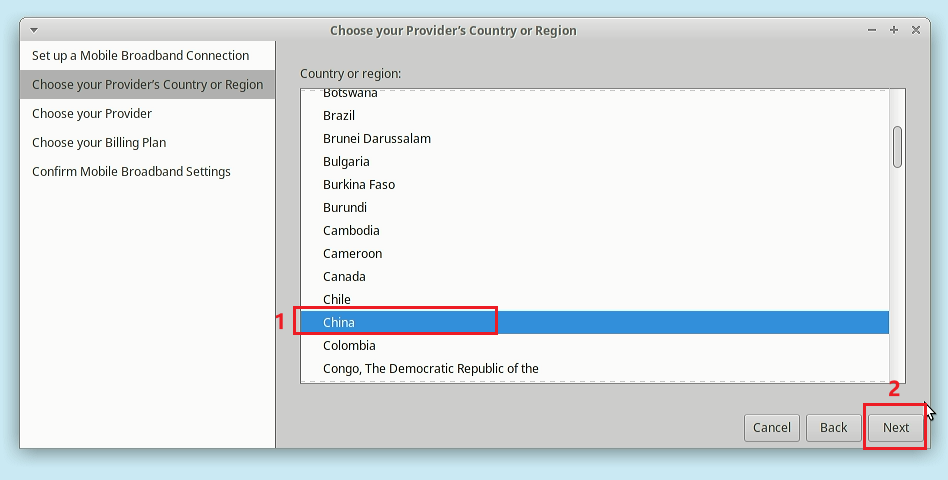
Select China as the country, then click NEXT
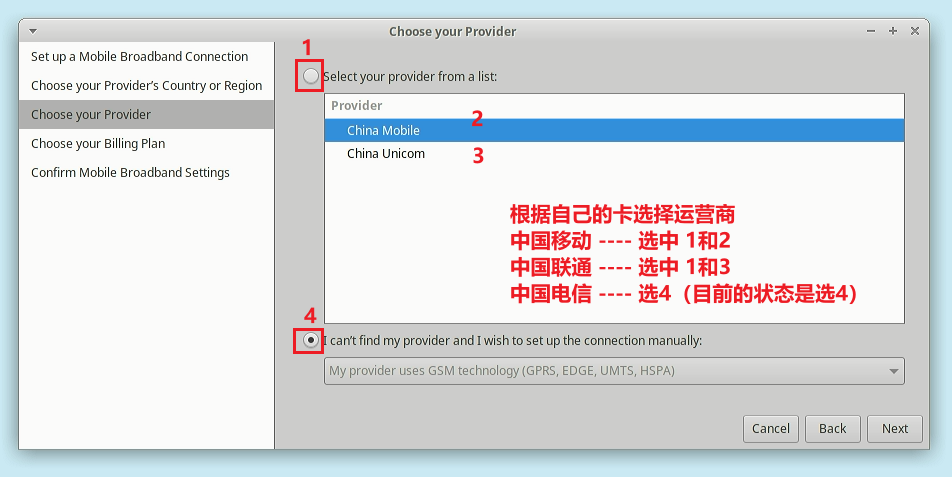
The author uses a telecom card, so I chose 4.
After selecting the access point, click NEXT to continue

Click apply
You can see that the network load is successful
At this point, the network is not working properly (see the next section for details).
20.2.2.6. Modify the routing table and configure the egress network.
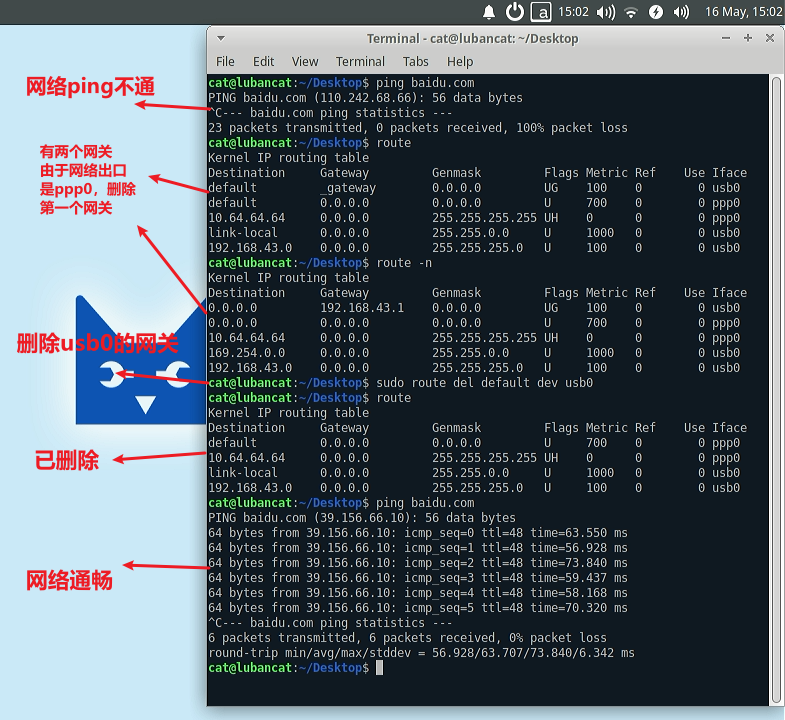
It can be seen that after the connection is successful, the network cannot be pinged successfully.
Check the routing table and find that there are two default routes. Since the network output interface we configured on the desktop is ppp0, we need to close the usb0 route.
1 2 | #xxx is the current interface that is using the default route.
sudo route del default dev xxx
|
After closing the default route of usb0, the network becomes unobstructed.
20.2.2.7. Repeat connection
After you have successfully configured the network, restart and the 4G configuration will still be retained.
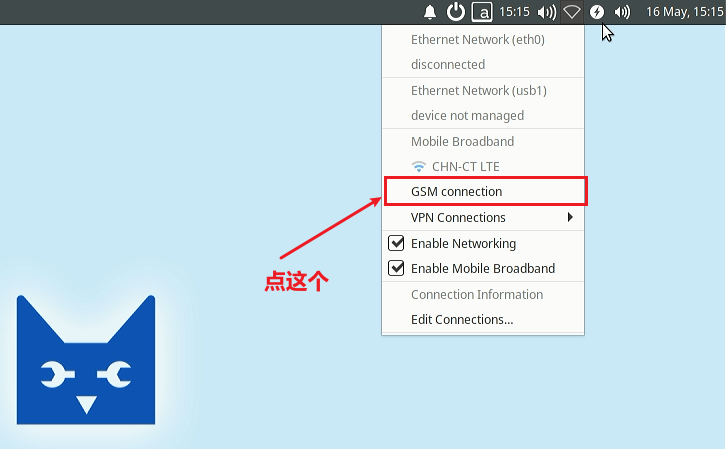
Click to enter the link
If the network is not connected, modify the routing table according to the above method.
20.3. Hezhou 4G module (verified: air724ug air780e)
注解
air724ug is currently testing the network card with its own sim card.
This section of tutorial is applicable to air720ug series and air780e series. The content of this section is mainly about rndis tutorial. If you want to use ppp, you can go to Hezhou official website to inquire.


20.3.1. Prepare
Install the sim card
Connect the antenna
Connect the module
20.3.2. Configure network card
There is currently no way to configure the Hezhou 4G network card on Linux. You need to configure the network on Windows first, and then run it on Lubanmao. The factory image comes with RNDIS mode by default, so you don’t need to configure the network card.
20.3.3. Connect Network
If your sim card can be normally recognized by the module and can access the Internet normally, a network port of ethx (x is a number) will be generated, and the ip will be automatically obtained. After the ip is obtained, it can be connected to the Internet
If you do not have a sim card installed, or the sim card is not recognized and you cannot access the Internet normally, there will be a network port that can generate ethx (x is a number), but you cannot access the Internet