21. 5G
Video introduction to this chapter:

“37-Use of 4G and 5G Modules”
https://www.bilibili.com/video/BV12c411M7Gt/
LubanCat-RK series boards support usb interface connection and mini-pcie interface connection. Although they are two different interfaces, the principle of the two connection methods is to communicate through usb.
The difference between usb interface connection and mini-pcie interface connection
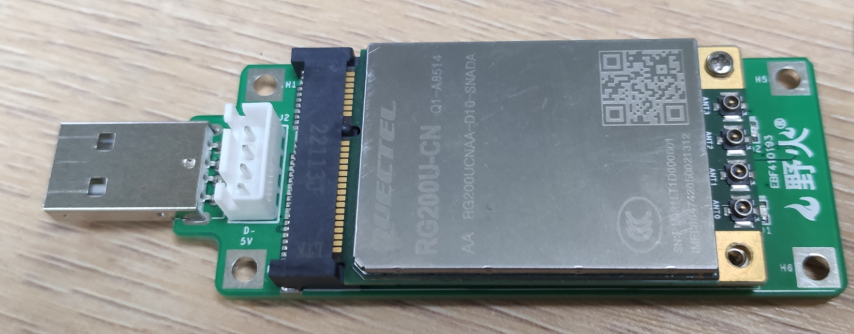
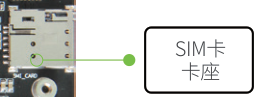
For usb interface connection. You need to insert the sim card on the backplane of the usb-5G module (it can be used with the 4G module backplane in the Embedfire mall), and the size of the sim card used is standard sim.
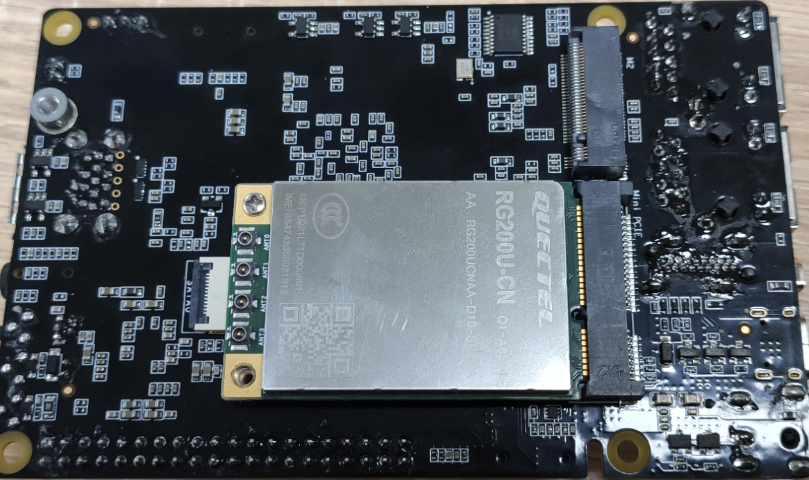
mini-pcie interface connection. You need to insert the sim card on the board, the size of the sim card used is nano sim.
21.1. 5G module
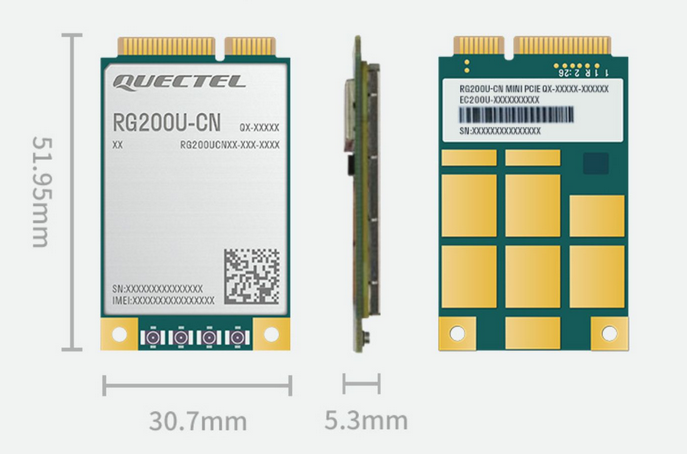
The model of the 5G module we tested is Quectel RG200U.
Quectel official Tmall link: click here
21.2. module installation

21.2.2. SIM card
If you want to run 4G, in addition to installing a 4G module, you must also install a SIM card.
21.3. Instructions
First, we install the module and the sim card first. The network card with mini-pcie interface needs to be installed before turning it on, otherwise it will affect the normal operation of the board.
Check the ip (you need to wait to see the generation of ip after booting)
1 2 | #Check ip address
sudo ifconfig
|
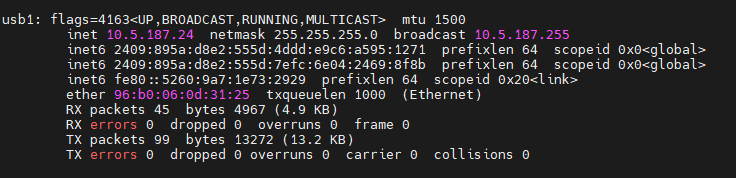
注意
If you see that the ip address is not 192.168.xxx.xxx, it proves that the module is in network card mode. You can connect to the external network, if the ip address is 192.168.xxx.xxx. The network card may be in routing mode or bridge mode. We need to set up the network through the content of the next section
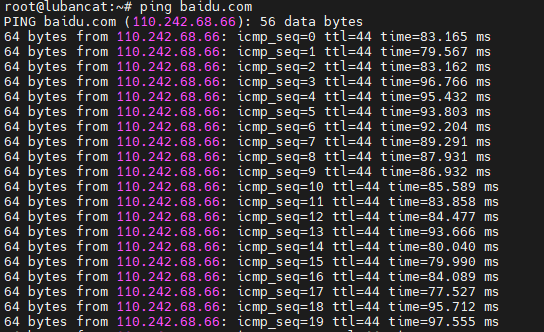
Ping the network (check whether the network can connect to the network correctly)
1 | sudo ping baidu.com
|
If the following figure appears, it means that the network can be connected normally.
21.4. Quectel RG200U configuration
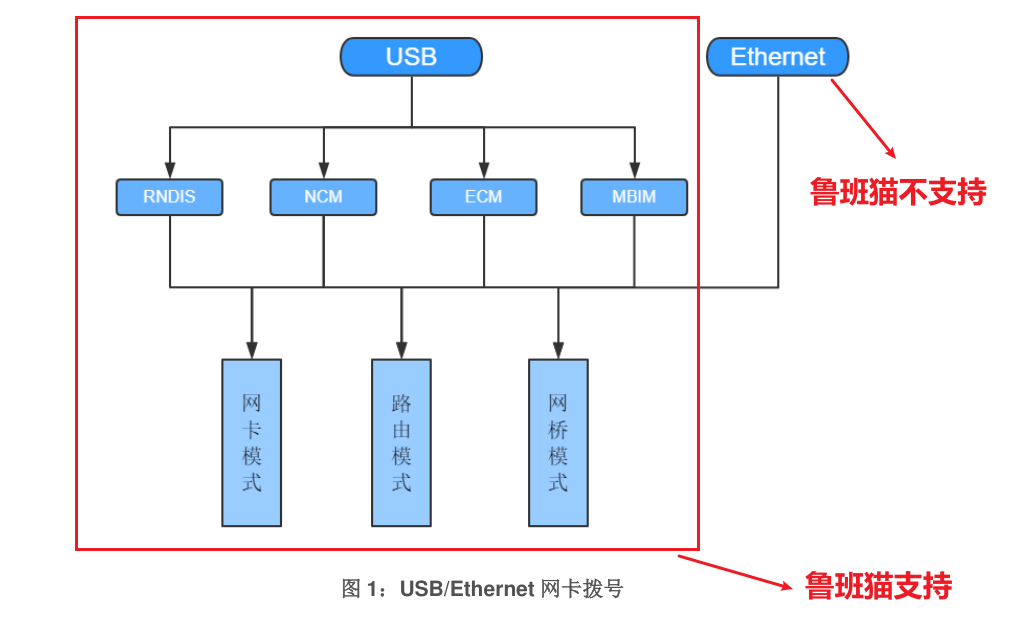
Quectel RG200U supports two dial-up interfaces, one is USB dial-up, and the other is Ethernet dial-up. Since our LubanCat does not support Ethernet network card dial-up, so I will use the usb network card dial-up to explain to you.
21.4.1. Network card dial-up mode
Quectel RG200U network card has three network card dial-up modes
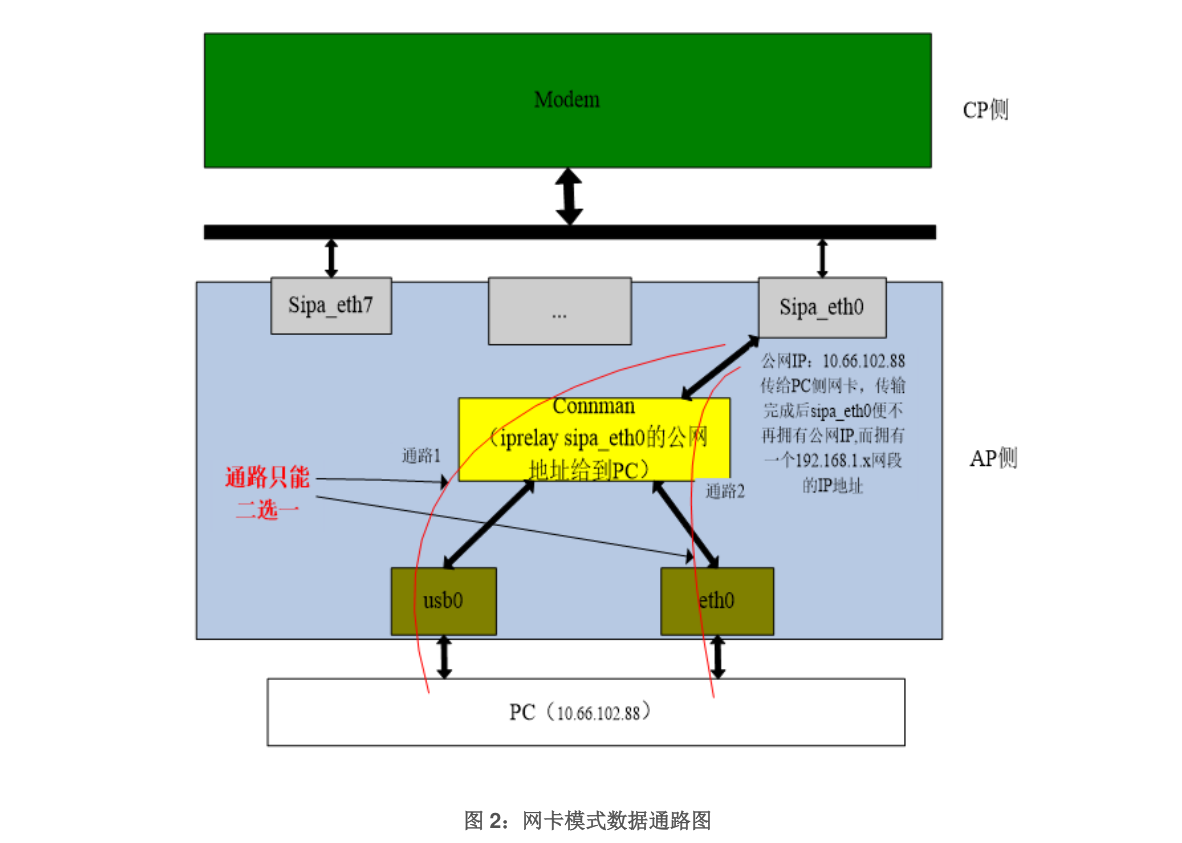
Network card mode
Routing mode
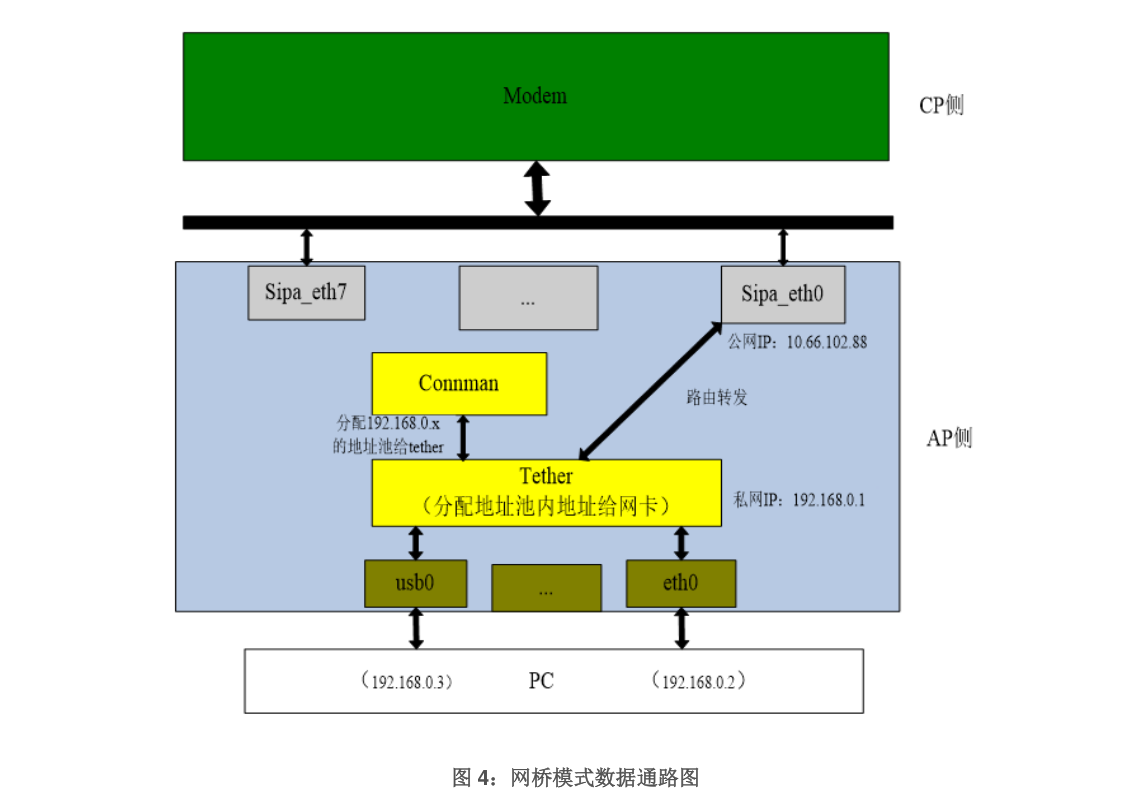
Bridge mode
注意
If you only want to connect to the network, please select the network card mode, other modes cannot connect to the external network under the default configuration.
21.4.1.2. Routing mode
In the default configuration, it does not support connecting to the external network.

21.4.1.3. Bridge mode
In the default configuration, it does not support connecting to the external network.
21.4.2. Drive type
RNDIS, NCM, ECM, and MBIM are some of the protocols used to implement Ethernet functionality over USB⁵. Their differences mainly lie in the following aspects:
RNDIS is a vendor protocol proposed by Microsoft, which requires special drivers to be installed, and only supports Windows systems³⁴⁵. RNDIS packets are MAC packets, but with an extra header¹².
Both NCM and ECM are standard protocols based on the USB Communication Device Class (CDC). They can be used across platforms and do not require driver installation ³⁴⁵. The packets of NCM and ECM are also MAC packets, but ECM has no header, while NCM has an optional header¹². NCM has higher transmission efficiency and compatibility than ECM⁵.
MBIM is an interface model specially designed for mobile broadband devices. It was proposed by Intel, Microsoft and other USB/IF members to unify and simplify the driver and management of mobile broadband devices¹³⁴. MBIM supports multiple mobile network technologies such as GSM, CDMA, LTE, etc⁴. MBIM has a built-in class driver in Windows 8 and above, and no additional driver installation is required¹³. Linux also supports MBIM after version 3.8. MBIM data packets are IP packets, and have a header and a trailer.
1 2 3 4 5 6 7 8 9 10 11 12 13 | Source: Conversation with Bing, 2023/2/16
(1) Ethernet over USB - Wikipedia. https://en.wikipedia.org/wiki/Ethernet_over_USB
(2) Brief description of RNDIS, ECM and MBIM messages - Docin. https://www.docin.com/p-703805208.html
(3) My understanding of mbim ndis ecm ncm_wandersky0822's blog-CSDN blog_mbim. https://blog.csdn.net/wandersky0822/article/details/101559271
(4) Brief description of RNDIS, ECM and MBIM messages_Baidu Library. https://wenku.baidu.com/view/fd16907e011ca300a6c3903e.html
(5) Brief description of RNDIS, ECM and MBIM messages.doc. https://max.book118.com/html/2017/0831/131033866.shtm
(6) Dial-up PPP NDIS RNDIS CDC ECM NCM QMI-WWAN GOBINET RMNET MBIM difference. https://blog.csdn.net/wwwyue1985/article/details/112971030
|
21.5. Use AT commands to configure Quectel RG200U network card
The configuration method of Quectel RG200U network card is to use AT commands. After the configuration is successful, the network card will save the configuration inside the network card. Therefore, after configuring once, we can do without additional configuration.
21.5.1. Preparation before configuration
Before configuration, you need to install the module first, then turn it on, and check whether the network card driver is installed.
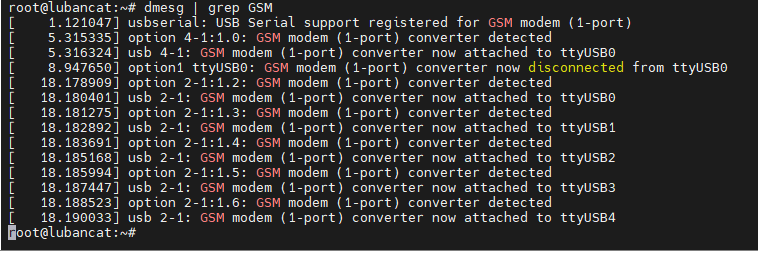
1 2 3 | #Check if the network card driver is installed
dmesg | grep GSM
|
If the following things appear to prove that the driver is installed.
21.5.2. Configuration of minicom
To use AT commands, we need to use the installation software –minicom
1 2 3 4 5 | #Install the minicom package
sudo apt install minicom
#Set serial port
sudo minicom -s
|
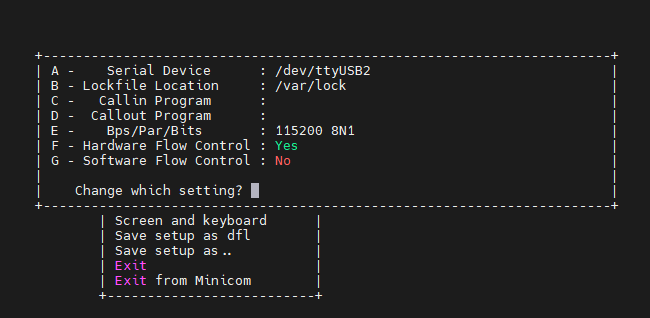
As shown below:
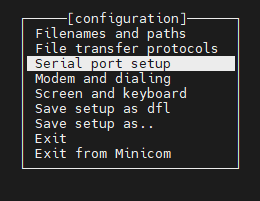
Enter the settings, according to the figure below, modify the serial port or baud rate, press the letter on the keyboard to enter the things you want to set, press enter to confirm.
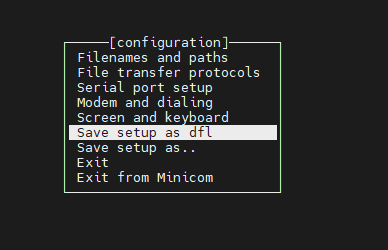
After the setting is completed, you can press this button to save the configuration. After saving, you will not need to set it when you open it later.
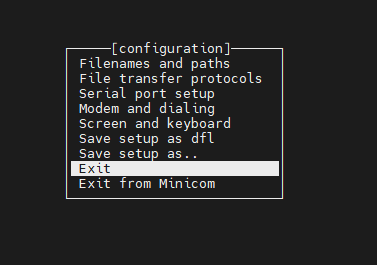
Then “exit” enters the minicom terminal, “exit from minicom” means exit minicom.
21.5.3. Use AT commands to configure the network card
If you have set up minicom before, you can skip the configuration of minicom and open minicom with the following command.
1 | sudo minicom
|
After entering, we can enter the number first. If the proof is not displayed, it proves that we have not opened the echo.
We use this method to set: first press the key combination “Ctrl + A” and then press the “e” key.
After the setup is complete, we can use AT commands to communicate with the network card.
AT command |
command effect |
command return |
|---|---|---|
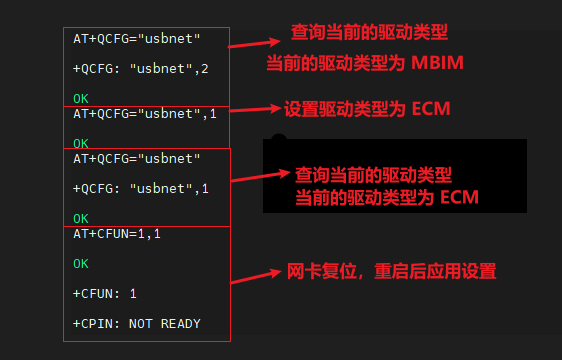
AT+QCFG=”usbnet” |
Query the current configuration |
5:NCM 1:ECM 2:MBIM 3:RNDIS |
AT+QCFG=”usbnet”,5 |
Configure the network card dial-up mode and drive type as NCM |
OK |
AT+QCFG=”usbnet”,1 |
Configure the network card dial-up mode and drive type as ECM |
OK |
AT+QCFG=”usbnet”,2 |
Configure the dial-up mode and driver type of the network card as MBIM |
OK |
AT+QCFG=”usbnet”,3 |
Configure the dial-up mode and driver type of the network card as RNDIS |
OK |
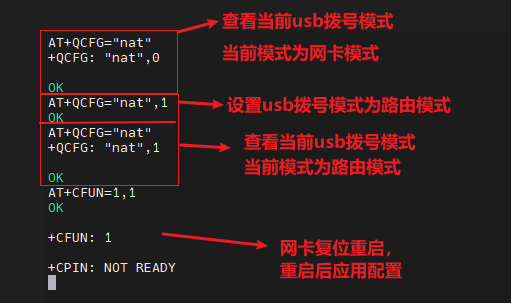
AT+QCFG=”nat” |
Query the current configuration |
0: NIC mode 1: Routing mode 2: Bridge mode |
AT+QCFG=”nat”,0 |
Configure the dial-up mode as network card mode |
OK |
AT+QCFG=”nat”,1 |
Configure dial-up mode as route mode |
OK |
AT+QCFG=”nat”,2 |
Configure the dial-up mode as bridge mode |
OK |
AT+CFUN=1,1 |
NIC reset and restart |
OK |
If
+CME ERROR: 4is received, it proves that the command was not entered correctly, and the command needs to be re-entered.
注意
The above parameter configurations need to be restarted to take effect. You can reset the network card, restart the board, if you use the usb interface, you can re-plug it.
Before configuration, it is recommended to query the configuration first. After configuration, it is recommended to query again to ensure that the configuration can be written into the network card correctly. Sometimes when the configuration is written, it will not return OK successfully, and it can be written repeatedly.
注意
When using minicom, you cannot use the backspace key to delete the sent content. minicom is sent as a single character. If you enter a wrong command, you can modify the command and send it to a command that does not affect the network card, so that it will not affect the work of the 5G module.
Example
21.5.4. Example of usb dial mode setting
21.5.5. Example of network card driver mode setting