
6. Serial communication
Video introduction to this chapter:

“30-Use UART serial port on LubanCat”
https://www.bilibili.com/video/BV1us4y1v7fC/
This chapter mainly explains the basic use of the serial port in the 40pin of LubanCat-RK series boards.
6.1. Serial port pin relationship
The pin relationship of the serial port is shown in the table below:
port |
pin |
fuction |
|---|---|---|
TXD |
8 |
send signal line |
RXD |
10 |
accept signal line |
Corresponding to the physical 40pin interface
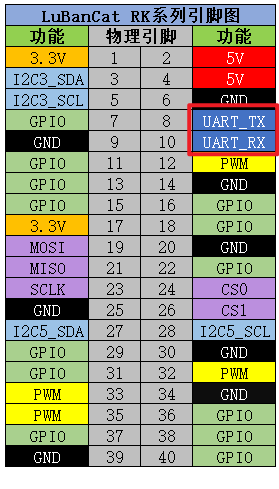
LubanCat-Zero series uses uart8.
LubanCat-1 series and LubanCat-2 series use uart3.
Although the name is different, the operation method is the same.
6.2. Enable the serial interface
The serial port is closed by default and needs to be enabled before it can be used
6.2.1. Method 1
1 2 3 4 5 | #Enter tool configuration
sudo fire-config
#Move the cursor to the position in the picture below
#Press the enter to enter the configuration
|
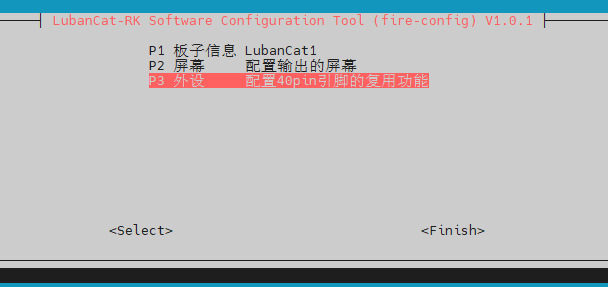
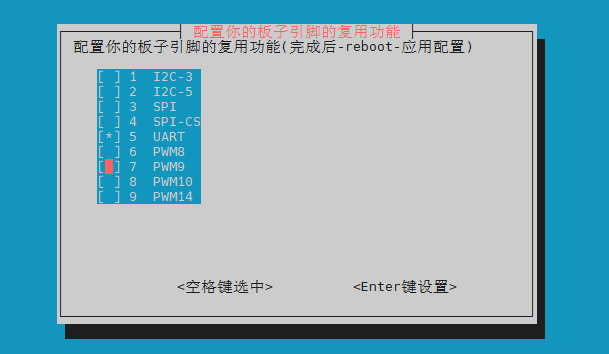
Open serial port
Use the arrow keys to move the cursor to
UARTPress “Space” to select UART (appear “*”), as shown below
Press “Enter” to set
Press “Esc” to exit to the terminal, run sudo reboot to restart the application
6.2.2. Method 2
Board |
Device Tree Plugin Configuration File |
|---|---|
LubanCat-Zero-W |
uEnvLubanCatZW.txt |
LubanCat-Zero-N |
uEnvLubanCatZN.txt |
LubanCat-1 |
uEnvLubanCat1.txt |
LubanCat-1N |
uEnvLubanCat1N.txt |
LubanCat-2 |
uEnvLubanCat2.txt |
New version LubanCat-2 |
uEnvLubanCat2-V1.txt |
LubanCat-2N |
uEnvLubanCat2N.txt |
You can check whether the uart-related device device tree plugin is enabled by opening /boot/uEnv/board.txt (board is the name of the board you are using).
Edit the file, and remove the comment symbol of the line with uart (take uart3 as an example), as shown in the figure below:
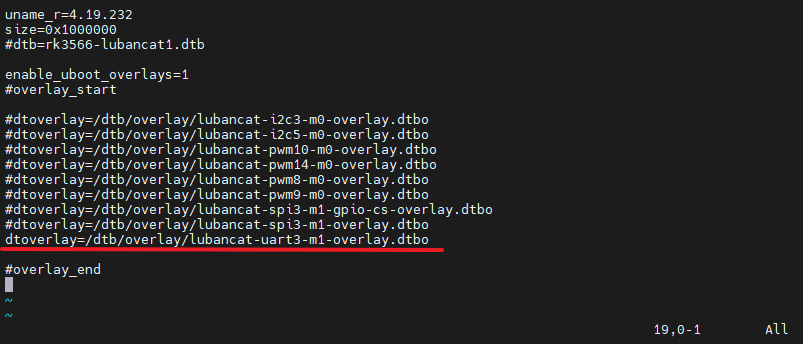
Then reboot to activate the device.
注解
If it is restarted by directly unplugging the power supply, the file may not be able to be modified (reason: the file was not synchronized from the memory to the storage device in time, the solution is to enter “sync” on the terminal and then unplug the power to shut down)
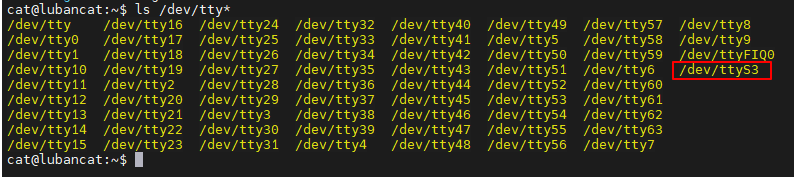
6.3. Check serial device
Check whether the serial port is successfully enabled
1 2 | #Execute the command to view the terminal device
ls /dev/tty*
|
The LubanCat-Zero series uses ttyS8
LubanCat-1 series and LubanCat-2 series use ttyS3
As shown below (the author uses LubanCat-1):
6.4. Serial communication experiment (Shell)
This experiment is explained with the LubanCat-1 board. The operation of other boards is similar to this experiment, so I won’t go into details here. Use serial port 3 on the board for experiments, and the corresponding device file is /dev/ttyS3. Directly reading and writing the tty device file can control the device to receive or send data through the serial port. Next, we use the board with the serial port debugging assistant under Windows or minicom under Linux to test.
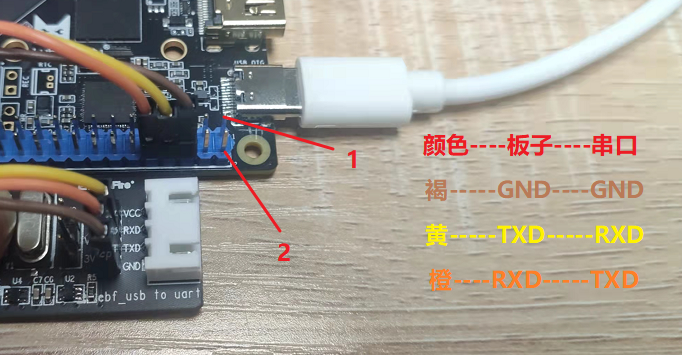
6.4.1. Connect to the serial port
Before the experiment, you need to use a serial cable or a USB-to-serial cable to connect it with the board and the computer.
Board - Computer
TXD — RXD
RXD — TXD
GND — GND
As shown below:
6.4.2. Query the communication parameters of serial port 3
After the serial port 3 peripheral is enabled, generate the ttyS3 device file in the /dev directory, and use the stty tool to query its communication parameters
1 2 | # Execute the following command on the terminal of the board
stty -F /dev/ttyS3
|
As shown below:

6.4.3. Modify the serial port baud rate
1 2 | #Set the communication rate, where ispeed is the input rate and ospeed is the output rate
stty -F /dev/ttyS3 ispeed 115200 ospeed 115200
|
As shown below:

6.4.4. turn off echo
The default serial port is to enable the echo, you can use the following command to turn off the echo
1 | stty -F /dev/ttyS3 -echo
|
6.5. Communicate with Windows host
After configuring the serial port debugging assistant, try to use the following command to test sending data:
1 2 3 4 5 | #Execute the following command on the terminal on the board
#Write a string to a terminal device file using the echo command"Hello!"、"I'm lubancat"
echo Hello! > /dev/ttyS3
echo "I'm lubancat" > /dev/ttyS3
#The serial port debugging assistant on Windows will receive the content
|
As shown below:
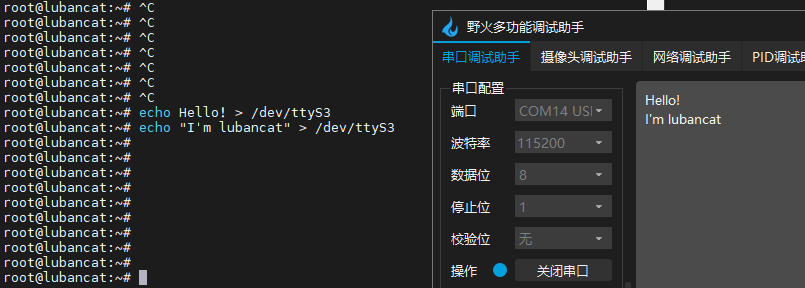
It can be seen that the content written to the /dev/ttyS3 device file will be directly sent to the Winodws host through the serial port line.
While reading the device file can receive the content sent by the Winodws host to the board, you can use the cat command to read:
1 2 3 4 5 6 7 | #Execute the following command on the terminal on the board
#Read a terminal device file using the cat command
cat /dev/ttyS3
#The cat command will wait for
#Use the serial port debugging assistant to send strings
#Press Enter at the end of the string!
#The terminal of the board will output the received content
|
As shown below:
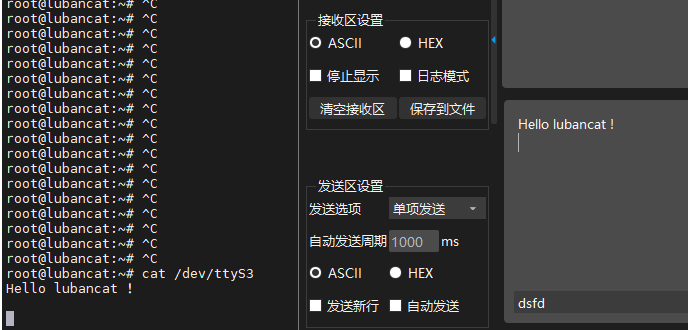
Hello lubancat!
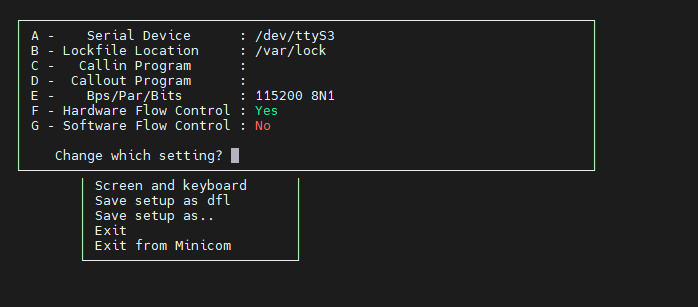
6.6. minicom Communication
1 2 3 4 5 | #Install the minicom package
sudo apt install minicom
#Set serial port
sudo minicom -s
|
As shown below:
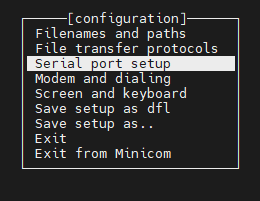
Enter the settings, modify the serial port or baud rate, press the letters on the keyboard to enter the things to be set, and press the enter to confirm.
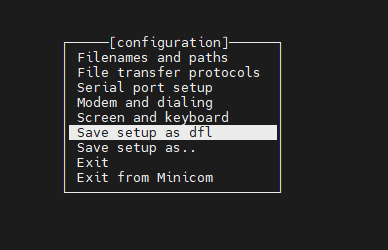
After the setting is completed, you can press this button to save the configuration. After saving, you will not need to set it when you open it later.
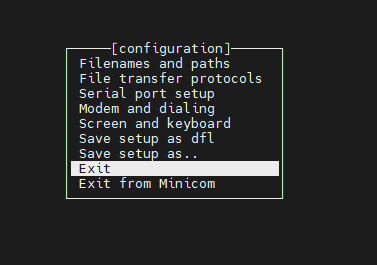
Then press the exit key to enter the terminal of minicom.
If you enter a letter and there is no response on the screen, you can display it by turning on the echo, first press “ctrl + A” and then press the ‘z’ key to enter the menu
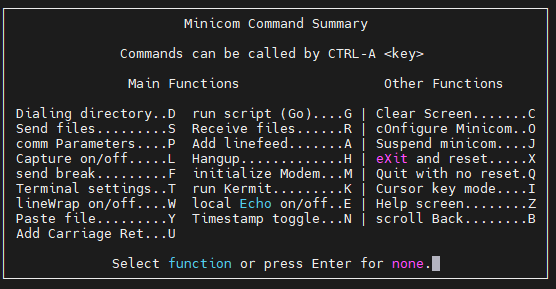
Press ‘e’, the echo will be opened successfully (there will be a prompt in the lower left corner, open or close), you can press the button to test and see if there is an echo. We can also press “ctrl + A” then ‘z’ and then ‘c’ to clear the screen. Connect the board and the computer with a serial cable, and set it to 115200 at the same time, On the board, enter “Hello! i’m lubancat!’”

注意
When using minicom, you cannot use the backspace key to delete the sent content. minicom is sent as a single character.
We can send text on pc side.

1 2 3 4 5 6 7 8 9 10 11 12 13 14 15 16 | The menu of minicom has many functions,
s ---- Send File
p ---- Set communication parameters, including some preset baud rates, data formats, data bits, etc.
l ---- Save the log information to a file for easy viewing
t ---- Set terminal parameters and key settings
w ---- Automatically wrap after data beyond one line
r ---- Receive files
a ---- Timestamp will be incremented when newline is sent
n ---- Add timestamp
c ---- Clear screen
o ---- Set up minicom, equivalent to sudo minicom -s
j ---- Sleep state
x ---- Reset on exit
q ---- Quit
You can also use "ctrl + a" + '?' directly instead of setting it by pressing "ctrl + a" + 'z' + '?'
|
6.7. More
For more information on the use and information of uart, please refer to: rk open source manual/Common/UART
6.8. References
This document mainly provides a quick start for users with certain experience. For beginners, you can view the following documents:
“Serial communication and terminal equipment”
For device tree-related knowledge points, please read the following chapters:
“Basic Knowledge of Device Tree Modification”
“Guidelines for Modifying Device Tree Plugins”
rk open source data (github): The Open Source Handbook