3. http服务器
3.1. http服务器的处理过程
在前面我们实现了http客户端,现在来实现一个http服务器,首先看看他的处理过程(使用socket api实现):
首先调用socket()创建一个服务端的套接字
然后使用bind()将套接字绑定在一个指定的端口上。
调用listen()将套接字转换到LISTEN状态。
调用accept()处理来自客户端的连接。
通过HTTP协议进行数据的收发操作。
一般客户端会发送HTTP请求报文报文,我们去简单解析即可,我们选择HTTP请求报文的起始行作为解析的地方,当它的请求是GET方法的时候,我们返回指定的数据内容,如果是POST方法,我们解析后再返回指定的内容。
在这里有几个注意事项,因为浏览器访问我们的服务器,其实是通过“GET”操作命令获取我们开发板/电脑的资源,那么我们在接收到这个命令后,返回我们的资源数据给浏览器,而浏览器显示是通过 HTML 代码来标记这些资源的,那么我们在开发板/电脑中就需要定义好相关的 HTML 数据,比如这个使用一个HTML格式的文件记录这些数据,因为在linux平台下,对文件的读写操作是非常简单的,那么在客户端请求资源的时候,我们将这些数据读取出来,然后再发送给客户端。
3.2. http客户端的示例
首先创建一个index.html文件,保存返回给客户端的数据内容。
文件的位置在:https://github.com/Embedfire/embed_linux_tutorial/tree/master/base_code/linux_iot/http_server
<!doctype html>
<html>
<head>
    <meta charset="utf-8">
    <title>富强、民主、和谐</title>
    <style>
        .container {
            width: 60%;
            margin: 10% auto 0;
            background-color: #f0f0f0;
            padding: 2% 5%;
            border-radius: 10px
        }
        ul {
            padding-left: 20px;
        }

            ul li {
                line-height: 2.3
            }
        a {
            color: #20a53a
        }
    </style>
</head>
<body>
    <div class="container">
        <h1>祝祖国70周年生日快乐</h1>
        <h3>爱祖国,为祖国的前途而奋斗,是时代赋予我们的神圣职责</h3>
        <ul>
          <li>我是中国人民的儿子。我深情地爱着我的祖国和人民。</li>
          <li>谁不爱自己的母亲,用那滚烫的赤子心灵。谁不爱自己的母亲,用那滚烫的赤子心灵。
              亲爱的祖国,慈祥的母亲,长江黄河欢腾着,欢腾着深情,我们对您的深情。</li>
          <li>我游览了白山黑水,看到了祖国的繁荣和富足。登上南沙群岛的珊瑚礁啊!我感受到了祖国幅员的广袤。
              在八百里秦川,我听到了祖国儿女气势奔雷的心声。那一阵阵响入云天的威风锣鼓,那一声声惊天动地的浑厚呐喊。</li>
          <li>“苟利国家生死以,岂因祸福避趋之”,我们现在就应该脚踏实地的从身边平凡的小事做起,不断陶冶爱国之心,增强爱国之智,将来为我们的祖国贡献力量!<br>
              爱国,是一种坚定的民族精神,是一种振兴中华的责任感。我们青少年要用这种强大的精神力量去描绘祖国未来的宏图,将一片丹心献给祖过。让我们一起向着“心系祖国,健康成长”的目标前进吧!<br>
              爱国,是至高无上的品德、是民族的灵魂。亲爱的同学们,为了学校的荣誉、为了我们肩上的重任,为了中华民族的腾飞,让我们努力学习,做一个无愧于人民的具有爱国主义情怀的万里学子吧!<br>
              爱国是一个人对自己祖国的一种诚挚的热爱和深厚的情感,是一个人最原始的感情之一。但作为一个涉世不深的我,一直认为爱国是高不可攀也是比较渺茫的事。最近,我读了《民族英雄郑成功》一书,对爱国之情有了深刻的感悟。</li>
        </ul>
    </div>
</body>
</html>
编写对应的c代码,代码的执行过程是根据前文所述的HTTP服务器出来过程编写的,有很详细的注释,具体见:
#include <stdio.h>
#include <netinet/in.h>
#include <sys/socket.h> // socket
#include <sys/types.h>  // 基本数据类型
#include <unistd.h> // read write
#include <string.h>
#include <stdlib.h>
#include <fcntl.h> // open close
#include <sys/shm.h>
#include <netinet/in.h>
#include <arpa/inet.h>
#include <signal.h>
#include <sys/stat.h>


#define PORT        8888
#define SERVER      "0.0.0.0"
#define BACKLOG     20
#define BUFF_SIZE   (1024 * 50)

#define INDEX_FILE  "./index.html"

int sockfd;

// 发送给客户端的信息
char *http_res_tmpl = "HTTP/1.1 200 OK\r\n"
        "Server: Cleey's Server V1.0\r\n"
        "Accept-Ranges: bytes\r\n"
        "Content-Length: %d\r\n"
        "Connection: close\r\n"
        "Content-Type: %s\r\n\r\n";

// 字符串的匹配,用于匹配http请求报文的内容
int http_str_nmatch(const char *str1, const char *str2, int n)
{
    int i = 0;
    int c1, c2;
    do {
        c1 = *str1++;
        c2 = *str2++;
        i++;
    } while(((c1 == c2) && c1) && (i < n));

    return c1 - c2;
}

// http 发送数据
void http_send(int sock_client, char *str)
{
    char header[BUFF_SIZE], body[BUFF_SIZE];

    int len = strlen(str);

    sprintf(header, http_res_tmpl, len,"text/html");

    len = sprintf(body,"%s%s", header, str);

    send(sock_client, body, len, 0);
}

void handle_signal(int sign)
{
    fputs("\nSIGNAL INTERRUPT \nBye Cleey! \nSAFE EXIT\n",stdout);
    close(sockfd);
    exit(0);
}

// 根据指定的文件名读取文件的内容
int read_file(char *filename, int *len, char **data)
{
    int file = open(filename, O_RDONLY);
    if ( file == -1 )
        return -1;

    int i = 0;
    while ( 1 )
    {
        // 分配内存空间
        *data = realloc(*data, (BUFF_SIZE * (i + 1)));
        if ( data == NULL )
        {
            close( file );
            return -1;
        }

        // 读取文件内容
        int cur_len = read(file, *data+(BUFF_SIZE * i), BUFF_SIZE);
        if ( cur_len == 0 )
            break;
        else
            *len += cur_len;

        i++;
    }

    close( file );

    return 0;
}

int main(void)
{
    signal(SIGINT,handle_signal);
    int len = 0;
    char *pdata = NULL;
    int count = 0; // 计数

    // 申请 socket
    sockfd = socket(AF_INET,SOCK_STREAM,0);

    // 定义 sockaddr_in
    struct sockaddr_in skaddr;
    skaddr.sin_family = AF_INET;            // ipv4
    skaddr.sin_port   = htons(PORT);
    skaddr.sin_addr.s_addr = inet_addr(SERVER);

    // bind,绑定 socket 和 sockaddr_in
    if (bind(sockfd,(struct sockaddr *)&skaddr,sizeof(skaddr)) == -1 ) {
        perror("bind error");
        exit(1);
    }

    // listen监听端口号
    if (listen(sockfd, BACKLOG) == -1 ) {
        perror("listen error");
        exit(1);
    }

    // 客户端信息
    char buff[BUFF_SIZE];
    struct sockaddr_in claddr;
    socklen_t length = sizeof(claddr);

    while(1) {
        // 出来连接
        int sock_client = accept(sockfd,(struct sockaddr *)&claddr, &length);
        if (sock_client <0) {
            perror("accept error");
            exit(1);
        }

        memset(buff,0,sizeof(buff));

        // 接收来自客户端的请求
        int len = recv(sock_client, buff, sizeof(buff), 0);

        // 匹配是否为get方法
        if (http_str_nmatch(buff, "GET /index", 10) == 0) {

            read_file(INDEX_FILE, &len, &pdata);
            http_send(sock_client, pdata);

        } else if (http_str_nmatch(buff, "GET /", 5) == 0) {

            read_file(INDEX_FILE, &len, &pdata);
            http_send(sock_client, pdata);
        } else {

            http_send(sock_client,"Hello World!");
        }

        // 关闭连接
        close(sock_client);
    }

    fputs("Bye Cleey",stdout);
    close(sockfd);
    return 0;
}
编译与运行,使用make命令去编译该源码,然后运行生成的可执行文件即可,然后在你的电脑上打开浏览器,输入http://[你开发板的IP地址]:8888,即可看到实现现象,具体见:
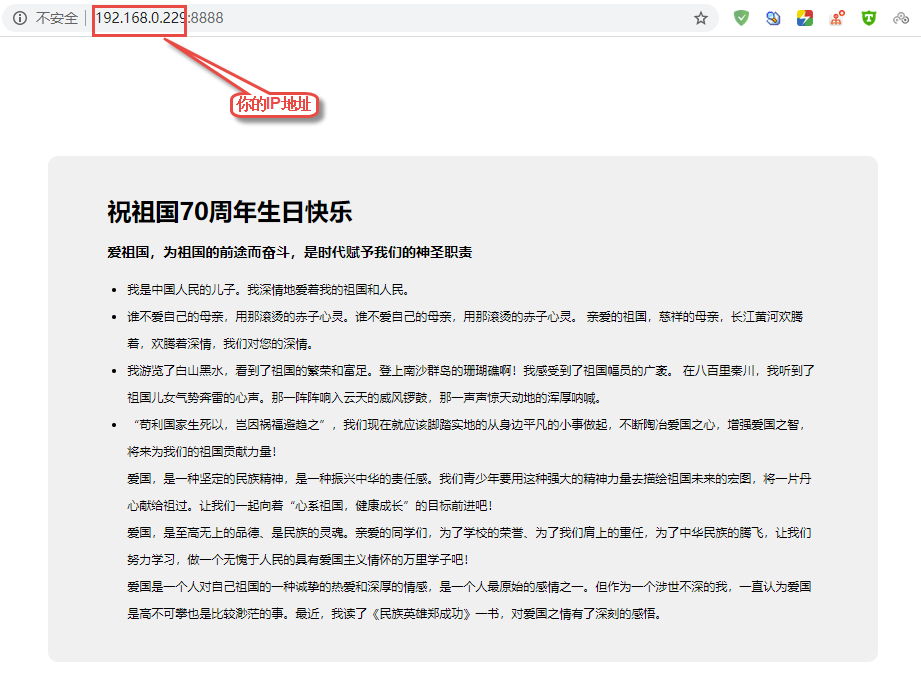
http004
3.3. 网页控制LED灯
这个实验是基于上个实验的再次开发,我们的开发板作为服务器,电脑浏览器访问服务器,然后通过网页上的控制按钮来控制我们开发板上的 LED 灯,那是什么原理呢?首先我们从上一节知道,浏览器是通过“GET”命令来获取开发板上的数据(资源),同样的,浏览器也可以通过“POST”命令来设置开发板上的资源,当然,我们在服务器端(开发板)需要对“POST”命令产生应答并且处理才可以,因此我们需要对服务器进行改写,而且将开发板上 LED 等的状态实时显示在网页上。
实现创建两个html资源文件,名字分别为led_on.html,led_off.html,用于保存开灯与关灯时候返回给客户端的数据内容,这两个文件的内容是差不多的,具体见:
文件的位置在:https://github.com/Embedfire/embed_linux_tutorial/tree/master/base_code/linux_iot/http_control_led
led_on.html
</html>
    <head><title>HTTP LED Control</title></head>
    <center>
        <p>
        <font size="6">LED<font style = "color:red">已打开</font>
        <form method=post action="off" name="ledform">
        <input type="submit" value="关闭" style="width:80px;height:30px;"></form>
    </center>

    <head><title>Congrats!</title></head>
    <body><h2 align="center">Welcome to Fire HTTP Server!</h2>
        <p align="center">This is a small test page : http control led.</p>
        <p align="center"><a href="https://www.firebbs.cn/forum.php/"> <font size="6"> 野火电子论 </font> </a></p>
        <a href="https://www.firebbs.cn/forum.php/">
        <img src="https://www.firebbs.cn/data/attachment/portal/201806/05/163015rhz7mbgbt0zfujzh.jpg"/></a>
    </body>

</html>
led_off.html
</html>
    <head><title>HTTP LED Control</title></head>
    <center>
        <p>
        <font size="6">LED<font style = "color:red">已关闭</font>
        <form method=post action="on" name="ledform">
        <input type="submit" value="打开" style="width:80px;height:30px;"></form>
    </center>

    <head><title>Congrats!</title></head>
    <body><h2 align="center">Welcome to Fire HTTP Server!</h2>
        <p align="center">This is a small test page : http control led.</p>
        <p align="center"><a href="https://www.firebbs.cn/forum.php/"> <font size="6"> 野火电子论 </font> </a></p>
        <a href="https://www.firebbs.cn/forum.php/">
        <img src="https://www.firebbs.cn/data/attachment/portal/201806/05/163015rhz7mbgbt0zfujzh.jpg"/></a>
    </body>

</html>
接着编写代码,在上一个实验的代码之上修改,具体见:
#include <stdio.h>
#include <netinet/in.h>
#include <sys/socket.h> // socket
#include <sys/types.h>  // 基本数据类型
#include <unistd.h> // read write
#include <string.h>
#include <stdlib.h>
#include <fcntl.h> // open close
#include <sys/shm.h>
#include <netinet/in.h>
#include <arpa/inet.h>
#include <signal.h>
#include <sys/stat.h>


#define PORT        8888
#define SERVER      "0.0.0.0"
#define BACKLOG     20
#define BUFF_SIZE   (1024 * 500)

#define LED_ON      "./led_on.html"
#define LED_OFF     "./led_off.html"

int sockfd;
char *http_res_tmpl = "HTTP/1.1 200 OK\r\n"
        "Server: Cleey's Server V1.0\r\n"
        "Accept-Ranges: bytes\r\n"
        "Content-Length: %d\r\n"
        "Connection: close\r\n"
        "Content-Type: %s\r\n\r\n";

int http_str_nmatch(const char *str1, const char *str2, int n)
{
    int i = 0;
    int c1, c2;
    do {
        c1 = *str1++;
        c2 = *str2++;
        i++;
    } while(((c1 == c2) && c1) && (i < n));

    return c1 - c2;
}

void http_send(int sock_client, char *str)
{
    char header[BUFF_SIZE], body[BUFF_SIZE];

    int len = strlen(str);

    sprintf(header, http_res_tmpl, len,"text/html");

    len = sprintf(body,"%s%s", header, str);

    send(sock_client, body, len, 0);
}

void handle_signal(int sign)
{
    fputs("\nSIGNAL INTERRUPT \nBye Cleey! \nSAFE EXIT\n",stdout);
    close(sockfd);
    exit(0);
}


int read_file(char *filename, int *len, char **data)
{
    int file = open(filename, O_RDONLY);
    if ( file == -1 )
        return -1;

    int i = 0;
    while ( 1 )
    {
        *data = realloc(*data, (BUFF_SIZE * (i + 1)));
        if ( data == NULL )
        {
            close( file );
            return -1;
        }

        int cur_len = read(file, *data+(BUFF_SIZE * i), BUFF_SIZE);
        if ( cur_len == 0 )
            break;
        else
            *len += cur_len;

        i++;
    }

    close( file );

    return 0;
}

int main(void)
{
    signal(SIGINT,handle_signal);
    int len = 0;
    char *pdata = NULL;
    int count = 0; // 计数
    // 定义 socket
    sockfd = socket(AF_INET,SOCK_STREAM,0);
    // 定义 sockaddr_in
    struct sockaddr_in skaddr;
    skaddr.sin_family = AF_INET;            // ipv4
    skaddr.sin_port   = htons(PORT);
    skaddr.sin_addr.s_addr = inet_addr(SERVER);
    // bind,绑定 socket 和 sockaddr_in
    if (bind(sockfd,(struct sockaddr *)&skaddr,sizeof(skaddr)) == -1 ) {
        perror("bind error");
        exit(1);
    }

    // listen,开始添加端口
    if (listen(sockfd, BACKLOG) == -1 ) {
        perror("listen error");
        exit(1);
    }

    // 客户端信息
    char buff[BUFF_SIZE];
    struct sockaddr_in claddr;
    socklen_t length = sizeof(claddr);

    while(1) {
        int sock_client = accept(sockfd,(struct sockaddr *)&claddr, &length);
        if (sock_client <0) {
            perror("accept error");
            exit(1);
        }

        memset(buff,0,sizeof(buff));

        int len = recv(sock_client, buff, sizeof(buff), 0);

        if (http_str_nmatch(buff, "GET /", 5) == 0) {

            read_file(LED_ON, &len, &pdata);
            http_send(sock_client, pdata);

        } else if (http_str_nmatch(buff, "POST /on", 8) == 0) {

            read_file(LED_ON, &len, &pdata);
            http_send(sock_client, pdata);

            // led 打开
            printf("led on\n");

        } else if (http_str_nmatch(buff, "POST /off", 8) == 0) {

            read_file(LED_OFF, &len, &pdata);
            http_send(sock_client, pdata);

            // led 关闭
            printf("led off\n");
        } else {
            http_send(sock_client,"Hello World!");
        }

        // fputs(buff,stdout);
        close(sock_client);
    }
    fputs("Bye Cleey",stdout);
    close(sockfd);
    return 0;
}
编译与运行,使用make命令去编译该源码,然后运行生成的可执行文件即可,然后在你的电脑上打开浏览器,输入http://[你开发板的IP地址]:8888,即可看到实现现象,具体见:
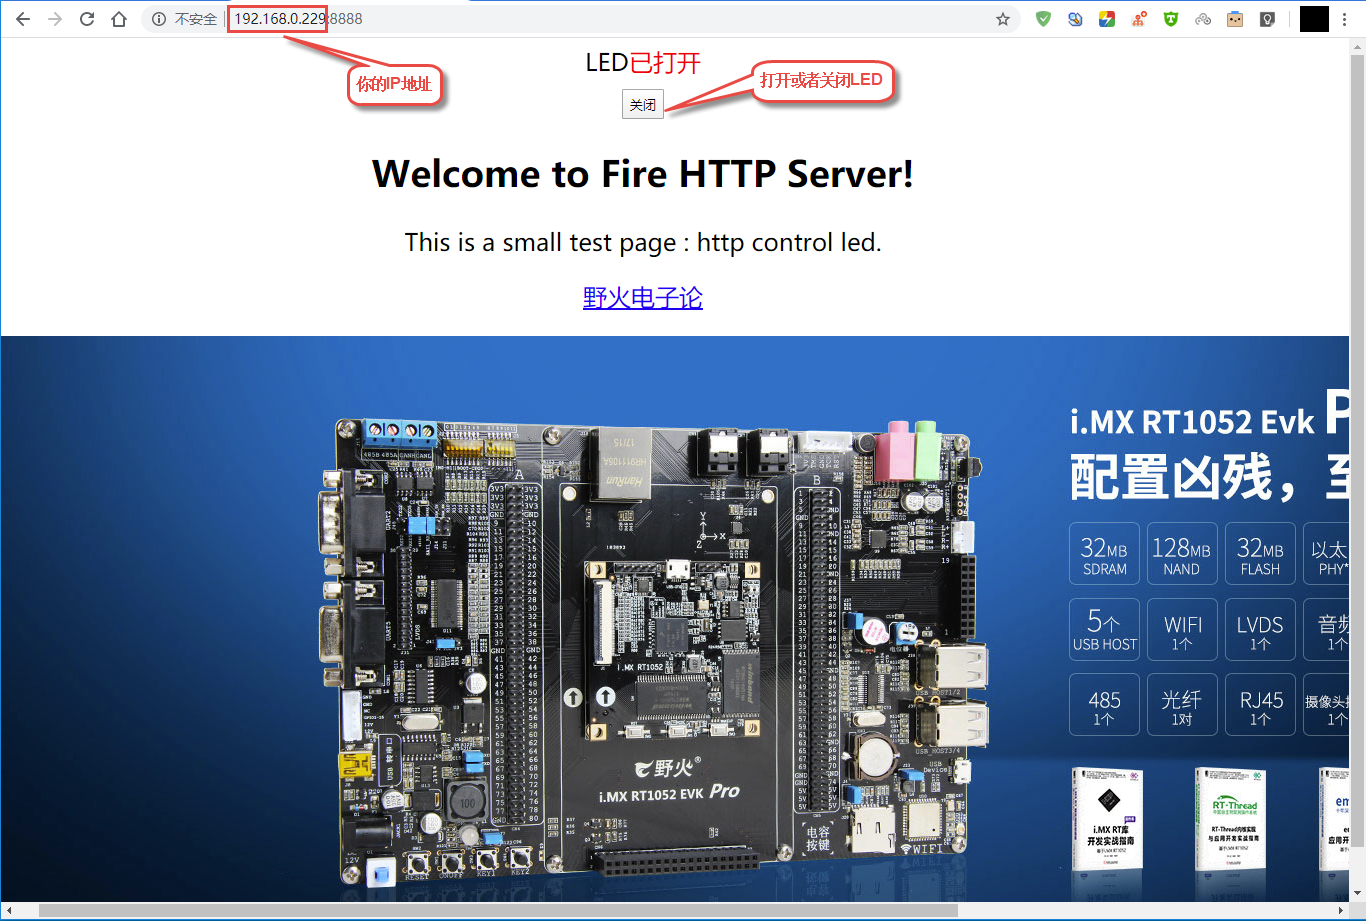
http005
当你点击打开或者关闭按钮时,你的终端会打印以下数据,表示LED打开或者关闭:
➜  http_control_led git:(dev_jie) ✗ ./targets
led off
led on
led off
led on
led off
led on
led off
led on
3.4. 使用systemd-network设置静态ip
在之前的章节中我们介绍过Systemd的启动方式和传统的启动方式的区别。Systemd已成为了大多数发行版的标准配置, 使用了Systemd,就不需要再用init了。Systemd 取代了initd,成为系统的第一个进程(PID 等于 1),其他进程都是它的子进程。 这里简单介绍如何使用systemd-network来设置静态ip
3.4.1. 步骤一
在板子上执行下面两条命令
mv /etc/network/interfaces /etc/network/interfaces.save

systemctl enable systemd-networkd
第一条指令将之前/etc/network/interfaces文件重命名为interfaces.save
第二条指令使能systemd-networkd服务
3.4.2. 步骤二
在/etc/systemd/network目录下增加需要配置的网卡配置信息文件,文件以.network后缀作为结尾。如新建一个配置网卡eth1文件 eth1.network,文件内容如下:
[Match]
Name=eth1

[Network]
Address=192.168.1.20/24
Gateway=192.168.1.1
DNS=192.168.1.1
如需配置多个网卡信息,新建多个网卡的配置信息文件即可。