
人脸检测68点模型
本节例程的位置在 百度云盘资料\野火K210 AI视觉相机\1-教程文档_例程源码\例程\10-KPU\face_detect_with_68landmark\face_detect_68lm.py
例程
1 2 3 4 5 6 7 8 9 10 11 12 13 14 15 16 17 18 19 20 21 22 23 24 25 26 27 28 29 30 31 32 33 34 35 36 37 38 39 40 41 42 43 44 45 46 47 48 49 50 51 52 53 54 55 56 57 58 59 60 61 62 63 64 65 66 67 | import sensor, image, time, lcd
from maix import KPU
import gc
lcd.init()
sensor.reset(dual_buff=True) # Reset and initialize the sensor. It will
# run automatically, call sensor.run(0) to stop
sensor.set_pixformat(sensor.RGB565) # Set pixel format to RGB565 (or GRAYSCALE)
sensor.set_framesize(sensor.QVGA) # Set frame size to QVGA (320x240)
sensor.skip_frames(time = 1000) # Wait for settings take effect.
clock = time.clock() # Create a clock object to track the FPS.
anchor = (0.1075, 0.126875, 0.126875, 0.175, 0.1465625, 0.2246875, 0.1953125, 0.25375, 0.2440625, 0.351875, 0.341875, 0.4721875, 0.5078125, 0.6696875, 0.8984375, 1.099687, 2.129062, 2.425937)
kpu = KPU()
kpu.load_kmodel("/sd/KPU/yolo_face_detect/face_detect_320x240.kmodel")
kpu.init_yolo2(anchor, anchor_num=9, img_w=320, img_h=240, net_w=320 , net_h=240 ,layer_w=10 ,layer_h=8, threshold=0.5, nms_value=0.2, classes=1)
lm68_kpu = KPU()
print("ready load model")
lm68_kpu.load_kmodel("/sd/KPU/face_detect_with_68landmark/landmark68.kmodel")
RATIO = 0.08
def extend_box(x, y, w, h, scale):
x1_t = x - scale*w
x2_t = x + w + scale*w
y1_t = y - scale*h
y2_t = y + h + scale*h
x1 = int(x1_t) if x1_t>1 else 1
x2 = int(x2_t) if x2_t<320 else 319
y1 = int(y1_t) if y1_t>1 else 1
y2 = int(y2_t) if y2_t<240 else 239
cut_img_w = x2-x1+1
cut_img_h = y2-y1+1
return x1, y1, cut_img_w, cut_img_h
while 1:
gc.collect()
#print("mem free:",gc.mem_free())
clock.tick() # Update the FPS clock.
img = sensor.snapshot()
kpu.run_with_output(img)
dect = kpu.regionlayer_yolo2()
fps = clock.fps()
if len(dect) > 0:
print("dect:",dect)
for l in dect :
x1, y1, cut_img_w, cut_img_h = extend_box(l[0], l[1], l[2], l[3], scale=RATIO) # 扩大人脸框
face_cut = img.cut(x1, y1, cut_img_w, cut_img_h)
a = img.draw_rectangle(l[0],l[1],l[2],l[3], color=(0, 255, 0))
face_cut_128 = face_cut.resize(128, 128)
face_cut_128.pix_to_ai()
out = lm68_kpu.run_with_output(face_cut_128, getlist=True)
#print("out:",len(out))
for j in range(68):
x = int(KPU.sigmoid(out[2 * j])*cut_img_w + x1)
y = int(KPU.sigmoid(out[2 * j + 1])*cut_img_h + y1)
#a = img.draw_cross(x, y, size=1, color=(0, 0, 255))
a = img.draw_circle(x, y, 2, color=(0, 0, 255), fill=True)
del (face_cut_128)
del (face_cut)
a = img.draw_string(0, 0, "%2.1ffps" %(fps), color=(0, 60, 255), scale=2.0)
lcd.display(img)
gc.collect()
kpu.deinit()
lm68_kpu.deinit()
|
例程解析
1 2 3 | import sensor, image, time, lcd
from maix import KPU
import gc
|
导入必要的模块:sensor, image, time, lcd, KPU, 和 gc。这些模块分别用于控制摄像头、处理图像、时间管理、LCD显示、KPU加速和垃圾回收。
1 2 3 4 5 6 | lcd.init()
sensor.reset(dual_buff=True) # Reset and initialize the sensor. It will
# run automatically, call sensor.run(0) to stop
sensor.set_pixformat(sensor.RGB565) # Set pixel format to RGB565 (or GRAYSCALE)
sensor.set_framesize(sensor.QVGA) # Set frame size to QVGA (320x240)
sensor.skip_frames(time = 1000) # Wait for settings take effect.
|
初始化LCD显示和摄像头,设置摄像头图像格式为RGB565,分辨率设为QVGA(320x240),跳过一些帧以等待设置生效。
1 | clock = time.clock() # Create a clock object to track the FPS.
|
定义一个时钟对象clock来跟踪帧率(FPS)。
1 | anchor = (0.1075, 0.126875, 0.126875, 0.175, 0.1465625, 0.2246875, 0.1953125, 0.25375, 0.2440625, 0.351875, 0.341875, 0.4721875, 0.5078125, 0.6696875, 0.8984375, 1.099687, 2.129062, 2.425937)
|
定义一个锚点数组anchor,用于YOLO v2目标检测算法。
1 2 3 | kpu = KPU()
kpu.load_kmodel("/sd/KPU/yolo_face_detect/face_detect_320x240.kmodel")
kpu.init_yolo2(anchor, anchor_num=9, img_w=320, img_h=240, net_w=320 , net_h=240 ,layer_w=10 ,layer_h=8, threshold=0.5, nms_value=0.2, classes=1)
|
创建一个KPU对象kpu,并加载人脸检测模型face_detect_320x240.kmodel,然后初始化YOLO v2目标检测。
1 2 3 | lm68_kpu = KPU()
print("ready load model")
lm68_kpu.load_kmodel("/sd/KPU/face_detect_with_68landmark/landmark68.kmodel")
|
创建一个KPU对象lm68_kpu,加载人脸68个关键点检测模型landmark68.kmodel。
1 2 3 4 5 6 7 8 9 10 11 12 13 | RATIO = 0.08
def extend_box(x, y, w, h, scale):
x1_t = x - scale*w
x2_t = x + w + scale*w
y1_t = y - scale*h
y2_t = y + h + scale*h
x1 = int(x1_t) if x1_t>1 else 1
x2 = int(x2_t) if x2_t<320 else 319
y1 = int(y1_t) if y1_t>1 else 1
y2 = int(y2_t) if y2_t<240 else 239
cut_img_w = x2-x1+1
cut_img_h = y2-y1+1
return x1, y1, cut_img_w, cut_img_h
|
定义一个函数extend_box,用于扩展人脸框的大小。
1 2 3 4 5 6 7 8 9 10 11 12 13 14 15 16 17 18 19 20 21 22 23 24 25 26 27 28 29 | while 1:
gc.collect()
#print("mem free:",gc.mem_free())
clock.tick() # Update the FPS clock.
img = sensor.snapshot()
kpu.run_with_output(img)
dect = kpu.regionlayer_yolo2()
fps = clock.fps()
if len(dect) > 0:
print("dect:",dect)
for l in dect :
x1, y1, cut_img_w, cut_img_h = extend_box(l[0], l[1], l[2], l[3], scale=RATIO) # 扩大人脸框
face_cut = img.cut(x1, y1, cut_img_w, cut_img_h)
a = img.draw_rectangle(l[0],l[1],l[2],l[3], color=(0, 255, 0))
face_cut_128 = face_cut.resize(128, 128)
face_cut_128.pix_to_ai()
out = lm68_kpu.run_with_output(face_cut_128, getlist=True)
#print("out:",len(out))
for j in range(68):
x = int(KPU.sigmoid(out[2 * j])*cut_img_w + x1)
y = int(KPU.sigmoid(out[2 * j + 1])*cut_img_h + y1)
#a = img.draw_cross(x, y, size=1, color=(0, 0, 255))
a = img.draw_circle(x, y, 2, color=(0, 0, 255), fill=True)
del (face_cut_128)
del (face_cut)
a = img.draw_string(0, 0, "%2.1ffps" %(fps), color=(0, 60, 255), scale=2.0)
lcd.display(img)
gc.collect()
|
进入主循环,首先进行垃圾回收,然后更新FPS时钟,捕获一帧图像,运行人脸检测模型,获取检测结果。
如果检测到人脸,对人脸进行框选,并裁剪出人脸图像。
对裁剪出的人脸图像进行关键点检测。
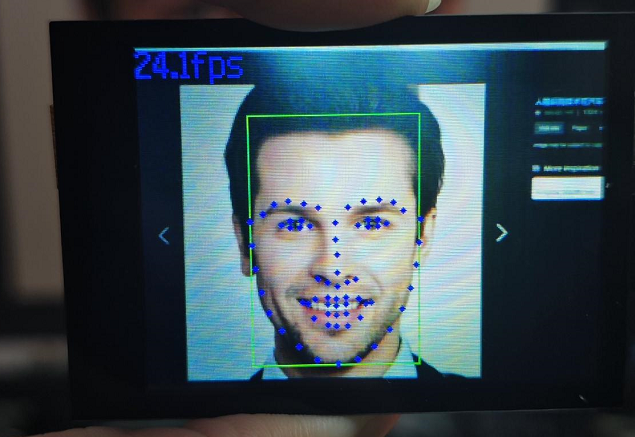
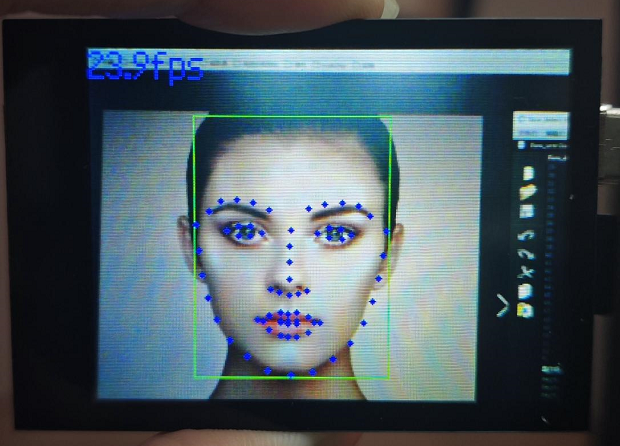
根据关键点检测结果,在原图上绘制68个关键点。
显示FPS信息,并将处理后的图像显示在LCD上。
1 2 | kpu.deinit()
lm68_kpu.deinit()
|
循环结束后,释放所有KPU资源。