4. Gstreamer工具以及MPP插件
本章节主要介绍Gstreamer工具及相关插件测试⽅法。
4.1. Gstreamer简介
GStreamer是一个开源的多媒体框架,用于构建音频和视频处理应用程序。它提供了丰富的功能,可以处理各种格式的媒体流,包括录制、播放、编辑和流式传输。 通过其插件架构,GStreamer支持许多编解码器和容器格式,使开发者能够轻松地构建复杂的多媒体应用,适用于桌面、嵌入式系统和服务器环境。
4.2. Gstreamer常⽤命令
4.2.1. gst-launch-1.0
gst-launch-1.0是GStreamer框架中的一个命令行工具,用于快速创建和测试多媒体管道。 它允许用户构建数据流管道,以处理音频和视频数据,进行实时流处理、编码、解码、转码等操作。简单示例如下:
1 2 | #使⽤videotestsrc⽣成⼀段视频,并使⽤xvimagesink显⽰
gst-launch-1.0 videotestsrc ! xvimagesink
|
4.2.2. gst-play-1.0
gst-play-1.0是GStreamer的一个简单媒体播放器工具,旨在快速播放音频和视频文件。 它支持多种媒体格式,并能够使用 GStreamer 的插件架构进行扩展。 通过命令行参数,用户可以轻松地播放本地文件或流式媒体,非常适合测试和演示多媒体功能。
1 2 | # 播放test.mp4,并通过xvimagesink显⽰
gst-play-1.0 test.mp4 --videosink=xvimagesink
|
4.2.3. gst-inspect-1.0
gst-inspect-1.0 是 GStreamer 的一个工具,用于查看 GStreamer 中可用的插件、元素和它们的属性。 通过这个工具,用户可以获取有关特定插件的信息,例如支持的格式、属性、信号和功能。
1 2 3 4 | # 不带任何参数,列出所有插件
gst-inspect-1.0
# 列出xvimagesink插件的所有信息
gst-inspect-1.0 xvimagesink
|
4.3. Gstreamer常⽤插件
4.3.1. Source
GStreamer的Source插件用于生成和提供媒体数据流。它们可以从不同的数据源读取音频或视频,比如文件、网络、设备等。 常见的Source插件包括文件源(如 filesrc)、网络源(如 tcpserversrc)、设备源(如 v4l2src),这些插件允许开发者灵活地构建多媒体管道, 以满足不同的应用需求。通过配置Source插件,用户可以轻松获取和处理多种类型的媒体数据。
4.3.1.1. filesrc
从⽂件读取数据,⽰例如下:
1 2 3 4 5 6 7 8 | #创建/tmp/test
echo 666 > /tmp/test
#读取文件数据到/tmp/test2
gst-launch-1.0 filesrc location=/tmp/test ! filesink location=/tmp/test2
#查看
cat /tmp/test2
|
4.3.1.2. videotestsrc
⽣成视频数据,⽰例如下:
1 2 3 4 | # 使⽤默认格式输出视频
gst-launch-1.0 videotestsrc ! xvimagesink
# 使⽤指定格式输出视频
gst-launch-1.0 videotestsrc ! "video/x-raw,width=1920,height=1080,format=(string)NV12" ! xvimagesink
|
4.3.1.3. v4l2src
从摄像头获取视频数据,⽰例如下:
1 2 3 4 5 | #如果不指定摄像头编号,默认使用系统的第一个视频设备/dev/video0
gst-launch-1.0 v4l2src ! video/x-raw,width=1920,height=1080,format=NV12 ! xvimagesink
#如果需要使用特定的摄像头,可以通过device属性指定设备,例如
gst-launch-1.0 v4l2src device=/dev/video0 ! video/x-raw,width=1920,height=1080,format=NV12 ! xvimagesink
|
4.3.1.4. rtspsrc和rtspclientsink
rtspsrc和rtspclientsink是GStreamer中用于处理RTSP流的两个不同元素。
rtspsrc:这是一个源元素,用于接收RTSP流。它可以从RTSP服务器拉取音视频流,并将其传递给管道的下游元素进行处理。
rtspclientsink:这是一个接收元素,用于将处理后的音视频流发送到RTSP服务器。
简单来说,rtspsrc用于接收流,rtspclientsink用于发送流。
系统默认没有安装插件,需要进行安装:
1 2 | #安装插件
sudo apt install gstreamer1.0-rtsp
|
具体使用方法,参考本章节推流、拉流部分。
4.3.2. Sink
GStreamer的Sink插件用于接收和处理媒体数据流,通常用于输出到不同的目标,例如文件、音频设备、视频显示等。 常见的Sink插件包括文件接收器(如filesink)、音频输出(如 alsasink)、视频显示(如 ximagesink)。 这些插件使开发者能够灵活地将媒体数据导出到所需的格式或设备,方便实现多媒体播放和录制功能。
4.3.2.1. filesink
将收到的数据保存为⽂件,⽰例如下:
1 2 3 4 5 6 7 8 | #创建/tmp/test
echo 666 > /tmp/test
#读取文件数据到/tmp/test2
gst-launch-1.0 filesrc location=/tmp/test ! filesink location=/tmp/test2
#查看
cat /tmp/test2
|
4.3.2.4. kmssink
视频Sink,接收视频并显⽰,使⽤kms接口实现,需要独占硬解图层,⽰例如下:
1 2 3 4 5 | gst-launch-1.0 videotestsrc ! kmssink
# 常⽤命令
connector-id #指定屏幕
plane-id #指定硬件图层
render-rectangle #指定渲染范围
|
4.3.2.6. rkximagesink
视频Sink,接收视频并显⽰,使⽤drm接口实现零拷⻉等功能,性能较好,但需要独占硬解图层。⽰例如下:
1 | gst-launch-1.0 videotestsrc ! rkximagesink
|
4.3.2.7. fpsdisplaysink
视频Sink,接收视频并统计帧率,同时会将视频中转⾄下⼀级Sink显⽰,⽰例如下:
1 2 3 4 5 6 7 8 9 10 11 12 13 14 15 | #⽇志等级为TRACE(7)即可查看实时帧率,设置为DEBUG(5)则只显⽰最⼤/最小帧率
GST_DEBUG=fpsdisplaysink:7 gst-play-1.0 --flags=3 --videosink="fpsdisplaysink \
video-sink=xvimagesink signal-fps-measurements=true text-overlay=false \
sync=false" test.mp4
#信息输出如下
Press 'k' to see a list of keyboard shortcuts.
Now playing /home/cat/test.mp4
0:00:00.111413754 7044 0x5580fc5d90 DEBUG fpsdisplaysink fpsdisplaysink.c:440:fps_display_sink_start:<fpsdisplaysink0> Use text-overlay? 0
Redistribute latency...
0:00:02.035048410 7044 0x7f6004e2d0 DEBUG fpsdisplaysink fpsdisplaysink.c:372:display_current_fps:<fpsdisplaysink0> Updated max-fps to 44.703224
0:00:02.036371046 7044 0x7f6004e2d0 DEBUG fpsdisplaysink fpsdisplaysink.c:376:display_current_fps:<fpsdisplaysink0> Updated min-fps to 44.703224
0:00:02.037667141 7044 0x7f6004e2d0 LOG fpsdisplaysink fpsdisplaysink.c:381:display_current_fps:<fpsdisplaysink0> Signaling measurements: fps:44.703224 droprate:0.000000 avg-fps:44.703224
0:00:02.552749637 7044 0x7f6004e2d0 DEBUG fpsdisplaysink fpsdisplaysink.c:372:display_current_fps:<fpsdisplaysink0> Updated max-fps to 46.356696
0:00:02.554009567 7044 0x7f6004e2d0 LOG fpsdisplaysink fpsdisplaysink.c:381:display_current_fps:<fpsdisplaysink0> Signaling measurements: fps:46.356696 droprate:0.000000 avg-fps:45.532539
|
4.4. Rockchip MPP插件
基于MPP的硬件编解码插件,基于Gstreamer原有GstVideoDecoder类和GstVideoEncoder类开发。
解码⽀持的格式有JPEG,MPEG,VP8,VP9,H264,H265。
编码⽀持的格式有JPEG,H264,H265,VP8。
具体参考:资料网盘/5-RockChip官方文档/Linux/Multimedia/Rockchip_User_Guide_Linux_Gstreamer_CN.pdf
默认系统已经安装mpp插件:
1 2 3 4 5 6 7 8 9 10 | #查看mpp插件
gst-inspect-1.0 | grep mpp
#信息输出如下
rockchipmpp: mpph264enc: Rockchip Mpp H264 Encoder
rockchipmpp: mpph265enc: Rockchip Mpp H265 Encoder
rockchipmpp: mppvp8enc: Rockchip Mpp VP8 Encoder
rockchipmpp: mppjpegenc: Rockchip Mpp JPEG Encoder
rockchipmpp: mppvideodec: Rockchip's MPP video decoder
rockchipmpp: mppjpegdec: Rockchip's MPP JPEG image decoder
|
4.4.1. gstmppdec说明
包含插件mppvideodec,mppjpegdec,以下以mppvideodec为例进⾏说明。
主要属性说明:
rotation: 旋转⻆度,默认为0°,可选0°,90°,180°,270°。
width: 宽度,默认为0,不进⾏缩放。
height: ⾼度,默认为0,不进⾏缩放。
crop-rectangle: 裁剪,使⽤⽅式为<x, y, w, h>,即裁剪源<x, y>为起点,宽⾼为w * h的图像送⾄下级。
arm-afbc: AFBC压缩格式,默认不开启,开启后可以降低DDR带宽占⽤,部分芯⽚解码效率会有明显提⾼。
format: 输出格式,默认为0 “auto”,不进⾏格式转换。
fast-mode: 开启MPP Fast Mode,可以使部分解码流程并⾏,提升解码效率。默认开启。
ignore-error: 忽略MPP解码错误,强制输出解码帧。默认开启。
4.4.2. gstmppenc说明
包含插件mpph264enc,mppvp8enc,mppjpegenc等,以下以mpph264enc为例进⾏说明。
主要属性说明:
width: 宽度,默认为0,不进⾏缩放。
height: ⾼度,默认为0,不进⾏缩放。
rc-mode: 码率控制模式,可选VBR,CBR和Fixed QP。
bps: ⽬标码率,在Fixed QP模式下忽略。
bps-max: 最⾼码率,在Fixed QP模式下忽略。
bps-min:最低码率,在Fixed QP模式下忽略。
gop: Group Of Picture,即两I帧的间隔。
level: 表⽰ SPS 中的 level_idc 参数
profile: 表⽰ SPS 中的 profile_idc 参数。
rotation: 旋转输⼊buffer,可选0°,90°,180°,270°。
4.4.3. 播放视频
1 2 3 4 5 6 | #获取音频播放设备
aplay -l
#播放并指定音频设备
gst-play-1.0 --flags=3 --videosink="fpsdisplaysink video-sink=xvimagesink signal-fps-measurements=true text-overlay=false sync=false" \
--audiosink="alsasink device=hw:1,0" test.mp4
|
4.4.4. 多路视频播放
1 2 3 4 5 | # 使⽤xvimagesink的render-rectangle指定不同的渲染位置
gst-launch-1.0 filesrc location=/home/cat/test.mp4 ! parsebin ! mppvideodec ! \
xvimagesink render-rectangle='<0,0,400,400>' &
gst-launch-1.0 filesrc location=/home/cat/test.mp4 ! parsebin ! mppvideodec ! \
xvimagesink render-rectangle='<0,500,400,400>' &
|
4.4.5. 编码预览
使⽤tee插件,将摄像头采集的数据拷⻉为两路,其中⼀路送⾄mpph264enc进⾏编码,而后送⾄filesink保存⽂件。 另⼀路送⾄autovideosink显⽰。注意在tee插件后需要加上queue插件,会对数据进⾏缓存,防⽌出现卡死的情况。
1 2 3 4 | #编码预览,并将视频流保存到/home/cat/out.h264
gst-launch-1.0 v4l2src ! 'video/x-raw,width=1920,height=1080,format=NV12' ! tee name=tv ! queue ! \
mpph264enc ! 'video/x-h264' ! h264parse ! 'video/x-h264' ! filesink \
location=/home/cat/out.h264 tv. ! queue ! autovideosink
|
4.4.6. 拆分码流
部分插件如qtdemux,会出现多个Source Pad的情况,如⾳频流、视频流、字幕流等,则可以将该插件命名,并提取出需要的码流。 如将qtdemux命名为qt,则qt.audio_0就是第⼀个⾳频流,qt.video_0就是第⼀个视频流,可提取后分别做处理。 同样建议在分流后加上queue插件。不同插件码流命名⽅式不同,可以通过gst-inspect命令查看命名⽅式, 或直接使⽤类似 qt. ! queue ! mppvidedec 的形式进⾏构建,gstreamer会与后级插件协商格式。
1 2 | gst-launch-1.0 filesrc location=test.mp4 ! qtdemux name=qt qt.audio_0 ! queue ! \
filesink location=audio.bin qt.video_0 ! queue ! filesink location=video.bin
|
4.5. AFBC
AFBC全称ARM Frame Buffer Compression,是⼀种压缩格式,⽤于节省带宽。 ⽬前mppvideodec插件⽀持AFBC的编码格式有:H264,H265,VP9,⽀持的⾊彩格式有NV12,NV12 10bit,NV16。 开启⽅法如下:
1 2 3 4 5 6 | # 开启全局AFBC,适⽤于使⽤gst-play-1.0等⽆法直接操作mppvideodec的情况
export GST_MPP_VIDEODEC_DEFAULT_ARM_AFBC=1
# 单独开启AFBC
gst-launch-1.0 filesrc location=test.mp4 ! parsebin ! mppvideodec arm-afbc=true \
! waylandsink
|
以下实际对比开启AFBC与没有开启AFBC的帧率区别:
没有开启AFBC时测试如下:
1 2 3 4 5 6 7 8 9 10 11 12 13 14 15 16 | #通过fpsdisplaysink获取帧率
GST_DEBUG=fpsdisplaysink:7 gst-play-1.0 --flags=3 --videosink="fpsdisplaysink \
video-sink=xvimagesink signal-fps-measurements=true text-overlay=false \
sync=false" test.mp4
#信息输出如下
Press 'k' to see a list of keyboard shortcuts.
Now playing /home/cat/test.mp4
0:00:00.104522663 1713 0x557e075f90 DEBUG fpsdisplaysink fpsdisplaysink.c:440:fps_display_sink_start:<fpsdisplaysink0> Use text-overlay? 0
Redistribute latency...
0:00:01.759775739 1713 0x7f7004f6d0 DEBUG fpsdisplaysink fpsdisplaysink.c:372:display_current_fps:<fpsdisplaysink0> Updated max-fps to 49.268096
0:00:01.760865346 1713 0x7f7004f6d0 DEBUG fpsdisplaysink fpsdisplaysink.c:376:display_current_fps:<fpsdisplaysink0> Updated min-fps to 49.268096
0:00:01.762249521 1713 0x7f7004f6d0 LOG fpsdisplaysink fpsdisplaysink.c:381:display_current_fps:<fpsdisplaysink0> Signaling measurements: fps:49.268096 droprate:0.000000 avg-fps:49.268096
0:00:02.268088250 1713 0x7f7004f6d0 DEBUG fpsdisplaysink fpsdisplaysink.c:376:display_current_fps:<fpsdisplaysink0> Updated min-fps to 45.237944
0:00:02.269162983 1713 0x7f7004f6d0 LOG fpsdisplaysink fpsdisplaysink.c:381:display_current_fps:<fpsdisplaysink0> Signaling measurements: fps:45.237944 droprate:0.000000 avg-fps:47.251046
0:00:02.822329583 1713 0x7f7004f6d0 LOG fpsdisplaysink fpsdisplaysink.c:381:display_current_fps:<fpsdisplaysink0> Signaling measurements: fps:46.915589 droprate:0.000000 avg-fps:47.132638
|
可见,在没有开启AFBC时,帧率在45-50帧。
开启AFBC时测试如下:
1 2 3 4 5 6 7 8 9 10 11 12 13 14 15 16 17 18 19 20 21 22 | # 开启全局AFBC
export GST_MPP_VIDEODEC_DEFAULT_ARM_AFBC=1
#通过fpsdisplaysink获取帧率
GST_DEBUG=fpsdisplaysink:7 gst-play-1.0 --flags=3 --videosink="fpsdisplaysink \
video-sink=xvimagesink signal-fps-measurements=true text-overlay=false \
sync=false" test.mp4
#信息输出如下
Press 'k' to see a list of keyboard shortcuts.
Now playing /home/cat/test.mp4
0:00:00.104146271 1868 0x55a0d01790 DEBUG fpsdisplaysink fpsdisplaysink.c:440:fps_display_sink_start:<fpsdisplaysink0> Use text-overlay? 0
Redistribute latency...
0:00:01.670561179 1868 0x7f84044f70 DEBUG fpsdisplaysink fpsdisplaysink.c:372:display_current_fps:<fpsdisplaysink0> Updated max-fps to 69.251621
0:00:01.671678203 1868 0x7f84044f70 DEBUG fpsdisplaysink fpsdisplaysink.c:376:display_current_fps:<fpsdisplaysink0> Updated min-fps to 69.251621
0:00:01.673051588 1868 0x7f84044f70 LOG fpsdisplaysink fpsdisplaysink.c:381:display_current_fps:<fpsdisplaysink0> Signaling measurements: fps:69.251621 droprate:0.000000 avg-fps:69.251621
0:00:02.175685861 1868 0x7f84044f70 DEBUG fpsdisplaysink fpsdisplaysink.c:372:display_current_fps:<fpsdisplaysink0> Updated max-fps to 69.281343
0:00:02.176746888 1868 0x7f84044f70 LOG fpsdisplaysink fpsdisplaysink.c:381:display_current_fps:<fpsdisplaysink0> Signaling measurements: fps:69.281343 droprate:0.000000 avg-fps:69.266479
0:00:02.688069779 1868 0x7f84044f70 DEBUG fpsdisplaysink fpsdisplaysink.c:372:display_current_fps:<fpsdisplaysink0> Updated max-fps to 72.214109
0:00:02.689163762 1868 0x7f84044f70 LOG fpsdisplaysink fpsdisplaysink.c:381:display_current_fps:<fpsdisplaysink0> Signaling measurements: fps:72.214109 droprate:0.000000 avg-fps:70.258145
0:00:03.193409405 1868 0x7f84044f70 DEBUG fpsdisplaysink fpsdisplaysink.c:372:display_current_fps:<fpsdisplaysink0> Updated max-fps to 75.213708
0:00:03.194469849 1868 0x7f84044f70 LOG fpsdisplaysink fpsdisplaysink.c:381:display_current_fps:<fpsdisplaysink0> Signaling measurements: fps:75.213708 droprate:0.000000 avg-fps:71.492593
|
可见,在开启AFBC时,帧率在69-75帧。
4.6. 字幕
开启字幕会出现卡顿,通常字幕合成需要从视频中截取部分图像并转为RGB,再合成字幕后再转回源格式,才能进⾏送显, 即解码的耗时还需考虑字幕合成的耗时,导致整体帧率下降。使⽤gst-play-1.0命令 测试可以通过 –flags=3 关闭字幕。字幕需要⾃⾏使⽤QT等框架独⽴于视频层实现。
4.7. 图层指定
使⽤rkximagesink或kmssink时,需要独占⼀个硬件图层,并且插件会⾃动寻找图层播放,但⾃动寻找的 图层可能⽆法满⾜需求,因此需要⼿动指定图层,⽅法如下:
1 | gst-play-1.0 --flags=3 test.mp4 --videosink="kmssink plane-id=117"
|
⽬标图层的ID,可通过 /sys/kernel/debug/dri/0/state 节点确认,可以使⽤如下命令列出所有图层:
1 2 3 4 5 6 7 8 9 10 | #列出所有图层
cat /sys/kernel/debug/dri/0/state | grep "plane\["
#信息输出如下
plane[57]: Smart0-win0
plane[73]: Smart1-win0
plane[89]: Esmart1-win0
plane[103]: Esmart0-win0
plane[117]: Cluster0-win0
plane[131]: Cluster1-win0
|
其中plane[xx]即为plane-id。通常不同图层⽀持的格式不同,如Cluster⽀持AFBC,但Esmart不⽀持AFBC,具体可查阅datasheet或TRM了解。
4.8. 视频推流/拉流
4.8.1. 本地推流/拉流
以下测试USB摄像头,摄像头接口为device=/dev/video9,需要先运行接收端命令,然后再运行服务端(注意如果是ssh需要指定export DISPLAY=:0环境变量)
1 2 3 4 5 6 7 8 9 10 11 | #如果是ssh需要指定屏幕环境变量
export DISPLAY=:0
#板卡接收端
gst-launch-1.0 udpsrc port=1234 ! "application/x-rtp, payload=96" ! rtph264depay ! decodebin ! autovideosink sync=false
#板卡服务端测试1
gst-launch-1.0 v4l2src device=/dev/video9 ! video/x-raw,width=640,height=480,framerate=30/1 ! videoconvert ! video/x-raw,format=UYVY ! mpph264enc ! queue ! h264parse ! rtph264pay ! udpsink host=127.0.0.1 port=1234
#板卡服务端测试2
gst-launch-1.0 v4l2src device=/dev/video9 ! image/jpeg ! mppjpegdec ! videoconvert ! video/x-raw,height=1080,width=1920,frame=30/1,format=NV12 ! mpph264enc ! queue ! h264parse ! rtph264pay ! udpsink host=127.0.0.1 port=1234
|
说明如下:
接收端,命令通过udpsrc从指定的端口(1234)接收RTP数据流,使用rtph264depay解封装RTP数据,接着通过decodebin解码视频流,最后将解码后的视频输出到自动选择的视频窗口(autovideosink)。
服务端测试1:使用v4l2src直接捕获原始视频流,输出为YUYV格式,并进行H.264编码,然后通过rtph264pay封装成RTP数据包,最后使用udpsink将数据推送到指定的地址(127.0.0.1:1234)。
服务端测试2:同样使用v4l2src,但输入的是JPEG格式的图像,通过解码后再转换成NV12格式,并进行H.264编码,然后通过rtph264pay封装成RTP数据包,最后使用udpsink将数据推送到指定的地址(127.0.0.1:1234)。
以下测试ov8858 mipi摄像头,摄像头接口为device=/dev/video0,需要先运行接收端命令,然后再运行服务端(注意如果是ssh需要指定export DISPLAY=:0环境变量),分辨率和帧率可根据实际进行修改:
1 2 3 4 5 6 7 8 9 10 11 | #如果是ssh需要指定屏幕环境变量
export DISPLAY=:0
#板卡接收端
gst-launch-1.0 udpsrc port=1234 ! "application/x-rtp, payload=96" ! rtph264depay ! decodebin ! autovideosink sync=false
#板卡服务端测试1
gst-launch-1.0 v4l2src device=/dev/video0 ! video/x-raw,width=640,height=480,framerate=15/1 ! videoconvert ! video/x-raw,format=UYVY ! mpph264enc ! queue ! h264parse ! rtph264pay ! udpsink host=127.0.0.1 port=1234
#板卡服务端测试2
gst-launch-1.0 v4l2src device=/dev/video0 ! video/x-raw,width=1280,height=960,framerate=15/1 ! videoconvert ! video/x-raw,format=NV12 ! mpph264enc ! queue ! h264parse ! rtph264pay ! udpsink host=127.0.0.1 port=1234
|
以上和usb相似,只是ov8858不支持输出JPEG格式,测试1和测试2分辨率和格式不同。
4.8.2. RTSP推流/拉流
系统默认没有安装插件,需要进行安装:
1 2 | #安装插件
sudo apt install gstreamer1.0-rtsp
|
推流前需要启动RTSP服务器,需要运行mediamtx
访问: mediamtx,下载mediamtx_vx.x.x_linux_arm64v8.tar.gz
或者访问资料网盘/6-开发软件/mediamtx_v1.9.1_linux_arm64v8.tar.gz
将mediamtx_v1.9.1_linux_arm64v8.tar.gz传到板卡解压并运行:
1 2 3 4 5 6 7 8 9 10 11 12 13 | tar xvf mediamtx_v1.9.1_linux_arm64v8.tar.gz
#运行mediamtx
sudo ./mediamtx &
#信息输出如下
2024/09/18 16:24:54 INF MediaMTX v1.9.1
2024/09/18 16:24:54 INF configuration loaded from /home/cat/mediamtx.yml
2024/09/18 16:24:54 INF [RTSP] listener opened on :8554 (TCP), :8000 (UDP/RTP), :8001 (UDP/RTCP)
2024/09/18 16:24:54 INF [RTMP] listener opened on :1935
2024/09/18 16:24:54 INF [HLS] listener opened on :8888
2024/09/18 16:24:54 INF [WebRTC] listener opened on :8889 (HTTP), :8189 (ICE/UDP)
2024/09/18 16:24:54 INF [SRT] listener opened on :8890 (UDP)
|
将视频流发送到RTSP服务器,简单⽰例如下:
以下测试USB摄像头,摄像头接口为device=/dev/video9,分辨率和帧率可根据实际进行修改:
1 2 3 | gst-launch-1.0 v4l2src device=/dev/video9 ! image/jpeg ! mppjpegdec ! videoconvert ! video/x-raw,height=1080,width=1920,frame=30/1,format=NV12 ! tee name=t \
t. ! queue ! videoconvert ! autovideosink \
t. ! videoconvert ! mpph264enc ! queue ! h264parse ! rtspclientsink location=rtsp://127.0.0.1:8554/live
|
以下测试mipi摄像头,摄像头接口为device=/dev/video0,分辨率和帧率可根据实际进行修改:
1 2 3 | gst-launch-1.0 v4l2src device=/dev/video0 ! video/x-raw,width=1920,height=1080,framerate=15/1 ! tee name=t \
t. ! queue ! videoconvert ! autovideosink \
t. ! videoconvert ! mpph264enc ! queue ! h264parse ! rtspclientsink location=rtsp://127.0.0.1:8554/live
|
从RTSP服务器中获取视频流,简单⽰例如下:
1 2 | #指定为实际推流板卡ip
gst-launch-1.0 rtspsrc location=rtsp://192.168.103.101:8554/live ! rtph264depay ! h264parse ! mppvideodec ! xvimagesink
|
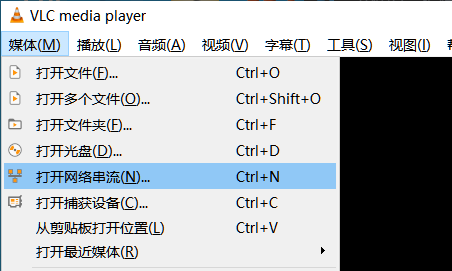
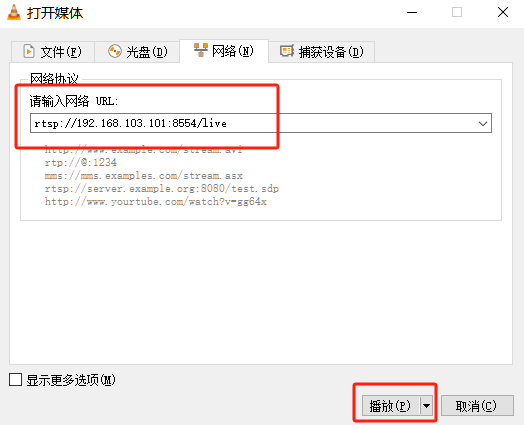
或者使用VLC工具,打开左上角媒体->打开网络串流

然后根据推流板卡实际IP输入RTSP地址

如果链接成功则会出现摄像头画面。
