7. YOLO26 目标检测
YOLO26 是YOLO系列的最新一代实时目标检测模型,在保持高精度的同时进一步降低了计算开销。
本章将介绍如何在鲁班猫板卡上使用 uv 创建虚拟环境,安装 RKNN Toolkit Lite2 和 Gradio, 快速部署 YOLO26 目标检测模型并构建 Web 界面。
7.1. 环境准备
7.2. 模型文件准备
模型转换部分请参考:教程
将转换好的 RKNN 模型文件复制到板卡:
# 复制测试模型到相应目录下
cp yolo26n_*.rknn  ~/yolo26-rknn/model/
7.3. 部署程序
完整程序请参考例程代码的main.py。
7.3.1. 板卡自动识别
程序通过读取设备树自动识别板卡型号,加载对应的 RKNN 模型:
1 2 3 4 5 6 7 8 9 10 11 12 13 14 | DEVICE_COMPATIBLE_NODE = '/proc/device-tree/compatible'
def get_host():
"""获取当前板卡型号"""
with open(DEVICE_COMPATIBLE_NODE) as f:
device_compatible_str = f.read()
if 'rk3562' in device_compatible_str:
return 'RK3562'
elif 'rk3576' in device_compatible_str:
return 'RK3576'
elif 'rk3588' in device_compatible_str:
return 'RK3588'
else:
return 'RK3566_RK3568'
|
7.3.2. RKNN初始化
加载 RKNN 模型并初始化运行环境:
1 2 3 4 5 6 7 8 9 10 11 12 13 14 15 16 17 18 19 20 21 22 23 24 25 26 27 28 29 30 31 32 33 34 35 36 | def init_rknn():
"""初始化 RKNN 模型"""
global rknn_lite
if rknn_lite is not None:
return True, "RKNN model already loaded"
# Get device information
host_name = get_host()
if host_name == 'RK3566_RK3568':
rknn_model = RK3566_RK3568_RKNN_MODEL
elif host_name == 'RK3562':
rknn_model = RK3562_RKNN_MODEL
elif host_name == 'RK3576':
rknn_model = RK3576_RKNN_MODEL
elif host_name == 'RK3588':
rknn_model = RK3588_RKNN_MODEL
else:
return False, "This demo cannot run on the current platform: {}".format(host_name)
rknn_lite = RKNNLite()
# Load RKNN model
ret = rknn_lite.load_rknn(rknn_model)
if ret != 0:
return False, 'Load RKNN model failed'
# Init runtime environment
if host_name in ['RK3576', 'RK3588']:
ret = rknn_lite.init_runtime(core_mask=RKNNLite.NPU_CORE_0)
else:
ret = rknn_lite.init_runtime()
if ret != 0:
return False, 'Init runtime environment failed'
return True, "RKNN model loaded successfully"
|
7.3.3. 图像预处理
对输入图像进行等比例缩放和灰边填充:
1 2 3 4 5 6 7 8 9 10 11 12 13 14 15 16 | def letterbox(im, new_shape=640, color=(0, 0, 0)):
"""等比例缩放图像并添加灰边填充"""
shape = im.shape[:2]
r = min(new_shape / shape[0], new_shape / shape[1])
# 计算缩放后的尺寸和填充
new_unpad = int(shape[1] * r), int(shape[0] * r)
dw, dh = (new_shape - new_unpad[0]) / 2, (new_shape - new_unpad[1]) / 2
# 缩放图像
im = cv2.resize(im, new_unpad, interpolation=cv2.INTER_LINEAR)
# 添加灰边填充
im = cv2.copyMakeBorder(im, int(dh), int(dh), int(dw), int(dw),
cv2.BORDER_CONSTANT, value=color)
return im, r, (dw, dh)
|
7.3.4. 后处理函数
将模型输出的三尺度特征图解码为检测框:
1 2 3 4 5 6 7 8 9 10 11 12 13 14 15 16 17 18 19 20 21 22 23 24 25 26 27 28 29 30 31 32 33 34 35 36 37 38 39 | def postprocess_yolo26(outputs):
"""三尺度输出解码"""
all_boxes, all_scores, all_classes = [], [], []
strides = [8, 16, 32] # 三个输出层的 stride
for i, output in enumerate(outputs):
pred = output[0].reshape(84, -1) # 4(框) + 80(类别)
h, w = output.shape[2], output.shape[3]
# 生成锚点
y = np.arange(h) * strides[i] + strides[i] // 2
x = np.arange(w) * strides[i] + strides[i] // 2
xx, yy = np.meshgrid(x, y)
anchor_points = np.stack([xx.ravel(), yy.ravel()], axis=0)
# 解析预测结果
box_dist = pred[:4, :]
cls_scores = pred[4:, :]
# 转换为框坐标
x1y1 = anchor_points - box_dist[:2, :] * strides[i]
x2y2 = anchor_points + box_dist[2:, :] * strides[i]
boxes = np.concatenate([x1y1, x2y2], axis=0)
# 筛选高置信度目标
max_scores = cls_scores.max(axis=0)
mask = max_scores > OBJ_THRESH
if mask.any():
all_boxes.append(boxes[:, mask])
all_scores.append(max_scores[mask])
all_classes.append(cls_scores.argmax(axis=0)[mask])
if not all_boxes:
return np.empty((0, 4)), np.empty(0), np.empty(0)
return (np.concatenate(all_boxes, axis=1).T,
np.concatenate(all_scores),
np.concatenate(all_classes))
|
7.4. 运行测试
直接使用uv命令执行测试程序:
uv run main.py
cd ~/yolo26-rknn
uv sync
source .venv/bin/activate
python main.py
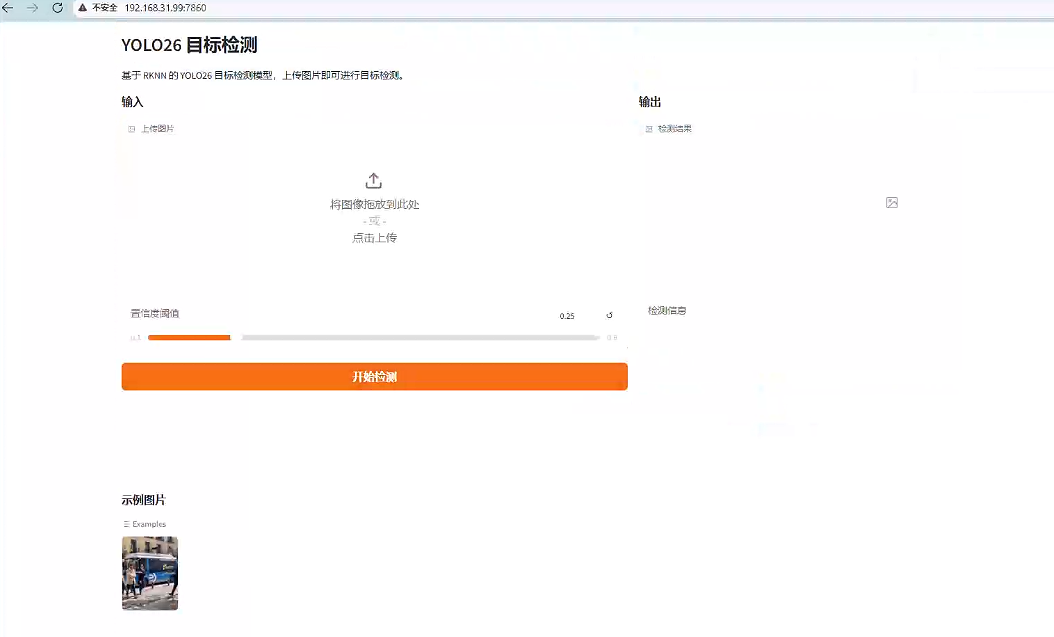
服务启动后在浏览器访问: http://192.168.103.xxx:7860
测试界面:
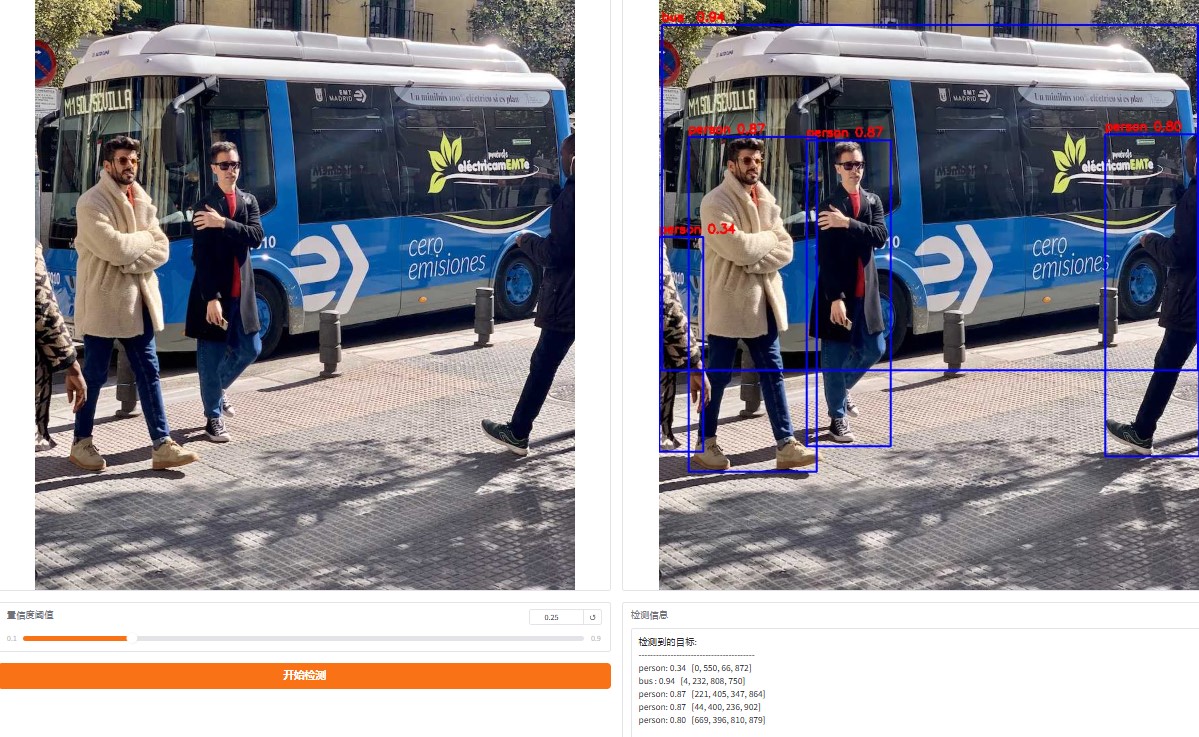
点击测试图像,显示测试结果: