5. YOLOv5
Yolov5是一种目标检测算法,属于单阶段目标检测方法,是在COCO数据集上预训练的物体检测架构和模型系列,它代表了Ultralytics对未来视觉AI方法的开源研究, 其中包含了经过数千小时的研究和开发而形成的经验教训和最佳实践。 最新的YOLOv5 v7.0有YOLOv5n、YOLOv5s、YOLOv5m、YOLOv5l、YOLOv5x等,除了目标检测,还有分割,分类等应用场景。
YOLOv5基本原理,简单的讲是:将整张图片划分为若干个网络,每个网格预测出该网格内物体的种类和位置信息,然后根据预测框与真实框之间的交并比值进行目标框的筛选,最终输出预测框。
本章将简单使用YOLOv5,并在鲁班猫板卡上简单部署测试。
提示
测试环境:鲁班猫RK板卡系统是Debian10,PC是WSL2(ubuntu20.04),PyTorch是1.10.1,rknn-Toolkit2版本1.4.0,YOLOv5 v7.0,airockchip/yolov5 v6.2。
5.1. YOLOv5环境安装
安装python等环境,以及相关依赖库,然后克隆YOLOv5仓库的源码。
# 创建虚拟环境(名称为.yolov5_env),这里使用venv,也可以先安装anaconda,使用conda命令创建
sudo python3 -m venv .yolov5_env
source .yolov5_env/bin/activate

# 拉取最新的yolov5仓库,pytorch版
git clone https://github.com/ultralytics/yolov5
cd yolov5

# 安装依赖库
pip3 install -r requirements.txt

# 进入python命令行,检测安装的环境
import torch
import utils
display = utils.notebook_init()

# 这里的测试环境显示:
Checking setup...
YOLOv5 🚀 2023-2-20 Python-3.8.10 torch-1.10.1+cpu CPU
Setup complete ✅ (6 CPUs, 12.4 GB RAM, 77.3/251.0 GB disk)
5.2. YOLOv5简单使用
5.2.1. 获取预训练权重文件
下载yolov5s.pt,yolov5m.pt,yolov5l.pt,yolov5x.pt权重文件,可以直接从 这里 获取。 其中后面n、s、m、l、x表示网络的宽度和深度,最小的是n,它速度最快、精度最低。
5.2.2. YOLOv5简单测试
进入yolov5源码目录,把前面下载的权重文件放到当前目录下,两张测试图片位于./data/images/,
# 简单测试
# --source指定测试数据,可以是图片或者视频等
# --weights指定权重文件路径,可以是自己训练的,或者直接用官网的
sudo python3 detect.py --source ./data/images/ --weights yolov5s.pt
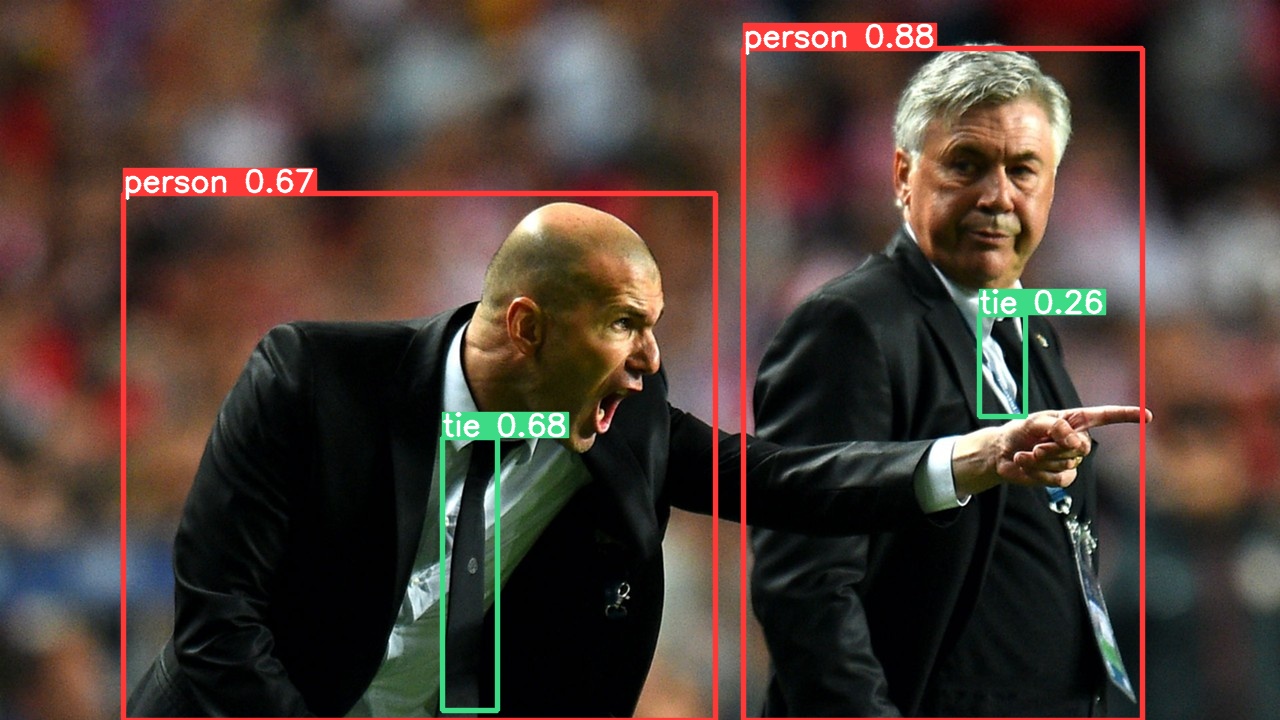
测试结果:

上面依次显示:基础配置、网络参数、检测的结果、处理速度、最后是保存的位置。 我们切换到runs/detect/exp2目录,查看检测的结果:

5.2.3. 转换为rknn模型
接下来将基于yolov5s.pt,导出rknn:
1、转成yolov5s.onnx(也可以是torchscript等模型),先安装下onnx安装依赖环境:
# 安装下onnx的环境灯
pip3 install -r requirements.txt coremltools onnx onnx-simplifier onnxruntime

# 获取权重文件,使用yolov5s.pt
# 这里我们使用下面命令,导出onnx模型
sudo python3 export.py --weights yolov5s.pt --include  onnx

# 或者使用下面命令,导出torchscript
sudo python3 export.py --weights yolov5s.pt --include  torchscript
模型导出显示:
(.yolov5_env) llh@YH-LONG:/mnt/e/Users/Administrator/Desktop/wsl_user/yolov5/yolov5-7.0$ python export.py --weights yolov5s.pt --include  onnx
export: data=data/coco128.yaml, weights=['yolov5s.pt'], imgsz=[640, 640], batch_size=1, device=cpu, half=False,
inplace=False, keras=False, optimize=False, int8=False, dynamic=False, simplify=False, opset=12, verbose=False,
workspace=4, nms=False, agnostic_nms=False, topk_per_class=100, topk_all=100, iou_thres=0.45, conf_thres=0.25, include=['onnx']
YOLOv5 🚀 2023-2-28 Python-3.8.10 torch-1.10.1+cpu CPU

Fusing layers...
YOLOv5s summary: 213 layers, 7225885 parameters, 0 gradients, 16.4 GFLOPs

PyTorch: starting from yolov5s.pt with output shape (1, 25200, 85) (14.1 MB)

ONNX: starting export with onnx 1.13.1...
ONNX: export success ✅ 1.8s, saved as yolov5s.onnx (28.0 MB)

Export complete (2.3s)
Results saved to /mnt/e/Users/Administrator/Desktop/wsl_user/yolov5/yolov5-7.0
Detect:          python detect.py --weights yolov5s.onnx
Validate:        python val.py --weights yolov5s.onnx
PyTorch Hub:     model = torch.hub.load('ultralytics/yolov5', 'custom', 'yolov5s.onnx')
Visualize:       https://netron.app
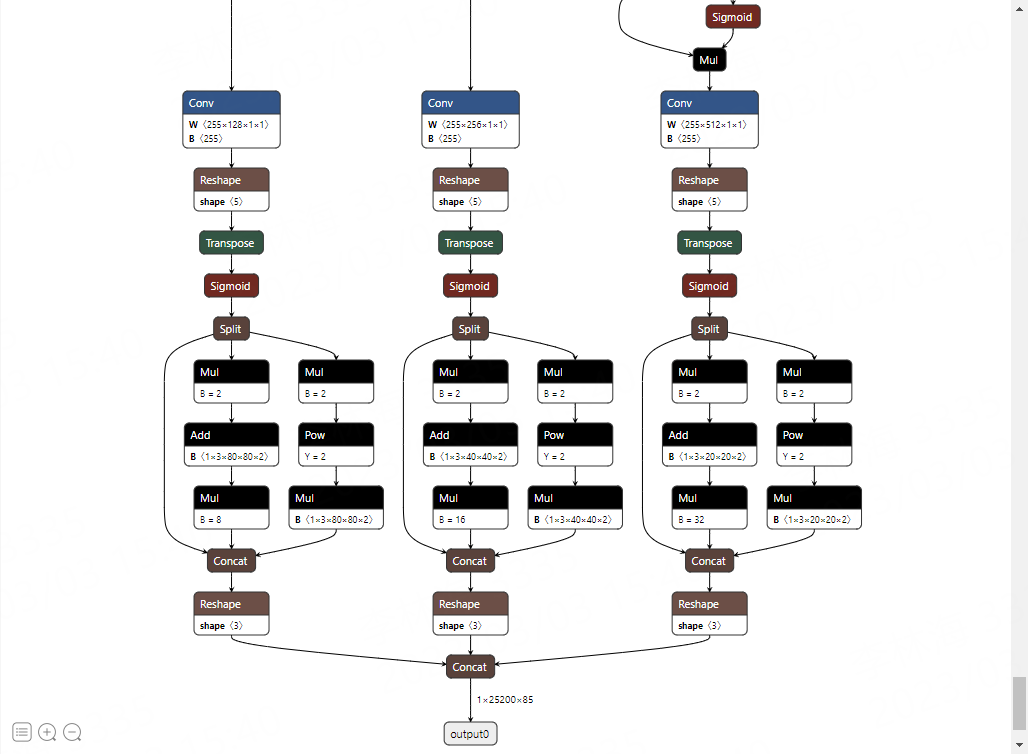
会在当前目录下生成yolov5s.onnx文件。我们可以使用 Netron 可视化模型:

2、重新导出
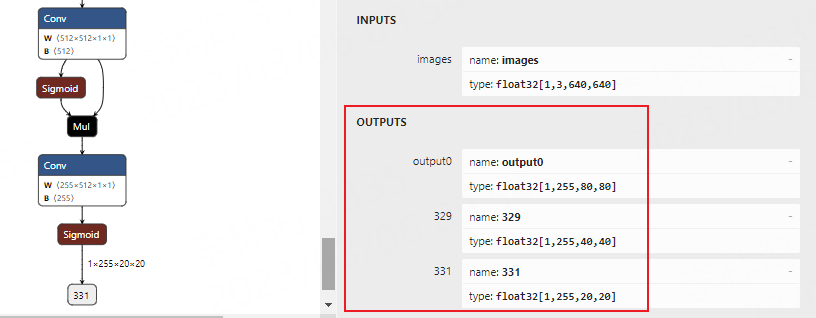
看上面的图片,转出onnx模型尾部最后经过Detect层,为适配到rknn做适当处理, 这里移除这个网络结构(注意模型结构尾部的sigmoid函数没有删除),直接输出三个特征图。
需要修改下yolov5文件源码:
# 修改工程文件models/yolo.py中类Detect的forward函数为:
# def forward(self, x):
#     z = []  # inference output
#     for i in range(self.nl):
#         x[i] = self.m[i](x[i])  # conv
#         bs, _, ny, nx = x[i].shape  # x(bs,255,20,20) to x(bs,3,20,20,85)
#         x[i] = x[i].view(bs, self.na, self.no, ny, nx).permute(0, 1, 3, 4, 2).contiguous()

#         if not self.training:  # inference
#             if self.dynamic or self.grid[i].shape[2:4] != x[i].shape[2:4]:
#                 self.grid[i], self.anchor_grid[i] = self._make_grid(nx, ny, i)

#             if isinstance(self, Segment):  # (boxes + masks)
#                 xy, wh, conf, mask = x[i].split((2, 2, self.nc + 1, self.no - self.nc - 5), 4)
#                 xy = (xy.sigmoid() * 2 + self.grid[i]) * self.stride[i]  # xy
#                 wh = (wh.sigmoid() * 2) ** 2 * self.anchor_grid[i]  # wh
#                 y = torch.cat((xy, wh, conf.sigmoid(), mask), 4)
#             else:  # Detect (boxes only)
#                 xy, wh, conf = x[i].sigmoid().split((2, 2, self.nc + 1), 4)
#                 xy = (xy * 2 + self.grid[i]) * self.stride[i]  # xy
#                 wh = (wh * 2) ** 2 * self.anchor_grid[i]  # wh
#                 y = torch.cat((xy, wh, conf), 4)
#             z.append(y.view(bs, self.na * nx * ny, self.no))

#     return x if self.training else (torch.cat(z, 1), ) if self.export else (torch.cat(z, 1), x)

def forward(self, x):
    z = []  # inference output
    for i in range(self.nl):
        z.append(torch.sigmoid(self.m[i](x[i])))

    return z
# 在export.py文件run()函数中修改行:

    if half and not coreml:
        im, model = im.half(), model.half()  # to FP16
-   shape = tuple((y[0] if isinstance(y, tuple) else y).shape)  # model output shape
+   shape = tuple((y[0] if (isinstance(y, tuple) or (isinstance(y, list))) else y).shape)  # model output shape
    metadata = {'stride': int(max(model.stride)), 'names': model.names}  # model metadata
    LOGGER.info(f"\n{colorstr('PyTorch:')} starting from {file} with output shape {shape} ({file_size(file):.1f} MB)")
修改之后重新执行命令转换: python export.py --weights yolov5s.pt --include onnx
使用 Netron 可视化模型:

3、转换成rknn模型
这里将前面的onnx模型转换成rknn模型,需要安装下rknn-Toolkit2等环境,参考下《NPU使用》章节。
提示
为避免其他问题,rknn-Toolkit2的版本和板卡端librknnrt.so库版本应该保持一致。
使用rknn-Toolkit2的模型转换功能:
1 2 3 4 5 6 7 8 9 10 11 12 13 14 15 16 17 18 19 20 21 22 23 24 25 26 27 28 29 30 31 32 33 34 35 36 37 38 39 40 41 42 43 44 45 46 47 48 49 50 51 52 53 54 55 56 57 58 59 60 61 62 63 64 65 66 67 68 69 70 71 72 | if __name__ == '__main__':
# 创建RKNN
# 如果测试遇到问题,请开启verbose=True,查看调试信息。
# rknn = RKNN(verbose=True)
rknn = RKNN()
# 输入图像处理
img = cv2.imread(IMG_PATH)
# img, ratio, (dw, dh) = letterbox(img, new_shape=(IMG_SIZE, IMG_SIZE))
img = cv2.cvtColor(img, cv2.COLOR_BGR2RGB)
img = cv2.resize(img, (IMG_SIZE, IMG_SIZE))
# pre-process config
print('--> Config model')
rknn.config(mean_values=[[0, 0, 0]], std_values=[[255, 255, 255]], target_platform="rk3568")
print('done')
# 如果前面转换出的是torchscript,重命名为.pt文件,取消下面注释,然后加载模型
#print('--> Loading model')
#ret = rknn.load_pytorch(model=PYTORCH_MODEL, input_size_list=[[1,3,IMG_SIZE,IMG_SIZE]])
#if ret != 0:
# print('Load model failed!')
# exit(ret)
#print('done')
# 加载onnx模型
print('--> Loading model')
ret = rknn.load_onnx(model=ONNX_MODEL)
if ret != 0:
print('Load model failed!')
exit(ret)
print('done')
# 构建模型,默认开启了量化
print('--> Building model')
ret = rknn.build(do_quantization=True, dataset=DATASET)
#ret = rknn.build(do_quantization=False)
if ret != 0:
print('Build model failed!')
exit(ret)
print('done')
# 量化精度分析。默认关闭,取消注释开启
#print('--> Accuracy analysis')
#Ret = rknn.accuracy_analysis(inputs=[img])
#if ret != 0:
# print('Accuracy analysis failed!')
# exit(ret)
#print('done')
# 导出RKNN模型
print('--> Export rknn model')
ret = rknn.export_rknn(RKNN_MODEL)
#if ret != 0:
# print('Export rknn model failed!')
# exit(ret)
print('done')
# 初始化运行环境,默认没有配置device_id等,需要调试时开启
print('--> Init runtime environment')
ret = rknn.init_runtime()
# ret = rknn.init_runtime(target='rk3568', device_id='192.168.103.115:5555', perf_debug=True)
if ret != 0:
print('Init runtime environment failed!')
exit(ret)
print('done')
# 调试,模型性能进行评估,取消注释打开
# rknn.eval_perf(inputs=[img], is_print=True)
rknn.release()
|
# 运行转换程序
sudo python3 test.py

# 显示结果,并在当前目录下生成yolov5s.rknn
W __init__: rknn-toolkit2 version: 1.4.0-22dcfef4
--> Config model
done
--> Loading model
done
--> Building model
Analysing : 100%|███████████████████████████████████████████████| 145/145 [00:00<00:00, 2992.56it/s]
Quantizating : 100%|█████████████████████████████████████████████| 145/145 [00:00<00:00, 320.39it/s]
W build: The default input dtype of 'images' is changed from 'float32' to 'int8' in rknn model for performance!
                    Please take care of this change when deploy rknn model with Runtime API!
W build: The default output dtype of 'output0' is changed from 'float32' to 'int8' in rknn model for performance!
                    Please take care of this change when deploy rknn model with Runtime API!
W build: The default output dtype of '329' is changed from 'float32' to 'int8' in rknn model for performance!
                    Please take care of this change when deploy rknn model with Runtime API!
W build: The default output dtype of '331' is changed from 'float32' to 'int8' in rknn model for performance!
                    Please take care of this change when deploy rknn model with Runtime API!
done
--> Export rknn model
done

# 取消上面的eval_perf和rknn.init_runtime注释,开启性能评估,简单调试
--> Init runtime environment
W init_runtime: Target is None, use simulator!
W init_runtime: Flag perf_debug has been set, it will affect the performance of inference!
I NPUTransfer: Starting NPU Transfer Client, Transfer version 2.1.0 (b5861e7@2020-11-23T11:50:36)
D RKNNAPI: ==============================================
D RKNNAPI: RKNN VERSION:
D RKNNAPI:   API: 1.4.0 (bb6dac9 build: 2022-08-29 16:17:01)(null)
D RKNNAPI:   DRV: rknn_server: 1.3.0 (121b661 build: 2022-04-29 11:11:47)
D RKNNAPI:   DRV: rknnrt: 1.4.0 (a10f100eb@2022-09-09T09:07:14)
D RKNNAPI: ==============================================
done
===================================================================================================================
                            Performance
        #### The performance result is just for debugging, ####
        #### may worse than actual performance!            ####
===================================================================================================================
Total Weight Memory Size: 7312768
Total Internal Memory Size: 7782400
Predict Internal Memory RW Amount: 138880000
Predict Weight Memory RW Amount: 7312768
ID   OpType           DataType Target InputShape                                   OutputShape            DDR Cycles     NPU Cycles     Total Cycles   Time(us)       MacUsage(%)    RW(KB)         FullName

0    InputOperator    UINT8    CPU    \                                            (1,3,640,640)          0              0              0              9              \              1200.00        InputOperator:images
1    Conv             UINT8    NPU    (1,3,640,640),(32,3,6,6),(32)                (1,32,320,320)         687110         691200         691200         8407           9.14           4409.25        Conv:Conv_0
2    exSwish          INT8     NPU    (1,32,320,320)                               (1,32,320,320)         997336         0              997336         3737           \              6400.00        exSwish:Sigmoid_1_2swish
.....(省略)
145  Sigmoid          INT8     NPU    (1,255,80,80)                                (1,255,80,80)          498668         0              498668         1895           \              3200.00        Sigmoid:Sigmoid_199
146  OutputOperator   INT8     CPU    (1,255,80,80),(1,80,80,256)                  \                      0              0              0              165            \              3200.00        OutputOperator:output0
147  OutputOperator   INT8     CPU    (1,255,40,40),(1,40,40,256)                  \                      0              0              0              52             \              800.00         OutputOperator:329
148  OutputOperator   INT8     CPU    (1,255,20,20),(1,20,20,256)                  \                      0              0              0              34             \              220.00         OutputOperator:331
Total Operator Elapsed Time(us): 77776

===================================================================================================================
会在当前目录下导出的rknn模型,如果取消eval_perf接口注释,会进行性能评估,简单调试。
5.2.4. 部署到鲁班猫板卡
导出rknn模型后,使用RKNN Toolkit Lite2在板端进行简单部署,获得结果后进行画框等后处理等等, 具体文件参考下 这里 。
1 2 3 4 5 6 7 8 9 10 11 12 13 14 15 16 17 18 19 20 21 22 23 24 25 26 27 28 29 30 31 32 33 34 35 36 37 38 39 40 41 42 43 44 45 | if __name__ == '__main__':
# 创建RKNNLite对象
rknn_lite = RKNNLite()
# 导入rknn模型
print('--> Load RKNN model')
ret = rknn_lite.load_rknn(rknn_model)
if ret != 0:
print('Load RKNN model failed')
exit(ret)
print('done')
# 初始化运行环境
print('--> Init runtime environment')
ret = rknn_lite.init_runtime()
if ret != 0:
print('Init runtime environment failed!')
exit(ret)
print('done')
# 输入图像处理
img = cv2.imread(IMG_PATH)
img, ratio, (dw, dh) = letterbox(img, new_shape=(640, 640)) # 灰度填充
img = cv2.cvtColor(img, cv2.COLOR_BGR2RGB)
# 推理
print('--> Running model')
outputs = rknn_lite.inference(inputs=[img])
print('done')
# 后处理
boxes, classes, scores = yolov5_post_process(outputs)
img_1 = cv2.cvtColor(img, cv2.COLOR_RGB2BGR)
if boxes is not None:
draw(img_1, boxes, scores, classes)
# 显示或者保存图片
cv2.imwrite("out.jpg", img_1)
# cv2.imshow("post process result", img_1)
# cv2.waitKey(0)
# cv2.destroyAllWindows()
rknn_lite.release()
|
简单测试显示:
--> Load RKNN model
done
--> Init runtime environment
I RKNN: [11:59:53.211] RKNN Runtime Information: librknnrt version: 1.4.0 (a10f100eb@2022-09-09T09:07:14)
I RKNN: [11:59:53.211] RKNN Driver Information: version: 0.7.2
I RKNN: [11:59:53.213] RKNN Model Information: version: 1, toolkit version: 1.4.0-22dcfef4(compiler version: 1.4.0 (3b4520e4f@2022-09-05T20:52:35)), target: RKNPU lite, target platform: rk3568, framework name: PyTorch, framework layout: NCHW
done
--> Running model
done
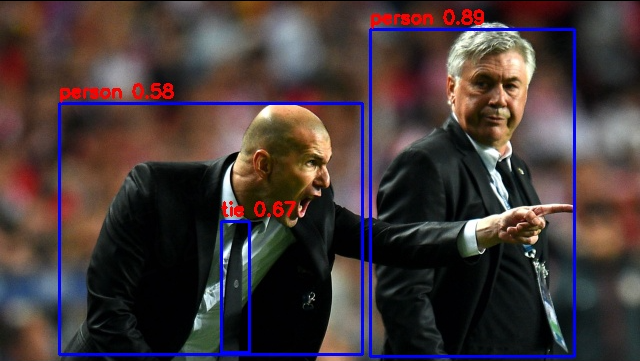
class: person, score: 0.8889630436897278
box coordinate left,top,right,down: [370, 168, 574, 495]
class: person, score: 0.5832323431968689
box coordinate left,top,right,down: [59, 242, 362, 493]
class: tie, score: 0.668832540512085
box coordinate left,top,right,down: [221, 360, 249, 491]
结果会保存在当前目录下的out.jpg,查看图片:

5.3. airockchip/yolov5简单测试
上面是使用官方的YOLOv5 v7.0进行简单测试,接下来我们使用 airockchip/yolov5 , 该仓库的yolov5对rknpu设备进行了部署优化,教程测试时是v6.2版本分支,相关优化说明请参考下仓库的README_rkopt.md。
拉取最新的airockchip/yolov5仓库,安装类似,参考下前面:
# 教程测试时是v6.2分支版本, 自行测试可以使用该仓库的master或者其他分支
git clone https://github.com/airockchip/yolov5.git
cd yolov5
获取权重文件,需要我们重新训练:
# 重新训练,获取优化后的权重文件,这里是基于权重yolov5s.pt,,或者使用--cfg指定配置文件
sudo python3 train.py --data coco128.yaml --weights yolov5s.pt  --img 640

# 训练结束输出信息很多,其中会输出:
...
Optimizer stripped from runs/train/exp/weights/last.pt, 14.9MB
Optimizer stripped from runs/train/exp/weights/best.pt, 14.9MB

Validating runs/train/exp/weights/best.pt...
...
# 训练一些分析和权重保存在runs/train/exp/目录下
会在runs/train/exp/weights/保存文件,我们重命名为yolov5s_relu.pt,并复制到源码根目录下。
接下来导出torchscript,使用命令:
# 其中--weights指定权重文件的路径,
# --rknpu指定平台(rk_platform支持 rk1808, rv1109, rv1126, rk3399pro, rk3566, rk3568, rk3588, rv1103, rv1106)
# --include 指定导出onnx模型,,不指定默认是torchscript

sudo python3 export.py --weights yolov5s_relu.pt --rknpu rk3568

# 正常转换会输出:
export: data=data/coco128.yaml, weights=['yolov5s.pt'], imgsz=[640, 640], batch_size=1, device=cpu, half=False, inplace=False, train=False, keras=False, optimize=False, int8=False, dynamic=False, simplify=False, opset=12, verbose=False, workspace=4, nms=False, agnostic_nms=False, topk_per_class=100, topk_all=100, iou_thres=0.45, conf_thres=0.25, include=['torchscript'], rknpu=rk3568
YOLOv5 🚀 2022-10-28 Python-3.8.10 torch-1.10.1+cpu CPU

Fusing layers...
YOLOv5s summary: 213 layers, 7225885 parameters, 0 gradients, 16.4 GFLOPs
---> save anchors for RKNN
[[10.0, 13.0], [16.0, 30.0], [33.0, 23.0], [30.0, 61.0], [62.0, 45.0], [59.0, 119.0], [116.0, 90.0], [156.0, 198.0], [373.0, 326.0]]

PyTorch: starting from yolov5s.pt with output shape (1, 255, 80, 80) (14.1 MB)

TorchScript: starting export with torch 1.10.1+cpu...
TorchScript: export success, saved as yolov5s.torchscript (27.8 MB)

Export complete (1.92s)
Results saved to /mnt/e/Users/Administrator/Desktop/wsl_user/yolov5/yolov5-master
Detect:          python detect.py --weights yolov5s.torchscript
Validate:        python val.py --weights yolov5s.torchscript
PyTorch Hub:     model = torch.hub.load('ultralytics/yolov5', 'custom', 'yolov5s.torchscript')
Visualize:       https://netron.app


# 或者使用下面命令,导出onnx模型,会在当前目录下生成yolov5s.onnx文件。
python export.py --weights yolov5s.pt --include onnx --rknpu rk3568
导出torchscript,会在当前目录下生成yolov5s_relu.torchscript文件,并重新命名为.pt文件。
5.3.1. 导出rknn模型
测试使用前面的转换文件,直接运行程序导出rknn文件,并测试。
# 运行测试,导出rknn模型:
W __init__: rknn-toolkit2 version: 1.4.0-22dcfef4
--> Config model
done
--> Loading model
PtParse: 100%|███████████████████████████████████████████████████| 698/698 [00:01<00:00, 602.67it/s]
done
--> Building model
Analysing : 100%|████████████████████████████████████████████████| 145/145 [00:00<00:00, 381.87it/s]
Quantizating : 100%|█████████████████████████████████████████████| 145/145 [00:00<00:00, 518.54it/s]
W build: The default input dtype of 'x.1' is changed from 'float32' to 'int8' in rknn model for performance!
                    Please take care of this change when deploy rknn model with Runtime API!
W build: The default output dtype of '172' is changed from 'float32' to 'int8' in rknn model for performance!
                    Please take care of this change when deploy rknn model with Runtime API!
W build: The default output dtype of '173' is changed from 'float32' to 'int8' in rknn model for performance!
                    Please take care of this change when deploy rknn model with Runtime API!
W build: The default output dtype of '174' is changed from 'float32' to 'int8' in rknn model for performance!
                    Please take care of this change when deploy rknn model with Runtime API!
done
--> Export rknn model
done
--> Init runtime environment
W init_runtime: Target is None, use simulator!
W init_runtime: Flag perf_debug has been set, it will affect the performance of inference!
I NPUTransfer: Starting NPU Transfer Client, Transfer version 2.1.0 (b5861e7@2020-11-23T11:50:36)
D RKNNAPI: ==============================================
D RKNNAPI: RKNN VERSION:
D RKNNAPI:   API: 1.4.0 (bb6dac9 build: 2022-08-29 16:17:01)(null)
D RKNNAPI:   DRV: rknn_server: 1.3.0 (121b661 build: 2022-04-29 11:11:47)
D RKNNAPI:   DRV: rknnrt: 1.4.0 (a10f100eb@2022-09-09T09:07:14)
D RKNNAPI: ==============================================
done
===================================================================================================================
                            Performance
        #### The performance result is just for debugging, ####
        #### may worse than actual performance!            ####
===================================================================================================================
Total Weight Memory Size: 7312768
Total Internal Memory Size: 6144000
Predict Internal Memory RW Amount: 86931200
Predict Weight Memory RW Amount: 7312768
ID   OpType           DataType Target InputShape                                   OutputShape            DDR Cycles     NPU Cycles     Total Cycles   Time(us)       MacUsage(%)    RW(KB)         FullName

0    InputOperator    UINT8    CPU    \                                            (1,3,640,640)          0              0              0              8              \              1200.00        InputOperator:x.1
1    ConvRelu         UINT8    NPU    (1,3,640,640),(32,3,6,6),(32)                (1,32,320,320)         687110         691200         691200         8387           9.16           4409.25        Conv:input.4_Conv
2    ConvRelu         INT8     NPU    (1,32,320,320),(64,32,3,3),(64)              (1,64,160,160)         750885         921600         921600         2247           45.57          4818.50        Conv:input.6_Conv
.....(省略)
80   Conv             INT8     NPU    (1,512,20,20),(255,512,1,1),(255)            (1,255,20,20)          66931          102000         102000         180            62.96          429.50         Conv:1189_Conv
81   Sigmoid          INT8     NPU    (1,255,20,20)                                (1,255,20,20)          31167          0              31167          141            \              200.00         Sigmoid:1190_Sigmoid
82   OutputOperator   INT8     CPU    (1,255,80,80),(1,80,80,256)                  \                      0              0              0              161            \              3200.00        OutputOperator:172
83   OutputOperator   INT8     CPU    (1,255,40,40),(1,40,40,256)                  \                      0              0              0              46             \              800.00         OutputOperator:173
84   OutputOperator   INT8     CPU    (1,255,20,20),(1,20,20,256)                  \                      0              0              0              24             \              220.00         OutputOperator:174
Total Operator Elapsed Time(us): 44412

===================================================================================================================
提示
前面测试时的CPU频率为1.8Ghz,DDR频率为1.056Ghz,NPU频率为900Mhz。
后面部署测试和前面类似就不列举了,其他部署文档请参考下 这里 。
