7. Modbus协议-pymodbus库
在前面,我们介绍了鲁班猫板卡上的各种对外连接的接口, 大家可以发现,其中的一些接口在工业领域应用的是十分广泛的。 那么我们鲁班猫板卡,能否在这些接口的基础上,再拓展出一些强大的功能呢?
本节实验中,我们就来给大家介绍一下在工业领域中,十分常见工业总线协议:Modbus通讯协议,示例是Modbus-RTU。
7.1. Modbus协议实验
我们的鲁班猫板卡系统有丰富的开源软件支持,像我们本节要介绍的Modbus通讯协议, 也有对应的软件可以供我们安装使用。
本节实验,我们的目标是使用Python语言及Python库-python3-pymodbus, 来完成Modbus协议中约定的RTU主站,和从站进行简单通讯。
那么我们来简单了解一下python3-pymodbus库。
7.2. python3-pymodbus库
pymodbus是基于BSD开源协议的一个的Modbus协议Python库。 它的功能十分强大,实现了Modbus协议中约定的所有功能,并且对通讯主机以同步及异步(asyncio、tornado、twisted)的方式进行了实现, 在拥有不错的性能的同时,也为Python开发者在构建Modbus协议应用时,对应用功能进行额外拓展提供了更多可能。
pymodbus支持以太网、串行接口来承载Modbus协议的物理层传输, 如果你不使用串行接口(pymodbus串行接口的实现依赖于pyserial库包)。 那么python3-pymodbus库完全不依赖与第三方库包,所以该库是十分轻量的。
我们可以在鲁班猫板卡上安装python3-pymodbus库, 并通过一些官方提供的示例代码来使用该库,完成本节的实验。
7.3. 实验准备
7.3.1. 添加板卡uart资源
重要
本节实验使用 一个uart串口(从机)和PC端(主机) 来适配Modbus底层硬件的连接,
故此小节为添加uart资源演示,pymodbus库提供Modbus协议的全栈实现,
所以底层使用网口通讯也是得到支持的,大家可以根据实际情况参考本小节内容与否。
在板卡上的部分GPIO可能没有启用,可注释掉某些设备树节点或者设备树插件的加载,重启系统来开启, LubanCat_RK系列板卡的引脚参考下: 《LubanCat-RK系列-40pin引脚对照图》
本节实验中,笔者使用鲁班猫LubanCat 2板卡为例演示,根据引出的40个引脚对照图,串口资源可以使用UART3,下面我们开启下UART3的设备树插件:
# 不同板卡的配置文件和pwm不同,以LubanCat 2为例,配置文件为uEnvLubanCat 2.txt,
# 使用下面命令:
sudo vim /boot/uEnv/uEnvLubanCat 2.txt
#进入编辑模式,取消pwm前面的注释,保存并退出文件,重启系统
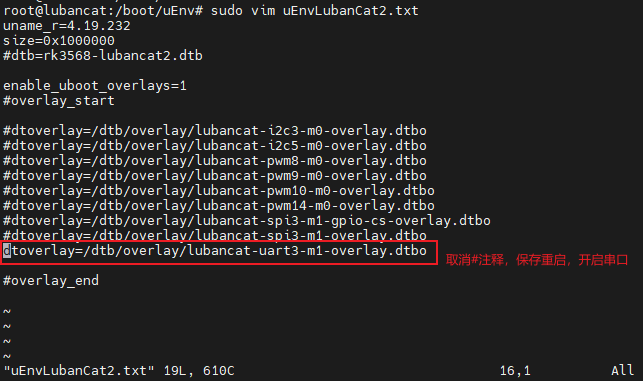
如果使用的是其他鲁班猫RK系列板卡,也是类似操作。
# 在终端中输入如下命令,可以查看到UART资源:
ls /dev/ttyS*
板卡上的UART资源示例,仅供参考:

其中/dev/ttyS3对应的就是板卡上的uart3资源。
提示
如出现 Permission denied 或类似字样,请注意用户权限,大部分操作硬件外设的功能,几乎都需要root用户权限,简单的解决方案是在执行语句前加入sudo或以root用户运行程序。
7.3.2. 硬件连接
硬件连接小节,需要大家根据自身开发环境等情况对本章内容进行参考调整, 本章会使用LubanCat 2中的一个串口:uart3完成数据传输的演示。 连接如下(和 UART通讯 章节连接相同):
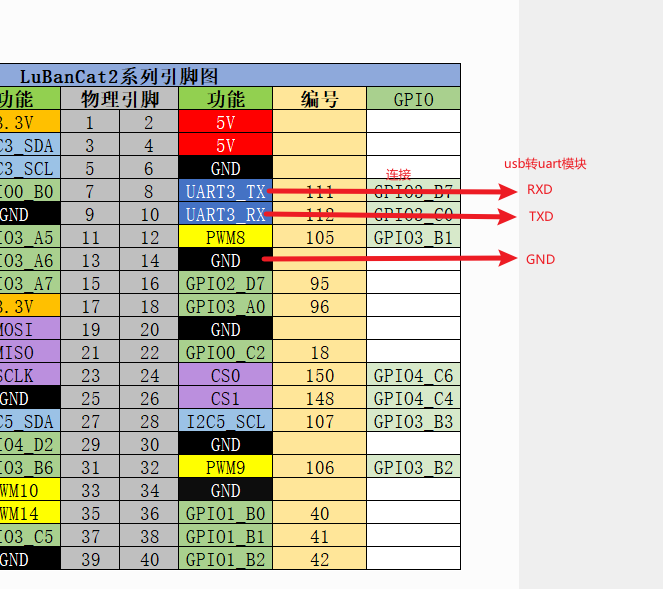
通过USB转TTL连接到电脑。
重要
pymodbus库对串行设备的支持,是基于pyserial库实现的, 该库默认的串行设备支持,是基于uart,故本节也以uart进行演示实验。 如想pymodbus使用rs485底层电气连接的方式,需要自行修改pymodbus库底层源码。
7.3.3. pymodbus库安装
# 在终端中输入如下命令:
sudo pip3 install -U pymodbus

#或者直接拉取仓库源码,使用setuptools工具安装等,参考前面安装python章节
git clone https://github.com/riptideio/pymodbus.git
7.4. 测试代码
安装pymodbus库之后,就可以使用pymodbus库编程,这里我们直接修改官方提供的examples,然后进行简单测试。 此Demo使用了pymodbus基于asyncio异步库实现的Modbus协议RTU通讯、串口异步主机, 代码里我们设置对外的通讯端口,是在硬件配置小节中开启的串行端口’/dev/ttyS3’,波特率115200,。
7.4.1. RTU从机 slave_server.py
代码如下:
1 2 3 4 5 6 7 8 9 10 11 12 13 14 15 16 17 18 19 20 21 22 23 24 25 26 27 28 29 30 31 32 33 34 35 36 37 38 39 40 41 42 43 44 45 46 47 48 49 50 51 52 53 54 55 56 57 58 59 60 61 62 63 64 65 66 67 68 69 70 71 72 73 74 75 76 77 78 79 80 81 82 83 84 85 86 87 88 89 90 91 92 93 94 95 96 97 98 99 100 101 102 103 104 105 106 107 108 109 110 111 112 113 114 115 116 117 118 119 120 121 122 123 124 125 126 127 128 129 130 131 132 133 134 135 136 137 138 139 140 141 142 143 144 145 146 147 148 149 150 151 152 153 154 155 156 157 | def get_commandline(server=False, description=None, extras=None):
"""Read and validate command line arguments"""
parser = argparse.ArgumentParser(description=description)
parser.add_argument(
"--comm",
choices=["serial"],
help="set communication",
default="serial",
type=str,
)
parser.add_argument(
"--framer",
choices=["rtu"],
help="set framer, default depends on --comm",
type=str,
)
parser.add_argument(
"--log",
choices=["critical", "error", "warning", "info", "debug"],
help="set log level, default is info",
default="info",
type=str,
)
parser.add_argument(
"--port",
help="set port",
type=str,
)
if server:
parser.add_argument(
"--store",
choices=["sequential"],
help="set type of datastore",
default="sequential",
type=str,
)
parser.add_argument(
"--slaves",
help="set number of slaves, default is 0 (any)",
default=0,
type=int,
nargs="+",
)
if extras:
for extra in extras:
parser.add_argument(extra[0], **extra[1])
args = parser.parse_args()
# set defaults
comm_defaults = {
"serial": ["rtu", "/dev/ptyp0"],
}
framers = {
"rtu": ModbusRtuFramer,
}
pymodbus_apply_logging_config()
_logger.setLevel(args.log.upper())
args.framer = framers[args.framer or comm_defaults[args.comm][0]]
args.port = args.port or comm_defaults[args.comm][1]
if args.comm != "serial" and args.port:
args.port = int(args.port)
return args
def setup_server(args):
"""Run server setup."""
# The datastores only respond to the addresses that are initialized
# If you initialize a DataBlock to addresses of 0x00 to 0xFF, a request to
# 0x100 will respond with an invalid address exception.
# This is because many devices exhibit this kind of behavior (but not all)
_logger.info("### Create datastore")
# 定义co线圈寄存器,存储起始地址为0,长度为10,内容为5个True及5个False
co_block = ModbusSequentialDataBlock(0, [True]*5 + [False]*5)
# 定义di离散输入寄存器,存储起始地址为0,长度为10,内容为5个True及5个False
di_block = ModbusSequentialDataBlock(0, [True]*5 + [False]*5)
# 定义ir输入寄存器,存储起始地址为0,长度为10,内容为0~10递增数值列表
ir_block = ModbusSequentialDataBlock(0, [0, 1, 2, 3, 4, 5, 6, 7, 8, 9])
# 定义hr保持寄存器,存储起始地址为0,长度为10,内容为0~10递减数值列表
hr_block = ModbusSequentialDataBlock(0, [9, 8, 7, 6, 5, 4, 3, 2, 1, 0])
if args.slaves:
# The server then makes use of a server context that allows the server
# to respond with different slave contexts for different unit ids.
# By default it will return the same context for every unit id supplied
# (broadcast mode).
# However, this can be overloaded by setting the single flag to False and
# then supplying a dictionary of unit id to context mapping::
#
# The slave context can also be initialized in zero_mode which means
# that a request to address(0-7) will map to the address (0-7).
# The default is False which is based on section 4.4 of the
# specification, so address(0-7) will map to (1-8)::
context = {
0x01: ModbusSlaveContext(
di=di_block,
co=co_block,
hr=hr_block,
ir=ir_block,
zero_mode=True
),
0x02: ModbusSlaveContext(
di=di_block,
co=co_block,
hr=hr_block,
ir=ir_block,
),
0x03: ModbusSlaveContext(
di=di_block,
co=co_block,
hr=hr_block,
ir=ir_block,
),
}
single = False
else:
context = ModbusSlaveContext(
di=di_block, co=co_block, hr=hr_block, ir=ir_block, unit=1
)
single = True
# Build data storage
args.context = ModbusServerContext(slaves=context, single=single)
return args
async def run_async_server(args):
"""Run server."""
txt = f"### start ASYNC server, listening on {args.port} - {args.comm}"
_logger.info(txt)
# socat -d -d PTY,link=/tmp/ptyp0,raw,echo=0,ispeed=9600
# PTY,link=/tmp/ttyp0,raw,echo=0,ospeed=9600
server = await StartAsyncSerialServer(
context=args.context, # Data storage
#identity=args.identity, # server identify
timeout=1, # waiting time for request to complete
port=args.port, # serial port
# custom_functions=[], # allow custom handling
framer=args.framer, # The framer strategy to use
# handler=None, # handler for each session
stopbits=1, # The number of stop bits to use
bytesize=8, # The bytesize of the serial messages
# parity="N", # Which kind of parity to use
baudrate=115200, # The baud rate to use for the serial device
# handle_local_echo=False, # Handle local echo of the USB-to-RS485 adaptor
# ignore_missing_slaves=True, # ignore request to a missing slave
# broadcast_enable=False, # treat unit_id 0 as broadcast address,
# strict=True, # use strict timing, t1.5 for Modbus RTU
# defer_start=False, # Only define server do not activate
)
return server
if __name__ == "__main__":
cmd_args = get_commandline(
server=True,
description="Run asynchronous server.",
)
run_args = setup_server(cmd_args)
asyncio.run(run_async_server(run_args), debug=True)
|
使用pymodbus模拟Modbus从设备的功能,需要构造从机上下文环境, 该环境由Modbus协议规定,需要实现Modbus从机的各项功能,比如各种寄存器。 最终该上下文由Server负责调度运作,实现主机对从机数据的存入读出维护, pymodbus还在此基础上实现了数据库的接口,感兴趣的同学可以查看pymodbus源码及示例。
7.4.2. 实验步骤
1、从机端,将配套的测试代码上传至LubanCat 2板卡系统中, 登录系统终端,启动从机服务:
# 在终端中输入如下命令:
sudo python slave_server.py --comm serial --framer rtu --port /dev/ttyS3 --store sequential --log debug --slaves 1
#--comm 指定serial通讯方式,,,--framer,指定使用rtu帧,,--port 指定串口,,--log指定debug信息
#可以使用命令sudo python slave_server.py -h查看帮助

#使用命令后在终端可以看到:
cat@lubancat:~$ sudo python server0.py --comm serial --framer rtu --port /dev/ttyS3 --store sequential --log debug --slaves 1
15:10:47 INFO  server0:123 ### Create datastore
15:10:47 DEBUG selector_events:59 Using selector: EpollSelector
15:10:47 INFO  server0:181 ### start ASYNC server, listening on /dev/ttyS3 - serial
15:10:47 DEBUG async_io:130 Serial connection opened on port: /dev/ttyS3
15:10:47 DEBUG async_io:442 Serial connection established
2、主机端,按前面的硬件连接,电脑端使用Modbus Poll软件(试用30天),下载地址https://modbustools.com/download.html 安装后,打开该软件:
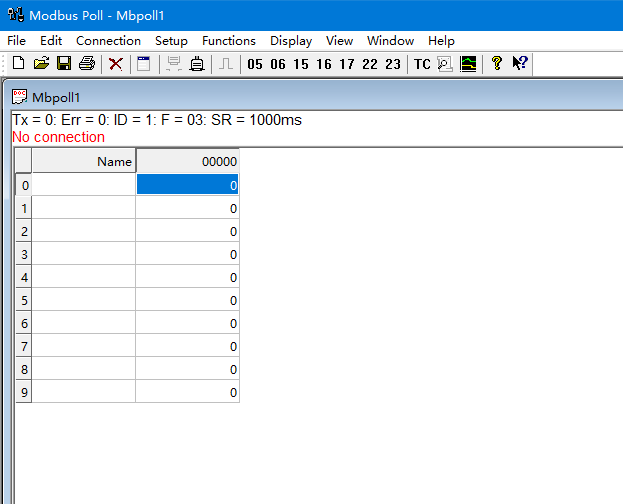
在空白处右击,选择“Read/write Definition”,然后设置从机地址,读写等。这里我们设置地址为1,从地址0开始读取10个线圈:
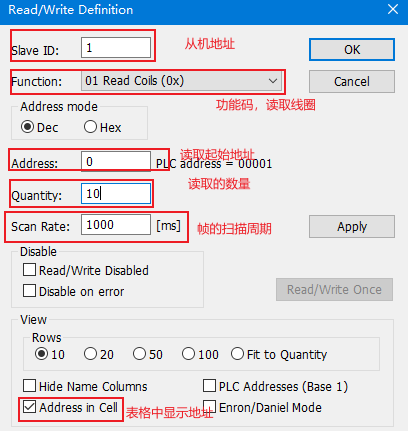
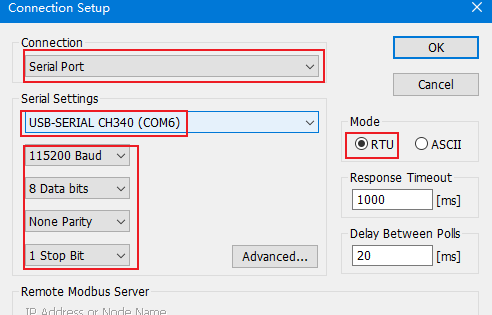
设置完成后,点击主窗口的“connection”,之后选择串口,这里是COM6,具体设置如下:
连接成功后就可以看到读取的值:
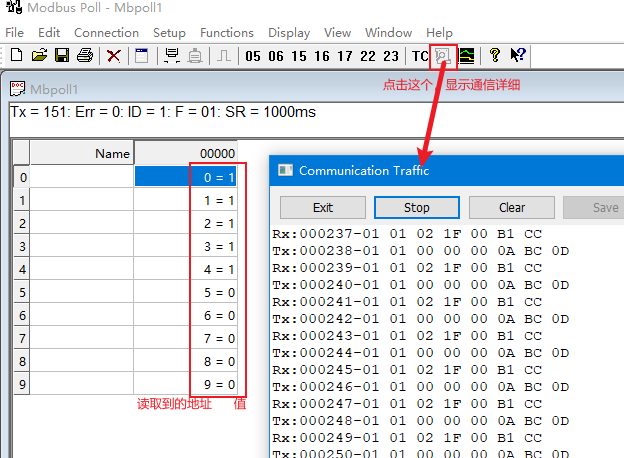
与此同时,板卡终端打印出的信息如下(执行时指定- -log debug):

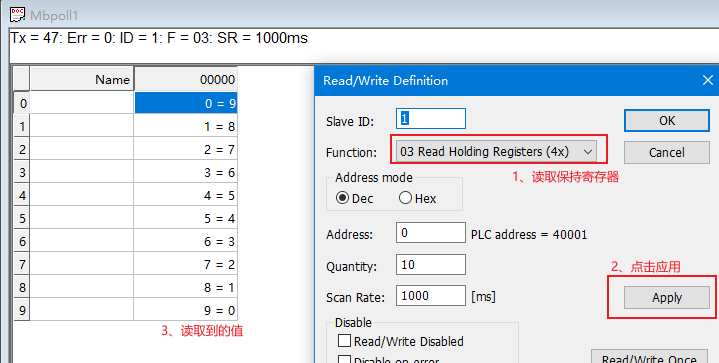
上面处于连接状态后,我们还可以进行其他寄存器的读取和写入等操作,右击空白进入“Read/write Definition”,重新设置下值:
修改保存寄存器的值:
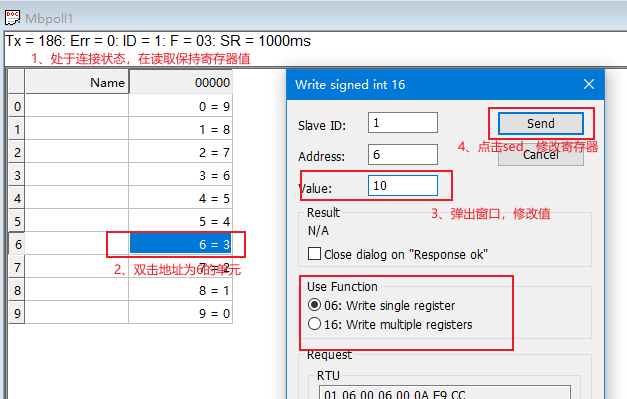
点击发送之后,读取到的寄存器的值:
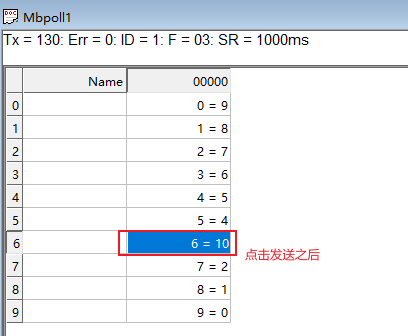
更详细的一些寄存器读写调试等操作,可以参考下Modbus Poll软件使用帮助。 在上面测试过程中,可以看到,主机对从机发送的命令、接收到从机的响应信息及各项测试结果等等。
7.4.3. 现象简析
我们可以通过一张图来简单看看,Modbus-RTU主从机在通讯过程中发生的一些请求与响应。
以 读取多个线圈测试 为例(单击图片可放大):
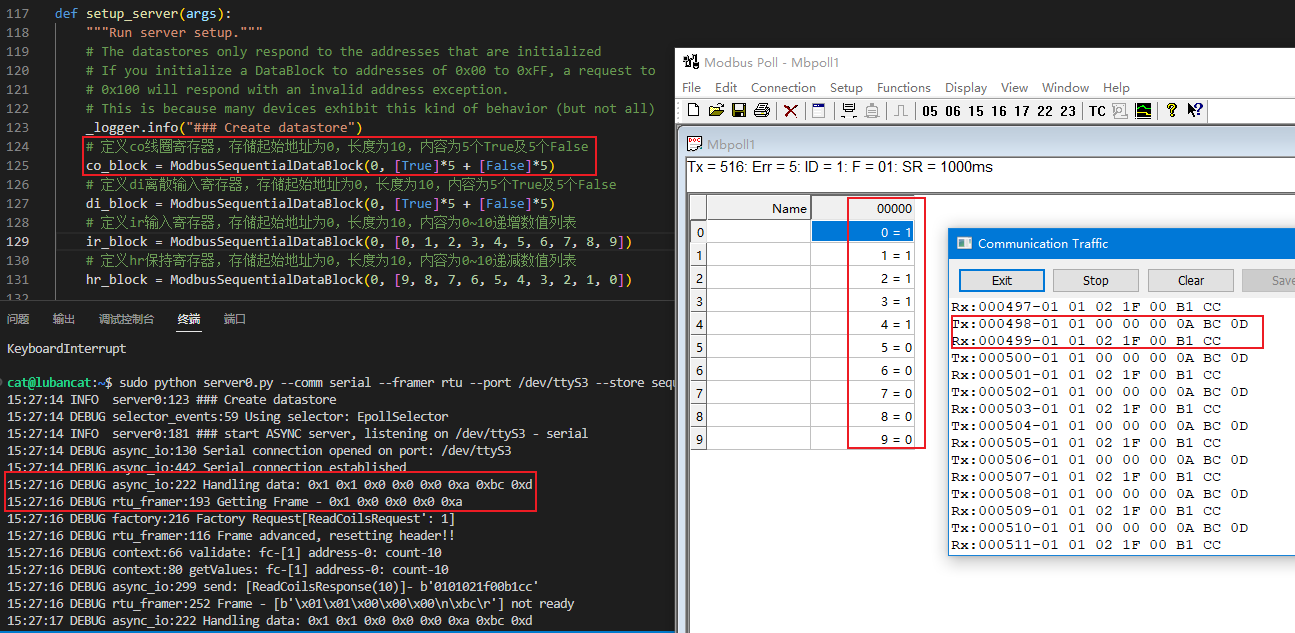
图中,在电脑上位机端,使用modbus Poll读写单个或者多个寄存器及对应参数, 当板卡从机收到命令后,会做出对应的响应,并将响应的log信息,开启debug后可以看到。
pymodbus库中还支持用户自定义的请求及响应,即Modbus协议中约定的用户定义功能码相关内容。 此外pymodbus库还是实现了一些服务器功能,比如数据持久化,可以让用户将从机寄存器内容通过 一些常见的数据库进行存储。
在前面,我们提到了,pymodbus库是使用Python语言编写的Modbus协议的全栈实现, 在我们给大家提供的示例代码中,只展示了该库的一部分功能。要测试更多,可以关注pymodbus的Github仓库 pymodbus , 学习更多相关的内容。
