
10. DRM应用编程–atomic接口
目前DRM主要推荐使用的是 Atomic(原子的) 接口,前面的程序legacy接口已经过时了。
本章的示例代码目录为:base_linux/screen/drm/drm-atomic/
10.1. Property
Property(属性)—–Atomic操作必须依赖的基本元素。
Property把前面的legacy接口传入的参数单独抽出来,做成一个个独立的全局属性。通过设置这些属性参数,即可完成对显示参数的设置。
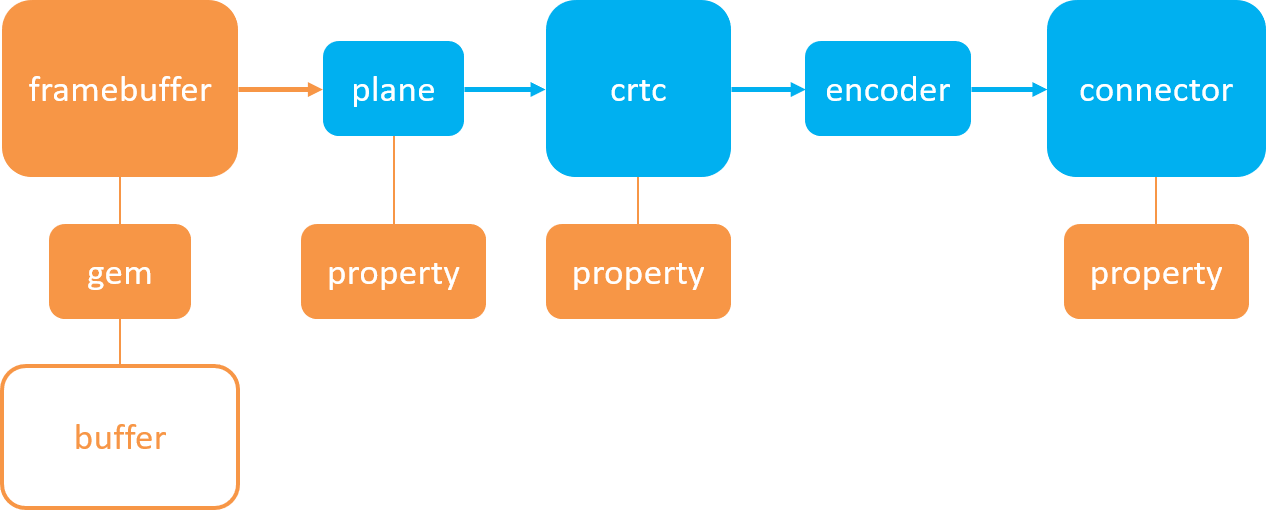
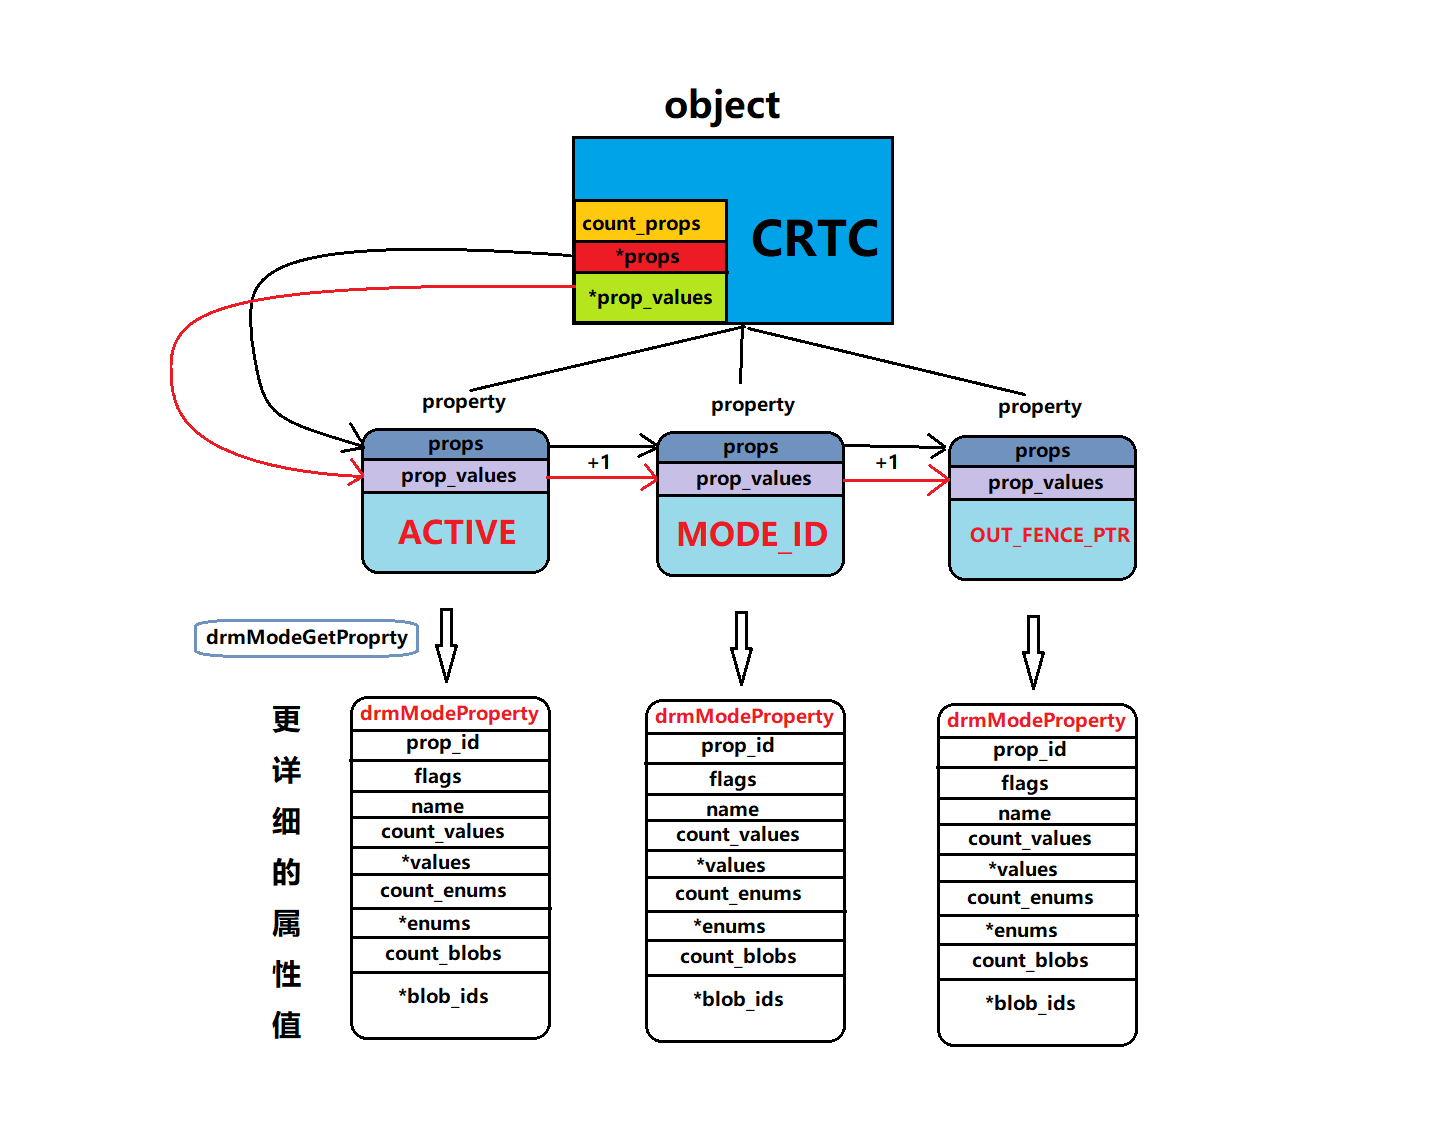
Property的结构简单概括主要由3部分组成:name、id 和 value。其中id为该property在DRM框架中全局唯一的标识符。
采用property机制的好处是:
减少上层应用接口的维护工作量。当开发者有新的功能需要添加时, 无需增加新的函数名和IOCTL,只需在底层驱动中新增一个property, 然后在自己的应用程序中获取/操作该property的值即可。
增强了参数设置的灵活性。一次IOCTL可以同时设置多个property, 减少了user space与kernel space切换的次数,同时最大限度的满足了不同硬件对于参数设置的要求,提高了软件效率。
DRM中的property大多以功能进行划分,并且还定义了一组 Standard Properties,这些标准properties在任何平台上都会被创建。
name |
功能 |
|---|---|
ACTIVE |
CRTC当前的使能状态,一般用于控制CRTC上下电 |
MODE_ID |
CRTC当前所使用的display mode ID,通过该ID可以找到具体的display mode配置参数 |
OUT_FENCE_PTR |
输出fence指针,指向当前正在显示的buffer所对应的fence fd,该fence由DRM驱动创建,供上层应用程序使用,用来表示当前buffer CRTC是否还在占用 |
GAMMA_LUT |
gamma查找表参数 |
GAMMA_LUT_SIZE |
gamma查找表参数长度 |
name |
功能 |
|---|---|
EDID |
Extended Display Identification Data,标识显示器的参数信息,是一种VESA标准数据格式 |
DPMS |
Display Power Management Signaling,用于控制显示器的电源状态,如休眠唤醒。也是一种VESA标准 |
link-status |
用于标识当前connector的连接状态,如Good/Bad |
CRTC_ID |
当前connector所连接的CRTC object ID,与PLANE中CRTC_ID属性是同一个property |
name |
功能 |
|---|---|
type |
plane的类型,CURSOR、PRIMARY或者OVERLAY |
FB_ID |
与当前plane绑定的framebuffer object ID |
IN_FENCE_FD |
与当前plane相关联的input fence fd,由buffer的生产者创建,供DRM底层驱动使用,用来标识当前传下来的buffer是否可以开始访问 |
CRTC_ID |
当前plane所关联的CRTC object ID,与CONNECTOR中的CRTC_ID属性是同一个property |
SRC_X |
当前framebuffer区域的起始偏移x坐标 |
SRC_Y |
当前framebuffer区域的起始偏移y坐标 |
SRC_W |
当前framebuffer区域的宽度 |
SRC_H |
当前framebuffer区域的高度 |
CRTC_X |
屏幕显示区域的起始偏移x坐标 |
CRTC_Y |
屏幕显示区域的起始偏移y坐标 |
CRTC_W |
屏幕显示区域的宽度 |
CRTC_H |
屏幕显示区域的高度 |
如下图所示:
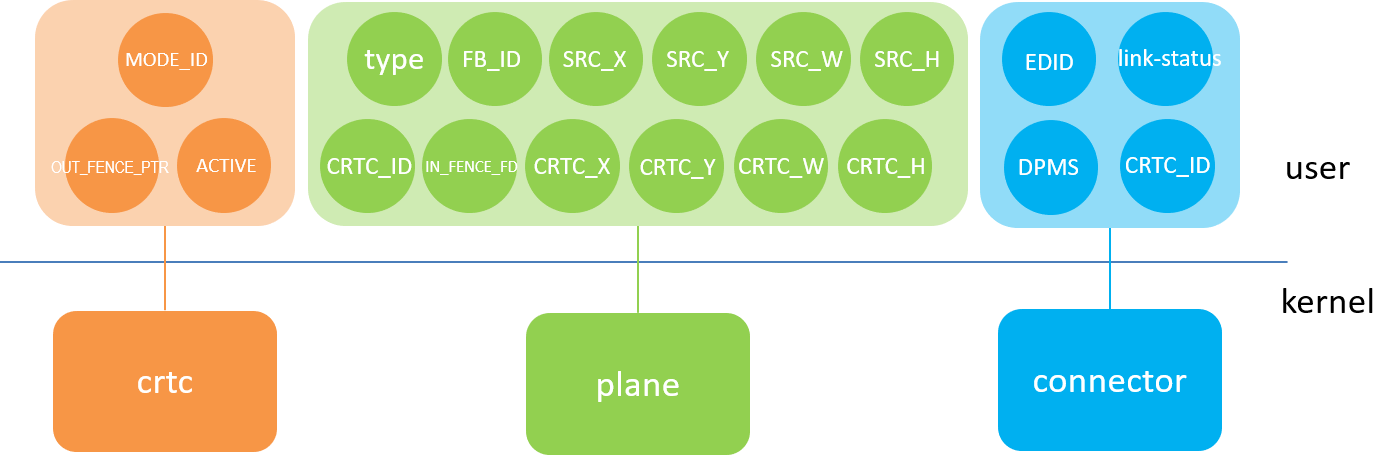
上图的Properties并非全部的Properties,这里只列举了drm程序里通用的几个Properties, 如果想要知道更多的Properties,后面的程序分析会有讲到。
我们操作上面的Properties就可以设置CRTC以及屏幕显示。
10.2. DRM应用编程(drm-atomic-ctrc)
在前面我们使用过的legacy接口有
1 2 | drmModeSetCrtc();
drmModeSetPlane();
|
因此,我们从legacy接口到Atomic接口,只需要把上面的接口改成相关的接口就可以操作了。
本例以DRM应用编程–legacy接口的drm-planes实验为基础,修改legacy接口的 drmModeSetCrtc(); 为atomic接口。
1 2 3 4 5 6 7 8 9 10 11 12 13 14 15 16 17 18 19 20 21 22 23 24 25 26 27 28 29 30 31 32 33 34 35 36 37 38 39 40 41 42 43 44 45 46 47 48 49 50 51 52 53 54 55 56 57 58 59 60 61 62 63 64 65 66 67 68 69 70 71 72 73 74 75 76 77 78 79 80 81 82 83 84 85 86 87 88 89 90 91 92 93 94 95 96 97 98 99 100 101 102 103 104 105 106 107 108 109 110 111 112 113 114 115 116 117 118 119 120 121 122 123 124 125 126 127 128 129 130 131 132 133 134 135 136 137 138 139 140 141 142 143 144 145 146 147 148 149 150 151 152 153 154 155 156 157 158 159 160 161 162 163 164 165 166 167 168 169 170 171 172 173 174 175 176 177 178 179 180 181 182 183 184 185 186 187 188 189 190 191 192 193 194 195 196 197 198 199 200 201 202 203 204 205 206 207 208 209 210 211 212 213 214 215 216 217 218 219 220 221 222 223 224 225 226 227 228 | #define _GNU_SOURCE
#include <errno.h>
#include <fcntl.h>
#include <stdbool.h>
#include <stdint.h>
#include <stdio.h>
#include <stdlib.h>
#include <string.h>
#include <sys/mman.h>
#include <time.h>
#include <unistd.h>
#include <xf86drm.h>
#include <xf86drmMode.h>
struct drm_device {
uint32_t width; //显示器的宽的像素点数量
uint32_t height; //显示器的高的像素点数量
uint32_t pitch; //每行占据的字节数
uint32_t handle; //drm_mode_create_dumb的返回句柄
uint32_t size; //显示器占据的总字节数
uint32_t *vaddr; //mmap的首地址
uint32_t fb_id; //创建的framebuffer的id号
struct drm_mode_create_dumb create ; //创建的dumb
struct drm_mode_map_dumb map; //内存映射结构体
};
struct property_crtc {
uint32_t blob_id;
uint32_t property_crtc_id;
uint32_t property_mode_id;
uint32_t property_active;
};
drmModeConnector *conn; //connetor相关的结构体
drmModeRes *res; //资源
drmModePlaneRes *plane_res;
int fd; //文件描述符
uint32_t conn_id;
uint32_t crtc_id;
uint32_t plane_id[3];
#define RED 0XFF0000
#define GREEN 0X00FF00
#define BLUE 0X0000FF
uint32_t color_table[6] = {RED,GREEN,BLUE,RED,GREEN,BLUE};
struct drm_device buf;
struct property_crtc pc;
static int drm_create_fb(struct drm_device *bo)
{
/* create a dumb-buffer, the pixel format is XRGB888 */
bo->create.width = bo->width;
bo->create.height = bo->height;
bo->create.bpp = 32;
/* handle, pitch, size will be returned */
drmIoctl(fd, DRM_IOCTL_MODE_CREATE_DUMB, &bo->create);
/* bind the dumb-buffer to an FB object */
bo->pitch = bo->create.pitch;
bo->size = bo->create.size;
bo->handle = bo->create.handle;
drmModeAddFB(fd, bo->width, bo->height, 24, 32, bo->pitch,
bo->handle, &bo->fb_id);
//每行占用字节数,共占用字节数,MAP_DUMB的句柄
printf("pitch = %d ,size = %d, handle = %d \n",bo->pitch,bo->size,bo->handle);
/* map the dumb-buffer to userspace */
bo->map.handle = bo->create.handle;
drmIoctl(fd, DRM_IOCTL_MODE_MAP_DUMB, &bo->map);
bo->vaddr = mmap(0, bo->create.size, PROT_READ | PROT_WRITE,
MAP_SHARED, fd, bo->map.offset);
/* initialize the dumb-buffer with white-color */
memset(bo->vaddr, 0xff,bo->size);
return 0;
}
static void drm_destroy_fb(struct drm_device *bo)
{
struct drm_mode_destroy_dumb destroy = {};
drmModeRmFB(fd, bo->fb_id);
munmap(bo->vaddr, bo->size);
destroy.handle = bo->handle;
drmIoctl(fd, DRM_IOCTL_MODE_DESTROY_DUMB, &destroy);
}
static uint32_t get_property(int fd, drmModeObjectProperties *props)
{
drmModePropertyPtr property;
uint32_t i, id = 0;
for (i = 0; i < props->count_props; i++) {
property = drmModeGetProperty(fd, props->props[i]);
printf("\"%s\"\t\t---",property->name);
printf("id = %d , value=%ld\n",props->props[i],props->prop_values[i]);
}
return 0;
}
static uint32_t get_property_id(int fd, drmModeObjectProperties *props,
const char *name)
{
drmModePropertyPtr property;
uint32_t i, id = 0;
/* find property according to the name */
for (i = 0; i < props->count_props; i++) {
property = drmModeGetProperty(fd, props->props[i]);
if (!strcmp(property->name, name))
id = property->prop_id;
drmModeFreeProperty(property);
if (id)
break;
}
return id;
}
int drm_init()
{
int i;
drmModeObjectProperties *props;
drmModeAtomicReq *req;
fd = open("/dev/dri/card0", O_RDWR | O_CLOEXEC);
res = drmModeGetResources(fd);
crtc_id = res->crtcs[0];
conn_id = res->connectors[0];
drmSetClientCap(fd, DRM_CLIENT_CAP_UNIVERSAL_PLANES, 1);
plane_res = drmModeGetPlaneResources(fd);
for(i=0;i<3;i++){
plane_id[i] = plane_res->planes[i];
printf("planes[%d]= %d\n",i,plane_id[i]);
}
conn = drmModeGetConnector(fd, conn_id);
buf.width = conn->modes[0].hdisplay;
buf.height = conn->modes[0].vdisplay;
drm_create_fb(&buf);
drmSetClientCap(fd, DRM_CLIENT_CAP_ATOMIC, 1);
/* get connector properties */
props = drmModeObjectGetProperties(fd, conn_id, DRM_MODE_OBJECT_CONNECTOR);
printf("/-----conn_Property-----/\n");
get_property(fd, props);
printf("\n");
pc.property_crtc_id = get_property_id(fd, props, "CRTC_ID");
drmModeFreeObjectProperties(props);
/* get crtc properties */
props = drmModeObjectGetProperties(fd, crtc_id, DRM_MODE_OBJECT_CRTC);
printf("/-----CRTC_Property-----/\n");
get_property(fd, props);
printf("\n");
pc.property_active = get_property_id(fd, props, "ACTIVE");
pc.property_mode_id = get_property_id(fd, props, "MODE_ID");
drmModeFreeObjectProperties(props);
/* create blob to store current mode, and retun the blob id */
drmModeCreatePropertyBlob(fd, &conn->modes[0],
sizeof(conn->modes[0]), &pc.blob_id);
/* start modeseting */
req = drmModeAtomicAlloc();
drmModeAtomicAddProperty(req, crtc_id, pc.property_active, 1);
drmModeAtomicAddProperty(req, crtc_id, pc.property_mode_id, pc.blob_id);
drmModeAtomicAddProperty(req, conn_id, pc.property_crtc_id, crtc_id);
drmModeAtomicCommit(fd, req, DRM_MODE_ATOMIC_ALLOW_MODESET, NULL);
drmModeAtomicFree(req);
}
int drm_exit()
{
drm_destroy_fb(&buf);
drmModeFreeConnector(conn);
drmModeFreePlaneResources(plane_res);
drmModeFreeResources(res);
close(fd);
}
int main(int argc, char **argv)
{
int i,j;
drm_init();
//显示三色
for(j=0;j<3;j++){
for(i =j*buf.width*buf.height/3;i< (j+1)*buf.width*buf.height/3;i++)
buf.vaddr[i] = color_table[j];
}
//1:1设置屏幕,没有该函数不会显示画面
drmModeSetPlane(fd, plane_id[0], crtc_id, buf.fb_id, 0,
0, 0, buf.width, buf.height,
0 << 16, 0 << 16, buf.width << 16, buf.height << 16);
getchar();
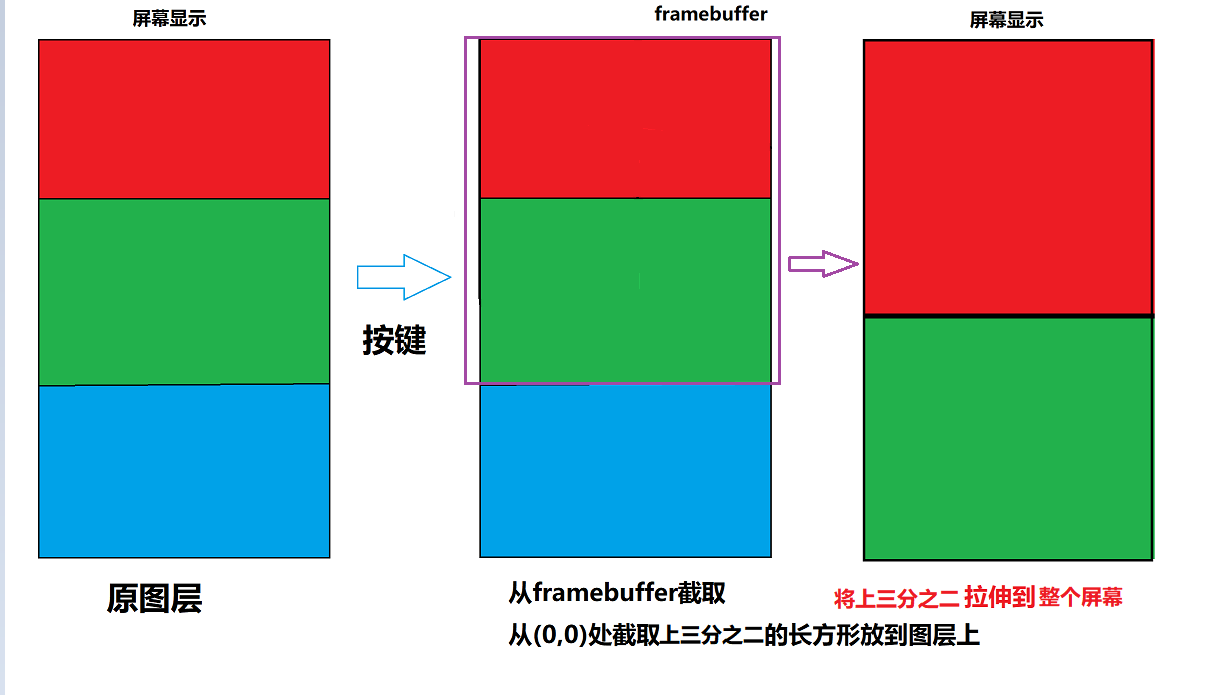
//将framebuffer上2/3的区域放到图层一上,
//此时屏幕改变,将的framebuffer区域拉伸到整个屏幕中
drmModeSetPlane(fd, plane_id[0], crtc_id, buf.fb_id, 0,
0, 0, buf.width, buf.height,
0 << 16, 0 << 16, buf.width << 16, buf.height/3*2 << 16);
getchar();
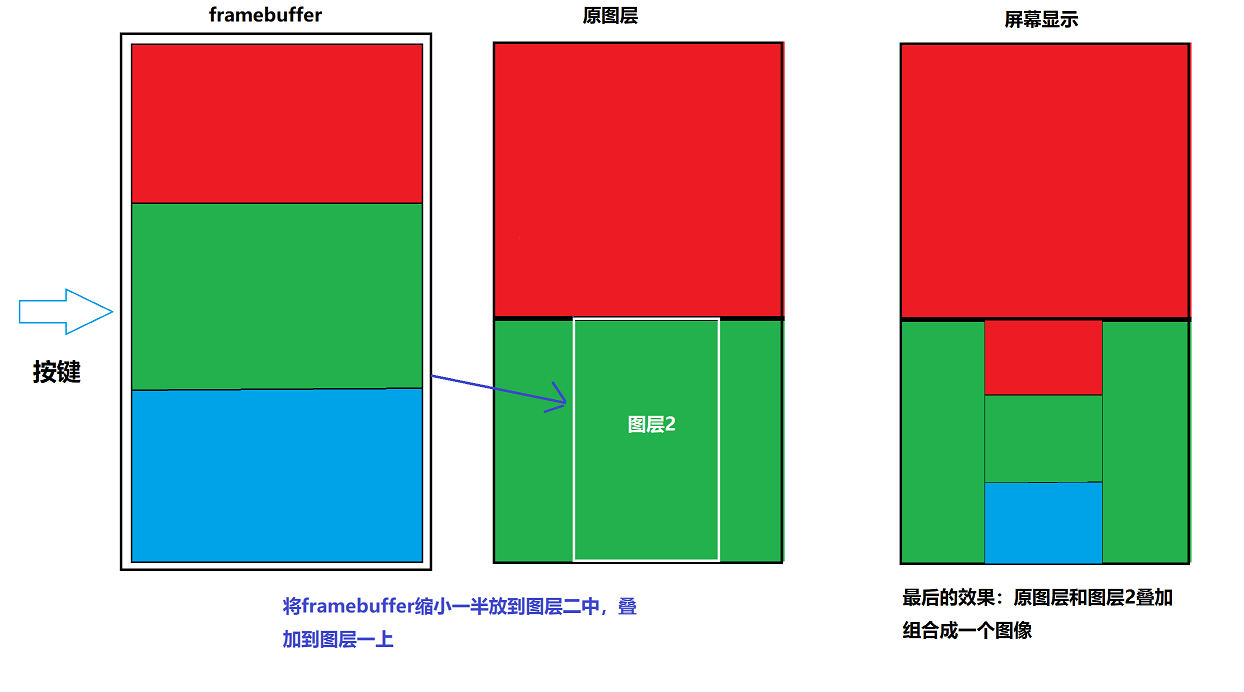
//将framebuffer区域缩放一倍放到图层二上,把图层二的位置放到屏幕的下方
//叠加在图层一上,可以看到图层二覆盖了图层一的部分区域
drmModeSetPlane(fd, plane_id[1], crtc_id, buf.fb_id, 0,
buf.width/4, buf.height/2, buf.width/2, buf.height/2,
0 << 16, 0 << 16, buf.width << 16, buf.height << 16);
getchar();
drm_exit();
return 0;
}
|
10.2.1. 编译
方法1:
1 2 | #编译
make
|
方法2:
1 2 | #编译
gcc -o drm-atomic-crtcs drm-atomic-crtcs.c `pkg-config --cflags libdrm` `pkg-config --libs libdrm`
|
10.2.3. 实验分析
本例以DRM应用编程–drm-planes实验为框架修改部分内容所得, 这里,我只分析与drm-planes有差异得地方。
1 2 3 4 5 6 7 8 9 10 11 12 13 14 15 16 17 18 19 20 21 22 23 24 25 26 27 28 29 30 31 32 33 34 35 36 37 38 39 40 41 42 43 44 45 46 47 48 49 50 51 52 53 54 55 56 57 58 59 60 61 62 63 | struct property_crtc {
uint32_t blob_id;
uint32_t property_crtc_id;
uint32_t property_mode_id;
uint32_t property_active;
};
int drm_init()
{
int i;
drmModeObjectProperties *props;
drmModeAtomicReq *req;
fd = open("/dev/dri/card0", O_RDWR | O_CLOEXEC);
res = drmModeGetResources(fd);
crtc_id = res->crtcs[0];
conn_id = res->connectors[0];
drmSetClientCap(fd, DRM_CLIENT_CAP_UNIVERSAL_PLANES, 1);
plane_res = drmModeGetPlaneResources(fd);
for(i=0;i<3;i++){
plane_id[i] = plane_res->planes[i];
printf("planes[%d]= %d\n",i,plane_id[i]);
}
conn = drmModeGetConnector(fd, conn_id);
buf.width = conn->modes[0].hdisplay;
buf.height = conn->modes[0].vdisplay;
drm_create_fb(&buf);
drmSetClientCap(fd, DRM_CLIENT_CAP_ATOMIC, 1);
/* get connector properties */
props = drmModeObjectGetProperties(fd, conn_id, DRM_MODE_OBJECT_CONNECTOR);
printf("/-----conn_Property-----/\n");
get_property(fd, props);
printf("\n");
pc.property_crtc_id = get_property_id(fd, props, "CRTC_ID");
drmModeFreeObjectProperties(props);
/* get crtc properties */
props = drmModeObjectGetProperties(fd, crtc_id, DRM_MODE_OBJECT_CRTC);
printf("/-----CRTC_Property-----/\n");
get_property(fd, props);
printf("\n");
pc.property_active = get_property_id(fd, props, "ACTIVE");
pc.property_mode_id = get_property_id(fd, props, "MODE_ID");
drmModeFreeObjectProperties(props);
/* create blob to store current mode, and retun the blob id */
drmModeCreatePropertyBlob(fd, &conn->modes[0],
sizeof(conn->modes[0]), &pc.blob_id);
/* start modeseting */
req = drmModeAtomicAlloc();
drmModeAtomicAddProperty(req, crtc_id, pc.property_active, 1);
drmModeAtomicAddProperty(req, crtc_id, pc.property_mode_id, pc.blob_id);
drmModeAtomicAddProperty(req, conn_id, pc.property_crtc_id, crtc_id);
drmModeAtomicCommit(fd, req, DRM_MODE_ATOMIC_ALLOW_MODESET, NULL);
drmModeAtomicFree(req);
}
|
第15-31行,可以看到与drm-planes.c的初始化代码框架是一样的,这里就不进行过多的讲解了。
第33行,
drmSetClientCap(fd, DRM_CLIENT_CAP_ATOMIC, 1);If setDRM_CLIENT_CAP_ATOMICto 1, the DRM core will expose atomic properties to userspace. 如果设置这个选项为1,drm驱动框架核心会把原子属性暴露给应用层使用,即设置了这个选项才能使用atomic接口。第36行和44行,获取某个资源的props指针,后面通过props指针能获取property_id,便于以后设置property_id。
1 2 3 4 5 6 7 8 9 10 11 | // 函数原型
extern drmModeObjectPropertiesPtr drmModeObjectGetProperties(int fd,
uint32_t object_id,uint32_t object_type);
//props指针原型
typedef struct _drmModeObjectProperties {
uint32_t count_props; //props数量
//props指针,指向id数组,可以根据props_id获取Properties属性
uint32_t *props;
uint64_t *prop_values; //指向Properties的值的数组
} drmModeObjectProperties, *drmModeObjectPropertiesPtr;
|
fd:文件描述符。object_id:目标id,第18,19行可获取。object_type:目标类型,如下宏定义。
1 2 3 4 5 6 7 8 9 | #define DRM_MODE_OBJECT_CRTC 0xcccccccc //CRTC
#define DRM_MODE_OBJECT_CONNECTOR 0xc0c0c0c0 //CONNECTOR
#define DRM_MODE_OBJECT_ENCODER 0xe0e0e0e0 //ENCODER
#define DRM_MODE_OBJECT_MODE 0xdededede //mode
#define DRM_MODE_OBJECT_PROPERTY 0xb0b0b0b0 //PROPERTY
#define DRM_MODE_OBJECT_FB 0xfbfbfbfb //FB
#define DRM_MODE_OBJECT_BLOB 0xbbbbbbbb //BLOB
#define DRM_MODE_OBJECT_PLANE 0xeeeeeeee //PLANE
#define DRM_MODE_OBJECT_ANY 0 //all
|
第37-39,45-47行,打印每个props中的properties属性,后面会讲到。
第40,48,49行get_property_id(fd, props, “XXXX”);通过名字匹配获取property_id。
第41,50行
drmModeFreeObjectProperties();释放获得的props资源。第53-54行,
drmModeCreatePropertyBlob创建一个Blob_property,自定义长度的内存块,用来存放自定义的结构体数据, 这里将CRTC的mode写进blob中,用于MODE_ID的设置。第56-62行通过刚才获取的property_id,设置CRTC。
第57行,获取原子操作的钥匙,有了req才能向后面进行操作。
1 2 3 | //函数原型
extern drmModeAtomicReqPtr drmModeAtomicAlloc(void);
//返回钥匙
|
第58-60行,设置property的属性:
“ACTIVE”为 1 即使能CRTC。
“MODE_ID”将刚才创建的blob_id传进去,驱动会访问blob的结构体为CRTC创建扫描区域。
“CRTC_ID”将CRTC_ID传入conn_id中,连接connector和CRTC。
1 2 3 | //函数原型
extern int drmModeAtomicAddProperty(drmModeAtomicReqPtr req,
uint32_t object_id,uint32_t property_id,uint64_t value);
|
第61行,
drmModeAtomicCommit();一次性提交所有的属性, 本次commit操作,要么成功,要么保持原来的状态不变。 即如果中途操作失败了,那些已经生效的配置需要恢复成之前的状态, 就像没发生过commit操作似的,这就是Atomic的含义。 可以通过返回值判断是否成功,一般返回值为负值,表示操作失败。
1 2 3 4 5 | //函数原型
extern int drmModeAtomicCommit(int fd,
drmModeAtomicReqPtr req,
uint32_t flags,
void *user_data);
|
第62行,
drmModeAtomicFree(req);释放钥匙。
1 2 | //函数原型
extern void drmModeAtomicFree(drmModeAtomicReqPtr req);
|
1 2 3 4 5 6 7 8 9 10 11 12 13 14 15 16 17 18 19 20 21 22 23 24 25 26 27 28 29 30 31 32 33 | static uint32_t get_property(int fd, drmModeObjectProperties *props)
{
drmModePropertyPtr property;
uint32_t i, id = 0;
for (i = 0; i < props->count_props; i++) {
property = drmModeGetProperty(fd, props->props[i]);
printf("\"%s\"\t\t---",property->name);
printf("id = %d , value=%ld\n",props->props[i],props->prop_values[i]);
}
return 0;
}
static uint32_t get_property_id(int fd, drmModeObjectProperties *props,
const char *name)
{
drmModePropertyPtr property;
uint32_t i, id = 0;
/* find property according to the name */
for (i = 0; i < props->count_props; i++) {
property = drmModeGetProperty(fd, props->props[i]);
if (!strcmp(property->name, name))
id = property->prop_id;
drmModeFreeProperty(property);
if (id)
break;
}
return id;
}
|
第1-15行,该函数打印所有property的名字-id号-数值。
第7行,根据id号获取property的具体资源。
1 2 3 4 5 6 7 8 9 10 11 12 13 14 15 16 17 18 19 20 | //函数原型
extern drmModePropertyPtr drmModeGetProperty(int fd, uint32_t propertyId);
//drmModePropertyPtr结构体原型
typedef struct _drmModeProperty {
uint32_t prop_id; //自身的property_id
uint32_t flags;
char name[DRM_PROP_NAME_LEN]; //名字,匹配字段
int count_values;
uint64_t *values; /* store the blob lengths */
int count_enums; //枚举的数量
struct drm_mode_property_enum *enums; //枚举,存放部分功能
int count_blobs;
uint32_t *blob_ids; /* store the blob IDs */
} drmModePropertyRes, *drmModePropertyPtr;
struct drm_mode_property_enum {
__u64 value; //枚举数值
char name[DRM_PROP_NAME_LEN];//名称
};
|
第14行-33行,该函数通过传入的文字匹配名,进行匹配,匹配成功返回id。
第23行,获取property的具体资源。
第24,25行,比较字符,如果匹配则退出循环。
第26行释放资源。
10.2.4. 总结
看到这里,大家可能会有点懵,我在这里给大家梳理一下
在设置CRTC的过程中,因为,CRTC没有绑定任何framebuffer, 所以无法通过设置CRTC达到刷屏的效果,需要借助设置Planes来达到。
Atomic接口设置CRTC的初始化的步骤:
设置Atomic,让Atomic的接口可以在用户中使用
通过conn_id获取”CRTC_ID”的property_id,获取后要释放资源
通过crtc_id获取”ACTIVE”和”MODE_ID”的property_id,获取后要释放资源
创建blob,用来存储CRTC的modes
获取令牌
通过property_id赋值,connector需要设置”CRTC_ID”,CRTC需要设置”ACTIVE”和”MODE_ID”
提交设置的结果,如果不成功就应用提交前的设置,成功就直接应用
释放令牌
10.3. DRM应用编程(drm-atomic-planes)
本例以DRM应用编程–drm-atomic-crtc实验为基础,修改legacy接口的 drmModeSetPlane(); 为atomic接口
1 | base_linux/screen/drm/drm-atomic/drm-atomic-planes/drm-atomic-planes.c
|
10.3.1. 编译
方法1:
1 2 | #编译
make
|
方法2:
1 2 | #编译
gcc -o drm-atomic-planes drm-atomic-planes.c `pkg-config --cflags libdrm` `pkg-config --libs libdrm`
|
10.3.3. 实验分析
本例以DRM应用编程–drm-atomic-crtc实验为框架修改部分内容所得, 这里,我只分析与其有差异得地方。
1 2 3 4 5 6 7 8 9 10 11 12 13 14 15 16 17 18 19 20 21 22 23 24 25 26 27 28 29 30 31 32 33 34 35 36 37 38 39 40 41 42 43 44 45 46 47 | struct property_planes {
uint32_t plane_id;
uint32_t property_fb_id;
uint32_t property_crtc_x;
uint32_t property_crtc_y;
uint32_t property_crtc_w;
uint32_t property_crtc_h;
uint32_t property_src_x;
uint32_t property_src_y;
uint32_t property_src_w;
uint32_t property_src_h;
};
static uint32_t drm_get_plane_property_id(int fd,uint32_t plane_id)
{
drmModeObjectProperties *props;
int i,num;
for(i=0;i<buf.count_plane+1;i++){
if(pp[i].plane_id == plane_id){
num = i;
break;
}
else{
num = buf.count_plane;
buf.count_plane++;
break;
}
}
pp[num].plane_id = plane_id;
/* get plane properties */
props = drmModeObjectGetProperties(fd, plane_id, DRM_MODE_OBJECT_PLANE);
if(printf_status == 1){
get_property(fd, props);
printf_status = 0;
}
pp[num].property_fb_id = get_property_id(fd, props, "FB_ID");
pp[num].property_crtc_x = get_property_id(fd, props, "CRTC_X");
pp[num].property_crtc_y = get_property_id(fd, props, "CRTC_Y");
pp[num].property_crtc_w = get_property_id(fd, props, "CRTC_W");
pp[num].property_crtc_h = get_property_id(fd, props, "CRTC_H");
pp[num].property_src_x = get_property_id(fd, props, "SRC_X");
pp[num].property_src_y = get_property_id(fd, props, "SRC_Y");
pp[num].property_src_w = get_property_id(fd, props, "SRC_W");
pp[num].property_src_h = get_property_id(fd, props, "SRC_H");
drmModeFreeObjectProperties(props);
buf.count_plane ++;
}
|
第1-12行,定义了一个结构体,它包含了一个planes所需的properties, 后面我们操作多个planes时可以定义结构体数组,把内容存放到里面。
第14-47行,该函数的作用通过传入的plane_id自动生成存放所需的properties的结构体, 即property_planes
第32-35行,获取一个图层上所有的properties,并将其打印出来, 如果想更深入的开发的话,可以阅读源码或者查找资源
1 2 3 4 5 6 7 8 9 10 11 12 13 14 15 16 17 18 19 20 21 22 23 24 25 26 27 28 29 30 31 32 33 34 35 36 37 38 39 40 41 | struct planes_setting {
uint32_t crtc_id;
uint32_t plane_id;
uint32_t fb_id;
uint32_t crtc_x;
uint32_t crtc_y;
uint32_t crtc_w;
uint32_t crtc_h;
uint32_t src_x;
uint32_t src_y;
uint32_t src_w;
uint32_t src_h;
};
static uint32_t drm_set_plane(int fd,struct planes_setting *ps)
{
drmModeAtomicReq *req;
int i;
int num;
uint32_t plane = ps->plane_id;
for(i=0;i<buf.count_plane+1;i++){
if(pp[i].plane_id == ps->plane_id){
num = i;
break;
}
}
req = drmModeAtomicAlloc();
drmModeAtomicAddProperty(req, ps->plane_id, pc.property_crtc_id, crtc_id);
drmModeAtomicAddProperty(req, ps->plane_id, pp[num].property_fb_id, ps->fb_id);
drmModeAtomicAddProperty(req, ps->plane_id, pp[num].property_crtc_x, ps->crtc_x);
drmModeAtomicAddProperty(req, ps->plane_id, pp[num].property_crtc_y, ps->crtc_y);
drmModeAtomicAddProperty(req, ps->plane_id, pp[num].property_crtc_w, ps->crtc_w);
drmModeAtomicAddProperty(req, ps->plane_id, pp[num].property_crtc_h, ps->crtc_h);
drmModeAtomicAddProperty(req, ps->plane_id, pp[num].property_src_x, ps->src_x << 16);
drmModeAtomicAddProperty(req, ps->plane_id, pp[num].property_src_y, ps->src_y << 16);
drmModeAtomicAddProperty(req, ps->plane_id, pp[num].property_src_w, ps->src_w << 16);
drmModeAtomicAddProperty(req, ps->plane_id, pp[num].property_src_h, ps->src_h << 16);
drmModeAtomicCommit(fd, req, 0, NULL);
drmModeAtomicFree(req);
}
|
第1-13行,定义了一个结构体,用于设置planes的properties。
第15-41行,定义了一个函数,根据传入的结构体,自动匹配相应planes的properties, 然后根据传入的结构体的内容进行设置。
1 2 3 4 5 6 7 8 9 10 11 12 13 14 15 16 17 18 19 20 21 22 23 24 25 26 27 28 29 30 31 32 33 34 35 36 37 38 39 40 41 42 43 44 45 46 47 48 49 50 51 52 53 54 55 56 57 58 | int main(int argc, char **argv)
{
int i,j;
drmModeAtomicReq *req;
struct planes_setting ps5;
drm_init();
drm_get_plane_property_id(fd,plane_id[0]);
drm_get_plane_property_id(fd,plane_id[1]);
//显示三色
for(j=0;j<3;j++){
for(i =j*buf.width*buf.height/3;i< (j+1)*buf.width*buf.height/3;i++)
buf.vaddr[i] = color_table[j];
}
//1:1设置屏幕,没有该函数不会显示画面
ps5.plane_id = plane_id[0];
ps5.fb_id = buf.fb_id;
ps5.crtc_x = 0;
ps5.crtc_y = 0;
ps5.crtc_w = buf.width;
ps5.crtc_h = buf.height;
ps5.src_x = 0;
ps5.src_y = 0;
ps5.src_w = buf.width;
ps5.src_h = buf.height;
drm_set_plane(fd,&ps5);
getchar();
//将framebuffer上2/3的区域放到图层一上,
//此时屏幕改变,将的framebuffer区域拉伸到整个屏幕中
ps5.src_w = buf.width;
ps5.src_h = buf.height/3*2;
drm_set_plane(fd,&ps5);
getchar();
//将framebuffer区域缩放一倍放到图层二上,把图层二的位置放到屏幕的下方
//叠加在图层一上,可以看到图层二覆盖了图层一的部分区域
ps5.plane_id = plane_id[1];
ps5.fb_id = buf.fb_id;
ps5.crtc_x = buf.width/4;
ps5.crtc_y = buf.height/2;
ps5.crtc_w = buf.width/2;
ps5.crtc_h = buf.height/2;
ps5.src_x = 0;
ps5.src_y = 0;
ps5.src_w = buf.width;
ps5.src_h = buf.height;
drm_set_plane(fd,&ps5);
//the price of PS5 is rising,no money to pay,damn it!!!
//wait!mine car is going to become cheap,PC games i'm comming!!
getchar();
drm_exit();
return 0;
}
|
第8-9行,获取plane[0]和plane[1]的properties并将其保存到结构体内。
18-28行,编辑结构体的数据然后传入到
drm_set_plane();中完成plane的设置。40-49行,设置plane[1]显示。
10.3.4. 小总结
atomic接口的plane设置和atomic接口的crtc设置的框架基本一样。直接借鉴使用即可,其他的参数同样如此。
10.4. DRM应用编程(drm-atomic-page-flip)
1 | base_linux/screen/drm/drm-atomic/drm-atomic-page-flip/drm-atomic-page-flip.c
|
10.4.1. 代码分析
本实验基于上一个实验以及drm-page-flip实验进行修改,修改内容为:
1 2 3 4 5 6 7 8 9 10 11 12 13 14 15 16 17 18 19 20 21 22 23 24 25 26 27 28 29 30 31 32 | static int drm_create_fb(struct drm_device *bo)
{
/* create a dumb-buffer, the pixel format is XRGB888 */
bo->create.width = bo->width;
bo->create.height = bo->height*2;
bo->create.bpp = 32;
/* handle, pitch, size will be returned */
drmIoctl(fd, DRM_IOCTL_MODE_CREATE_DUMB, &bo->create);
/* bind the dumb-buffer to an FB object */
bo->pitch = bo->create.pitch;
bo->size = bo->create.size;
bo->handle = bo->create.handle;
drmModeAddFB(fd, bo->width, bo->height*2, 24, 32, bo->pitch,
bo->handle, &bo->fb_id);
//每行占用字节数,共占用字节数,MAP_DUMB的句柄
printf("pitch = %d ,size = %d, handle = %d \n",bo->pitch,bo->size,bo->handle);
/* map the dumb-buffer to userspace */
bo->map.handle = bo->create.handle;
drmIoctl(fd, DRM_IOCTL_MODE_MAP_DUMB, &bo->map);
bo->vaddr = mmap(0, bo->create.size, PROT_READ | PROT_WRITE,
MAP_SHARED, fd, bo->map.offset);
/* initialize the dumb-buffer with white-color */
memset(bo->vaddr, 0xff,bo->size);
return 0;
}
|
将framebuffer扩大一倍,通过修改偏移量即可实现双缓冲。
1 2 3 4 5 6 7 8 9 10 11 | static uint32_t drm_set_crtc(void)
{
drmModeAtomicReq *req;
req = drmModeAtomicAlloc();
drmModeAtomicAddProperty(req, crtc_id, pc.property_active, 1);
drmModeAtomicAddProperty(req, crtc_id, pc.property_mode_id, pc.blob_id);
drmModeAtomicAddProperty(req, conn_id, pc.property_crtc_id, crtc_id);
drmModeAtomicCommit(fd, req, DRM_MODE_ATOMIC_ALLOW_MODESET|DRM_MODE_PAGE_FLIP_EVENT, NULL);
drmModeAtomicFree(req);
return 0;
}
|
将crtc的atomic-commit移动到一个函数中,方便调用。
drmModeAtomicCommit(fd, req, DRM_MODE_ATOMIC_ALLOW_MODESET|DRM_MODE_PAGE_FLIP_EVENT, NULL)中添加了flags–DRM_MODE_PAGE_FLIP_EVENT通过设置这个才能让crtc具有page-flip的能力。
1 2 3 4 5 6 7 8 9 10 11 12 13 14 15 16 17 18 | static void drm_page_flip_handler(int fd, uint32_t frame,
uint32_t sec, uint32_t usec,
void *data)
{
drmModeAtomicReq *req;
//切换显示
if(count==0)
count=1;
else if(count==1)
count=0;
//设置偏移量
if(count==1)
ps5.src_y = 1280;
else
ps5.src_y = 0;
drm_set_plane(fd,&ps5);
drm_set_crtc();
}
|
设置完planes后,还需要重新进行crtc的设置,否则继续发送信号会进入堵塞状态,程序将卡在那里不动。
1 2 3 4 5 6 7 8 9 10 11 12 13 14 15 16 17 18 19 20 21 22 23 24 25 26 27 28 29 30 31 32 33 34 35 36 37 38 | int main(int argc, char **argv)
{
int i,j;
drmModeAtomicReq *req;
ev.version = DRM_EVENT_CONTEXT_VERSION;
ev.page_flip_handler = drm_page_flip_handler;
drm_init();
drm_get_plane_property_id(fd,plane_id[0]);
drm_get_plane_property_id(fd,plane_id[1]);
for(i =0;i< buf.width*buf.height;i++)
buf.vaddr[i] = RED;
for(i =buf.width*buf.height;i< buf.width*buf.height*2;i++)
buf.vaddr[i] = BLUE;
ps5.plane_id = plane_id[0];
ps5.fb_id = buf.fb_id;
ps5.crtc_x = 0;
ps5.crtc_y = 0;
ps5.crtc_w = buf.width;
ps5.crtc_h = buf.height;
ps5.src_x = 0;
ps5.src_y = 0;
ps5.src_w = buf.width;
ps5.src_h = buf.height;
drm_set_plane(fd,&ps5);
getchar();
drmHandleEvent(fd, &ev);
getchar();
drmHandleEvent(fd, &ev);
getchar();
drm_exit();
return 0;
}
|
设置drm_page_flip_handler
10.4.2. 编译
方法1:
1 2 | #编译
make
|
方法2:
1 2 | #编译
gcc -o drm-atomic-page-flip drm-atomic-page-flip.c `pkg-config --cflags libdrm` `pkg-config --libs libdrm`
|
10.5. Makefile管理
1 | base_linux/screen/drm/project
|
到了最后一个实验,我们会发现代码量已经达到了360+行,这还是main函数比较短小的情况下, 如果我们还写入自己的东西,那么代码量可能达到我们比较难以阅读地步, 因此,我在这里就做个总结,把drm-atomc-planes.c改成一个project, 我们可以直接使用make命令进行编译以及使用Makefile来管理更多的东西。
1 2 3 4 5 6 7 8 9 10 11 12 13 14 15 16 17 18 19 20 21 22 23 | #源文件夹
project/
|-- Makefile #make编译
|-- includes
| `-- drm-core.h #存放函数定义,以及结构体
`-- sources
|-- main.c #主程序所在
`-- drm-core.c #包含drm显示核心函数的c文件
#编译过后
project/
|-- Makefile #make编译
|-- build
| |-- drm-core.o
| |-- main.o
| `-- test #可执行二进制程序-名字可在Makefile修改
|-- includes
| `-- drm-core.h
|-- sources
| |-- drm-core.c
| `-- main.c
`-- test -> build/test #软链接出来的执行文件,执行此文件就不用切换文件夹执行
|
main.c如下:
1 2 3 4 5 6 7 8 9 10 11 12 13 14 15 16 17 18 19 20 | #include "drm-core.h"
uint32_t color_table[6] = {RED,GREEN,BLUE,BLACK,WHITE,BLACK_BLUE};
int main(int argc, char **argv)
{
int i,j;
drm_init();
getchar();
for(j = 0; j< 6; j++){
for(i = 0;i< buf.width*buf.height;i++)
buf.vaddr[i] = color_table[j];
getchar();
}
drm_exit();
return 0;
}
|
1 2 3 4 5 6 7 8 9 10 11 12 13 14 15 16 17 18 19 20 21 22 23 24 25 26 27 28 29 30 31 32 33 34 35 36 37 38 39 40 41 42 43 44 45 46 47 | #定义变量
TARGET = test
#在Makefile路径上,把执行程序软链接出来
OTHER_TARGET = test
#存放中间文件的路径
BUILD_DIR = build
#存放源文件的文件夹
SRC_DIR = sources
#存放头文件的文件夹
INC_DIR = includes .
#源文件
SRCS = $(wildcard $(SRC_DIR)/*.c)
#目标文件(*.o)
OBJS = $(patsubst %.c, $(BUILD_DIR)/%.o, $(notdir $(SRCS)))
#头文件
DEPS = $(wildcard $(INC_DIR)/*.h)
#指定头文件的路径
CFLAGS = $(patsubst %, -I%, $(INC_DIR))
#编译器
CC = gcc
#引用库
LIBDRM = `pkg-config --cflags libdrm` `pkg-config --libs libdrm`
#目标文件
$(BUILD_DIR)/$(TARGET): $(OBJS)
$(CC) -o $@ $^ $(CFLAGS) $(LIBDRM)
@ln -sf $(BUILD_DIR)/$(TARGET) $(OTHER_TARGET)
#*.o文件的生成规则
$(BUILD_DIR)/%.o: $(SRC_DIR)/%.c $(DEPS)
#创建一个编译目录,用于存放过程文件
#命令前带“@”,表示不在终端上输出
@mkdir -p $(BUILD_DIR)
$(CC) -c -o $@ $< $(CFLAGS) $(LIBDRM)
#伪目标
.PHONY: clean cleanall
#删除输出文件夹
clean:
rm -rf $(BUILD_DIR)
@rm $(OTHER_TARGET)
#全部删除
cleanall:
rm -rf $(BUILD_DIR)
@rm $(OTHER_TARGET)
|
10.6. 双屏异显
rk3568的双屏异显和多屏异显时Planes的设置会有些奇怪。
开启三个屏幕时的分配:
VP0–》 HDMI 可插拔 -》 二
VP1–》 MIPI 主屏幕 -》 三
VP2–》 DP转VGA,可插拔 -》 一
当我们打开了双屏异显时,这里以同时打开HDMI和MIPI屏为例:
通过设置
drminit()中的crtc_id = res->crtcs[0];该函数为获取HDMI的crtc_id通过设置
drminit()中的crtc_id = res->crtcs[1];该函数为获取MIPI屏幕的crtc_id
planes的设置需要多几步:
1 2 3 4 5 | //获取所有的planes资源
plane_res = drmModeGetPlaneResources(fd);
for(i=0;i<plane_res->count_planes;i++){
plane_id[i] = plane_res->planes[i];
}
|
planes的绑定信息,需要我们使用函数来获取:
1 2 3 4 5 6 7 8 9 10 11 12 13 14 15 16 17 | //通过plane_id获取drmModePlanePtr的资源
extern drmModePlanePtr drmModeGetPlane(int fd, uint32_t plane_id);
typedef struct _drmModePlane {
uint32_t count_formats; //格式数量
uint32_t *formats; //格式指针
uint32_t plane_id;
uint32_t crtc_id; //绑定的crtc_id
uint32_t fb_id; //绑定的fb_id
uint32_t crtc_x, crtc_y;
uint32_t x, y;
uint32_t possible_crtcs; //可能绑定的crtc_id
uint32_t gamma_size;
} drmModePlane, *drmModePlanePtr;
|
在RK系列中由于图层是可变的,除了PRIMARY_PLANE可以从crtc_id中得到,其他图层需要possible_crtcs中获得。
possible_crtcs =1 –》 HDMI
possible_crtcs =2 –》 MIPI
因此在操作图层时需要知道哪个CRTC对应哪些Planes。
这里直接提供答案:
HDMI -》 plane_id[0] , plane_id[2] , plane_id[5]
MIPI -》 plane_id[1] , plane_id[3] , plane_id[4]
我们设置图层时既可以依据上方来进行。