
摄像头
本章配套视频介绍:

《40-在鲁班猫上使用摄像头》
https://www.bilibili.com/video/BV1q14y1275u/
LubanCat-RK356x系列板卡使用的摄像头接口是24pin mipi接口,目前适配了ov5648/ov8858摄像头,以及树莓派OV5647的摄像头(需要搭配转接板使用)
除了mipi摄像头外,LubanCat-RK356x系列板卡还支持UVC摄像头,如果你想购买uvc摄像头,可以前往模块推荐列表去选择
注意
RK3528系列不支持摄像头
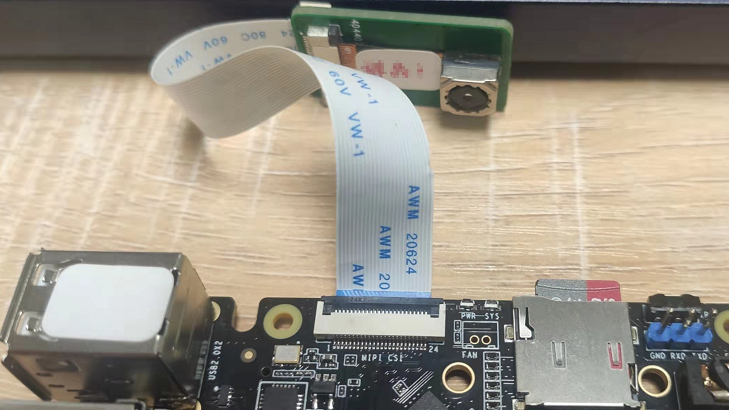
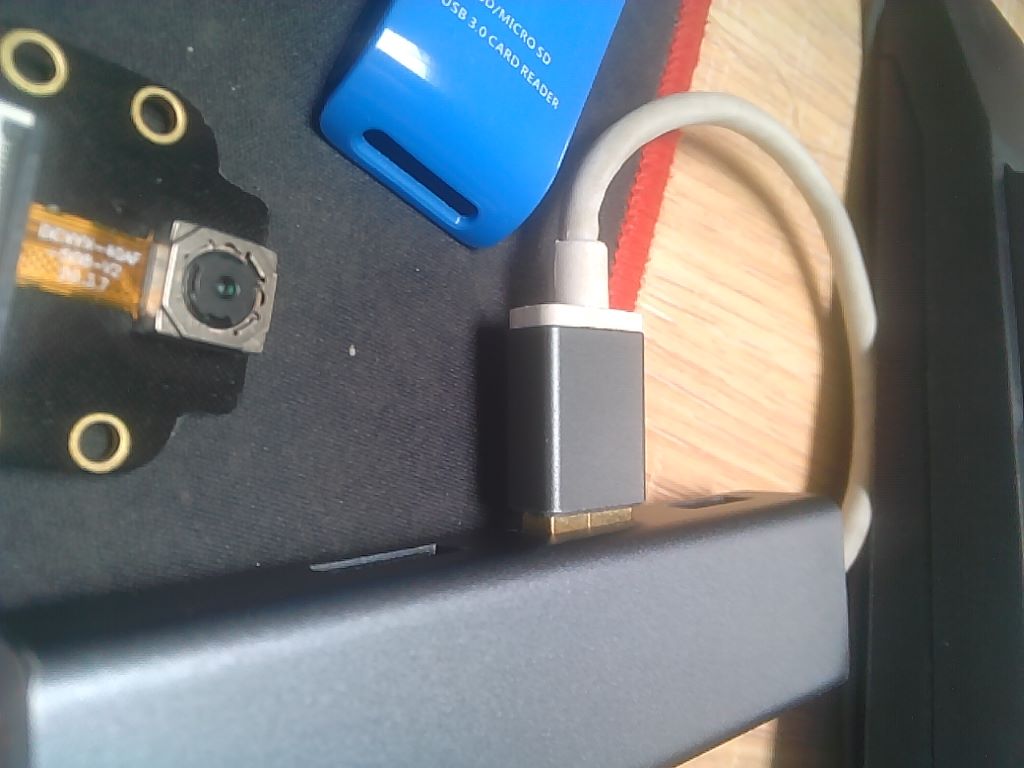
接口的附近都会带有 mipi csi 字眼,接口图如下

注意
排线的金属引脚需要朝向板子
连接图如下
配置摄像头
注解
6月8日后的镜像支持摄像头设备树插件,旧镜像没有摄像头的设备树插件的,旧镜像安装摄像头即可使用
本小节讲解6月8日后的镜像如何使用设备树插件来配置摄像头
单摄
打开鲁班猫的配置文件
1 2 3 4 | #修改配置文件
vi /boot/uEnv/uEnv.txt
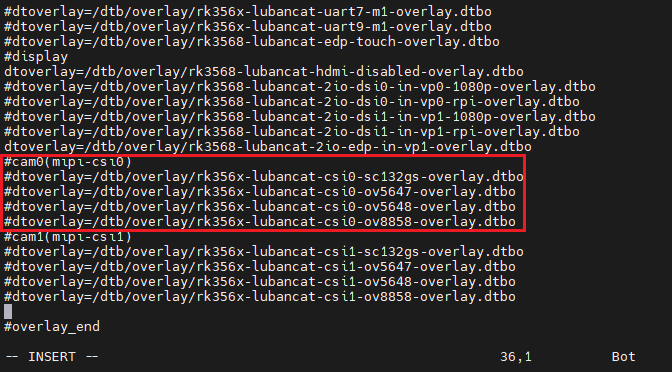
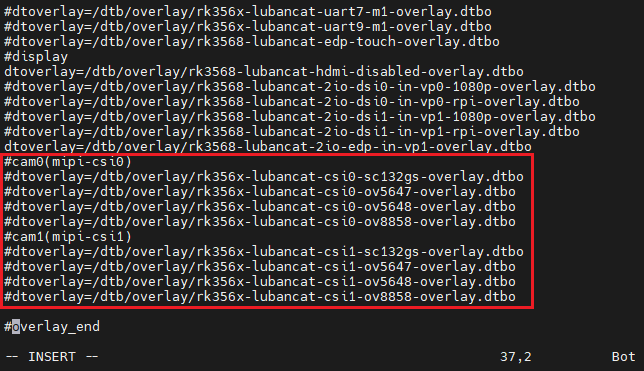
#移动光标就可以看到下图
|
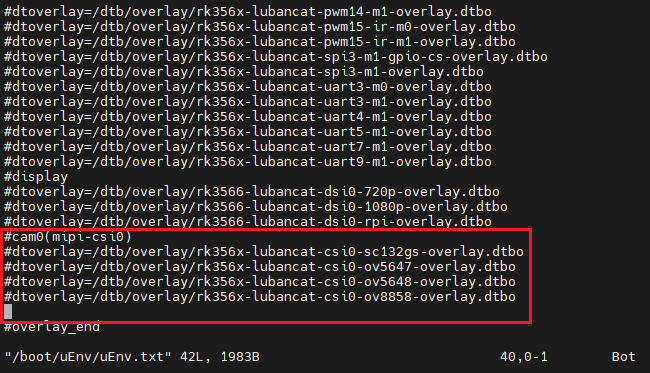
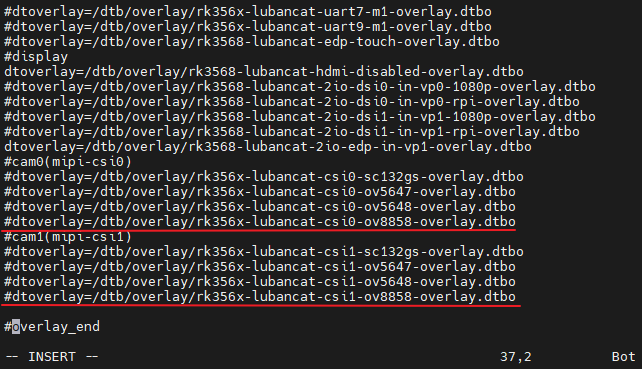
可以看到目前四款支持设备树插件的设备,ov5647,ov5648,ov8858和sc132gs
开启摄像头
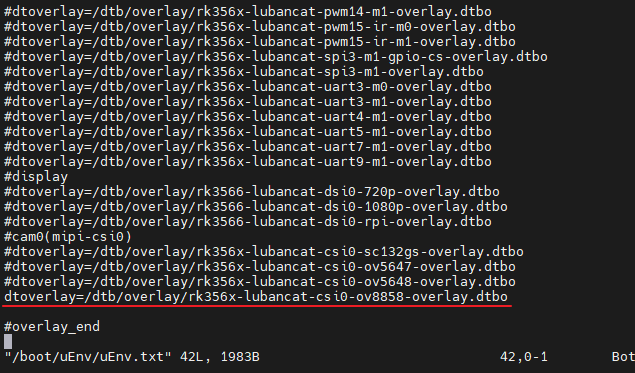
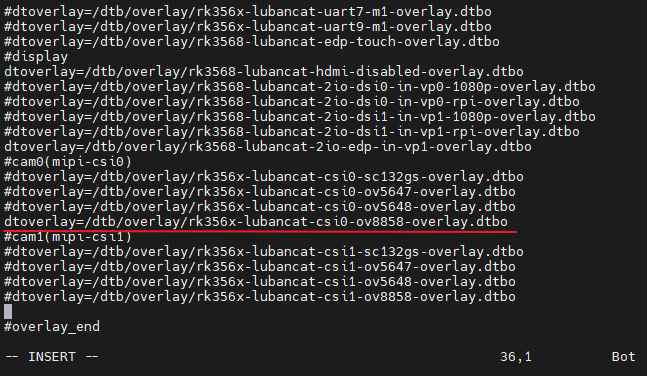
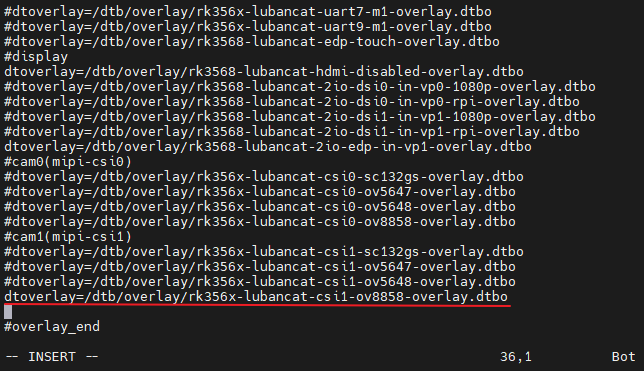
开启摄像头仅需把设备树插件前面的
#删除即可,如下图打开ov8858的摄像头
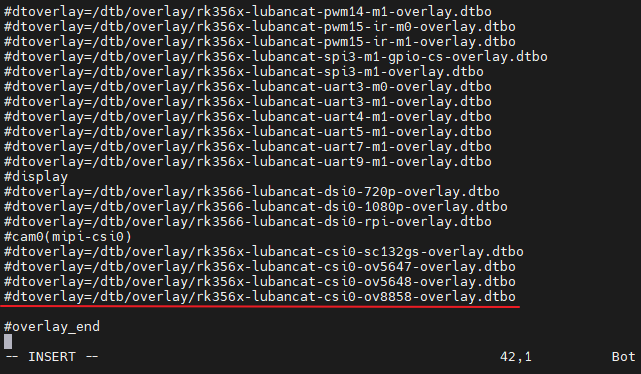
关闭摄像头
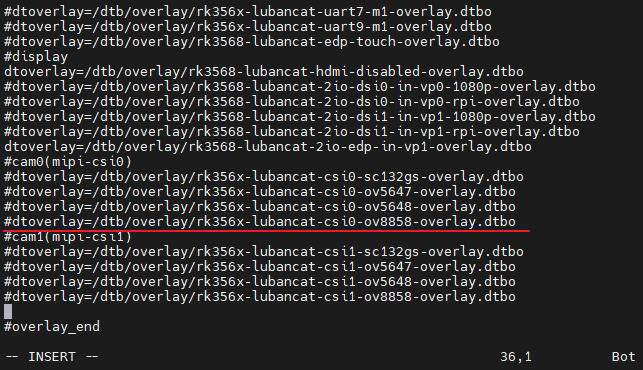
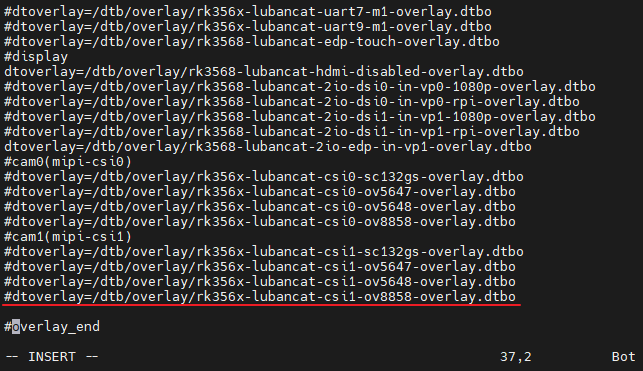
关闭摄像头仅需在设备树插件前面添加
#即可,如下图关闭ov8858的摄像头
修改完配置文件后,需要先保存配置文件,然后重启才能生效
双摄
目前支持双摄的设备有LubanCat2IO,即BTB的底板和金手指的底板
仅开启cam0
打开鲁班猫的配置文件
1 2 3 4 | #修改配置文件
vi /boot/uEnv/uEnv.txt
#移动光标就可以看到下图
|
可以看到目前四款支持设备树插件的设备,ov5647,ov5648,ov8858和sc132gs
开启摄像头
开启摄像头仅需把设备树插件前面的
#删除即可,如下图打开ov8858的摄像头
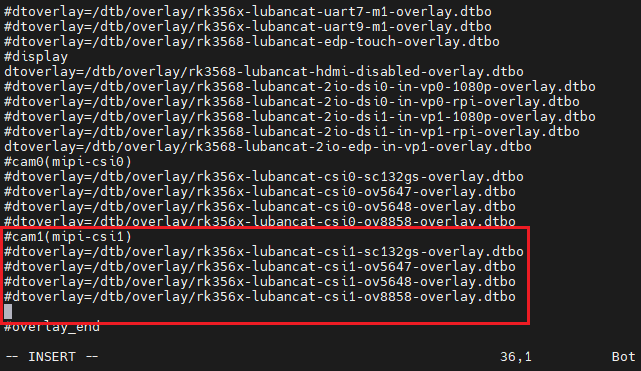
关闭摄像头
关闭摄像头仅需在设备树插件前面添加
#即可,如下图关闭ov8858的摄像头
修改完配置文件后,需要先保存配置文件,然后重启才能生效
仅开启cam1
注解
目前cam1仅支持ov5648和ov8858
打开鲁班猫的配置文件
1 2 3 4 | #修改配置文件
vi /boot/uEnv/uEnv.txt
#移动光标就可以看到下图
|
虽然设备树插件可以看到四个设备树插件,但实际仅支持ov5648和ov8858
开启摄像头
开启摄像头仅需把设备树插件前面的
#删除即可,如下图打开ov8858的摄像头
关闭摄像头
关闭摄像头仅需在设备树插件前面添加
#即可,如下图关闭ov8858的摄像头
修改完配置文件后,需要先保存配置文件,然后重启才能生效
双摄同时开启
注意
目前双摄的同时开启仅适用于ov5648和ov8858
打开鲁班猫的配置文件
1 2 3 4 | #修改配置文件
vi /boot/uEnv/uEnv.txt
#移动光标就可以看到下图
|
虽然设备树插件可以看到四个设备树插件,但实际仅支持ov5648和ov8858
开启摄像头
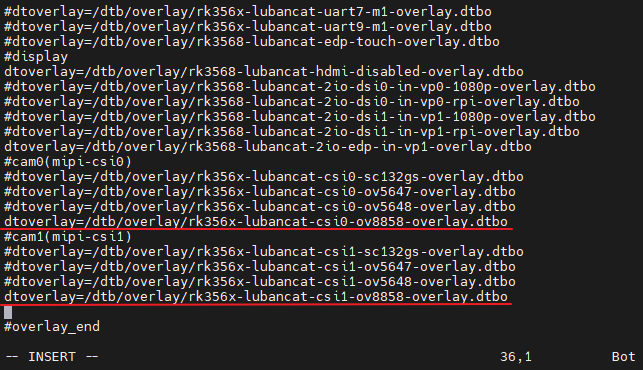
开启摄像头仅需把设备树插件前面的
#删除即可,如下图双摄同时打开ov8858的摄像头
关闭摄像头
关闭摄像头仅需在设备树插件前面添加
#即可,如下图双摄同时关闭ov8858的摄像头
修改完配置文件后,需要先保存配置文件,然后重启才能生效
查看摄像头信息
列出摄像头设备
1 | v4l2-ctl --list-devices
|
单个摄像头如下图
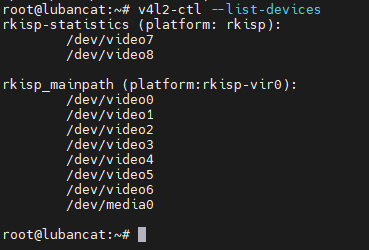
其中/dev/video0就是这个摄像头的设备
双摄像头同时开启如下图
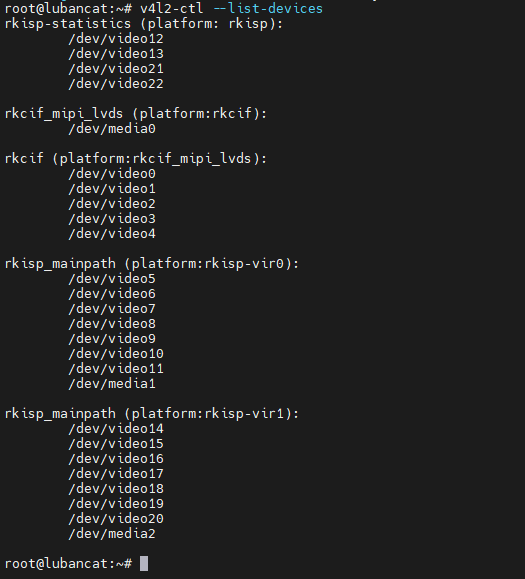
其中/dev/video5就是cam0的设备,/dev/video14就是cam1的设备
查看摄像头格式和分辨率
1 2 | #查看支持的格式
v4l2-ctl --list-formats-ext --device=/dev/video0
|
命令输出如下:
1 2 3 4 5 6 7 8 9 10 11 12 13 14 15 16 17 18 19 20 21 22 23 24 25 26 27 | cat@lubancat:~$ v4l2-ctl --list-formats-ext --device=/dev/video0
ioctl: VIDIOC_ENUM_FMT
Type: Video Capture Multiplanar
[0]: 'UYVY' (UYVY 4:2:2)
Size: Stepwise 32x16 - 1296x972 with step 8/8
[1]: '422P' (Planar YUV 4:2:2)
Size: Stepwise 32x16 - 1296x972 with step 8/8
[2]: 'NV16' (Y/CbCr 4:2:2)
Size: Stepwise 32x16 - 1296x972 with step 8/8
[3]: 'NV61' (Y/CrCb 4:2:2)
Size: Stepwise 32x16 - 1296x972 with step 8/8
[4]: 'YM16' (Planar YUV 4:2:2 (N-C))
Size: Stepwise 32x16 - 1296x972 with step 8/8
[5]: 'NV21' (Y/CrCb 4:2:0)
Size: Stepwise 32x16 - 1296x972 with step 8/8
[6]: 'NV12' (Y/CbCr 4:2:0)
Size: Stepwise 32x16 - 1296x972 with step 8/8
[7]: 'NM21' (Y/CrCb 4:2:0 (N-C))
Size: Stepwise 32x16 - 1296x972 with step 8/8
[8]: 'NM12' (Y/CbCr 4:2:0 (N-C))
Size: Stepwise 32x16 - 1296x972 with step 8/8
[9]: 'YU12' (Planar YUV 4:2:0)
Size: Stepwise 32x16 - 1296x972 with step 8/8
.
.
.
|
可以看到当前摄像头支持UYVY、422P、NV16等格式,支持的最大分辨率为1296x972。
重要
无论是否接上摄像头,系统里/dev/video0都是存在的,如果接上摄像头,查看摄像头最大分辨率是800*600,而实际参数不是该值,则可能当前摄像头不是video0,或者摄像头的硬件连接或者驱动有问题。
查看摄像头支持的配置参数
1 2 | #查看摄像头支持的配置参数
v4l2-ctl -d /dev/video0 -L
|
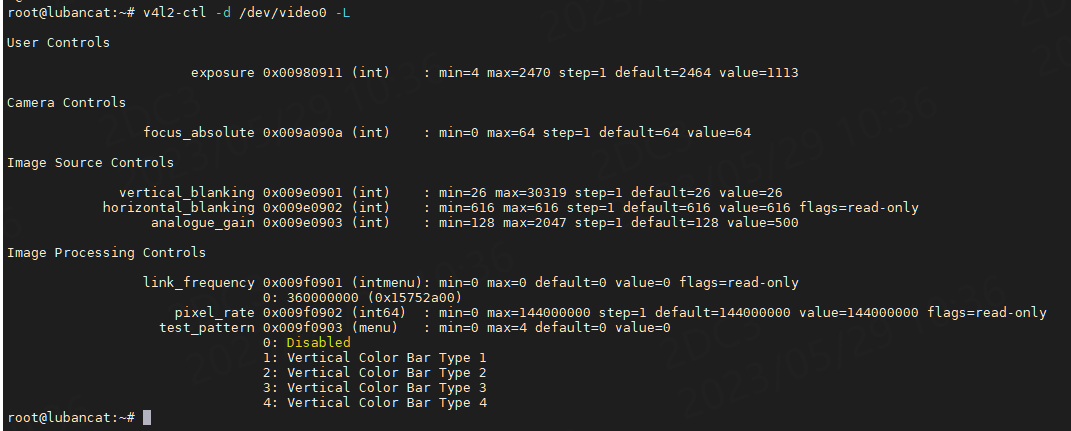
参数说明如下:
参数 |
说明 |
|---|---|
exposure |
曝光度,用于控制相机的曝光水平。 |
focus_absolute |
对焦程度,用于调整相机的对焦状态。 |
vertical_blanking |
垂直空白时间,指相机图像帧的垂直同步信号之间的时间,一般用于计算图像帧率。 |
horizontal_blanking |
水平空白时间,指相机图像帧的水平同步信号之间的时间,一般用于计算图像帧率。 |
analogue_gain |
模拟增益,用于增强相机对光线的捕捉能力。 |
link_frequency |
链接频率,用于控制数据在不同设备间传输的速度。 |
pixel_rate |
像素速率,用于表示相机输出图像的数据传输速率。 |
test_pattern |
测试图案,用于在关闭相机时进行测试,以确保相机功能正常。 |
以上参数为ov8858的可设置参数,每个参数都有默认值(default)和当前值(value),如果使用不同摄像头则很可能可设置参数和默认配置不同。
ov8858摄像头支持通过瑞芯微的3A服务自动调节焦距、白平衡等参数,如果需要手动调节以上参数,参考如下命令。
1 2 | #调节摄像头模拟增益为500
v4l2-ctl -d /dev/video0 -c analogue_gain=500
|
注意
有些摄像头不支持自动调参,则需要我们手动调节参数到合适的值,否则摄像头获取到的图像将异常。该类摄像头调参参考本章手动调节摄像头参数小节。
命令行拍摄视频
1 2 3 4 5 6 7 8 | #拍摄视频
v4l2-ctl --verbose -d /dev/video0 --set-fmt-video=width=800,height=600,pixelformat='NV12' --stream-mmap=4 --set-selection=target=crop,flags=0,top=0,left=0,width=800,height=600 --stream-to=out.yuv
#播放视频
ffplay -f rawvideo -video_size 800x600 -pixel_format nv12 out.yuv
#out.yuv 便是拍摄出来的视频了
|
命令行拍摄照片
1 2 3 4 | #拍摄照片
sudo gst-launch-1.0 v4l2src num-buffers=1 device=/dev/video0 ! jpegenc ! filesink location=picture.jpg
#picture.jpg就是拍摄出来的照片了
|
桌面端拍摄-guvcview
guvcview是一个功能十分强大的摄像头预览和拍摄软件。
1 2 3 | #安装软件
sudo apt update
sudo apt install guvcview
|
双摄预览使用方法
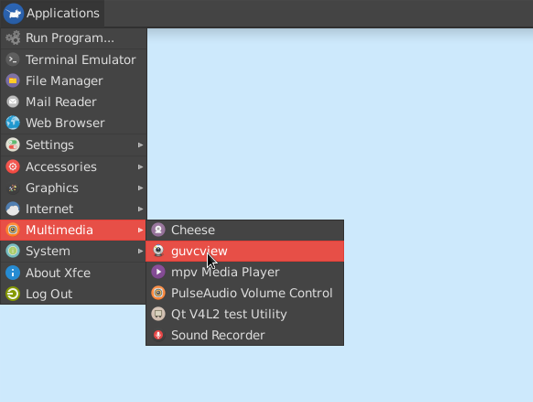
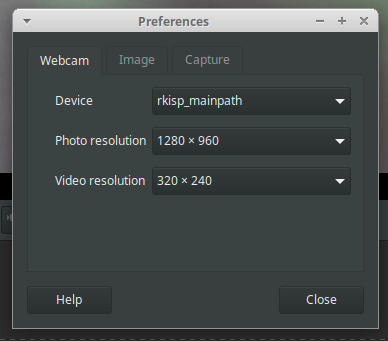
桌面端打开guvcview,如下图
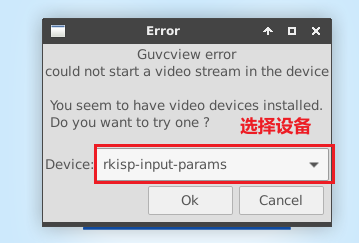
然后会碰到找不到设备,点击设备的选项,自动选择,如下图
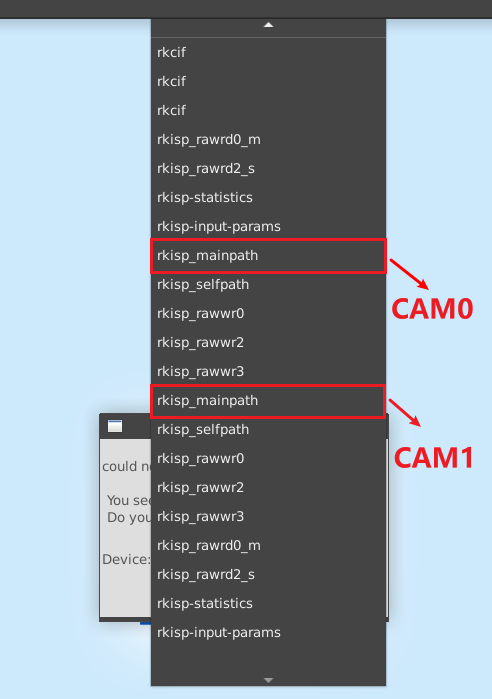
在列出的设备里面,有两个是真正的摄像头的设备,他们的命名都是
rkisp_mainpath只能通过先后顺序判断他们是哪个设备, 排在前面的是CAM0,排在后面的是CAM1, 选择其中一个设备,然后打开
打开设备后就会看到下图的繁荣景象
image_control,可以调整预览图像的显示情况,间接控制摄像头的驱动。
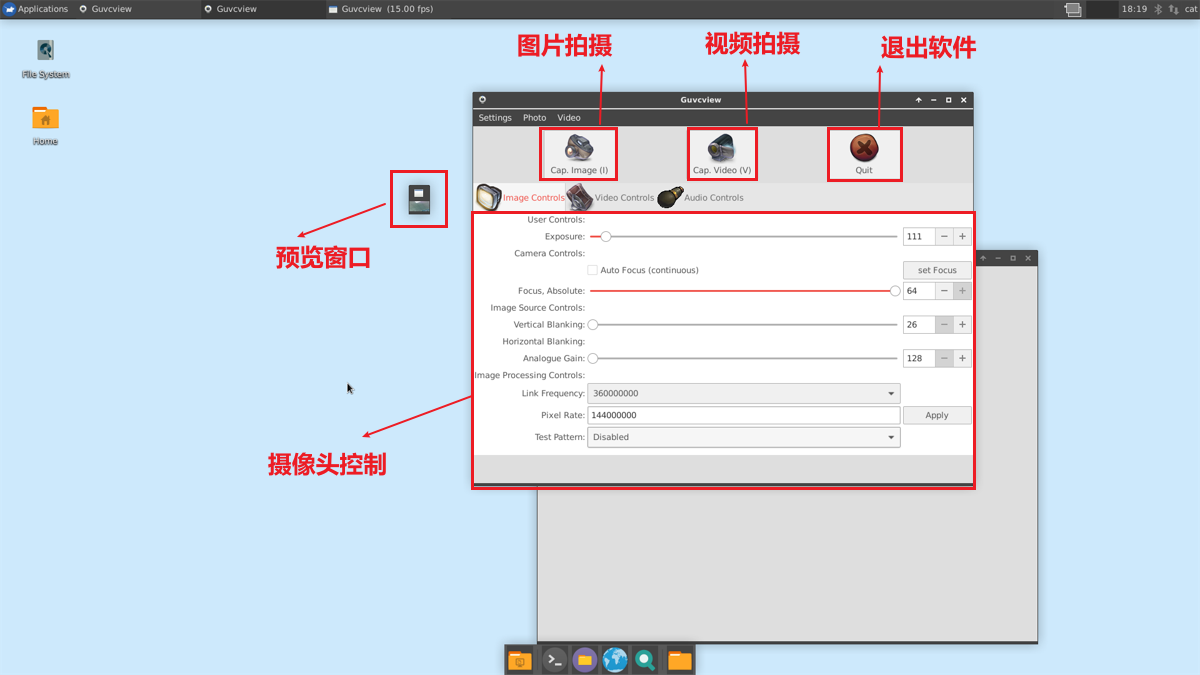
第一次打开设备,图像的预览窗口的分辨率会很低,需要在
video_control里修改video_control的使用如图下
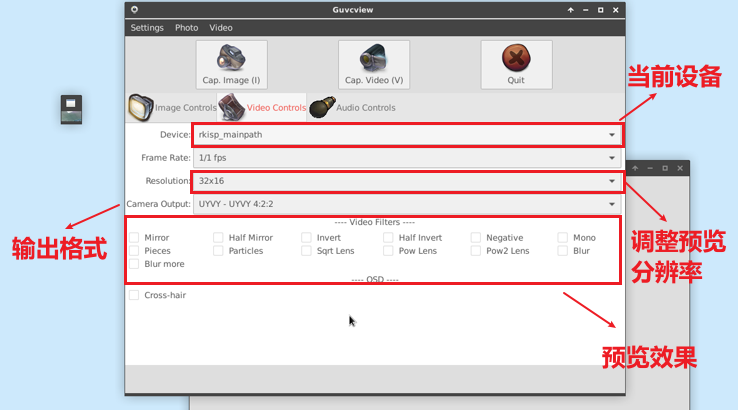
调整完成后,一个摄像头就调整结束了,然后可以重复上述操作打开另一个摄像头
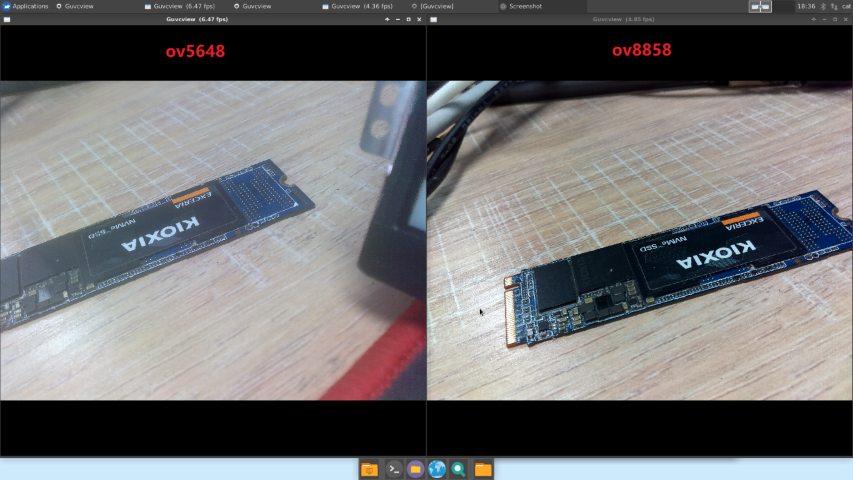
两个摄像头同时预览的效果图如下
手动调节摄像头参数
有些摄像头不支持自动调参,则需要我们手动调节参数到合适的值,否则摄像头获取到的图像将异常。
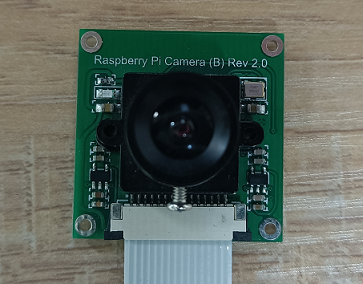
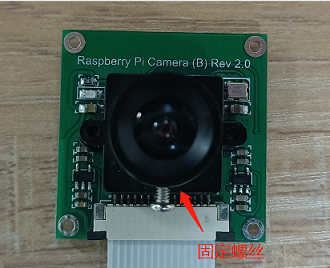
以下使用树莓派ov5647作为说明,使用的具体型号为Camera(B) Rev2.0,实物图如下所示:
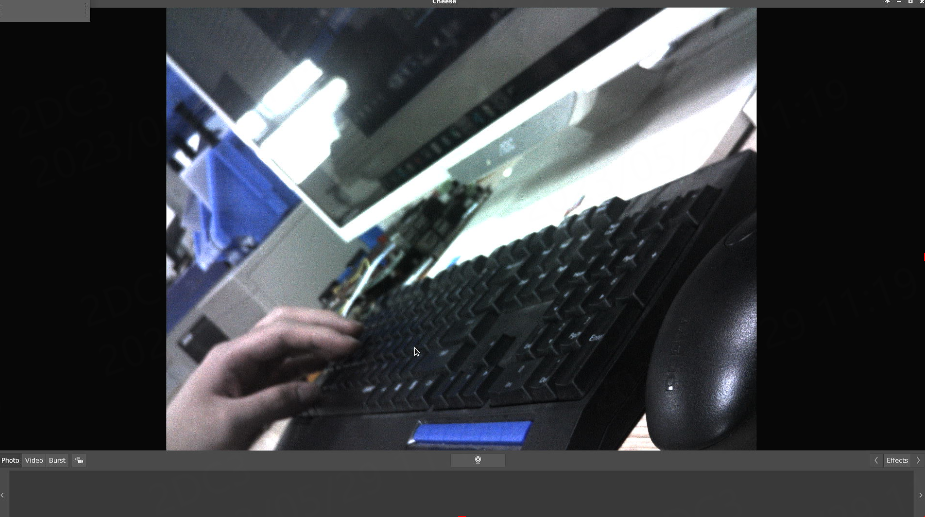
该摄像头默认不支持自动调参,如果使用默认配置,则获取到的图像偏暗偏绿,如下图所示:
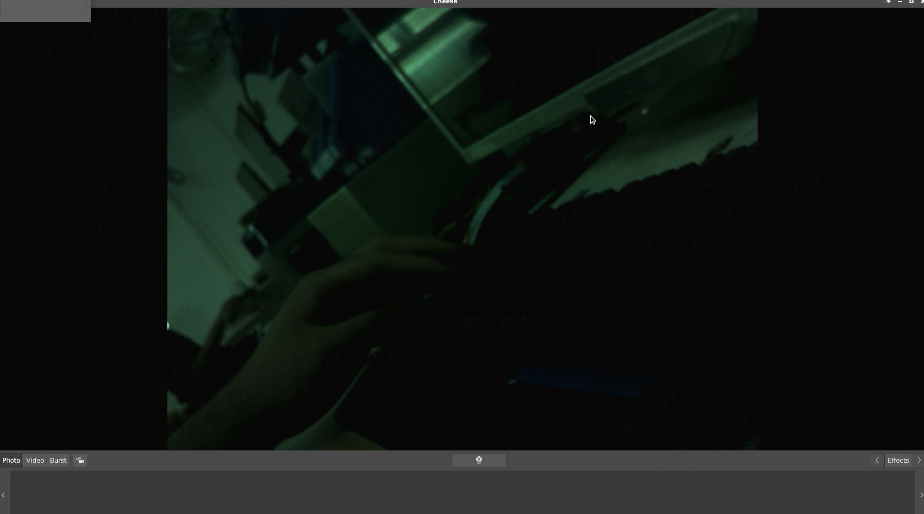
原因在于该摄像头不支持3A服务,需要手动配置参数,而原来的默认参数很糟糕,导致图像异常。
查看摄像头支持的配置参数
1 2 | #查看摄像头支持的配置参数
v4l2-ctl -d /dev/video0 -L
|
摄像头可配置参数如下图所示:
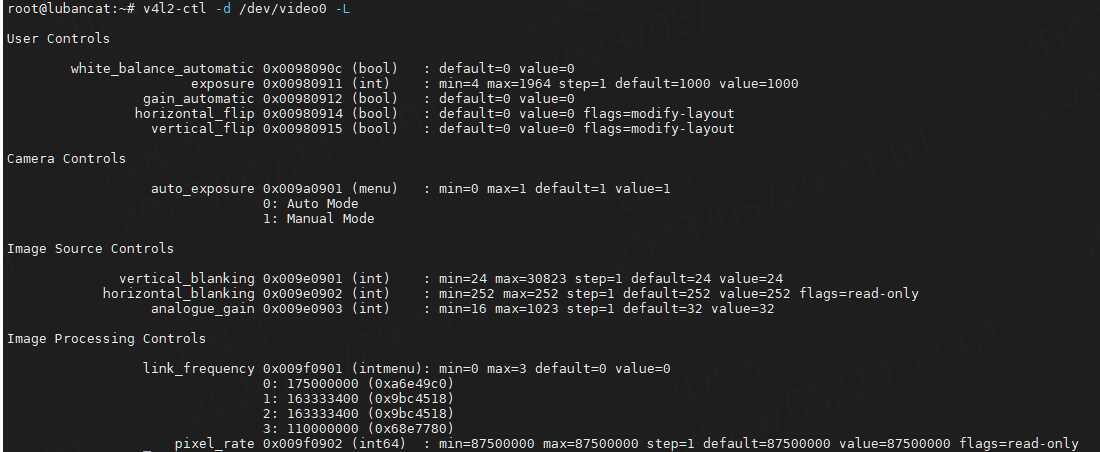
参数说明如下:
参数 |
说明 |
|---|---|
white_balance_automatic |
白平衡自动控制开关,0 表示关闭,1 表示开启。 |
exposure |
曝光时间,单位是微秒。通过适当调节曝光时间可以改变图像的亮度。 |
gain_automatic |
增益自动控制开关,0 表示关闭,1 表示开启。 |
horizontal_flip |
水平翻转开关,0 表示关闭,1 表示开启。 |
vertical_flip |
垂直翻转开关,0 表示关闭,1 表示开启。 |
auto_exposure |
自动曝光模式切换,0 表示自动模式,1 表示手动模式。 |
vertical_blanking |
垂直消隐时间,单位为行数。 |
horizontal_blanking |
水平消隐时间,单位为像素数。 |
analogue_gain |
模拟增益控制,可以通过调节该参数来改变图像的亮度。 |
link_frequency |
接口频率,影响视频传输速率,根据不同的频率可以选择不同的传输速率。 |
可以发现该摄像头和前面提到的ov8858摄像头的参数不同,多了几个控制开关如下:
white_balance_automatic :白平衡自动控制开关
gain_automatic :增益自动控制开关
auto_exposure :自动曝光模式切换
并且我们可以发现以上自动控制开关的值都为0,默认处于关闭状态。
值得说明的是图像偏绿是没有开启白平衡调节导致,图像偏暗是增益和曝光时间参数不对导致。
我们打开这些自动控制开关,再尝试获取摄像头图像,使用如下命令修改配置:
1 2 3 4 5 6 | #打开白平衡自动控制开关
v4l2-ctl -d /dev/video0 -c white_balance_automatic=1
#打开增益自动控制开关
v4l2-ctl -d /dev/video0 -c gain_automatic=1
#打开自动曝光模式切换
v4l2-ctl -d /dev/video0 -c auto_exposure=1
|
重新获取到的图像如下:
可以发现图像颜色正常,但略微模糊,我们可以调节镜头焦距使我们想拍摄的物体清晰。笔者使用的摄像头需要拧松固定螺丝,然后旋转镜头从而调节焦距。
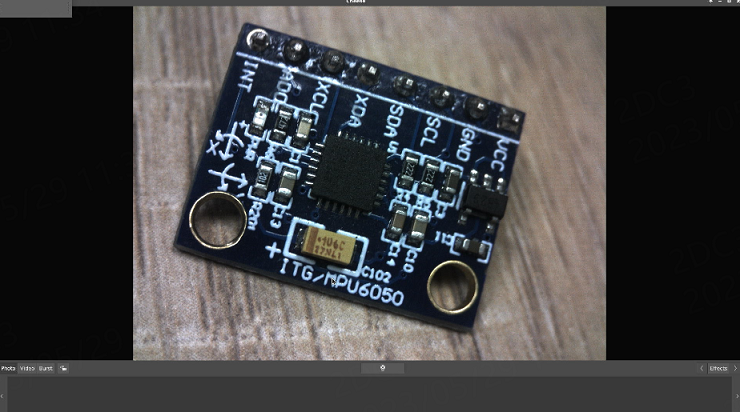
调节焦距,拍摄一个物体进行实际测试,如下图所示:
除了上述可以打开自动控制开关,我们也可以手动调节参数进行微调。
使用如下命令关闭增益和曝光自动控制开关,而白平衡自动控制开关不能关闭,因为没有提供白平衡相关设置。
1 2 3 4 5 6 7 8 9 | #关闭增益自动控制开关
v4l2-ctl -d /dev/video0 -c gain_automatic=0
#关闭自动曝光模式切换
v4l2-ctl -d /dev/video0 -c auto_exposure=0
#设置曝光时间
v4l2-ctl -d /dev/video0 -c exposure=1964
#设置模拟增益
v4l2-ctl -d /dev/video0 -c analogue_gain=150
|
需根据实际情况不断调节参数才能获取到清晰的图像。