9. 数据类和容器
经过前面的章节,我们应该对Qt基本使用和相关机制特性有了一定的了解, 相信认真看过例程代码,修改练习过的同学应该可以写出一些简单的控件了, 野火demo界面大多都是使用前面的套路来完成的,也就是教程UI部分我们就暂时告与段落了。
接下来的几章,我们一起学习Qt更复杂的一些类,利用这些类来帮我们实现特定的一些需求。 比如说数据处理,文件存储等等,这些也是一个应用所必须的。
我们就从Qt中的数据结构和容器开始吧。
9.1. 数据
9.1.1. 基本数据类型
Qt在<QtGlobal>中定义了下表中的数据类型, 这些类型定义部分是对基本类型的方便性定义(其中一些类型保证Qt支持的所有平台上的某些位大小相同), 部分类型是与Qt消息处理有关的类型。
类型 |
数据类型 |
含义 |
|---|---|---|
typedef |
QFunctionPointer |
这是typedef的类型void (*)(),它指向不带参数且返回void的函数的指针 |
typedef |
QtMessageHandler |
指向具有以下签名的函数的指针的typedef:void myMessageHandler((QtMsgType,const QMessageLogContext&,const QString&) |
enum |
QtMsgType { QtDebugMsg, …} |
该枚举描述了可以发送到消息处理程序(QtMessageHandler)的消息 |
typedef |
qint8 |
signed char |
typedef |
qint16 |
signed short |
typedef |
qint32 |
signed int |
typedef |
qint64 |
long long int |
typedef |
qintptr |
整数类型,用于表示带符号整数中的指针(用于哈希等) |
typedef |
qlonglong |
long long int |
typedef |
qptrdiff |
表示指针差异的整数类型 |
typedef |
qreal |
double |
(alias) |
qsizetype |
|
typedef |
quint8 |
unsigned char |
typedef |
quint16 |
unsigned short |
typedef |
quint32 |
unsigned int |
typedef |
quint64 |
unsigned long long |
typedef |
quintptr |
整数类型,用于以无符号整数表示指针(用于哈希等) |
typedef |
qulonglong |
unsigned long long int |
typedef |
uchar |
unsigned char |
typedef |
uint |
unsigned int |
typedef |
ulong |
unsigned long |
typedef |
ushort |
unsigned short |
<QtGlobal>也定义了很多函数,比如绝对值qAbs()函数,qMin()和qMax()来检索两个给定对象的最小值和最大值等
除了函数还声明了很多宏,这些申明的宏使程序员能够向其应用程序添加编译器或平台特定的代码,而其他宏则是用于较大操作的便捷宏。 比如Q_PROCESSOR_ARM,定义是否为ARM处理器编译应用程序。Qt当前支持三个可选的ARM版本:Q_PROCESSOR_ARM_V5,Q_PROCESSOR_ARM_V6和Q_PROCESSOR_ARM_V7。
9.1.2. 常用数据类
我们先来了解一个概念——隐式共享。
我先举一个例子,我们定义一个str1,再定义一个str2等于str1。 定义这两个变量的时候,计算机内部会对这两个变量值进行存储,由于str1比较大,str2和str1内容相同, 就会造成资源的浪费。
string str1("hellohellohellohellohellohellohellohellohellohellohellohellohellohello");
string str2 = str1;
于是Qt中就提供了一种隐士共享,共享类由指向共享数据块的指针组成,该数据块包含引用计数和数据。
QString str1("hellohellohellohellohellohellohellohellohellohellohellohellohellohello");
QString str2 = str1;
当我们用str2 = str1,operator=() 就会进行隐式共享对象分配,这时计算机内部就不会再完全重新开辟一个空间来存储str2, 而是进行浅层拷贝,也就是只拷贝一个指针,这个指针指向str1的数据,此时str1和str2就共用一个数据块。 浅层拷贝的时候,引用计数会自加,而当对象取消引用共享数据时,引用计数就减少。当参考计数变为零时,共享数据将被删除。
当我们需要对str2进行修改的时候,直接修改是不可行的,这个时候我们就需要将对象与共享块分离,通常称为写时复制(深层拷贝)。
共享的好处是程序不需要不必要地复制数据,从而减少了内存使用量并减少了数据复制。可以轻松分配对象,将其作为函数参数发送以及从函数返回。 隐式共享主要发生在幕后。目前我们只需要了解这个概念,以及明白我们下面讲到的类都是隐式共享的可以了。
9.1.2.1. QBitArray
QBitArray是一个数组,它可以访问单个位并提供可在整个位数组上工作的运算符(AND,OR,XOR和NOT)。
QBitArray bit(200);
qDebug()<<bit;
下面的代码构造一个QBitArray,其中包含200位初始化为false(0)的位:
bit.resize(3);
bit[0] = true;
bit[1] = false;
bit[2] = true;
qDebug()<<bit;
QBitArray使用基于0的索引,就像C ++数组一样,可以使用 operator[] 访问特定索引位置的位。
bit.setBit(0, false);
bit.setBit(1, true);
bit.setBit(2, false);
qDebug()<<bit;
同样使用 testBit() 和 setBit() 访问QBitArray中的位比使用 operator[] 效率更高。
QBitArray支持位运算,如下面的示例:
QBitArray bit_x(5);
bit_x.setBit(3, true);// x: [ 0, 0, 0, 1, 0 ]

QBitArray bit_y(5);
bit_y.setBit(4, true);// y: [ 0, 0, 0, 0, 1 ]

bit_x |= bit_y;// x: [ 0, 0, 0, 1, 1 ]
qDebug()<<bit_x<<bit_y;
bit_x &= bit_y;// x: [ 0, 0, 0, 0, 1 ]
qDebug()<<bit_x<<bit_y;
QBitArray区分数组null和empty;分别通过isNull()和isEmpty()来判断
isNull() 如果此位数组为null,则返回true;否则返回false;
isEmpty() 此位数组的大小是否为0,是返回true;否则返回false。
qDebug()<<QBitArray().isNull();
qDebug()<<QBitArray().isEmpty();
qDebug()<<QBitArray(3).isNull();
qDebug()<<QBitArray(3).isEmpty();
9.1.2.2. QByteArray
QByteArray可用于存储原始字节(包括’0’和传统的以’0’结尾的8位字符串)。使用QByteArray比使用const char*更为方便。 QByteArray在主要以下两种情况中使用:需要存储原始二进制数据时和在内存保护至关重要时(例如,对于嵌入式Linux使用Qt)。
初始化QByteArray的一种方法就是将一个 const char * 传递给其构造函数。
QByteArray byte("Hello");
qDebug()<<byte.data();
qDebug()<<byte.size();
上诉byte大小为5,数据为 “Hello”,数组byte末尾还保留了一个额外的 “0” 字符。
resize()可以重新设置数组的大小,并按字节数重新初始化数据字节。 QByteArray使用基于0的索引,就像C ++数组一样,可以使用 operator[] 访问特定索引位置的字节,
如果只读,我们也可以使用at()访问指定的字节,left()、right()或mid()则可以一次读取多个字节。
byte.resize(5);
byte[0] = 0x3c;
byte[1] = 0xb8;
byte[2] = 0x64;
byte[3] = 0x18;
byte[4] = 0xca;

qDebug()<<byte;
qDebug()<<byte[3];
qDebug()<<byte[4];

for (int i = 0; i < byte.size();i++) {
    qDebug()<<byte.at(i);
}

qDebug()<<byte.right(2);
qDebug()<<byte.left(2);
qDebug()<<byte.mid(2,2);
QByteArray可以包含 “0”, rize()函数总会计算”0”,但是date()和constData()返回结果总是以”0”作为结束标志。
qDebug()<<byte.right(2);
qDebug()<<byte.left(2);
qDebug()<<byte.mid(2,2);

QByteArray byte1("ca\0r\0t");
qDebug()<<byte1.size();                     // Returns 2.
qDebug()<<byte1.data();
qDebug()<<byte1.constData();                // Returns "ca" with terminating \0.

QByteArray byte2("ca\0r\0t", 3);
qDebug()<<byte2.size();                     // Returns 3.
qDebug()<<byte2.constData();                // Returns "ca\0" with terminating \0.

QByteArray byte3("ca\0r\0t", 4);
qDebug()<<byte3.size();                     // Returns 4.
qDebug()<<byte3.constData();                // Returns "ca\0r" with terminating \0.
for(int i=0; i<byte3.size();i++)
{
    qDebug()<<byte3.at(i);
}

const char cart[] = {'c', 'a', '\0', 'r', '\0', 't'};
QByteArray byte4(QByteArray::fromRawData(cart, 6));
qDebug()<<byte4.size();                     // Returns 6.
qDebug()<<byte4.constData();                // Returns "ca\0r\0t" without terminating \0.
QByteArray提供以下用于修改字节数据的基本功能:追加append(),前置添加prepend(),插入insert(),替代replace()和移除remove()。 如下面的示例,分别输出 and、 rock and、 rock and rock、 rock & rock。
QByteArray byte5("and");
qDebug()<<byte5;
byte5.prepend("rock ");
qDebug()<<byte5;
byte5.append(" roll");
qDebug()<<byte5;
byte5.replace(5, 3, "&");
qDebug()<<byte5;
indexOf()或lastIndexOf()提供查找QByteArray中所有出现的特定字符或子字符串,返回字符或子字符串的索引位置(如果找到的话)。 contains()用于检查QByteArray是否包含特定字符或子字符串,count()则可以用来统计特定字符或子字符串在字节数组中出现的次数。
QByteArray byte6("We must be <b>bold</b>, very <b>bold</b>");
int j = 0;
while ((j = byte6.indexOf("<b>", j)) != -1) {
    qDebug() << "Found <b> tag at index position " << j;
    ++j;
}

if(byte6.contains("b"))
{
    qDebug()<<byte6.count("b");
}
QByteArray还支持数据类型转换以及大小写转换。
QByteArray byte7("0f");
bool ok;
qDebug()<<byte7.toInt(&ok,10);
qDebug()<<byte7.toInt(&ok,16);
qDebug()<<byte7.toLong(&ok,10);
qDebug()<<byte7.toUpper();
9.1.2.3. QChar
在Qt中,Unicode字符是没有任何标记或结构的16位实体。QChar表示这样的实体。 它是轻量级的,因此可以在任何地方使用。大多数编译器将其视为unsigned short。
9.1.2.4. QString
除了QByteArray,Qt还提供了QString类来存储字符串数据。大多数时候我们都使用QString。 它存储16位Unicode字符,可以轻松地在应用程序中存储US-ASCII(ANSI X3.4-1986)和Latin-1(ISO 8859-1)。
QString使用也包含QByteArray中部分方法,
QString str = "Hello";
static const QChar data[4] = {0x0055, 0x006e, 0x10e3, 0x03a3};
QString str1(data, 4);

QString str2;
str2.resize(4);

str[0] = QChar('U');
str[1] = QChar('n');
str[2] = QChar(0x10e3);
str[3] = QChar(0x03a3);

QString str3="asfcfrvfbgkiocmewiocmiq";
for (int i = 0; i<str.size(); i++)
{
    if (str3.at(i) >= QChar('a')  && str3.at(i) <= QChar('f'))
    qDebug()  << "Found character in range [a-f]:"<<str3.at(i);
}

QString str4="extern";
if (str4 == "auto")
    qDebug()<<"str is auto";
else if(str4 == "extern")
    qDebug()<<"str is extern";
else
    qDebug()<<str4;

QString str5("and");
qDebug()<<str5;
str5.prepend("rock ");
qDebug()<<str5;
str5.append(" roll");
qDebug()<<str5;
str5.replace(5, 3, "&");
qDebug()<<str5;

qDebug()<<str5.toUpper();
qDebug()<<str5.toLower();
qDebug()<<str5.count("l");
qDebug()<<str5.length();
qDebug()<<str5.left(5).size();
qDebug()<<str5.mid(2,8);
qDebug()<<str5.append(str5);

QString str6 = "We must be <b>bold</b>, very <b>bold</b>";
j=0;
while ((j = str6.indexOf("<b>", j)) != -1) {
    qDebug()  << "Found <b> tag at index position:"<<j;
    ++j;
}
字符串和数值之间的转换
QString str7 = "56.5";
qDebug()<<str7.toInt();
qDebug()<<str7.toDouble();
qDebug()<<str7.toFloat();
qDebug()<<str7.toLong();
qDebug()<<QString::number(53);
qDebug()<<QString::number(4.4156);
qDebug()<<QString::number(4.4156,'f',2);

QString str8 = "F0F0";
bool OK;
int val = str8.toInt(&OK,16);
qDebug()<<val;
qDebug()<<QString::number(val,2);
qDebug()<<QString::number(val,8);
qDebug()<<QString::number(val,10);
qDebug()<<QString::number(val,16);
8位字符串和Unicode字符串之间转换,以QByteArray的形式返回字符串
qDebug()<<str8.toLocal8Bit();
qDebug()<<str8.toLatin1();
qDebug()<<str8.toUtf8();
toLatin1()返回Latin-1(ISO 8859-1)编码的8位字符串。
toUtf8()返回UTF-8编码的8位字符串。UTF-8是US-ASCII(ANSI X3.4-1986)的超集,它通过多字节序列支持整个Unicode字符集。
toLocal8Bit()使用系统的本地编码返回8位字符串。
QString也提供了fromLatin1(),fromUtf8()和fromLocal8Bit()对应的转换函数。
字符串的拆分和拼接,除了前面提到的append(),prepend(),insert(),replace()和remove(),indexOf()或lastIndexOf()以及trimped()和simplified()。 常见的操作还有如下方式。
QString str9 = "To get an upper - or lowercase version of a string use toUpper() or toLower().";
QStringList list= str9.split(" ");
int count=0;
for(int i=0; i<list.count();i++)
{
    qDebug()<<list.at(i);
    if(list.at(i)== "or")
    {
        qDebug()<< "'or' times:"<<++count;
    }
}

QString name ="xiao fang";
int age=22;
qDebug()<<QString("%1 is %2 years old").arg(name).arg(age);
字符串的查询和比较包含,startsWith()或endssWith(),contains(),count(), 以及重载的operator <(),operator <=(),operator ==(),operator> =(),operator +()等等
9.1.2.5. QStringList
QStringList继承自QList < QString >,提供字符串列表
QList的所有功能也适用于QStringList。例如可以使用isEmpty()测试列表是否为空,并且可以调用诸如append(),prepend(),insert(),replace(),removeAll(),removeAt(),removeFirst(), removeLast()和removeOne()之类的函数来修改QStringList。此外,QStringList提供了一些便利功能,这些功能使处理字符串列表更加容易:
QStringList默认构造函数会创建一个空列表。我们可以使用initializer-list构造函数创建包含元素的列表, 并通过insert() append()或者重载的 operator + =()和 operator <<()将字符串添加到列表中。
QStringList fonts = { "Arial", "Helvetica", "Times" };
fonts << "Courier" << "Verdana";
fonts += "chinese";
要遍历QStringList,可以使用索引位置或QList的Java样式和STL样式的迭代器类型:
for (int i = 0; i < fonts.size(); ++i)
qDebug()<< fonts.at(i).toLocal8Bit().constData();

QStringListIterator javaStyleIterator(fonts);
while (javaStyleIterator.hasNext())
qDebug() << javaStyleIterator.next().toLocal8Bit().constData();
QStringList::const_iterator constIterator;
for (constIterator = fonts.constBegin(); constIterator != fonts.constEnd();++constIterator)
qDebug() << (*constIterator).toLocal8Bit().constData();
QStringList提供了几个函数,使您可以操纵列表的内容。您可以使用join()函数将字符串列表中的所有字符串连接为单个字符串(带有可选的分隔符), 也可以使用split()要将字符串分解为字符串列表,split的参数可以是单个字符,字符串,QRegularExpression(正则表达式)。 QString列表还提供了filter()函数,该函数使您可以提取一个新列表,该列表仅包含那些包含特定子字符串(或与特定正则表达式匹配)的字符串:
QString str_list = fonts.join(", ");// str == "Arial, Helvetica, Times, Courier"
qDebug() <<  str_list;
QStringList list_font = str.split(',');// list: ["Arial", "Helvetica", "Times", "Courier"]
for (int i = 0; i < list_font.size(); ++i)
    qDebug() <<  list_font.at(i);

QStringList monospacedFonts = fonts.filter(QRegularExpression("Courier|Fixed"));
contains()函数告诉你的列表中是否包含给定的字符串,而的indexOf()函数和lastIndexOf()会返回给定字符串中第一次(最后一次)出现的索引。 replaceInStrings()函数依次对字符串列表中的每个字符串调用QString :: replace。
QStringList files;
files << "$QTDIR/src/moc/moc.y"
    << "$QTDIR/src/moc/moc.l"
    << "$QTDIR/include/qconfig.h";
for (int i = 0; i < files.size(); ++i)
    qDebug() <<  files.at(i);
files.replaceInStrings("$QTDIR", "/usr/lib/qt");
for (int i = 0; i < files.size(); ++i)
    qDebug() <<  files.at(i);
9.2. 容器
Qt库提供了一组基于通用模板的容器类。这些类可用于存储指定类型的项目。 例如,如果您需要一个可调整大小的QString数组,请使用QVector < QString >。
Qt中这些容器类的设计比STL容器更轻,更安全且更易于使用。如果您不熟悉STL,或者更喜欢以“Qt方式”进行操作,则可以使用这些类而不是STL类。 容器类也都是隐式共享的,它们是可重入的,并且已针对速度,低内存消耗和最小的内联代码扩展进行了优化,从而生成了较小的可执行文件。 此外,在所有用于访问它们的线程都将它们用作只读容器的情况下,它们是线程安全的。
要遍历存储在容器中的项目,可以使用两种类型的迭代器之一:Java样式的迭代器和STL样式的迭代器。 Java样式的迭代器更易于使用并提供高级功能,而STL样式的迭代器效率更高,并且可以与Qt和STL的通用算法一起使用。 Qt还提供了一个foreach关键字,使访问容器中存储的所有项目变得非常容易。
Qt提供以下顺序容器:QList,QLinkedList,QVector,QStack和QQueue。
QList是最适合使用的类型。尽管它是作为数组列表实现的,但它提供了非常快的前置和追加操作。
如果您确实需要一个链表,请使用QLinkedList。
如果希望项目占据连续的内存位置,请使用QVector。
QStack和QQueue是提供LIFO和FIFO语义的便捷类。
Qt还提供了以下关联容器:QMap,QMultiMap,QHash,QMultiHash和QSet。 “多”容器方便地支持与单个键关联的多个值。“散列”容器通过使用散列函数而不是对排序集进行二进制搜索来提供更快的查找。
作为特殊情况,QCache和QContiguousCache类在有限的缓存存储中提供了对象的有效哈希查找。
9.2.1. QList <T>
到目前为止,这是最常用的容器类。它存储可以通过索引访问的给定类型(T)的值的列表。 在内部,QList是使用数组实现的,从而确保基于索引的访问非常快。 可以使用QList::append()和QList::prepend()将项目添加到列表的任一端,也可以使用QList :: insert()将它们插入到中间。 与其他任何容器类相比,QList经过了高度优化,可以在可执行文件中扩展为尽可能少的代码。 前面提到的QStringList继承自QList < QString >。
QList<int> integerList ={1,2,3,4,5,6,7,8,9};
QList<QChar> dateList;

QList<QString> list = {"one", "two", "three"};
list << "four" << "five";

if (list[0] == "one")
    list[0] = "Robert";

for (int i = 0; i< list.size(); ++i) {
    if (list.at(i)== "three")
        qDebug() << "Found three at position " << i;
}

int index = list.indexOf("three");
if (index != -1)
qDebug() << "First occurrence of Jane is at position " << index;

QList<QWidget *> widgetlist;
QWidget *w1 =new QWidget();
QWidget *w2 =new QWidget();
widgetlist.append(w1);
widgetlist.append(w2);
while (!widgetlist.isEmpty())
    delete widgetlist.takeFirst();
9.2.2. QVector <T>
QVector类是提供动态数组的模板类,它将给定类型的值的数组存储在内存中的相邻位置,并提供基于索引的快速访问。 QVector <T>通常会提供比QList <T>更好的性能,因为QList <T>将其项分配在堆上而QVector <T>始终将其项顺序存储在内存中。
QVector<int> integerVector={1,2,3,4,5,6,7,8,9};
QVector<QString> stringVector;
QVector<QString> vector1(200);
QVector<QString> vector2(200, "Pass");
QVector<QString> vector = {"one", "two", "three"};
if (vector[0] == "one")
    vector[0] = "Elizabeth";

for (int i = 0; i< vector.size();++i) {
    if (vector.at(i) == "three")
        qDebug() << "Found three at position " << i ;
}

index = vector.indexOf("two");
if (index != -1)
    qDebug() << "First occurrence of two is at position " << index;
9.2.3. QVarLengthArray <T,Prealloc>
QVarLengthArray提供了一个低级别的可变长度数组。在速度特别重要的地方,可以使用它代替QVector。
C ++语言不支持堆栈上的可变长度数组,但是我们可以使用下面的办法来实现:
int myfunc(int n)
{
    int *table = new int[n + 1];
    ...
    int ret = table[n];

    delete[] table;
    return ret;
}
但是,如果从应用程序的内部循环非常频繁地调用myfunc(),则堆分配可能是减慢速度的主要来源。
所以Qt就使用QVarLengthArray类型来实现可分配的数据类型。
QVarLengthArray与QVector一样,提供了可调整大小的数组数据结构。这两类之间的主要区别是:
QVarLengthArray的API更底层,并且缺少QVector的某些功能。
如果值是基本类型,则QVarLengthArray不会初始化内存。(QVector总是这样。)
QVarLengthArray不提供隐式共享,这减少了开销,因此该类通常会产生稍微更好的性能,尤其是在紧密循环中。
9.2.4. QStack <T>
QStack类是提供堆栈的模板类,为相同类型的项目实现了堆栈数据结构。 堆栈是后进先出(LIFO)结构。使用push()将项目添加到堆栈的顶部,并使用pop()从顶部检索项目。 在top()函数可以访问到的最上方项目而不删除。
QStack<int> stack;
stack.push(1);
stack.push(2);
stack.push(3);

while (!stack.isEmpty())
qDebug() << stack.pop();
QStack继承自QVector。QVector的所有功能也适用于QStack。QStack提供push(),pop()和top()三个方便的功能,可轻松实现LIFO语义。
9.2.5. QQueue <T>
QQueue类是提供队列的通用容器,它为相同类型的项目实现队列数据结构。 队列是先进先出(FIFO)结构。使用enqueue()将项目添加到队列的尾部,并使用dequeue()从项目头检索项目。 head()函数提供了访问头项目而不删除数据。
QQueue<int> queue;;
queue.enqueue(1);
queue.enqueue(2);
queue.enqueue(3);

while (!queue.isEmpty())
    qDebug() << queue.dequeue();
QQueue继承自QList。QList的所有功能也适用于QQueue, QQueue提供enqueue(),dequeue()和head()三个便利功能,可轻松实现FIFO语义。
9.2.6. QSet <T>
QSet类是提供基于哈希表的集合的模板类,它以未指定的顺序存储值,并提供非常快速的值查找。 在内部,QSet <T>被实现为QHash。
QSet<QString> set;

set.insert("one");
set.insert("three");
set.insert("seven");
set  << "twelve" << "fifteen" << "nineteen";

if (set.contains("fifteen"))
    qDebug()<<"set contains fifteen";

QSet<QWidget *> setwidget;
QWidget *widget1 =new QWidget();
widget1->setObjectName("widget1");
QWidget *widget2 =new QWidget();
widget2->setObjectName("widget2");
setwidget.insert(widget1);
setwidget.insert(widget2);

QSetIterator<QWidget *> setIterator1(setwidget);
while (setIterator1.hasNext())
    qDebug() << setIterator1.next()->objectName();

QSet<QWidget *>::const_iterator setIterator2 = setwidget.constBegin();
while (setIterator2 != setwidget.constEnd()) {
    qDebug()  << *setIterator2;
    QWidget *widget=*setIterator2;
    qDebug() << widget->objectName();
    delete  widget;
    ++setIterator2;
}

foreach (const QString &value, set)
    qDebug()  << value;
9.2.7. QMap <Key,T>
QMap类是一个模板类,提供基于红黑树的字典。它存储(键,值)对,并提供与键关联的值的快速查找。 通常,每个键都与一个值相关联。QMap以密钥顺序存储其数据;如果顺序无关紧要,则QHash是更快的选择。”
QMap和QHash提供了非常相似的功能。不同之处在于:
QHash提供比QMap平均更快的查找。
在QHash上进行迭代时,这些项是任意排序的。使用QMap时,项目始终按键排序。
QHash的键类型必须提供operator ==()和全局qHash(键)功能。QMap的键类型必须提供operator <()来指定总顺序。
QMap<QString, int> map;
map["one"] = 1;
map["three"] = 3;
map["seven"] = 7;
map.insert("twelve", 12);

int num1 = map["thirteen"];
qDebug()<<num1;
int num2 = map.value("thirteen");
qDebug()<<num2;

int timeout = 30;
if (map.contains("TIMEOUT"))
    timeout = map.value("TIMEOUT");

qDebug()<<timeout;


QMap<int, QWidget *> mapwidget;
mapwidget.insert(1,widget1);
mapwidget.insert(2,widget2);

for (int i = 0;i < 1000;i++) {
    if (mapwidget[i]->objectName() == "widget1")
        qDebug() << "Found widget1 at index " << i;
}

QMapIterator<QString, int> mapIterator_java(map);
while (mapIterator_java.hasNext()) {
    mapIterator_java.next();
    qDebug() << mapIterator_java.key() << ": " << mapIterator_java.value();
}

QMap<QString, int>::const_iterator mapIterator_stl = map.constBegin();
while (mapIterator_stl != map.constEnd()) {
    qDebug() << mapIterator_stl.key() << ": " << mapIterator_stl.value();
    ++mapIterator_stl;
}

QList<int> values = map.values("twelve");
for (int i = 0; i < values.size(); ++i)
    qDebug() << values.at(i);

QMap<QString, int>::iterator i = map.find("three");
while (i != map.end() && i.key() == "three") {
    qDebug() << i.value();
    ++i;
}

foreach (int value, map)
    qDebug() << value;
9.2.8. QMultiMap <Key,T>
QMultiMap继承自QMap并对其功能进行了扩展,使其能够存储多个值,多值映射是一种允许使用同一键的多个值的映射。
QMultiMap<QString, int> map1, map2, map3;

map1.insert("plenty", 100);
map1.insert("plenty", 2000);
qDebug()<<map1.size();

map2.insert("plenty", 5000);
qDebug()<<map2.size();

map3 = map1 + map2;
qDebug()<<map3.size();

QList<int> valueslist = map.values("plenty");
for (int i = 0; i< values.size(); ++i)
    qDebug() << values.at(i);

QMultiMap<QString, int>::iterator iterator_multimap = map2.find("plenty");
while (iterator_multimap != map2.end()&& iterator_multimap.key()== "plenty"){
    qDebug() << iterator_multimap.value();
    ++i;;
}
9.2.9. QHash <Key,T>
QHash类是提供基于散列表的字典的模板类,它具有与QMap几乎相同的API, 它存储(键,值)对,并提供与键关联的值的非常快速的查找。
9.2.10. QMultiHash <Key,T>
QMultiHash类是方便的QHash子类,它提供多值哈希,其操作和QMultiMap类似。
9.3. 迭代器
迭代器提供了一种统一的方法来访问容器中的项目。Qt的容器类提供了两种类型的迭代器:Java样式的迭代器和STL样式的迭代器。 当容器中的数据由于对非const成员函数的调用而被修改或与隐式共享副本分离时,两种类型的迭代器均无效。
9.3.1. Java样式的迭代器
Java样式的迭代器是Qt 4中的新增功能,并且是Qt应用程序中使用的标准迭代器。 它们比STL样式的迭代器更方便使用,但代价是效率略低。他们的API以Java的迭代器类为模型。
对于每个容器类,都有两种Java样式的迭代器数据类型:一种提供只读访问,另一种提供读写访问。
容器类 |
只读迭代器 |
迭代器 |
|---|---|---|
QList <T>,QQueue <T> |
QListIterator <T> |
QMutableListIterator <T> |
QLinkedList <T> |
QLinkedListIterator <T> |
QMutableLinkedListIterator <T> |
QVector <T>,QStack <T> |
QVectorIterator <T> |
QMutableVectorIterator <T> |
QSet <T> |
QSetIterator <T> |
QMutableSetIterator <T> |
QMap <Key,T>,QMultiMap <Key,T> |
QMapIterator <Key,T> |
QMutableMapIterator <Key,T> |
QHash <Key,T>,QMultiHash <Key,T> |
QHashIterator <Key,T> |
QMutableHashIterator <Key,T> |
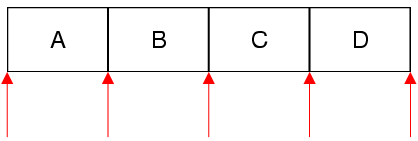
与STL风格的迭代器相比Java风格的迭代器点之间的项目,而不是直接在项目。 因此,它们要么指向容器的最开始(在第一个项目之前),要么指向容器的最末端(在最后一个项目之后),或者指向两个项目之间。 下图将有效的迭代器位置显示为包含四个项目的列表的红色箭头:
例如我们使用迭代器遍历QList < QString >的所有元素
QList<QString> listiterator;
listiterator << "A" << "B" << "C" << "D";

QListIterator<QString> listiterator_java1(listiterator);
while (listiterator_java1.hasNext())
    qDebug() << listiterator_java1.next();

QListIterator<QString> listiterator_java2(listiterator);
listiterator_java2.toBack();
while (listiterator_java2.hasPrevious())
    qDebug() << listiterator_java2.previous();
它的工作方式如下: 将要迭代的QList传递给QListIterator构造函数。此时,迭代器listiterator_java1位于列表中第一个项目的前面(项目“ A”之前)。 然后我们调用hasNext()来检查迭代器之后是否有一个项目。如果存在,我们调用next()跳过该项目。next()函数返回它跳过的项目。
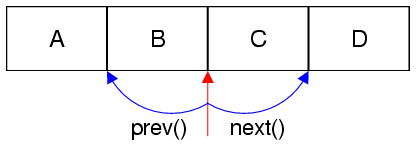
对于第二个迭代器listiterator_java2,首先调用toBack()将迭代器移动到列表中的最后一项之后。然后再调用previous去检查前一个项目。
next()和previous()的示意如下图:
QListIterator具备如下api
QListIterator不提供在迭代时从列表中插入或删除项目的功能。为此,必须使用QMutableListIterator。 下面的示例演示了mutableiterator插入删除项目和对项目值进行更改设置。
QList<int> mutableiterator;
mutableiterator << 1 << 2 << 3 << 4;

QMutableListIterator<int> mutableiterator_java1(mutableiterator);
while (mutableiterator_java1.hasNext()) {
    if (mutableiterator_java1.next() % 2 != 0)
        mutableiterator_java1.remove();
}

QMutableListIterator<int> mutableiterator_java2(mutableiterator);
mutableiterator_java2.toBack();
while (mutableiterator_java2.hasPrevious()) {
    if (mutableiterator_java2.previous() % 2 != 0)
        mutableiterator_java2.remove();
}

QMutableListIterator<int> mutableiterator_java3(mutableiterator);
while (mutableiterator_java3.hasNext()) {
    if (mutableiterator_java3.next() < 128)
        mutableiterator_java3.setValue(128);
}

QMutableListIterator<int> mutableiterator_java4(mutableiterator);
while (mutableiterator_java4.hasNext())
    mutableiterator_java4.next() *= 2;
QLinkedList,QVector和QSet的迭代器类具有与QList完全相同的API,QMapIterator略微不同
QMap<QString, QString> mapiterator;
mapiterator.insert("Paris", "France");
mapiterator.insert("Guatemala City", "Guatemala");
mapiterator.insert("Mexico City", "Mexico");
mapiterator.insert("Moscow", "Russia");

QMutableMapIterator<QString, QString> mutableiterator_java5(mapiterator);
while (mutableiterator_java5.hasNext()) {
    if (mutableiterator_java5.next().key().endsWith("City"))
        mutableiterator_java5.remove();
}

QMap<int, QWidget *> mapiterator1;
QHash<int, QWidget *> hashiterator;

QMapIterator<int, QWidget *> mapiterator_java5(mapiterator1);
while (mapiterator_java5.hasNext()) {
    mapiterator_java5.next();
    hash.insert(i.key(), i.value());
}
QMapIterator也提供toFront(),toBack(),hasNext(),next(),peekNext(),hasPrevious(),previous()和peekPrevious()。通过对next(),peekNext(),previous()或peekPrevious()返回的对象调用key()和value()来提取键和值分量。 除此QMapIterator还提供直接在迭代器上操作的key()和value()函数,并返回迭代器跳到其上方的最后一项的键和值。 如果要遍历具有相同值的所有项目,则可以使用findNext()或findPrevious()。
9.3.2. STL样式的迭代器
自Qt 2.0发行以来,已经可以使用STL样式的迭代器。它们与Qt和STL的通用算法兼容,并针对速度进行了优化。 对于每个容器类,有两种STL样式的迭代器类型:一种提供只读访问,另一种提供读写访问。 应尽可能使用只读迭代器,因为它们比读写迭代器快。
容器类 |
只读迭代器 |
读写迭代器 |
|---|---|---|
QList<T>, QQueue<T> |
QList<T>::const_iterator |
QList<T>::iterator |
QLinkedList<T> QLinkedList<T>::const_iterator |
QLinkedList<T>::iterator |
|
QVector<T>, QStack<T> |
QVector<T>::const_iterator |
QVector<T>::iterator |
QSet<T> |
QSet<T>::const_iterator |
QSet<T>::iterator |
QMap<Key, T>, QMultiMap<Key, T> |
QMap<Key, T>::const_iterator |
QMap<Key, T>::iterator |
QHash<Key, T>, QMultiHash<Key, T> |
QHash<Key, T>::const_iterator |
QHash<Key, T>::iterator |
STL迭代器的API以数组中的指针为模型。
QList<QString> listiteratorstl1;
list << "A" << "B" << "C" << "D";

QList<QString>::iterator listindex1;
for (listindex1 = listiteratorstl1.begin(); listindex1 != listiteratorstl1.end(); ++listindex1)
    *listindex1 = (*listindex1).toLower();

QList<QString> listiteratorstl2;
list << "A" << "B" << "C" << "D";

QList<QString>::reverse_iterator listindex2;
for (listindex2 = listiteratorstl2.rbegin(); listindex2 != listiteratorstl2.rend(); ++listindex2){
    *listindex2 = listindex2->toLower();
}

QList<QString>::const_iterator listindex3;
for (listindex3 = list.constBegin(); listindex3 != list.constEnd(); ++listindex3)
    qDebug() << *listindex3;
与Java样式的迭代器不同,STL样式的迭代器直接指向项目。容器的begin()函数返回一个迭代器,该迭代器指向容器中的第一项。 容器的end()函数将迭代器返回到假想项目,该假想项目位于容器中最后一个项目之后的位置。 end()标记无效位置;绝对不能取消引用。它通常用于循环的中断条件中。 如果列表为空,则begin()等于end(),因此我们从不执行循环。
下图为STL迭代器的示意图:

STL样式的迭代器的API
对于QMap和QHash,*运算符返回项目的值组成部分。如果要检索密钥,请在迭代器上调用key()。 为了对称起见,迭代器类型还提供了一个value()函数来检索该值。
QMap<int, int> mapiteratorstl;
QMap<int, int>::const_iterator mapindex;
for (mapindex = mapiteratorstl.constBegin(); mapindex != mapiteratorstl.constEnd(); ++mapindex)
    qDebug() << mapindex.key() << ':' << mapindex.value();
9.3.3. foreach关键字
如果只想按顺序遍历容器中的所有项目,则可以使用Qt的foreach关键字。 关键字是Qt特定于C ++语言的添加,并使用预处理器实现。
QList<QString> strlist;
QString str;
foreach (str, strlist)
    qDebug() << str;

foreach (const QString &str, strlist)
    qDebug() << str;

foreach (const QString &str, strlist) {
    if (str.isEmpty())
        break;
    qDebug() << str;
}
使用QMap和QHash时,将自动foreach访问(key,value)对的value组件, 因此您不应在容器上调用values()(它会生成不必要的副本,请参见下文)。 如果要遍历键和值,则可以使用迭代器(速度更快),也可以获取键,也可以使用它们来获取值:
QListIterator<QString> strindex(strlist);
while (strindex.hasNext())
    qDebug() << strindex.next();

QMap<QString, int> strmap;

foreach (const QString &str, strmap.keys())
    qDebug() << str << ':' << strmap.value(str);

QMultiMap<QString, int> strmultimap;
foreach (const QString &str, strmultimap.uniqueKeys()) {
    foreach (int i, strmultimap.values(str))
        qDebug() << str << ':' << i;
}
9.4. 例程说明
野火提供的Qt Demo已经开源,仓库地址在:
文档所涉及的示例代码也提供下载,仓库地址在:
本章例程在 embed_qt_develop_tutorial_code/Containers
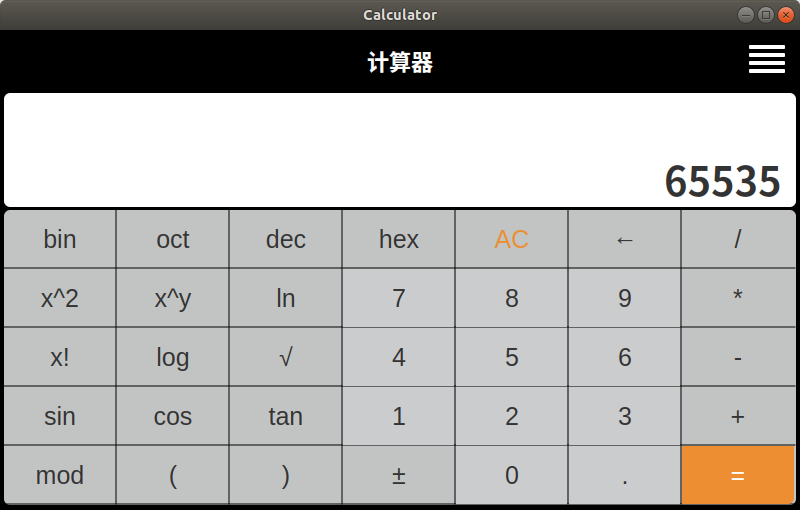
例程中包含三个例程,QData、QContainer、Calculator
9.4.1. 编程思路
QData演示了Qt中基本数据类的使用,
QContainer演示了Qt中容器类和迭代器的使用;
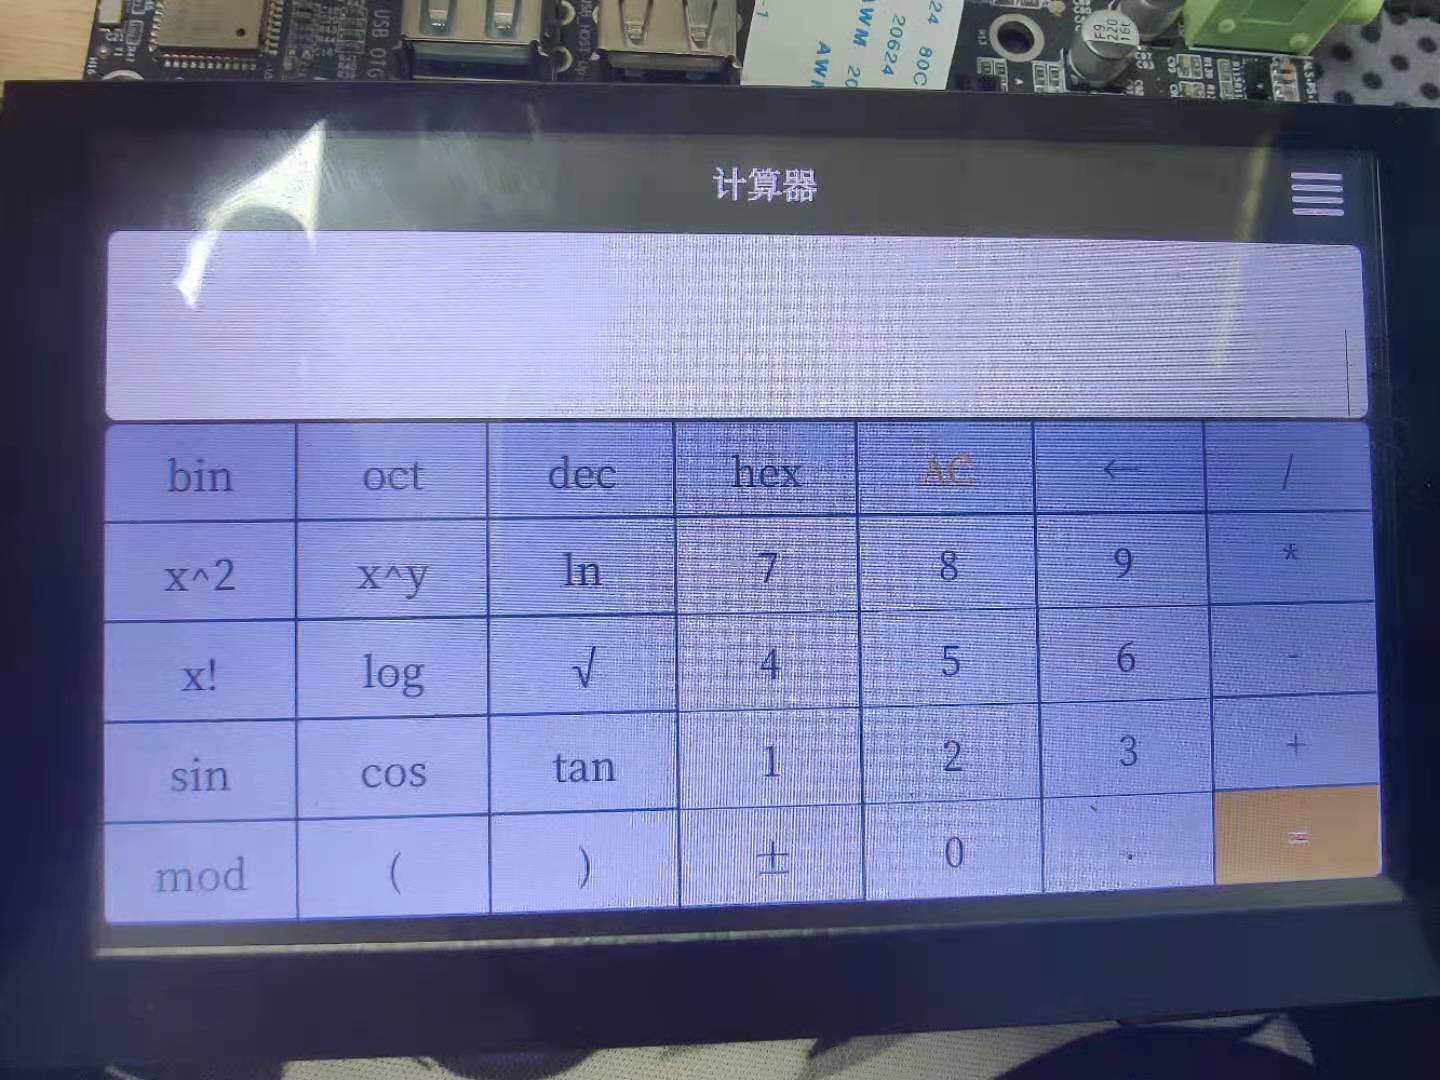
Calculator是Qtdemo里面的计算器程序,在这个程序中体现了不同数据类型处理。
9.4.2. 代码讲解
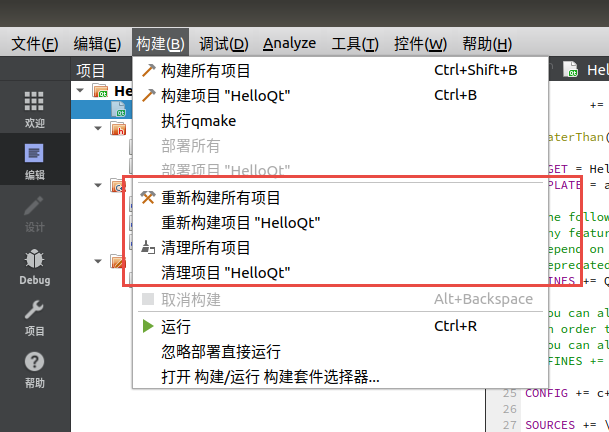
9.4.3. 编译构建
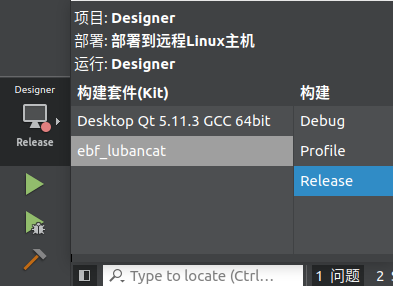
Ubuntu 选择 Desktop Qt 5.11.3 GCC 64bit 套件,编译运行
LubanCat 选择 ebf_lubancat,只编译
提示
当两种构建套件进行切换时,请重新构建项目或清除之前项目。针对我们的工程还需要手动重新构建QtUI和Skin。
9.4.4. 运行结果
9.4.4.2. LubanCat实验
通过SCP或者NFS将编译好的程序拷贝到LubanCat上
NFS环境搭建 参考这里
SCP命令如下:
# scp传输文件
# scp 文件名 服务器上的某个用户@服务器ip:/文件保存路径
scp filename server_user_name@192.168.0.205:server_file_path
# 从服务器拉取文件
# scp 服务器上的某个用户@服务器ip:/服务器文件存放路径 拉取文件保存路径
scp server_user_name@192.168.0.229:server_file_path local_path
编译好的程序在 embed_qt_develop_tutorial_code/app_bin/containers 目录中,通过scp命令将编译好的程序拉到LubanCat。
scp root@192.168.0.174:/home/embed_qt_develop_tutorial_code/app_bin/containers/Calculator /usr/local/qt-app/
在LubanCat运行程序,使用run_myapp.sh配置好环境,并执行 Calculator 。
sudo /usr/local/qt-app/run_myapp.sh /usr/local/qt-app/Calculator