
9. 摄像头
LubanCat-sg200x系列板卡使用的摄像头接口是24pin mipi接口,目前适配了GC4653。
除了mipi摄像头外,LubanCat-sg200x系列板卡还支持UVC摄像头。
9.1. mipi摄像头
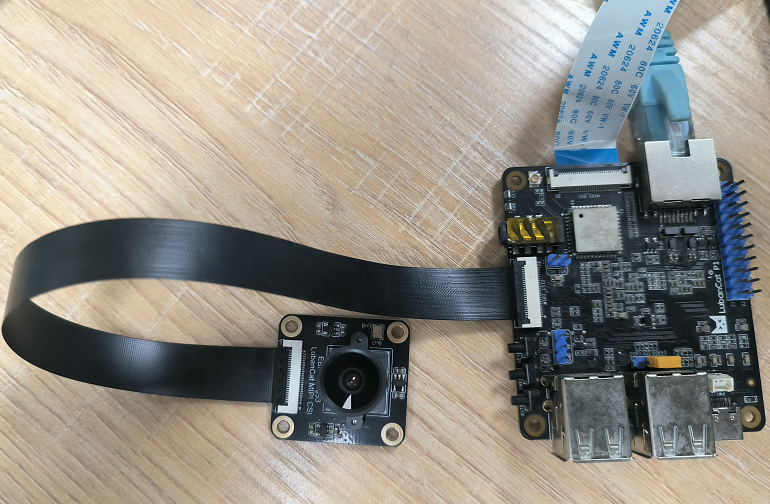
GC4653摄像头连接,排线金属接触面朝下:
测试摄像头,目前使用系统自带的sample_vi_fd程序,在系统/mnt/system/usr/bin/ai目录下。 该例程将打开摄像头并推流,PC上使用 VLC播放器 拉流播放显示。
按照前面图片连接摄像头,然后插上网口,使板卡和PC需要在同一局域网下。板卡上电,登录串口终端或者ssh终端, 通过ssh将scrfd_768_432_int8_1x.cvimodel(从配套网盘资料获取)传输到板卡,然后执行下面摄像头测试例程:
cat@lubancat:~$ cd /mnt/system/usr/bin/ai
cat@lubancat:/mnt/system/usr/bin/ai$ su root

root@lubancat:/mnt/system/usr/bin/ai# ./sample_vi_fd /home/cat/scrfd_768_432_int8_1x.cvimodel
[SAMPLE_COMM_SNS_ParseIni]-2168: Parse /mnt/data/sensor_cfg.ini
[parse_source_devnum]-1761: devNum =  1
[parse_sensor_name]-1842: sensor =  GCORE_GC4653_SLAVE_MIPI_4M_30FPS_10BIT
[parse_sensor_mipidev]-1893: mipi_dev =  0
[parse_sensor_busid]-1871: bus_id =  1
[parse_sensor_i2caddr]-1882: sns_i2c_addr =  29
[parse_sensor_laneid]-1904: Lane_id =  5,3,4,-1,-1
[parse_sensor_pnswap]-1915: pn_swap =  0, 0, 0, 0, 0
[parse_sensor_mclken]-1937: mclk_en =  1
[parse_sensor_mclk]-1948: mclk =  1
MMF Version:ba1be61b4-64bit
Create VBPool[0], size: (5529600 * 5) = 27648000 bytes
Create VBPool[1], size: (1382400 * 5) = 6912000 bytes
Create VBPool[2], size: (2764800 * 3) = 8294400 bytes
Total memory of VB pool: 42854400 bytes
Initialize SYS and VB
Initialize VI
ISP Vipipe(0) Allocate pa(0x99095000) va(0x0x3fb74d8000) size(284096)
stSnsrMode.u16Width 2560 stSnsrMode.u16Height 1440 25.000000 wdrMode 0 pstSnsObj 0x3fb7fc0cf8
[SAMPLE_COMM_VI_StartMIPI]-494: sensor 0 stDevAttr.devno 0
awbInit ver 6.9@2021500
0 R:1400 B:3100 CT:2850
1 R:1500 B:2500 CT:3900
2 R:2300 B:1600 CT:6500
Golden 1024 1024 1024
WB Quadratic:0
# 省略.......................................
venc codec: h264
venc frame size: 1280x720
Initialize RTSP
rtsp://192.168.103.151/h264
prio:0
anchor:-8,-8,8,8
anchor:-16,-16,16,16
bbox:bbox_8_Conv_dequant
landmark:kps_8_Conv_dequant
score:score_8_Sigmoid_dequant
anchor:-32,-32,32,32
anchor:-64,-64,64,64
bbox:bbox_16_Conv_dequant
landmark:kps_16_Conv_dequant
score:score_16_Sigmoid_dequant
anchor:-128,-128,128,128
anchor:-256,-256,256,256
bbox:bbox_32_Conv_dequant
landmark:kps_32_Conv_dequant
score:score_32_Sigmoid_dequant
Enter TDL thread
Enter encoder thread
0 R:1436 B:3510 CT:2716
1 R:1710 B:2668 CT:3835
2 R:2578 B:1598 CT:7284
Golden 1710 1024 2668
wdrLEOnly:1
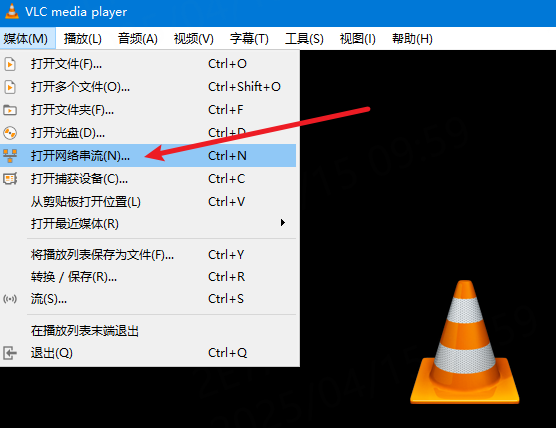
在PC上打开 VLC播放器 ,菜单“媒体”中选择“打开网络串流”
选择“网络”标签,然后在“请输入网络URL”中输入:
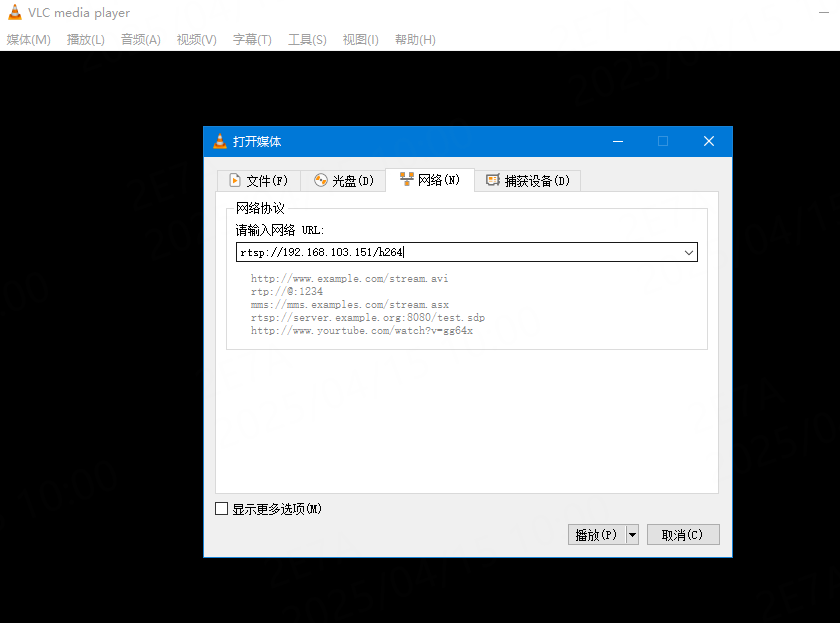
# 根据板卡实际IP
rtsp://192.168.103.151/h264
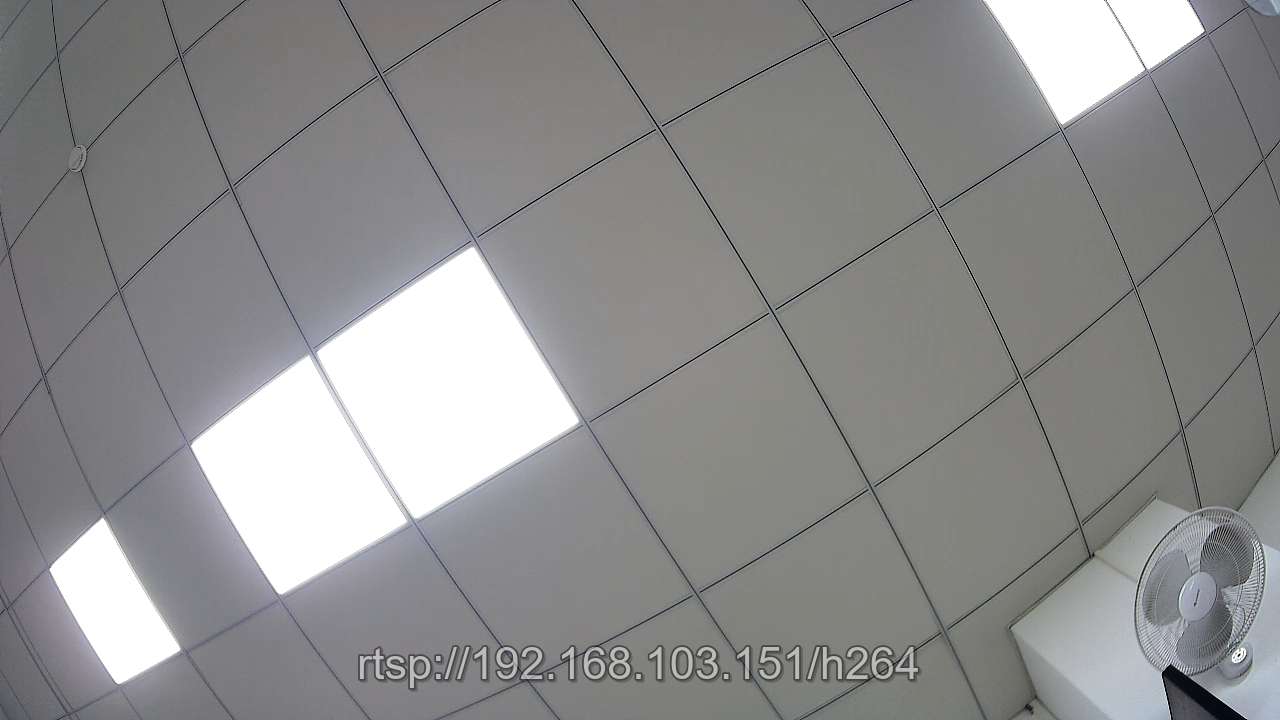
点击”播放“按钮,就可以看到摄像头推流的画面:
9.2. uvc摄像头
LubanCat-sg200x系列板卡支持使用USB UVC摄像头,以下介绍UVC摄像头的使用方法。
以下测试野火在售的 USB UVC摄像头
9.2.1. 安装工具
安装v4l-utils和gstreamer1.0软件包:
1 2 3 | #安装软件包
sudo apt install v4l-utils
sudo apt install gstreamer1.0-tools gstreamer1.0-plugins-base gstreamer1.0-plugins-good
|
9.2.2. 连接摄像头
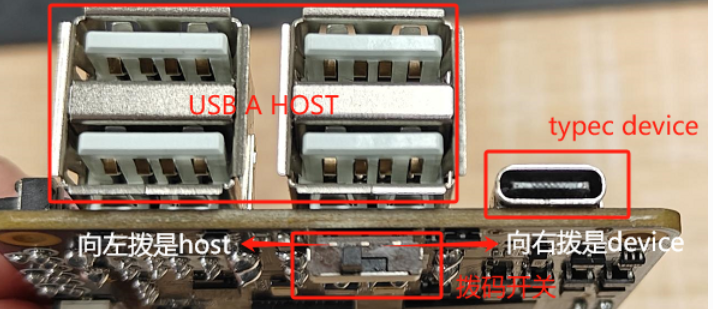
将摄像头插入USB HOST接口,然后拔动切换开关向USB A口方向,切换为host,USB-OTG切换开关可以理解成物理接口的切换开关 切换到USB A接口方向时,主控的USB信号通往USB A接口;切换到Type-C接口方向时,主控的USB信号通往Type-C接口。
将拨码开关拨到USB A口方向后,仍需要软件配置usb口为host模式,因为系统默认设置usb为device模式,需要执行以下命令进行切换host。
1 2 | #临时切换host模式
sudo sh -c 'echo host > /proc/cviusb/otg_role'
|
具体usb otg切换方法可以参考: USB 章节。
9.2.3. 查看摄像头信息
9.2.3.1. 列出摄像头设备
通过v4l2-ctl查看摄像头设备,如果只接了一个摄像头,那么其中/dev/video0就是我们的摄像头的设备。
1 2 3 4 5 6 7 8 | #列出摄像头设备
v4l2-ctl --list-devices
#信息输出如下
USB camera: USB camera (usb-4340000.usb-1.4):
/dev/video0
/dev/video1
/dev/media0
|
9.2.3.2. 查看摄像头格式和分辨率
1 2 3 4 5 6 7 8 9 10 11 12 13 14 15 16 17 18 19 20 21 22 23 24 25 26 27 28 29 30 31 32 33 34 35 36 37 38 39 40 41 42 43 44 45 46 47 | #查看支持的格式
ioctl: VIDIOC_ENUM_FMT
Type: Video Capture
[0]: 'MJPG' (Motion-JPEG, compressed)
Size: Discrete 640x480
Interval: Discrete 0.033s (30.000 fps)
Interval: Discrete 0.033s (30.000 fps)
Size: Discrete 640x360
Interval: Discrete 0.033s (30.000 fps)
Size: Discrete 352x288
Interval: Discrete 0.033s (30.000 fps)
Size: Discrete 320x240
Interval: Discrete 0.033s (30.000 fps)
Size: Discrete 1280x720
Interval: Discrete 0.033s (30.000 fps)
Size: Discrete 1600x1200
Interval: Discrete 0.033s (30.000 fps)
Size: Discrete 1920x1080
Interval: Discrete 0.033s (30.000 fps)
Size: Discrete 2048x1536
Interval: Discrete 0.033s (30.000 fps)
Size: Discrete 2560x1440
Interval: Discrete 0.033s (30.000 fps)
Size: Discrete 2592x1944
Interval: Discrete 0.033s (30.000 fps)
Size: Discrete 640x480
Interval: Discrete 0.033s (30.000 fps)
Interval: Discrete 0.033s (30.000 fps)
[1]: 'YUYV' (YUYV 4:2:2)
Size: Discrete 1280x720
Interval: Discrete 0.100s (10.000 fps)
Size: Discrete 640x480
Interval: Discrete 0.033s (30.000 fps)
Size: Discrete 320x240
Interval: Discrete 0.033s (30.000 fps)
Size: Discrete 1600x1200
Interval: Discrete 0.200s (5.000 fps)
Size: Discrete 1920x1080
Interval: Discrete 0.200s (5.000 fps)
Size: Discrete 2048x1536
Interval: Discrete 0.333s (3.000 fps)
Size: Discrete 2560x1440
Interval: Discrete 0.333s (3.000 fps)
Size: Discrete 2592x1944
Interval: Discrete 0.333s (3.000 fps)
|
可以看到当前摄像头支持MJPG、YUYV等格式,支持的最大分辨率为2592x1944。
9.2.4. 命令行拍摄照片
1 2 | #拍摄照片
sudo gst-launch-1.0 v4l2src num-buffers=1 device=/dev/video0 ! jpegenc ! filesink location=picture.jpg
|
生成的picture.jpg就是拍摄出来的照片了
9.2.5. 命令行拍摄视频
1 2 | #拍摄视频
v4l2-ctl --verbose -d /dev/video0 --set-fmt-video=width=640,height=480,pixelformat='mjpg' --stream-mmap=4 --set-selection=target=crop,flags=0,top=0,left=0,width=640,height=480 --stream-to=out.yuv
|
生成的out.yuv 便是拍摄出来的视频了