15. pwm控制
本章讲解Linux pwm相关应用层程序控制。
15.1. 开启pwm设备树插件
野火IMX8M MINI提供了很多的设备树插件,用于控制板子上外设的开启,默认状态下pwm相关插件是没有开启的。 在系统中存在4个pwm的设备树插件,如下图所示:
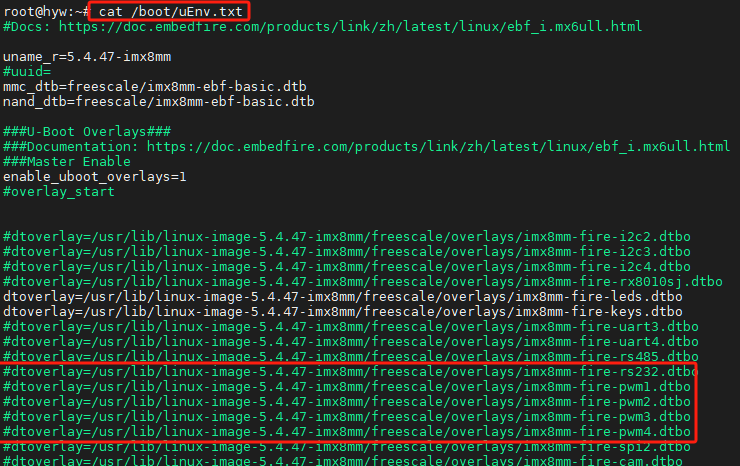
野火提供的pwm设备树插件与配置引脚关系如下
1 2 3 4 | pwm1-->GPIO5_IO21
pwm2-->GPIO5_IO04
pwm3-->GPIO5_IO03
pwm4-->GPIO5_IO18
|
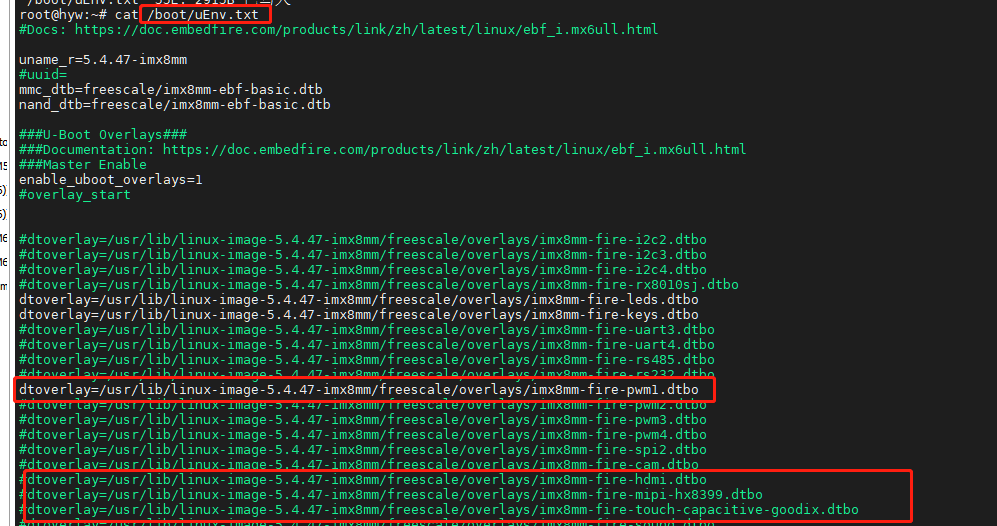
我们以开启pwm1.dtbo为例。修改 /boot/uEnv.txt 文件内容,使能pwm设备树相关插件内容, 并注释原来MIPI屏幕和触摸屏的设备树插件,因为mipi屏幕的背光也是使用pwm1,需要取消占用。
开启pwm之后使用一个led模块与开发板连接。
15.2. pwm控制方式(shell)
1 2 3 4 5 6 7 8 9 10 11 12 13 14 15 16 17 | #将pwm1导出到用户空间
echo 0 > /sys/class/pwm/pwmchip0/export
#设置pwm周期 单位为ns
echo 1000000 > /sys/class/pwm/pwmchip0/pwm0/period
#设置占空比
echo 500000 > /sys/class/pwm/pwmchip0/pwm0/duty_cycle
#设置pwm极性
echo "normal" > /sys/class/pwm/pwmchip0/pwm0/polarity
#使能pwm
echo 1 > /sys/class/pwm/pwmchip0/pwm0/enable
#取消将pwm3导出到用户空间
echo 0 > /sys/class/pwm/pwmchip0/unexport
|
提示
当设置period与duty_cycle值的时候需要注意在任何的情况下都得保证period的值大于等于duty_cycle的值。 调整duty_cycle的值可以改变led亮度。
15.3. pwm控制方式(系统调用)
1 2 3 4 5 6 7 8 9 10 11 12 13 14 15 16 17 18 19 20 21 22 23 24 25 26 27 28 29 30 31 32 33 34 35 36 37 38 39 40 41 42 43 44 45 46 47 48 49 50 51 52 53 54 55 56 57 58 59 60 61 62 63 64 65 66 67 68 69 70 71 72 73 74 75 76 77 78 79 80 81 82 83 84 85 86 87 88 89 90 91 92 93 94 95 96 97 98 99 100 101 102 103 104 105 106 107 108 109 110 111 112 113 114 115 116 117 118 119 120 121 122 123 124 125 126 127 128 129 130 131 132 133 134 135 136 137 138 139 140 | #include <stdio.h>
#include <stdlib.h>
#include <string.h>
#include <sys/types.h>
#include <sys/stat.h>
#include <fcntl.h>
#include <unistd.h>
#define PWM_PATH "/sys/class/pwm/pwmchip0/"
int main(int argc,char * argv[])
{
int fd;
ssize_t ret;
long period,duty_cycle;
//判断参数合法性
if( argc < 3)
{
printf("Please enter period and duty_cycle!\n ");
exit(-1);
}
period = atol(argv[1]);
duty_cycle = atol(argv[2]);
if ( (period < duty_cycle) ||
( strspn(argv[1], "0123456789")!= strlen(argv[1]) ) ||
( strspn(argv[2], "0123456789")!= strlen(argv[2]) )
)
{
printf("Period or duty_cycle parameter error!\n ");
exit(-1);
}
//导出用户空间
fd = open(PWM_PATH"export",O_WRONLY);
if( fd < 0 )
{
perror(PWM_PATH"export");
goto err1;
}
ret = write( fd,"0",1);
if( ret < 1 )
{
perror(PWM_PATH"export");
goto err1;
}
close(fd);
//设置pwm周期
fd = open(PWM_PATH"/pwm0/period",O_RDWR);
if( fd < 0 )
{
perror(PWM_PATH"/pwm0/period");
goto err1;
}
ret = write( fd,argv[1],strlen(argv[1]));
if( ret < strlen(argv[1]) )
{
perror(PWM_PATH"/pwm0/period");
goto err1;
}
close(fd);
//设置占空比
fd = open(PWM_PATH"/pwm0/duty_cycle",O_RDWR);
if( fd < 0 )
{
perror(PWM_PATH"/pwm0/duty_cycle");
goto err1;
}
ret = write( fd,argv[2],strlen(argv[2]));
if( ret < strlen(argv[2]) )
{
perror(PWM_PATH"/pwm0/duty_cycle");
goto err1;
}
close(fd);
//设置极性
fd = open(PWM_PATH"/pwm0/polarity",O_RDWR);
if( fd < 0 )
{
perror(PWM_PATH"/pwm0/polarity");
goto err1;
}
ret = write( fd,"normal",strlen("normal"));
if( ret < strlen("normal") )
{
perror(PWM_PATH"polarity");
goto err1;
}
close(fd);
//使能pwm
fd = open(PWM_PATH"/pwm0/enable",O_RDWR);
if( fd < 0 )
{
perror(PWM_PATH"/pwm0/enable");
goto err1;
}
ret = write( fd,"1",1);
if( ret < 1 )
{
perror(PWM_PATH"/pwm0/enable");
goto err1;
}
close(fd);
printf("Set pwm success! \n");
//从用户空间删除
if 0
{
fd = open(PWM_PATH"unexport",O_WRONLY);
if( fd < 0 )
{
perror(PWM_PATH"unexport");
goto err1;
}
ret = write( fd,"0",1);
if( ret < 1 )
{
perror(PWM_PATH"unexport");
goto err1;
}
close(fd);
};
return 0;
err1:
close(fd);
return -1;
}
|
最后在开发板上直接使用-gcc进行编译即可。
1 2 3 | gcc -o pwm pwm.c
#sudo ./pwm 周期 占空比
sudo ./pwm 1000000 500000
|
更详细参考可以参考应用篇pwm章节: pwm(脉宽调制)