6. YOLOV5目标检测
YOLOV5 是一种目标检测算法,属于单阶段目标检测方法, 是在COCO数据集上预训练的物体检测架构和模型系列。最新的YOLOv5 v7.0有YOLOv5n、YOLOv5s、YOLOv5m、YOLOv5l、YOLOv5x等, 除了目标检测,还有分割,分类等应用场景。
6.1. 环境准备
教程测试使用conda创建yolov5 PyTorch环境, Anaconda安装可以从官网网页直接下载,打开https://www.anaconda.com/download#downloads , Pytorch的安装参考下https://pytorch.org/ 。
下面测试yolov5的安装过程,使用conda创建环境,使用pip安装依赖库,使用python命令行检测安装的环境:
# 安装anaconda参考前面环境搭建教程,然后使用conda命令创建环境
conda create -n yolov5 python=3.9
conda activate yolov5

git clone https://github.com/ultralytics/yolov5
cd yolov5

# 安装依赖库
pip3 install -r requirements.txt

# 进入python命令行,检测安装的环境
(yolov5) llh@anhao:~yolov5$ python
Python 3.9.18 (main, Sep 11 2023, 13:41:44)
[GCC 11.2.0] :: Anaconda, Inc. on linux
Type "help", "copyright", "credits" or "license" for more information.
>>> import torch
>>> import utils
>>> display=utils.notebook_init()
Checking setup...
YOLOv5 🚀 v7.0-253-g63555c8 Python-3.9.18 torch-2.1.2+cu121 CUDA:0 (NVIDIA GeForce RTX 3060 Laptop GPU, 6144MiB)
Setup complete ✅ (12 CPUs, 15.6 GB RAM, 142.6/1006.9 GB disk)
TPU-MLIR开发环境的创建,参考下前面TPU-MLIR开发环境章节。
6.2. 模型转换
yolov5模型转换前,需要重新导出下模型,主要是更改输出节点,部分处理放到后处理,下面的修改示例仅供参考, 可以自行修改输出简单,修改后需要编写对应的后处理。
6.2.1. 导出模型文件
下面以测试yolov5s模型为例,获取yolov5s.pt模型文件:
wget https://github.com/ultralytics/yolov5/releases/download/v7.0/yolov5s.pt
进入前面创建的yolov5环境,拉取yolov5工程源码:
conda activate yolov5

git clone https://github.com/ultralytics/yolov5
然后找到yolov5/models/yolo.py文件,修改Detect类的forward函数:
1 2 3 4 5 6 7 8 9 10 11 12 13 14 15 16 17 18 19 20 21 22 23 24 25 26 27 28 29 30 31 32 | # def forward(self, x):
# """Processes input through YOLOv5 layers, altering shape for detection: `x(bs, 3, ny, nx, 85)`."""
# z = [] # inference output
# for i in range(self.nl):
# x[i] = self.m[i](x[i]) # conv
# bs, _, ny, nx = x[i].shape # x(bs,255,20,20) to x(bs,3,20,20,85)
# x[i] = x[i].view(bs, self.na, self.no, ny, nx).permute(0, 1, 3, 4, 2).contiguous()
# if not self.training: # inference
# if self.dynamic or self.grid[i].shape[2:4] != x[i].shape[2:4]:
# self.grid[i], self.anchor_grid[i] = self._make_grid(nx, ny, i)
# if isinstance(self, Segment): # (boxes + masks)
# xy, wh, conf, mask = x[i].split((2, 2, self.nc + 1, self.no - self.nc - 5), 4)
# xy = (xy.sigmoid() * 2 + self.grid[i]) * self.stride[i] # xy
# wh = (wh.sigmoid() * 2) ** 2 * self.anchor_grid[i] # wh
# y = torch.cat((xy, wh, conf.sigmoid(), mask), 4)
# else: # Detect (boxes only)
# xy, wh, conf = x[i].sigmoid().split((2, 2, self.nc + 1), 4)
# xy = (xy * 2 + self.grid[i]) * self.stride[i] # xy
# wh = (wh * 2) ** 2 * self.anchor_grid[i] # wh
# y = torch.cat((xy, wh, conf), 4)
# z.append(y.view(bs, self.na * nx * ny, self.no))
# return x if self.training else (torch.cat(z, 1),) if self.export else (torch.cat(z, 1), x)
def forward(self, x):
z = [] # inference output
for i in range(self.nl):
z.append(self.m[i](x[i]))
return z
|
修改export.py文件中的run函数:
1 2 3 4 5 6 7 8 | for _ in range(2):
y = model(im) # dry runs
if half and not coreml:
im, model = im.half(), model.half() # to FP16
# shape = tuple((y[0] if isinstance(y, tuple) else y).shape) # model output shape
shape = tuple((y[0] if (isinstance(y, tuple) or (isinstance(y, list))) else y).shape) # model output shape
metadata = {"stride": int(max(model.stride)), "names": model.names} # model metadata
LOGGER.info(f"\n{colorstr('PyTorch:')} starting from {file} with output shape {shape} ({file_size(file):.1f} MB)")
|
然后执行命令模型导出模型:
# 设置yolov5s.pt模型的路径,导出yolov5s.onnx模型
python3 export.py --weights ./yolov5s.pt --include onnx
以上是教程测试的导出方式(一些模型处理放到部署例程的后处理), 也可以自行更改其他方式的导出,只是需要注意后面模型部署的后处理也要修改。
6.2.2. 转换模型为MLIR
进入TPU-MLIR开发环境,Docker环境,创建一个yolov5s工作目录,然后复制量化和测试的图片到工作目录下。
# 获取tpu-mlir源码
root@cfa2f8976af9:/workspace# git clone https://github.com/milkv-duo/tpu-mlir.git

# 创建yolov5s工作目录
root@cfa2f8976af9:/workspace# mkdir yolov5s && cd yolov5s
root@cfa2f8976af9:/workspace/yolov5s#

# 复制tpu-mlir/regression目录下COCO数据集图像和测试图片
root@cfa2f8976af9:/workspace/yolov5s# cp -r ../tpu-mlir/regression/dataset/COCO2017  ./
root@cfa2f8976af9:/workspace/yolov5s# cp ../tpu-mlir/regression/image/dog.jpg ./
复制前面导出使用yolov5s.onnx模型到当前工作目录,然后使用model_transform(model_transform.py)工具将模型转成MLIR模型。
# model_def指定指定模型定义文件,input_shapes指定输入形状,
# mean和scale指定均值和归一化参数,pixel_format指定输入图像格式
# test_input指定验证的图像,test_result指定验证的结果文件,mlir指定输出mlir模型文件名称和路径。
root@cfa2f8976af9:/workspace/yolov5s# model_transform \
                                    --model_name yolov5s \
                                    --model_def ./yolov5s.onnx \
                                    --input_shapes [[1,3,640,640]] \
                                    --mean 0.0,0.0,0.0 \
                                    --scale 0.0039216,0.0039216,0.0039216 \
                                    --keep_aspect_ratio \
                                    --pixel_format rgb \
                                    --test_input ../dog.jpg \
                                    --test_result yolov5s_top_outputs.npz \
                                    --mlir yolov5s.mlir
# 省略.....................
[359_Conv                        ]      SIMILAR [PASSED]
    (1, 255, 20, 20) float32
    cosine_similarity      = 1.000000
    euclidean_similarity   = 1.000000
    sqnr_similarity        = 125.106964
142 compared
142 passed
0 equal, 2 close, 140 similar
0 failed
0 not equal, 0 not similar
min_similiarity = (0.9999997615814209, 0.999998570296626, 116.59041404724121)
Target    yolov5s_top_outputs.npz
Reference yolov5s_ref_outputs.npz
npz compare PASSED.
compare 359_Conv: 100%|███████████████████████████| 142/142 [00:09<00:00, 15.64it/s]
[Success]: npz_tool.py compare yolov5s_top_outputs.npz yolov5s_ref_outputs.npz --tolerance 0.99,0.99 --except - -vv
生成yolov5s.mlir等文件,保存在yolov5s工作目录下。
6.2.3. 量化模型
运行run_calibration(run_calibration.py)得到校准表,测试模型使用的是COCO数据集, 所以量化使用100张来自COCO2017的图片,执行命令:
root@cfa2f8976af9:/workspace/yolov5s# run_calibration yolov5s.mlir \
                                    --dataset ./COCO2017/ \
                                    --input_num 100 \
                                    -o yolov5s_cali_table
TPU-MLIR v1.8.1-20240712
GmemAllocator use FitFirstAssign
reused mem is 6553600, all mem is 61738800
2024/07/23 17:45:06 - INFO :
load_config Preprocess args :
        resize_dims           : [640, 640]
        keep_aspect_ratio     : True
        keep_ratio_mode       : letterbox
        pad_value             : 0
        pad_type              : center
        input_dims            : [640, 640]
        --------------------------
        mean                  : [0.0, 0.0, 0.0]
        scale                 : [0.0039216, 0.0039216, 0.0039216]
        --------------------------
        pixel_format          : rgb
        channel_format        : nchw

last input data (idx=100) not valid, droped
input_num = 100, ref = 100
real input_num = 100
activation_collect_and_calc_th for op: 359_Conv: 100%|█████████████████████████████████| 143/143 [01:35<00:00,  1.49it/s]
[2048] threshold: 359_Conv: 100%|██████████████████████████████████████████████████████| 143/143 [00:00<00:00, 745.94it/s]
[2048] threshold: 359_Conv: 100%|██████████████████████████████████████████████████| 143/143 [00:01<00:00, 88.21it/s]
GmemAllocator use FitFirstAssign
reused mem is 6553600, all mem is 61738800
GmemAllocator use FitFirstAssign
reused mem is 6553600, all mem is 61738800
prepare data from 100
tune op: 359_Conv: 100%|██████████████████| 143/143 [02:38<00:00,  1.11s/it]
auto tune end, run time:159.4181764125824
然后使用model_deploy(model_deploy.py)工具将MLIR模型转成INT8 cvimodel模型:
# 转成INT8量化模型,执行命令
# calibration_table指定前面生成的校准表,tolerance表示MLIR量化后的结果与MLIR推理结果相似度的误差容忍度
# model指定输出的cvimodel模型文件名称和路径
root@cfa2f8976af9:/workspace/yolov5s# model_deploy.py --mlir yolov5s.mlir --quantize INT8 --calibration_table ./yolov5s_cali_table \
--chip cv181x --fuse_preprocess  --test_input ./dog.jpg  \
--test_reference yolov5s_top_outputs.npz  --tolerance 0.85,0.45  --model yolov5s_int8_sym.cvimodel
# 省略..............................................
Cmodel: bm_run_cmdbuf
device[0] closed
[Running]: npz_tool.py compare yolov5s_cv181x_int8_sym_model_outputs.npz yolov5s_cv181x_int8_sym_tpu_outputs.npz
--tolerance 0.99,0.90 --except - -vv
compare 359_Conv_f32:  67%|████████████████████████████████████ | 2/3 [00:00<00:00, 983.65it/s][output0_Conv_f32 ] EQUAL [PASSED]
    (1, 255, 80, 80) float32
[358_Conv_f32                    ]        EQUAL [PASSED]
    (1, 255, 40, 40) float32
[359_Conv_f32                    ]        EQUAL [PASSED]
    (1, 255, 20, 20) float32
3 compared
3 passed
3 equal, 0 close, 0 similar
0 failed
0 not equal, 0 not similar
min_similiarity = (1.0, 1.0, inf)
Target    yolov5s_cv181x_int8_sym_model_outputs.npz
Reference yolov5s_cv181x_int8_sym_tpu_outputs.npz
npz compare PASSED.
compare 359_Conv_f32: 100%|███████████████████████████████████████████████| 3/3 [00:00<00:00, 10.10it/s]
[Success]: npz_tool.py compare yolov5s_cv181x_int8_sym_model_outputs.npz yolov5s_cv181x_int8_sym_tpu_outputs.npz
--tolerance 0.99,0.90 --except - -vv

# 运行完成后,会在当前目录下生成模型文件yolov5s_int8_sym.cvimodel。
其中设置了参数fuse_preprocess,是将预处理融入到模型中,如果没有设置,在模型推理预处理阶段需要进行相应的量化等操作。
6.3. 板卡部署推理
获取配套例程文件:
# 获取配套例程文件并切换到yolov5目录下
git clone https://gitee.com/LubanCat/lubancat_sg2000_application_code.git
cd lubancat_sg2000_application_code/examples/yolov5
6.3.1. 部署推理和后处理
教程测试测试的是尺寸大小为s,batch为1,输入图像为640*640的yolov5模型,并且在模型转换和量化前进行了重新导出。
模型输出特征图尺度为80x80、40x40和20x20的三个特征图,每个位置共3个anchor,因此输出特征图通道为3x(5+80)=255, 也就是模型输出(1, 255, 80, 80)、(1, 255, 40, 40)、(1, 255, 20, 20)。
后处理阶段:
类别预测分支和目标分支需要进行sigmoid计算,通过conf_threshold阈值过滤目标分值,低于分值的检测框去掉,再用conf_threshold过滤之前过滤后的类别预测分值
对于符合的过滤框,保存过滤框的目标分值和类别分值的乘积,以及进行bbox解码成xywh格式
再通过nms对检测框进行非极大值抑制,去除重复的检测框,在这过程中通过nms_threshold阈值进行过滤,还设置OBJ_NUMB_MAX_SIZE限制过滤后的检测框数目最大为该值,
最后将剩下的检测框还原到网络输出前的原图尺度
1 2 3 4 5 6 7 8 9 10 11 12 13 14 15 16 17 18 19 20 21 22 23 24 25 26 27 28 29 30 31 32 33 34 35 36 37 38 39 40 41 42 43 44 45 46 47 48 49 50 51 52 53 54 55 56 57 58 59 60 61 62 63 64 65 66 67 68 69 70 71 72 73 74 75 76 77 78 79 80 81 82 83 84 85 86 87 88 89 90 91 92 93 94 95 96 | // 省略........................
int main(int argc, char **argv) {
if (argc != 3) {
usage(argv);
exit(-1);
}
cvi_app_context_t cvi_yolov5_ctx;
memset(&cvi_yolov5_ctx, 0, sizeof(cvi_app_context_t));
// load model file
const char *model_file = argv[1];
CVI_MODEL_HANDLE model = nullptr;
int ret = CVI_NN_RegisterModel(model_file, &model);
if (CVI_RC_SUCCESS != ret) {
printf("CVI_NN_RegisterModel failed, err %d\n", ret);
exit(1);
}
printf("CVI_NN_RegisterModel succeeded\n");
// get input output tensors
CVI_NN_GetInputOutputTensors(model, &cvi_yolov5_ctx.input_tensors, &cvi_yolov5_ctx.input_num, &cvi_yolov5_ctx.output_tensors,
&cvi_yolov5_ctx.output_num);
printf("Input Tensor Number : %d\n", cvi_yolov5_ctx.input_num);
dump_tensors(cvi_yolov5_ctx.input_tensors, cvi_yolov5_ctx.input_num);
printf("Output Tensor Number : %d\n", cvi_yolov5_ctx.output_num);
dump_tensors(cvi_yolov5_ctx.output_tensors, cvi_yolov5_ctx.output_num);
CVI_TENSOR *input = CVI_NN_GetTensorByName(CVI_NN_DEFAULT_TENSOR, cvi_yolov5_ctx.input_tensors, cvi_yolov5_ctx.input_num);
assert(input);
CVI_SHAPE shape = CVI_NN_TensorShape(input);
cvi_yolov5_ctx.model_height = shape.dim[2];
cvi_yolov5_ctx.model_width = shape.dim[3];
printf("model_height:%d model_width:%d \n", cvi_yolov5_ctx.model_height, cvi_yolov5_ctx.model_width);
// imread
cv::Mat image;
image = cv::imread(argv[2]);
if (!image.data) {
printf("Could not open or find the image\n");
return -1;
}
// preprocess: letterbox,resize,bgr2rgb
cv::Mat resized_img = letterbox(&cvi_yolov5_ctx, image, IMG_RESIZE_DIMS, IMG_RESIZE_DIMS);
cv::cvtColor(resized_img, resized_img, cv::COLOR_BGR2RGB);
printf("resized_img: %d, %d \n",resized_img.cols, resized_img.rows);
// Packed2Planar (rgb nchw)
cv::Mat channels[3];
for (int i = 0; i < 3; i++) {
channels[i] = cv::Mat(resized_img.rows, resized_img.cols, CV_8SC1);
}
cv::split(resized_img, channels);
int8_t *ptr = (int8_t *)CVI_NN_TensorPtr(input);
int channel_size = cvi_yolov5_ctx.model_height * cvi_yolov5_ctx.model_width;
for (int i = 0; i < 3; ++i) {
memcpy(ptr + i * channel_size, channels[i].data, channel_size);
}
// 模型推理
CVI_NN_Forward(model, cvi_yolov5_ctx.input_tensors, cvi_yolov5_ctx.input_num, cvi_yolov5_ctx.output_tensors, cvi_yolov5_ctx.output_num);
printf("CVI_NN_Forward succeeded\n");
// 后处理
const float nms_threshold = 0.45; // 默认的NMS阈值
const float box_conf_threshold = 0.25; // 默认的置信度阈值
object_detect_result_list od_results;
postprocess(&cvi_yolov5_ctx, box_conf_threshold, nms_threshold, &od_results);
// 在原图上画检测框
char text[256];
printf("%d objects are detected: \n", od_results.count);
for (int i = 0; i < od_results.count; i++)
{
object_detect_result *det_result = &(od_results.results[i]);
printf(" %s @ (%f %f %f %f) %.3f\n", class_names[det_result->cls_id],
det_result->rect.x, det_result->rect.y,
det_result->rect.width, det_result->rect.height,
det_result->prop);
int x1 = det_result->rect.x;
int y1 = det_result->rect.y;
cv::rectangle(image, det_result->rect, cv::Scalar(255, 0, 0));
sprintf(text, "%s %.1f%%", class_names[det_result->cls_id], det_result->prop * 100);
cv::putText(image, text, cv::Point(x1, y1 - 6), cv::FONT_HERSHEY_DUPLEX, 0.7, cv::Scalar(0,0,255), 1, cv::LINE_AA);
}
// save
cv::imwrite("./out.jpg", image);
CVI_NN_CleanupModel(model);
return 0;
}
|
6.3.2. 编译部署例程
执行下面命令设置交叉编译器(教程测试板卡默认是rsiv64系统), 根据部署的板卡系统选择交叉编译器,如果是arm64设置aarch64-linux-gnu,如果是riscv64设置riscv64-linux-musl-x86_64 。
# 获取交叉编译器(如果前面测试获取了交叉编译器,就不需要),教程测试rsiv64系统,并设置交叉编译器到环境变量
wget https://sophon-file.sophon.cn/sophon-prod-s3/drive/23/03/07/16/host-tools.tar.gz
cd /workspace/tpu-mlir
tar xvf host-tools.tar.gz
cd host-tools
export PATH=$PATH:$(pwd)/gcc/riscv64-linux-musl-x86_64/bin
# 如果是aarch64系统,设置交叉编译器到环境变量
#export PATH=$PATH:$(pwd)/gcc/gcc-linaro-6.3.1-2017.05-x86_64_aarch64-linux-gnu/bin

# 检测交叉编译
riscv64-unknown-linux-musl-gcc -v
Using built-in specs.
COLLECT_GCC=riscv64-unknown-linux-musl-gcc
COLLECT_LTO_WRAPPER=/home/dev/sg2000/cvi_mmf_sdk_test/host-tools/gcc/riscv64-linux-musl-x86_64/bin/
../libexec/gcc/riscv64-unknown-linux-musl/10.2.0/lto-wrapper
Target: riscv64-unknown-linux-musl
Configured with: /mnt/ssd/jenkins_iotsw/slave/workspace/Toolchain/build-gnu-riscv_4/
./source/riscv/riscv-gcc/configure #省略................
Thread model: posix
Supported LTO compression algorithms: zlib
gcc version 10.2.0 (Xuantie-900 linux-5.10.4 musl gcc Toolchain V2.6.1 B-20220906
获取配套例程文件:
# 获取配套例程文件并切换到yolov5目录下
git clone https://gitee.com/LubanCat/lubancat_sg2000_application_code.git
编译部署例程:
# 切换到yolov5例程
cd lubancat_sg2000_application_code/examples/yolov5

# 编译yolov5例程,请根据不同板卡系统设置-a参数,如果是arm64设置aarch64,如果是riscv64设置musl_riscv64
./build.sh -a musl_riscv64
-- CMAKE_C_COMPILER: riscv64-unknown-linux-musl-gcc
-- CMAKE_CXX_COMPILER: riscv64-unknown-linux-musl-g++
-- CMAKE_C_COMPILER: riscv64-unknown-linux-musl-gcc
-- CMAKE_CXX_COMPILER: riscv64-unknown-linux-musl-g++
-- The C compiler identification is GNU 10.2.0
-- The CXX compiler identification is GNU 10.2.0
-- Detecting C compiler ABI info
-- Detecting C compiler ABI info - done
-- Check for working C compiler: /home/dev/host-tools/gcc/riscv64-linux-musl-x86_64/bin/riscv64-unknown-linux-musl-gcc - skipped
-- Detecting C compile features
-- Detecting C compile features - done
-- Detecting CXX compiler ABI info
-- Detecting CXX compiler ABI info - done
-- Check for working CXX compiler: /home/dev/host-tools/gcc/riscv64-linux-musl-x86_64/bin/riscv64-unknown-linux-musl-g++ - skipped
-- Detecting CXX compile features
-- Detecting CXX compile features - done
-- Configuring done (0.9s)
-- Generating done (0.0s)
-- Build files have been written to: /home/dev/xxx/examples/yolov5/build/build_riscv_musl
[2/3] Install the project...
-- Install configuration: "RELEASE"
# 省略.................
复制可执行文件到板卡:
# 通过scp复制可执行程序yolov5到板卡
scp -r install/install_riscv_musl/yolov5  cat@192.168.103.142:~/
模型推理测试:
# 如果是riscv系统需要设置下环境变量
export LD_LIBRARY_PATH=$LD_LIBRARY_PATH:/lib64v0p7_xthead/lp64d
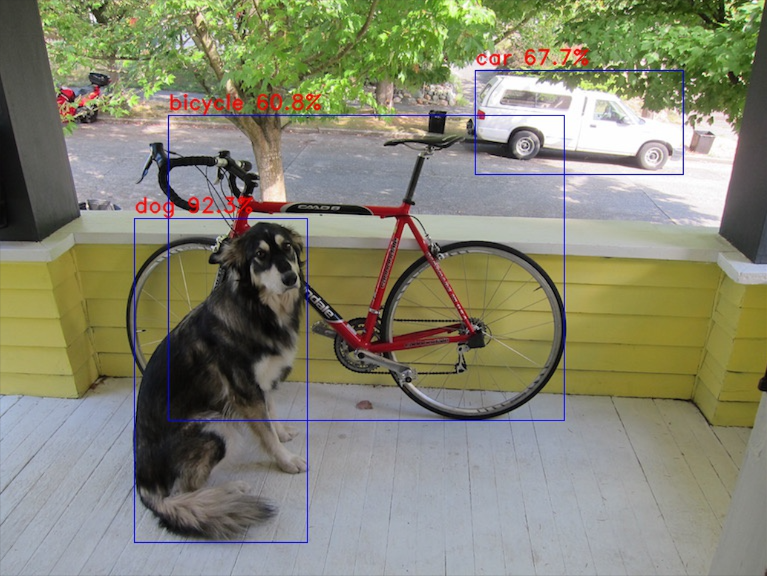
root@lubancat:/home/cat# ./yolov5 yolov5s_int8_sym.cvimodel cat.jpg
version: 1.4.0
yolov5s Build at 2024-07-15 16:09:38 For platform cv181x
Max SharedMem size:5734400
CVI_NN_RegisterModel succeeded
Input Tensor Number : 1
[0] images_raw, shape (1,3,640,640), count 1228800, fmt 7
Output Tensor Number : 3
[0] output0_Conv_f32, shape (1,255,80,80), count 1632000, fmt 0
[1] 358_Conv_f32, shape (1,255,40,40), count 408000, fmt 0
[2] 359_Conv_f32, shape (1,255,20,20), count 102000, fmt 0
model_height:640 model_width:640
resized_img: 640, 640
CVI_NN_Forward succeeded
dog @ (134.000000 218.000000 174.000000 325.000000) 0.923
car @ (475.000000 70.000000 209.000000 105.000000) 0.677
bicycle @ (168.000000 115.000000 397.000000 306.000000) 0.608
可以看到模型的输入输出Tensor信息,最后输出模型推理前3个预测结果,dog的概率是0.923等等,结果图片保存为out.jpg, 通过scp命令(或者其他方式)传输到PC上查看: