
3. MobileNetV2图像分类
MobileNet 是谷歌研究人员于2017年开发的一种CNN架构, 用于将计算机视觉有效地融入手机和机器人等小型便携式设备中而不会显著降低准确性。 后续进一步为了解决实际应用中的一些问题,推出了v2,v3版本。
本章我们将测试 MobileNetV2 图像分类,使用Caffe架构的预训练模型, 使用TPU-MLIR进行模型转换,最终在LubanCat-P1板卡上Runtime推理。
3.1. 环境准备
TPU-MLIR的环境搭建参考 前面章节 ,进入Docker容器环境后, 获取MobileNetV2模型文件,使用Caffe框架,基于ImageNet上的预训练MobileNet模型,文件请参考下: https://github.com/shicai/MobileNet-Caffe 。
# 获取MobileNetV2模型文件
root@cfa2f8976af9:/workspace# git clone https://github.com/shicai/MobileNet-Caffe.git

# 在工作目录下创建一个mobilenetv2
root@cfa2f8976af9:/workspace# mkdir mobilenetv2 && cd mobilenetv2
root@cfa2f8976af9:/workspace/mobilenetv2#

# 复制MobileNet-Caffe模型文件到/mobilenetv2工作目录下
root@cfa2f8976af9:/workspace/mobilenetv2# cp ../MobileNet-Caffe/mobilenet_v2_deploy.prototxt ./
root@cfa2f8976af9:/workspace/mobilenetv2# cp ../MobileNet-Caffe/mobilenet_v2.caffemodel ./
root@cfa2f8976af9:/workspace/mobilenetv2# cp ../MobileNet-Caffe/cat.jpg ./
复制量化所需的数据集到mobilenetv2工作目录下:
# 拉取 tpu-mlir源码,如果之前有拉取过,可以忽略
root@cfa2f8976af9:/workspace# git clone https://github.com/milkv-duo/tpu-mlir.git
root@cfa2f8976af9:/workspace# cd mobilenetv2
root@cfa2f8976af9:/workspace/mobilenetv2#  cp -rf ../tpu-mlir/regression/dataset/ILSVRC2012/ ./
3.2. 模型转换
需要将MobileNetV2的Caffe模型转换为MLIR模型,然后再编译为INT8量化模型。
3.2.1. 转换成MLIR
使用model_transform(model_transform.py)工具将模型转成MLIR模型。
# model_def指定指定模型定义文件,input_shapes指定输入形状,
# mean和scale指定均值和归一化参数,pixel_format指定输入图像格式默认bgr,resize_dims是指图片调整为设置的大小,再裁剪成模型输入的尺寸。
# test_input指定验证的图像,test_result指定验证的结果文件,mlir指定输出mlir模型文件名称和路径。
root@cfa2f8976af9:/workspace/mobilenetv2# model_transform.py \
                                        --model_name mobilenet_v2 \
                                        --model_def ./mobilenet_v2_deploy.prototxt \
                                        --model_data ./mobilenet_v2.caffemodel \
                                        --input_shapes [[1,3,224,224]] \
                                        --resize_dims=256,256 \
                                        --mean 103.94,116.78,123.68 \
                                        --scale 0.017,0.017,0.017 \
                                        --pixel_format bgr \
                                        --test_input ./cat.jpg \
                                        --test_result mobilenet_v2_top_outputs.npz \
                                        --mlir mobilenet_v2.mlir
# 省略.....................
[pool6                           ]        CLOSE [PASSED]
    (1, 1280, 1, 1) float32
    close order            = 3
[fc7                             ]      SIMILAR [PASSED]
    (1, 1000, 1, 1) float32
    cosine_similarity      = 1.000000
    euclidean_similarity   = 0.999999
    sqnr_similarity        = 120.549612
[prob                            ]        CLOSE [PASSED]
    (1, 1000, 1, 1) float32
    close order            = 5
120 compared
120 passed
1 equal, 2 close, 117 similar
0 failed
0 not equal, 0 not similar
min_similiarity = (0.9999998807907104, 0.9999984916577703, 116.07050895690918)
Target    mobilenet_v2_top_outputs.npz
Reference mobilenet_v2_ref_outputs.npz
npz compare PASSED.
compare prob: 100%|██████████████████████████████████████████████████████████| 120/120 [00:03<00:00, 34.67it/s]
[Success]: npz_tool.py compare mobilenet_v2_top_outputs.npz mobilenet_v2_ref_outputs.npz --tolerance 0.99,0.99 --except - -vv
其中mean和scale指定均值和归一化参数,mean设置[103.94,116.78,123.68],每个值对应到一个通道,图像输入的三个通道的值分别减去103.94,116.78,123.68,scale设置[0.017,0.017,0.017], 表示输入的三个通道值经过前面均值后都乘以0.017,用公式表示(X代表输入):y = (X − mean) × scale。
最后,会在当前目录下生成mobilenet_v2.mlir, mobilenet_v2_in_f32.npz和mobilenet_v2_top_outputs.npz等文件。
3.2.2. 模型量化INT8
运行run_calibration(run_calibration.py)得到校准表,输入数据使用前面复制的100张来自ILSVRC2012的图片,执行calibration命令:
root@cfa2f8976af9:/workspace/mobilenetv2# run_calibration.py mobilenet_v2.mlir \
                                            --dataset ./ILSVRC2012 \
                                            --input_num 100 \
                                            -o mobilenet_v2_cali_table
TPU-MLIR v1.8.1-20240712
GmemAllocator use FitFirstAssign
reused mem is 2408448, all mem is 18179536
2024/07/13 11:16:45 - INFO :
load_config Preprocess args :
        resize_dims           : [256, 256]
        keep_aspect_ratio     : False
        keep_ratio_mode       : letterbox
        pad_value             : 0
        pad_type              : center
        input_dims            : [224, 224]
        --------------------------
        mean                  : [103.94, 116.78, 123.68]
        scale                 : [0.017, 0.017, 0.017]
        --------------------------
        pixel_format          : bgr
        channel_format        : nchw

last input data (idx=100) not valid, droped
input_num = 100, ref = 100
real input_num = 100
activation_collect_and_calc_th for op: prob: 100%|██████████████████████████████████████████| 120/120 [00:22<00:00,  5.32it/s]
[2048] threshold: prob: 100%|███████████████████████████████████████████████████████████████| 120/120 [00:00<00:00, 745.37it/s]
[2048] threshold: prob: 100%|██████████████████████████████████████████████████████████| 120/120 [00:01<00:00, 107.79it/s]
GmemAllocator use FitFirstAssign
reused mem is 2408448, all mem is 18179536
GmemAllocator use FitFirstAssign
reused mem is 2408448, all mem is 18179536
prepare data from 100
tune op: prob: 100%|███████████████████████████████████████████████████████| 120/120 [00:31<00:00,  3.82it/s]
auto tune end, run time:32.02129077911377
使用model_deploy(model_deploy.py)工具将MLIR模型转成INT8对称的cvimodel模型:
# 转成INT8对称量化模型,执行命令
# calibration_table指定前面生成的校准表,tolerance表示MLIR量化后的结果与MLIR推理结果相似度的误差容忍度
# test_input指定验证的图像,test_reference前面输出的验证结果文件,model指定输出的cvimodel模型文件名称和路径
root@cfa2f8976af9:/workspace/mobilenetv2# model_deploy.py \
                                        --mlir mobilenet_v2.mlir \
                                        --calibration_table mobilenet_v2_cali_table \
                                        --fuse_preprocess \
                                        --chip cv181x \
                                        --quantize INT8 \
                                        --test_input ./cat.jpg \
                                        --test_reference mobilenet_v2_top_outputs.npz \
                                        --tolerance 0.96,0.70 \
                                        --model mobilenet_v2_int8_sym_fused_preprocess.cvimodel
# 省略..............................................
Start TPU Simulator for cv181x
device[0] opened, 4294967296
version: 1.4.0
mobilenet_v2 Build at 2024-07-17 14:15:34 For platform cv181x
Cmodel: bm_load_cmdbuf
Max SharedMem size:928256
Cmodel: bm_run_cmdbuf
device[0] closed
[Running]: npz_tool.py compare mobilenet_v2_cv181x_int8_sym_model_outputs.npz mobilenet_v2_cv181x_int8_sym_tpu_outputs.npz
--tolerance 0.99,0.90 --except - -vv
compare prob_f32:   0%|                    | 0/1 [00:00<?, ?it/s][prob_f32                        ]        EQUAL [PASSED]
    (1, 1000, 1, 1) float32
1 compared
1 passed
1 equal, 0 close, 0 similar
0 failed
0 not equal, 0 not similar
min_similiarity = (1.0, 1.0, inf)
Target    mobilenet_v2_cv181x_int8_sym_model_outputs.npz
Reference mobilenet_v2_cv181x_int8_sym_tpu_outputs.npz
npz compare PASSED.
compare prob_f32: 100%|██████████████████████████████████████████| 1/1 [00:00<00:00, 18.12it/s]

# 运行完成后,会在当前目录下生成模型文件mobilenet_v2_int8_sym.cvimodel。
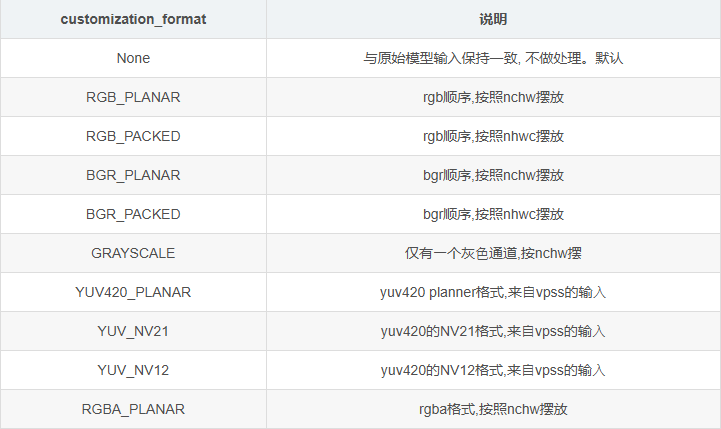
其中设置了参数fuse_preprocess,是将预处理融入到模型中, 使用customization_format参数指定实际的外部输入格式,例程中指令中未设置customization_format参数,则根据使用model_transform工具时定义的 pixel_format和channel_format参数自动获取对应的customization_format。
关于输入格式请简单参考下面图片:
更多参数说明请参考下 TPU SDK 开发资料汇总 中的TPU-MLIR开发手册。
提示
LubanCat-P1板卡processor参数设置 --processor cv181x 或者设置chip参数 --chip cv181x。
3.3. 板卡上模型部署
部署运行使用tpu-sdk库,相关API参考下 TPU SDK 开发资料汇总 中的CVITEK_TPU_SDK开发指南。
3.3.1. 部署程序流程
模型加载,通过CVI_NN_RegisterModel函数接口从文件加载cvimode模型
通过CVI_NN_GetInputOutputTensors函数获取模型输⼊输出Tensor信息,然后准备数据和buffer等等
执⾏推理模型,通过CVI_NN_Forward函数
关于预处理和后处理,可以根据模型对前处理的需要,⾃⾏添加代码实现,或者使用TPU进行预处理和后处理,本章节测试的mobilenet_v2预处理在TPU中。
3.3.2. 部分例程
部署例程mobilnetv2_fused_preprocess.cpp部分如下:
1 2 3 4 5 6 7 8 9 10 11 12 13 14 15 16 17 18 19 20 21 22 23 24 25 26 27 28 29 30 31 32 33 34 35 36 37 38 39 40 41 42 43 44 45 46 47 48 49 50 51 52 53 54 55 56 57 58 59 60 61 62 63 64 65 66 67 68 69 70 71 72 73 74 75 76 77 | // 省略....................
// load model file
const char *model_file = argv[1];
CVI_MODEL_HANDLE model = nullptr;
int ret = CVI_NN_RegisterModel(model_file, &model);
if (CVI_RC_SUCCESS != ret) {
printf("CVI_NN_RegisterModel failed, err %d\n", ret);
exit(1);
}
printf("CVI_NN_RegisterModel succeeded\n");
// get input output tensors
CVI_TENSOR *input_tensors;
CVI_TENSOR *output_tensors;
int32_t input_num;
int32_t output_num;
CVI_NN_GetInputOutputTensors(model, &input_tensors, &input_num, &output_tensors,
&output_num);
CVI_TENSOR *input = CVI_NN_GetTensorByName(CVI_NN_DEFAULT_TENSOR, input_tensors, input_num);
assert(input);
CVI_TENSOR *output = CVI_NN_GetTensorByName(CVI_NN_DEFAULT_TENSOR, output_tensors, output_num);
assert(output);
printf("Input Tensor Number : %d\n", input_num);
dump_tensors(input_tensors, input_num);
printf("Output Tensor Number : %d\n", output_num);
dump_tensors(output_tensors, output_num);
// nchw
CVI_SHAPE shape = CVI_NN_TensorShape(input);
int32_t height = shape.dim[2];
int32_t width = shape.dim[3];
// imread
cv::Mat image;
image = cv::imread(argv[2]);
if (!image.data) {
printf("Could not open or find the image\n");
return -1;
}
// resize
cv::resize(image, image, cv::Size(IMG_RESIZE_DIMS, IMG_RESIZE_DIMS)); // linear is default
// HWC转成CHW
cv::Mat channels[3];
for (int i = 0; i < 3; i++) {
channels[i] = cv::Mat(image.rows, image.cols, CV_8SC1);
}
cv::split(image, channels);
int8_t *ptr = (int8_t *)CVI_NN_TensorPtr(input);
int channel_size = height * width;
for (int i = 0; i < 3; ++i) {
memcpy(ptr + i * channel_size, channels[i].data, channel_size);
}
// 模型推理
CVI_NN_Forward(model, input_tensors, input_num, output_tensors, output_num);
printf("CVI_NN_Forward succeeded\n");
std::vector<std::string> labels;
std::ifstream file(argv[3]);
if (!file) {
printf("Didn't find synset_words file\n");
exit(1);
} else {
std::string line;
while (std::getline(file, line)) {
labels.push_back(std::string(line));
}
}
int32_t top_num = 5;
float *prob = (float *)CVI_NN_TensorPtr(output);
int32_t count = CVI_NN_TensorCount(output);
// 后面省略....................
|
3.3.3. 编译部署运行
执行下面命令设置交叉编译器, 根据部署的板卡系统选择交叉编译器,如果是arm64设置aarch64-linux-gnu,如果是riscv64设置riscv64-linux-musl-x86_64 。
# 获取交叉编译器(如果前面测试获取了交叉编译器,就不需要),教程测试rsiv64系统,并设置交叉编译器到环境变量
wget https://sophon-file.sophon.cn/sophon-prod-s3/drive/23/03/07/16/host-tools.tar.gz
cd /workspace/tpu-mlir
tar xvf host-tools.tar.gz
cd host-tools
export PATH=$PATH:$(pwd)/gcc/riscv64-linux-musl-x86_64/bin
# 如果是aarch64系统,设置交叉编译器到环境变量
#export PATH=$PATH:$(pwd)/gcc/gcc-linaro-6.3.1-2017.05-x86_64_aarch64-linux-gnu/bin

# 检测交叉编译
riscv64-unknown-linux-musl-gcc -v
Using built-in specs.
COLLECT_GCC=riscv64-unknown-linux-musl-gcc
COLLECT_LTO_WRAPPER=/home/dev/sg2000/cvi_mmf_sdk_test/host-tools/gcc/riscv64-linux-musl-x86_64/bin/
../libexec/gcc/riscv64-unknown-linux-musl/10.2.0/lto-wrapper
Target: riscv64-unknown-linux-musl
Configured with: /mnt/ssd/jenkins_iotsw/slave/workspace/Toolchain/build-gnu-riscv_4/
./source/riscv/riscv-gcc/configure #省略................
Thread model: posix
Supported LTO compression algorithms: zlib
gcc version 10.2.0 (Xuantie-900 linux-5.10.4 musl gcc Toolchain V2.6.1 B-20220906
获取配套例程文件:
# 获取配套例程文件并切换到mobilenetv2目录下
git clone https://gitee.com/LubanCat/lubancat_sg2000_application_code.git
cd lubancat_sg2000_application_code/examples/mobilenetv2
交叉编译部署例程:
# 编译mobilentnetv2例程,请根据不同板卡系统设置-a参数,如果是arm64设置aarch64,如果是riscv64设置musl_riscv64
cd lubancat_sg2000_application_code/examples/mobilenetv2
./build.sh -a musl_riscv64
-- CMAKE_C_COMPILER: riscv64-unknown-linux-musl-gcc
-- CMAKE_CXX_COMPILER: riscv64-unknown-linux-musl-g++
-- CMAKE_C_COMPILER: riscv64-unknown-linux-musl-gcc
-- CMAKE_CXX_COMPILER: riscv64-unknown-linux-musl-g++
-- The C compiler identification is GNU 10.2.0
-- The CXX compiler identification is GNU 10.2.0
-- Detecting C compiler ABI info
-- Detecting C compiler ABI info - done
-- Check for working C compiler: /home/dev/host-tools/gcc/riscv64-linux-musl-x86_64/bin/riscv64-unknown-linux-musl-gcc - skipped
-- Detecting C compile features
-- Detecting C compile features - done
-- Detecting CXX compiler ABI info
-- Detecting CXX compiler ABI info - done
-- Check for working CXX compiler: /home/dev/host-tools/gcc/riscv64-linux-musl-x86_64/bin/riscv64-unknown-linux-musl-g++ - skipped
-- Detecting CXX compile features
-- Detecting CXX compile features - done
-- Configuring done (0.8s)
-- Generating done (0.0s)
-- Build files have been written to: xxxx/samples/mobilenetv2/build/build_riscv_musl
[2/3] Install the project...
-- Install configuration: "RELEASE"
# 省略......
在当前目录install/build_riscv_musl目录下生成可执行文件mobilenetv2_fused_preprocess。 通过scp命令或者其他方式将该文件夹的内容传输到LubanCat-P1板卡。
scp -r install/ cat@192.168.103.142:~/
然后在板卡上执行程序:
# 如果是riscv系统需要设置下环境变量
cat@lubancat:~/install/build_riscv_musl$ export LD_LIBRARY_PATH=$LD_LIBRARY_PATH:/lib64v0p7_xthead/lp64d

# 命令格式:./mobilenetv2_fused_preprocess cvimodel image.jpg label_file
cat@lubancat:~/install/build_riscv_musl$ ./mobilenetv2_fused_preprocess mobilenet_v2_int8_sym_fused_preprocess.cvimodel cat.jpg synset.txt
CVI_NN_RegisterModel succeeded
Input Tensor Number  : 1
[0] data_raw, shape (1,3,256,256), count 196608, fmt 7
Output Tensor Number : 1
[0] prob_f32, shape (1,1000,1,1), count 1000, fmt 0
CVI_NN_Forward succeeded
------
0.330078, idx 285, 'n02124075 Egyptian cat'
0.257812, idx 282, 'n02123159 tiger cat'
0.165039, idx 281, 'n02123045 tabby, tabby cat'
0.050537, idx 331, 'n02326432 hare'
0.030518, idx 287, 'n02127052 lynx, catamount'
------
CVI_NN_CleanupModel succeeded
可以看到模型的输入输出Tensor信息, 最后输出模型推理前5个预测结果,其中第一个是预测概率最大的结果,即’Egyptian cat’。