11. 串口通讯与终端设备
本章主要讲解串口和终端设备的基本使用。
11.1. 终端设备
Teletype是最早出现的一种终端设备,类似于电传打字机,tty是Teletype的缩写。 最初tty是指连接到Unix系统上的物理或者虚拟终端。但是随着时间的推移,tty也用于串口设备,如ttyn、ttySACn等, Linux系统对终端设备的支持非常强大,本章通过Linux的终端设备文件进行串口通讯。
11.1.1. 终端设备文件
在Linux下终端的设备文件都位于/dev/目录下,以tty*开头的字符命名, 在开发板的终端上执行“ls /dev/tty*”命令,如下图所示。

可以看到有个名为“/dev/ttySTM*”的设备,“/dev/ttySTM*”就是开发板的串口, 其中“/dev/ttySTM0”为开发板的串口4,它已被默认被用在命令行的终端上。 而“/dev/ttySTM1”对应开发板串口1,“/dev/ttySTM3”对应开发板串口3。
11.1.2. stty命令
Linux下有一个专门的stty命令可以查看或设置终端的参数。
在开发板的终端执行如下命令:
1 2 3 4 5 | #在开发板的终端执行如下命令
#它会输出当前终端的参数
stty
#查看ttymxc0设备参数
stty -F /dev/ttySTM0
|
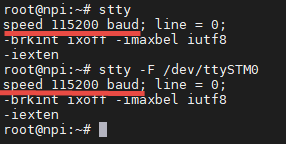
从上图中命令的执行结果可看到,ttySTM0的通讯速率“speed”为115200, 这就是串口通讯的波特率,这些是在驱动中设置的默认值。若用户想修改tty设备的配置,可以使用如下命令:
1 2 3 4 5 | #在开发板的终端执行如下命令
#查看设备参数
stty -F /dev/ttySTM0
#设置通讯速率,其中ispeed为输入速率,ospeed为输出速率
stty -F /dev/ttySTM0 ispeed 9600 ospeed 9600
|
命令中的ispeed和ospeed分别表示要设置的输入速率和输出速率,并不是所有设备 都支持不同的输入输出速率,所以最好把它们设置成一样。
11.2. 串口通讯实验(Shell)
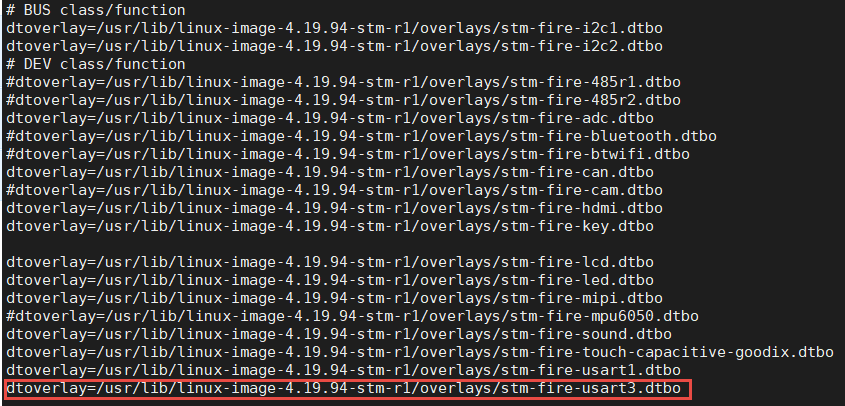
本实验使用开发板上的串口3进行实验,对应的设备文件为/dev/ttySTM3, 对tty的设备文件直接读写就可以控制设备通过串口接收或发送数据, 下面我们使用开发板配合Windows下的串口调试助手或Linux下的minicom进行测试。
11.2.2. 查询串口3的通信参数
串口3外设使能后,在/dev目录下生成ttySTM3设备文件,用stty工具查询其通信参数
1 2 | #在开发板的终端执行如下命令
stty -F /dev/ttySTM3
|
如下:
1 2 3 4 | root@npi:~# stty -F /dev/ttySTM3
speed 9600 baud; line = 0;
-brkint -imaxbel
root@npi:~#
|
11.2.4. 连接串口线及跳线帽
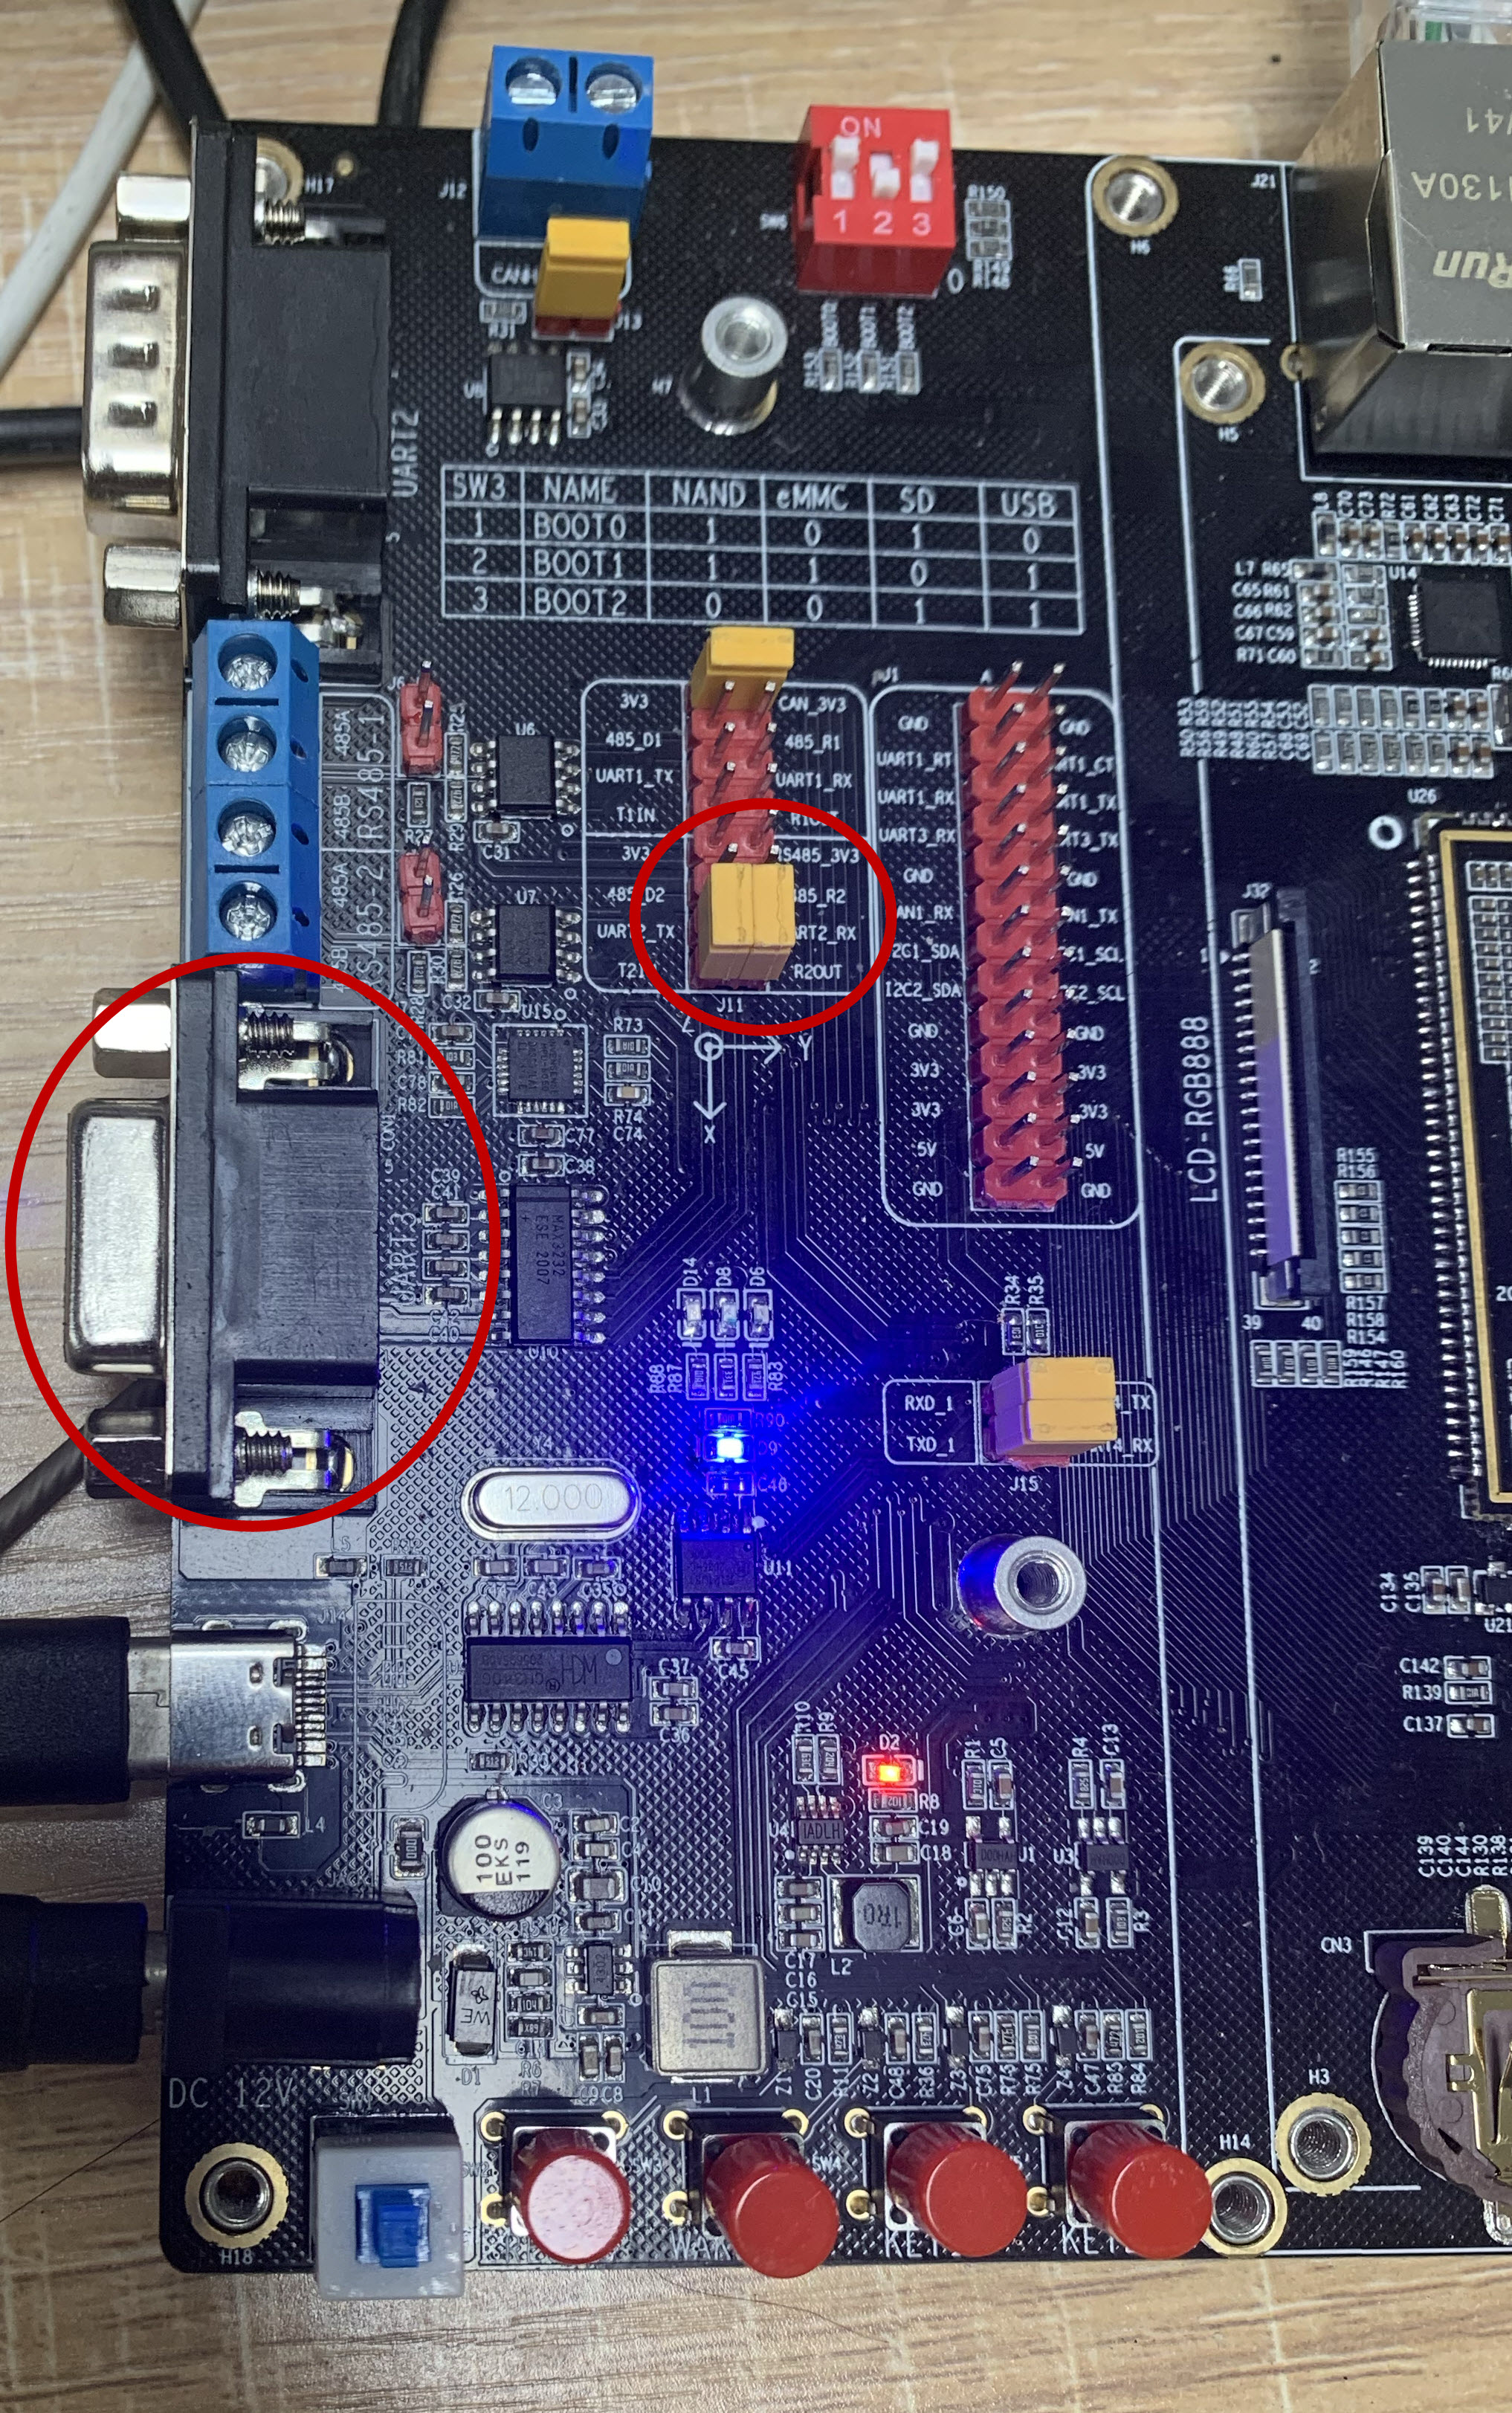
实验前需要使用串口线或USB转串口线把它与开发板与电脑连接起来,并且使用跳线帽连接 排针“UART3_TXD<—->T2IN”、“UART3_RXD<—->R2OUT”,如下图所示。
11.2.5. 与Windows主机通讯
11.2.5.1. 串口通讯实验
配置好串口调试助手后,尝试使用如下命令测试发送数据:
1 2 3 4 5 | #在开发板上的终端执行如下指令
#使用echo命令向终端设备文件写入字符串"board"、"embedfire"
echo board > /dev/ttySTM3
echo embedfire > /dev/ttySTM3
#Windows上的串口调试助手会接收到内容
|
如下图:

可以看到,往/dev/ttyttySTM3设备文件写入的内容会直接通过串口线发送至Winodws的主机。
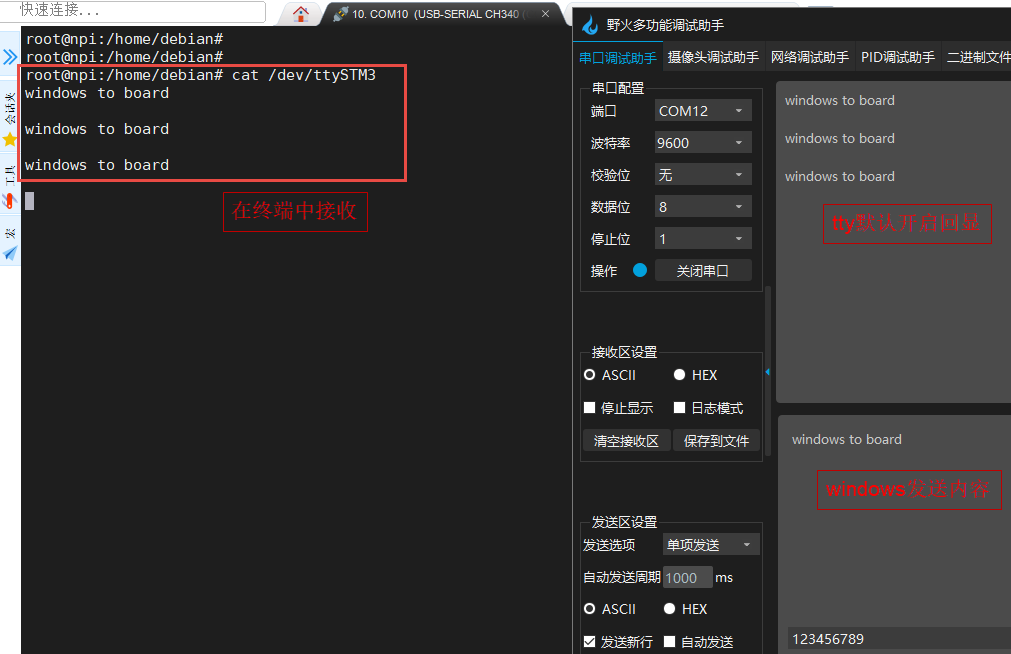
而读取设备文件则可接收Winodws主机发往开发板的内容,可以使用cat命令来读取:
1 2 3 4 5 6 7 | #在开发板上的终端执行如下指令
#使用cat命令读取终端设备文件
cat /dev/ttySTM3
#cat命令会等待
#使用串口调试助手发送字符串
#字符串最后必须加回车!
#开发板的终端会输出接收到的内容
|
如下图:
11.3. 串口通讯实验(系统调用)
终端设备通过termios进行配置。同样串口终端也是通过termios配置,
11.3.1. termios结构体
源码/include/uapi/asm-generic/termbits.h 头文件中声明了串口终端相关数据结构。
termio结构体如下所示。
1 2 3 4 5 6 7 8 9 | #define NCCS 19
struct termio {
unsigned short c_iflag; /* input mode flags */
unsigned short c_oflag; /* output mode flags */
unsigned short c_cflag; /* control mode flags */
unsigned short c_lflag; /* local mode flags */
unsigned char c_line; /* line discipline */
unsigned char c_cc[NCC]; /* control characters */
};
|
termios编程相关函数如下。
1 2 3 4 5 6 7 8 9 10 11 12 13 14 15 16 17 18 19 20 21 22 23 24 25 26 27 28 29 30 31 32 33 34 35 36 37 38 | #include <termios.h>
#include <unistd.h>
//读取当前串口配置参数
int tcgetattr(int fd, struct termios *termios_p);
//设置串口配置参数
int tcsetattr(int fd, int optional_actions,const struct termios *termios_p);
//获取输入波特率
speed_t cfgetispeed(const struct termios *termios_p);
//获取输出波特率
speed_t cfgetospeed(const struct termios *termios_p);
//设置输入波特率
int cfsetispeed(struct termios *termios_p, speed_t speed);
//设置输出波特率
int cfsetospeed(struct termios *termios_p, speed_t speed);
//同时设置输入输出波特率
int cfsetspeed(struct termios *termios_p, speed_t speed);
//清空buffer数据
int tcflush(int fd, int queue_selector);
//等待所有输出都被发送
int tcdrain(int fd);
//在一个指定的时间区内发送连续的0位流
int tcsendbreak(int fd, int duration);
//用于对输入和输出流控制进行控制
int tcflow(int fd, int action);
//将终端设置为原始模式
void cfmakeraw(struct termios *termios_p);
|
11.3.2. 编写应用程序
根据上面介绍termios相关数据结构及函数,编写应用程序如下
1 2 3 4 5 6 7 8 9 10 11 12 13 14 15 16 17 18 19 20 21 22 23 24 25 26 27 28 29 30 31 32 33 34 35 36 37 38 39 40 41 42 43 44 45 46 47 48 49 50 51 52 53 54 55 56 57 58 59 60 61 62 63 64 65 66 67 68 69 70 71 72 73 74 75 76 77 78 79 80 81 82 83 84 85 86 87 88 89 90 91 92 93 94 95 96 97 98 99 100 101 102 103 104 105 106 107 108 109 110 111 112 113 114 115 116 117 118 119 120 121 122 123 124 125 126 127 128 129 130 131 132 133 134 135 136 137 138 139 140 141 142 143 144 145 146 147 148 149 150 151 152 153 154 155 156 157 158 159 160 161 162 163 164 165 166 167 | #include <sys/types.h>
#include <sys/stat.h>
#include <fcntl.h>
#include <stdio.h>
#include <stdlib.h>
#include <string.h>
#include <unistd.h>
#include <termios.h>
const char default_path[] = "/dev/ttySTM3";
/*
*串口配置成功返回0,失败返回-1;
*/
int set_uart(int fd,int nSpeed, int nBits, char nEvent, int nStop);
int main(int argc,char *argv[])
{
int fd;
int res;
char *path;
char buf[1024] = "Embedfire tty send test.\n";
if(argc > 1)
{
path = argv[1];
}
else
{
path = (char *)default_path;
}
fd = open(path,O_RDWR);
if(fd < 0)
{
perror(path);
exit(-1);
}
if( set_uart(fd,115200,8,'n',1) )
{
printf("set uart error\n");
}
while(1)
{
write(fd, buf, strlen(buf));
//printf("send res = %d bytes data: %s",strlen(buf), buf);
memset(buf,0,1024);
res = read(fd, buf, 1024);
if(res > 0)
{
printf("Receive res = %d bytes data: %s",res, buf);
}
}
close(fd);
return 0;
}
int set_uart(int fd,int nSpeed, int nBits, char nEvent, int nStop)
{
struct termios opt;
//清空串口接收缓冲区
tcflush(fd, TCIOFLUSH);
//获取串口配置参数
tcgetattr(fd, &opt);
opt.c_cflag &= (~CBAUD); //清除数据位设置
opt.c_cflag &= (~PARENB); //清除校验位设置
//opt.c_iflag |= IGNCR; //忽略接收数据中的'\r'字符,在windows中换行为'\r\n'
opt.c_iflag &= (~ICRNL); //不将'\r'转换为'\n'
opt.c_lflag &= (~ECHO); //不使用回显
//设置波特率
switch(nSpeed)
{
case 2400:
cfsetspeed(&opt,B2400);
break;
case 4800:
cfsetspeed(&opt,B4800);
break;
case 9600:
cfsetspeed(&opt,B9600);
break;
case 38400:
cfsetspeed(&opt,B38400);
break;
case 115200:
cfsetspeed(&opt,B115200);
break;
default:
return -1;
}
//设置数据位
switch(nBits)
{
case 7:
opt.c_cflag |= CS7;
break;
case 8:
opt.c_cflag |= CS8;
break;
default:
return -1;
}
//设置校验位
switch(nEvent)
{
//无奇偶校验
case 'n':
case 'N':
opt.c_cflag &= (~PARENB);
break;
//奇校验
case 'o':
case 'O':
opt.c_cflag |= PARODD;
break;
//偶校验
case 'e':
case 'E':
opt.c_cflag |= PARENB;
opt.c_cflag &= (~PARODD);
break;
default:
return -1;
}
//设置停止位
switch(nStop)
{
case 1:
opt.c_cflag &= ~CSTOPB;
break;
case 2:
opt.c_cflag |= CSTOPB;
break;
default:
return -1;
}
//设置串口
tcsetattr(fd,TCSANOW,&opt);
return 0;
}
|
使用直接使用arm-linux-gnueabihf-gcc进行编译即可。
1 | arm-linux-gnueabihf-gcc -o tty_uart tty_uart.c
|
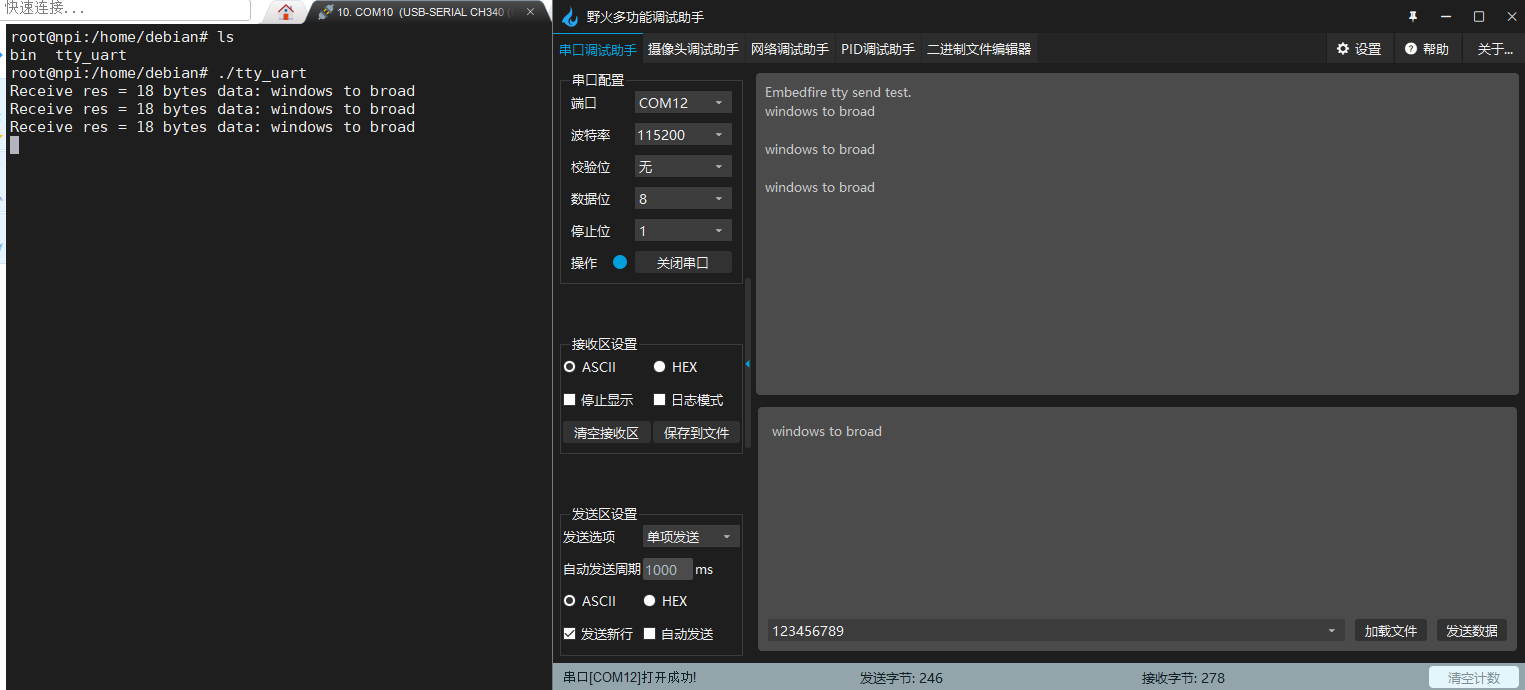
效果如下图:
11.4. 串口设备树插件修改
野火STM32MP157提供了很多的设备树插件源码,若想要添加或修改不同的引脚作为串口, 用户只需要根据相关相对应的设备树插件修改即可。
其中串口3的设备树插件文件为 stm-fire-usart3-overlay.dts ,源码如下所示
1 2 3 4 5 6 7 8 9 10 11 12 13 14 15 16 17 18 19 20 21 22 23 24 25 26 27 28 29 30 31 32 33 34 35 36 37 38 39 40 41 42 43 44 45 46 47 48 49 50 51 52 53 54 55 | /dts-v1/;
/plugin/;
#include <dt-bindings/pinctrl/stm32-pinfunc.h>
#include <dt-bindings/input/input.h>
#include <dt-bindings/mfd/st,stpmic1.h>
/{
fragment@0 {
target=<&pinctrl>;
__overlay__ {
usart3_pins_a: usart3-0 {
pins1 {
pinmux = <STM32_PINMUX('B', 10, AF7)>; /* USART3_TX */
bias-disable;
drive-push-pull;
slew-rate = <0>;
};
pins2 {
pinmux = <STM32_PINMUX('B', 12, AF8)>; /* USART3_RX */
bias-disable;
};
};
usart3_idle_pins_a: usart3-idle-0 {
pins1 {
pinmux = <STM32_PINMUX('B', 10, ANALOG)>;/* USART3_TX */
};
pins2 {
pinmux = <STM32_PINMUX('B', 12, AF8)>; /* USART3_RX */
bias-disable;
};
};
usart3_sleep_pins_a: usart3-sleep-0 {
pins {
pinmux = <STM32_PINMUX('B', 10, ANALOG)>, /* USART3_TX */
<STM32_PINMUX('B', 12, ANALOG)>; /* USART3_RX */
};
};
};
};
fragment@1 {
target=<&usart3>;
__overlay__ {
pinctrl-names = "default", "sleep", "idle";
pinctrl-0 = <&usart3_pins_a>;
pinctrl-1 = <&usart3_sleep_pins_a>;
pinctrl-2 = <&usart3_idle_pins_a>;
status = "okay";
};
};
};
|
若想要使用其他的引脚作为串口3的收发引脚,只需修改代码高亮部分即可。

