13. Building a root file system using Docker
Our SDK uses Ubuntu20.04 as the standard development environment.
However, due to the different build environments of different versions of Ubuntu images, we have to frequently install new build environments when building different versions of root file systems. This not only wastes a lot of time, but also easily leads to build failures.
In order to solve the above problems, we use Docker to isolate our root file system build environment.
13.1. What is Docker
Docker is an open source application container engine. It allows developers to package their applications and dependency packages into a portable container, and then publish them to any popular Linux or Windows operating system machine, and can also implement virtualization. Containers completely use the sandbox mechanism and will not have any interfaces with each other.
To simply understand, Docker is a small virtualization system that can be isolated from the host environment. The picture below is the logo of Docker, which is a small whale holding many containers. It vividly describes the role of Docker.

The official website of docker is https://www.docker.com/
13.2. Docker installation
There are different methods to install Docker on different operating systems. We mainly use the Ubuntu operating system. For installation methods on other systems, please refer to the official documentation: https://docs.docker.com/engine/install/
We can install Docker Engine on the Ubuntu virtual machine. The specific installation process is as follows.
13.2.1. Uninstall old version
Uninstall the old version before trying to install the new version
1 | sudo apt-get remove docker docker-engine docker.io containerd runc
|
13.2.2. Install using repository
Before installing Docker Engine on a new host for the first time, you need to set up a Docker repository. You can then install and update Docker from the repository.
13.2.2.1. Set up the repository
Update the apt package index and install the relevant packages to allow apt to use the docker repository over HTTPS:
1 2 | sudo apt-get update
sudo apt-get install ca-certificates curl gnupg lsb-release
|
Add Docker’s official GPG key:
1 2 | sudo mkdir -p /etc/apt/keyrings
curl -fsSL https://download.docker.com/linux/ubuntu/gpg | sudo gpg --dearmor -o /etc/apt/keyrings/docker.gpg
|
Set up the repository:
1 2 | echo "deb [arch=$(dpkg --print-architecture) signed-by=/etc/apt/keyrings/docker.gpg] https://download.docker.com/linux/ubuntu \
$(lsb_release -cs) stable" | sudo tee /etc/apt/sources.list.d/docker.list > /dev/null
|
13.2.2.2. Install Docker engine
1 2 | sudo apt-get update
sudo apt-get install docker-ce docker-ce-cli containerd.io docker-compose-plugin
|
13.2.2.3. Verify installation is complete
Use the following command to print out the version number, which means the installation is successful.
1 2 3 4 | sudo docker -v
# Print out the version number
Docker version 20.10.22, build 3a2c30b
|
13.3. Create a local docker image
Since the Docker image server is abroad and the access speed is very slow, we use the local Dockerfile to create the Docker image.
The local Dockerfile is stored under the ubuntu22.04 branch of the script warehouse built by the Ubuntu root file system. We clone the corresponding branch.
1 | git clone --branch=ubuntu22.04 --depth=1 https://github.com/LubanCat/ubuntu.git
|
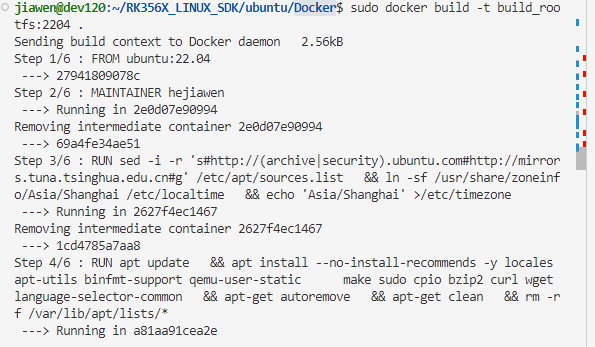
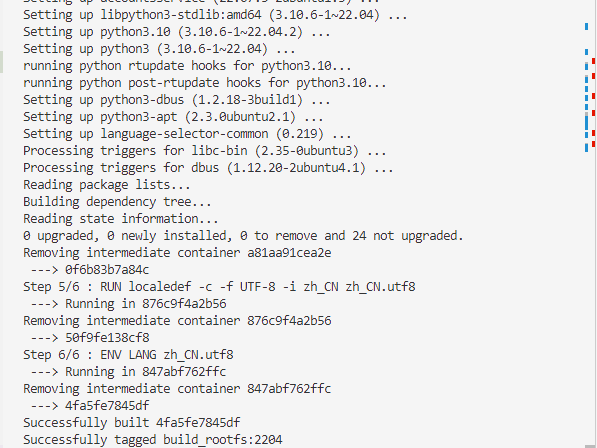
Then enter the cloned ubuntu directory and execute the docker build command to build the Docker image. “build_rootfs:2204” is the image name we set.
1 2 3 | cd ubuntu/Docker
sudo docker build -t build_rootfs:2204 .
|


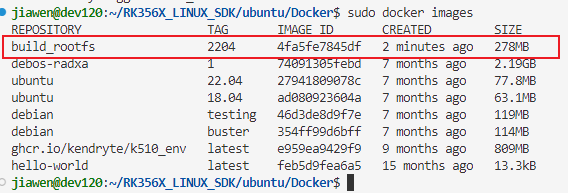
After the docker image is built, we use the following command to view the built docker image.

We can see that the image name is build_rootfs, and its TAG is 2204, which matches what we set. Its image ID is 4fa5fe7845df, and the size is 278M.
13.4. Create docker container
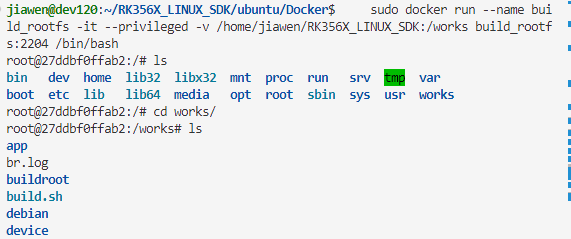
Execute the docker run command to run the docker image, mount the SDK into the container running the docker image, and enter the working directory.
1 2 3 | sudo docker run --name build_rootfs -it --privileged -v /home/jiawen/RK356X_LINUX_SDK:/works build_rootfs:2204 /bin/bash
cd works/
|
docker run: Run the container.
–name build_rootfs: Set the name of the container.
-it: Run the container in interactive mode.
–privileged: Run the container in privileged mode.
-v /home/jiawen/RK356X_LINUX_SDK:/works Set the directory to be mounted to the container. The first “:” is the path of the host, and the last is the path to mount to the container. This path must use an absolute path. Here, the entire SDK is mounted to the /works directory of the container.
build_rootfs:2204 The image used by the container. The name of the image is specified here. You can also use the image ID.
/bin/bash Shell interpreter used in interactive mode.

As you can see in the picture, after executing the command to run the container, we changed from jiawen@dev120 to root@27ddbf0ffab2. This means that we have now entered the container and run it as the root user. The container ID is 27ddbf0ffab2.
Be careful not to close the current terminal at this time. If you close the interrupt, you will lose the connection with the current container.
13.5. Build root file system
The method of building the root file system is the same as in the virtual machine. We can view the readme file in the current root file system build script warehouse. Here is a simple demonstration.
1 2 3 4 5 6 7 8 9 10 11 | # Enter the ubuntu root file system to build the script repository
cd /works/ubuntu
# Install related build dependencies
apt-get install binfmt-support qemu-user-static
dpkg -i ubuntu-build-service/packages/*
apt-get install -f
# Build image
./mk-base-ubuntu.sh
./mk-ubuntu-rootfs.sh
|
After running the above command, the Ubuntu root file system is completed.
