
4. Uboot的介绍
4.1. uboot简介
uboot是从FADSROM、8xxROM、PPCBOOT逐步发展演化而来的。uboot发展至今,已经可以实现非常多的功能, 在操作系统方面,它不仅支持嵌入式Linux系统的引导,还支持NetBSD,VxWorks, QNX, RTEMS, ARTOS, LynxOS, Android等嵌入式操作系统的引导。在CPU架构方面, uboot支持PowerPC、MIPS、x86、ARM、NIOS、XScale等诸多常用系列的处理器。
一般来说BootLoader必须提供系统上电时的初始化代码,在系统上电时初始化相关环境后, BootLoader需要引导完整的操作系统,然后将控制器交给操作系统。 简单来说BootLoader是一段小程序,它在系统上电时执行,通过这段小程序可以将硬件 设备进行初始化,如CPU、SDRAM、Flash、串口、网络等,初始化完毕后调用操作系统内核。
4.2. 启动uboot
以野火stm32mp157版本uboot为例,介绍uboot的使用, 在开发板上电uboot启动kernel之前按下键盘的空格或回车键, 进入uboot的命令模式。如下所示
1 2 3 4 5 6 7 8 9 10 11 12 13 14 15 16 17 18 19 20 21 22 23 24 25 26 | #忽略前面的tfa信息
U-Boot 2018.11-stm32mp-r4-g569038fc (Feb 11 2022 - 03:03:27 +0000)
CPU: STM32MP157AAC Rev.Z
Model: STMicroelectronics STM32MP157A-DK1 Discovery Board
Board: stm32mp1 in trusted mode (st,stm32mp157a-dk1)
DRAM: 1 GiB
Clocks:
- MPU : 650 MHz
- MCU : 208.878 MHz
- AXI : 266.500 MHz
- PER : 24 MHz
- DDR : 533 MHz
NAND: 0 MiB
MMC: STM32 SDMMC2: 0, STM32 SDMMC2: 1
Loading Environment from FAT... OK
In: serial
Out: serial
Err: serial
invalid MAC address in OTP 00:00:00:00:00:00Net:
Error: ethernet@5800a000 address not set.
eth-1: ethernet@5800a000
Hit any key to stop autoboot: 0
STM32MP>
STM32MP>
|
可以看出uboot打印出了板子的一些基本信息,包括CPU、内存等信息。
4.3. uboot命令
当不清楚uboot支持什么命令时, 可输入 help 或 ? 可查看uboot支持的命令列表,如下所示
1 2 3 4 5 6 7 8 9 10 11 12 13 14 15 16 17 18 19 20 21 22 23 24 25 26 27 28 29 30 31 32 33 34 35 36 37 38 39 40 41 42 43 44 45 46 47 48 49 50 51 52 53 54 55 56 57 58 59 60 61 62 63 64 65 66 67 68 69 70 71 72 73 74 75 76 77 78 79 80 81 82 83 84 85 86 87 88 89 90 91 92 | ? - alias for 'help'
base - print or set address offset
bdinfo - print Board Info structure
blkcache - block cache diagnostics and control
bmode - sd1|sd2|qspi1|normal|usb|sata|ecspi1:0|ecspi1:1|ecspi1:2|ecspi1:3|esdhc1|esdhc2|esdhc3|esdhc4
bmode - getprisec
boot - boot default, i.e., run 'bootcmd'
bootd - boot default, i.e., run 'bootcmd'
bootefi - Boots an EFI payload from memory
bootelf - Boot from an ELF image in memory
bootm - boot application image from memory
bootp - boot image via network using BOOTP/TFTP protocol
bootvx - Boot vxWorks from an ELF image
bootz - boot Linux zImage image from memory
clocks - display clocks
cmp - memory compare
coninfo - print console devices and information
cp - memory copy
crc32 - checksum calculation
dcache - enable or disable data cache
dhcp - boot image via network using DHCP/TFTP protocol
dm - Driver model low level access
dtfile - dtoverlay utility commands
echo - echo args to console
editenv - edit environment variable
env - environment handling commands
erase - erase FLASH memory
exit - exit script
ext2load - load binary file from a Ext2 filesystem
ext2ls - list files in a directory (default /)
ext4load - load binary file from a Ext4 filesystem
ext4ls - list files in a directory (default /)
ext4size - determine a file's size
ext4write - create a file in the root directory
false - do nothing, unsuccessfully
fatinfo - print information about filesystem
fatload - load binary file from a dos filesystem
fatls - list files in a directory (default /)
fatmkdir - create a directory
fatrm - delete a file
fatsize - determine a file's size
fatwrite - write file into a dos filesystem
fdt - flattened device tree utility commands
flinfo - print FLASH memory information
fstype - Look up a filesystem type
fstypes - List supported filesystem types
fuse - Fuse sub-system
go - start application at address 'addr'
gpio - query and control gpio pins
help - print command description/usage
i2c - I2C sub-system
icache - enable or disable instruction cache
iminfo - print header information for application image
imxtract - extract a part of a multi-image
itest - return true/false on integer compare
ln - Create a symbolic link
load - load binary file from a filesystem
loadb - load binary file over serial line (kermit mode)
loads - load S-Record file over serial line
loadx - load binary file over serial line (xmodem mode)
loady - load binary file over serial line (ymodem mode)
loop - infinite loop on address range
ls - list files in a directory (default /)
md - memory display
mm - memory modify (auto-incrementing address)
mmc - MMC sub system
mmcinfo - display MMC info
mtest - simple RAM read/write test
mw - memory write (fill)
nfs - boot image via network using NFS protocol
nm - memory modify (constant address)
panic - Panic with optional message
ping - send ICMP ECHO_REQUEST to network host
pinmux - show pin-controller muxing
printenv - print environment variables
protect - enable or disable FLASH write protection
random - fill memory with random pattern
reset - Perform RESET of the CPU
run - run commands in an environment variable
save - save file to a filesystem
saveenv - save environment variables to persistent storage
setenv - set environment variables
setexpr - set environment variable as the result of eval expression
sf - SPI flash sub-system
showvar - print local hushshell variables
size - determine a file's size
sleep - delay execution for some time
source - run script from memory
test - minimal test like /bin/sh
tftpboot - boot image via network using TFTP protocol
true - do nothing, successfully
version - print monitor, compiler and linker version
|
可看到uboot支持很多的命令,功能十分强大,与linux类似,在执行某条uboot命令时, 可使用 tab 自动补全命令,在没有命令名冲突的情况下可以使用命令的前几个字母作为命令的输入, 例如想要执行 reset 命令,输入 res 或 re 即可。
当需要具体使用哪个命令时,可使用 “help 命令” 或 “? 命令” 的方式查看具体命令的使用说明。以 “help printenv” 为例,
1 2 3 4 5 6 7 8 | => help printenv
printenv - print environment variables
Usage:
printenv [-a]
- print [all] values of all environment variables
printenv name ...
- print value of environment variable 'name'
|
可以看到printenv命令的说明以及使用方法。
关于uboot命令的使用可参考uboot官方链接: http://www.denx.de/wiki/DULG/Manual 5.9. uboot Command Line Interface 部分。
4.3.1. uboot常见命令
uboot命令众多,下面介绍常用的uboot命令,详细的uboot命令使用方式请使用 help [命令] 查看。
命令 |
说明 |
举例 |
|---|---|---|
help |
列出当前uboot所有支持的命令 |
|
help [命令] |
查看指定命令的帮助 |
help printenv |
reset |
重启uboot |
|
printenv |
打印所有环境参数的值 |
|
printenv [环境参数名] |
查看指定的环境参数值 |
printenv bootdelay |
setenv |
设置/修改/删除环境参数的值 |
setenv bootdelay 3 |
saveenv |
保存环境参数 |
|
ping |
检测网络是否连通 |
ping 192.168.0.1 |
md |
查看内存地址上的值 |
md.b 0xc2000000 10 以字节查看0xc2000000后0x10个数据 |
mw |
用于修改内存地址上的值 |
mw.b 0xc2000000 ff 10 以字节修改0xc2000000后0x10个数据为ff |
echo |
打印信息,与linux下的echo类似 |
|
run |
在执行某条环境参数命令 |
run bootcmd,执行bootcmd |
bootz |
在内存中引导内核启动 |
|
ls |
查看文件系统中目录下的文件 |
|
load |
从文件系统中加载二进制文件到内存 |
以上为用户较为常用使用的部分命令,具体的使用方式可使用 help [命令] 查看。
4.3.2. mmc命令
mmc命令能够对如sd卡以及emmc类的存储介质进行操作,以下进行简单说明, 对于mmc命令不熟悉可使用 help mmc 查看相关命令的帮助,常用功能如下所示
命令 |
说明 |
|---|---|
mmc list |
查看板子上mmc设备 |
mmc dev |
查看/切换当前默认mmc设备 |
mmc info |
查看当前mmc设备信息 |
mmc part |
查看当前mmc设备分区 |
mmc read |
读取当前mmc设备数据 |
mmc write |
写入当前mmc设备数据 |
mmc erase |
擦除当前mmc设备数据 |
4.3.2.1. 查看mmc设备
使用 mmc list 查看板子上相关设备,本人使用的是emmc版本的开发板,未插入sd卡, 可看到打印信息如下。
1 2 3 | => mmc list
STM32 SDMMC2: 0
STM32 SDMMC2: 1 (eMMC)
|
使用 mmc dev 1 命令切换当前设备为emmc设备。
1 2 3 | => mmc dev 1
switch to partitions #0, OK
mmc1(part 0) is current device
|
使用 mmc info 查看当前使用的emmc设备的信息。
1 2 3 4 5 6 7 8 9 10 11 12 13 14 15 16 17 18 | => mmc info
Device: STM32 SDMMC2
Manufacturer ID: 15
OEM: 100
Name: 8GTF4
Bus Speed: 52000000
Mode : MMC High Speed (52MHz)
Rd Block Len: 512
MMC version 5.1
High Capacity: Yes
Capacity: 7.3 GiB
Bus Width: 8-bit
Erase Group Size: 512 KiB
HC WP Group Size: 8 MiB
User Capacity: 7.3 GiB WRREL
Boot Capacity: 4 MiB ENH
RPMB Capacity: 512 KiB ENH
|
4.3.2.2. 查看分区信息
使用 mmc part 列出当前mmc设备分区
1 2 3 4 5 6 7 8 9 10 11 12 13 14 15 16 17 18 19 20 21 22 23 24 25 26 27 | => mmc part
Partition Map for MMC device 1 -- Partition Type: EFI
Part Start LBA End LBA Name
Attributes
Type GUID
Partition GUID
1 0x00000400 0x000013ff "ssbl"
attrs: 0x0000000000000000
type: 8da63339-0007-60c0-c436-083ac8230908
guid: 8ef917d1-2c6f-4bd0-a5b2-331a19f91cb2
2 0x00001400 0x000333ff "boot"
attrs: 0x0000000000000004
type: 0fc63daf-8483-4772-8e79-3d69d8477de4
type: linux
guid: 77877125-add0-4374-9e60-02cb591c9737
3 0x00033400 0x000337ff "vendorfs"
attrs: 0x0000000000000000
type: 0fc63daf-8483-4772-8e79-3d69d8477de4
type: linux
guid: b4b84b8a-04e3-48ae-8536-aff5c9c495b1
4 0x00033800 0x00e8ffde ""
attrs: 0x0000000000000000
type: 0fc63daf-8483-4772-8e79-3d69d8477de4
type: linux
guid: 42810701-24bf-e14a-821c-00afd6f62558
|
以上第二分区是boot分区,存放内核和配置文件,第四分区是文件系统分区。
4.3.2.3. mmc操作
可使用以下指令对mmc存储介质以block为操作单位进行读、写、擦除操作,根据上面sd的信息可知, 一个block为512字节。
1 2 3 | mmc read addr blk# cnt #读
mmc write addr blk# cnt #写
mmc erase blk# cnt #擦除
|
简单实例:将mmc设备的的前10个block读取到0xc2000000地址处: mmc read 0xc2000000 0 10
4.3.3. 文件系统操作命令
uboot能够对ext2/3/4以及fat文件系统设备进行访问, 可使用fstype命令判断存储介质分区使用的是什么类型的文件系统。 以mmc介质为例,判断emmc的boot和文件系统分区的文件系统类型
1 2 3 4 | => fstype mmc 1:2
fat
=> fstype mmc 1:4
ext4
|
野火linux开发板具有U盘功能,能够通过PC以访问U盘的形式访问/boot目录下的文件, /boot目录对应的即是 mmc 1:2 分区。
而ext4分区对应的则是Debian根文件系统。
知道了文件系统的类型即可使用相对应的命令对分区内容进行操作了。
4.3.3.1. FAT格式文件系统
uboot提供了能够对于FAT格式文件系统操作的各个指令, 如下所示,详细可通过 help [命令] 查看
命令 |
说明 |
|---|---|
fatinfo |
打印关于文件系统的信息 |
fatls |
查看存储设备的fat分区里的内容 |
fatload |
从fat分区里读出文件到指定的内存地址 |
fatwrite |
把内存上的数据存储到fat分区的一个文件里 |
fatmkdir |
创建文件夹 |
fatrm |
删除文件 |
4.3.3.1.1. 查看文件系统信息
使用fatinfo查看文件系统信息,打印信息如下
1 2 3 4 5 6 | => fatinfo mmc 1:2
Interface: MMC
Device 1: Vendor: Man 000015 Snr 71c3e8f1 Rev: 0.6 Prod: 8GTF4R
Type: Removable Hard Disk
Capacity: 7456.0 MB = 7.2 GB (15269888 x 512)
Filesystem: FAT16 "NO NAME "
|
4.3.3.1.2. 查看分区下的文件目录
使用fatls查看分区下的文件目录,打印信息如下
1 2 3 4 5 6 7 8 9 10 11 12 13 14 15 | => fatls mmc 1:2
dtbs/
kernel/
mmc0_extlinux/
mmc1_extlinux/
nand0_extlinux/
38 ID.txt
1339 SOC.sh
4235 boot.scr.uimg
823815 u-boot.stm32
2731 uEnv.txt
8192 uboot.env
System Volume Information/
6 file(s), 6 dir(s)
|
若想要查看其它目录下的文件列表,只要加上文件路径即可,如下
1 2 3 4 5 6 7 8 9 | => fatls mmc 1:2 kernel/
./
../
3794191 System.map-4.19.94-stm-r1
143166 config-4.19.94-stm-r1
4939432 initrd.img-4.19.94-stm-r1
8778240 vmlinuz-4.19.94-stm-r1
4 file(s), 2 dir(s)
|
4.3.3.1.3. 读取文件内容
使用fatload将FAT文件系统的文件加载到内存中,如下所示
1 2 | => fatload mmc 1:2 c2000000 uEnv.txt
2418 bytes read in 13 ms (181.6 KiB/s)
|
可使用md命令查看c2000000内存中的部分数据内容
1 2 3 4 5 6 7 8 9 | => md.b c2000000 0x80
c2000000: 23 44 6f 63 73 3a 20 68 74 74 70 3a 2f 2f 65 6c #Docs: http://el
c2000010: 69 6e 75 78 2e 6f 72 67 2f 42 65 61 67 6c 65 62 inux.org/Beagleb
c2000020: 6f 61 72 64 3a 55 2d 62 6f 6f 74 5f 70 61 72 74 oard:U-boot_part
c2000030: 69 74 69 6f 6e 69 6e 67 5f 6c 61 79 6f 75 74 5f itioning_layout_
c2000040: 32 2e 30 0a 0a 75 6e 61 6d 65 5f 72 3d 34 2e 31 2.0..uname_r=4.1
c2000050: 39 2e 39 34 2d 73 74 6d 2d 72 31 0a 23 75 75 69 9.94-stm-r1.#uui
c2000060: 64 3d 0a 64 74 62 3d 73 74 6d 33 32 6d 70 31 35 d=.dtb=stm32mp15
c2000070: 37 61 2d 62 61 73 69 63 2e 64 74 62 0a 0a 23 23 7a-basic.dtb..##
|
读取到的内容就是我们日常在/boot/uEnv.txt文件中的看到的内容了。
4.3.3.1.4. FAT文件系统其他操作
uboot还提供了FAT文件系统的其他操作命令,可用于创建目录、写入、删除等操作, 通常情况下在uboot中需要使用这类命令的场景很少,简单介绍如下:
fatmkdir:创建目录
fatrm:删除文件
fatwrite:把内存上的数据存储到FAT分区的一个文件里
4.3.3.2. ext4格式文件系统
ext4文件系统的命令使用方式和FAT使用方式相似,仅命令名不同, uboot提供的ext文件系统命令如下
命令 |
说明 |
|---|---|
ext4ls |
查看存储设备的ext4分区里的内容 |
ext4load |
从ext4分区里读出文件到指定的内存地址 |
ext4write |
把内存上的数据存储到ext4分区的一个文件里 |
4.3.3.2.1. ext4文件系统操作
下面以将/etc/apt/sources.list的内容读取到内存实例,简单说明uboot对ext4文件系统操作。
1.查看/etc/apt目录中的文件内容,
1 2 3 4 5 6 7 8 9 10 | => ext4ls mmc 1:4 /etc/apt/
<DIR> 4096 .
<DIR> 4096 ..
<DIR> 4096 apt.conf.d
<DIR> 4096 auth.conf.d
<DIR> 4096 preferences.d
<DIR> 4096 sources.list.d
<DIR> 4096 trusted.gpg.d
836 sources.list
1743 trusted.gpg
|
2.将/etc/apt/sources.list 文件读取到内存地址c2000000处
1 2 | => ext4load mmc 1:4 c2000000 /etc/apt/sources.list
865 bytes read in 30 ms (27.3 KiB/s)
|
3.查看内存0x8000 0000的部分数据内存
1 2 3 4 5 6 7 8 9 | => md.b c2000000 0x80
c2000000: 64 65 62 20 68 74 74 70 3a 2f 2f 6d 69 72 72 6f deb http://mirro
c2000010: 72 73 2e 62 66 73 75 2e 65 64 75 2e 63 6e 2f 64 rs.bfsu.edu.cn/d
c2000020: 65 62 69 61 6e 20 62 75 73 74 65 72 20 6d 61 69 ebian buster mai
c2000030: 6e 20 63 6f 6e 74 72 69 62 20 6e 6f 6e 2d 66 72 n contrib non-fr
c2000040: 65 65 0a 23 64 65 62 2d 73 72 63 20 68 74 74 70 ee.#deb-src http
c2000050: 3a 2f 2f 6d 69 72 72 6f 72 73 2e 62 66 73 75 2e ://mirrors.bfsu.
c2000060: 65 64 75 2e 63 6e 2f 64 65 62 69 61 6e 20 62 75 edu.cn/debian bu
c2000070: 73 74 65 72 20 6d 61 69 6e 20 63 6f 6e 74 72 69 ster main contri
|
4.4. uboot环境参数介绍
uboot中环境参数为我们提供一种不修改uboot源码的情况下, 能够修改kernel启动倒计时、ip地址、以及向内核传递不同的参数等。
在板子上使用 printenv 可查看板子上所有的环境参数, 使用 setenv 添加/修改/删除环境参数,具体说明如下所示
1 2 3 4 5 6 7 8 9 10 11 12 13 14 15 | #设置新的环境参数名为abc,值为100
=> setenv abc 100
=> echo $abc
= 100
#将值修改为200
=> setenv abc 200
=> echo $abc
200
#删除abc环境参数
=> setenv abc
=> echo $abc
=>
|
默认情况下使用setenv命令修改环境参数重启后就会消失, 若想要掉电保存需要执行 saveenv 将环境参数保存到存储介质。
uboot上有一些官方规定的环境变量,这些环境变量在uboot有着特殊的作用, 可通过以下链接查看: https://www.denx.de/wiki/view/DULG/UBootEnvVariables
4.5. uboot启动系统过程
bootcmd与bootargs可以说是uboot最重要的两个环境参数, uboot执行完毕之后,如果没有按下回车,则会自动执行bootcmd命环境参数里的内容, 而bootargs则是传递给内核的启动参数。
使用 printenv bootcmd 可查看bootcmd的内容。
1 2 | => printenv bootcmd
bootcmd=run bootcmd_stm32mp
|
使用 printenv bootcmd_stm32mp 可查看bootcmd_stm32mp的内容
1 2 | => printenv bootcmd_stm32mp
bootcmd_stm32mp=echo "Boot over ${boot_device}${boot_instance}!";if test ${boot_device} = serial || test ${boot_device} = usb;then stm32prog ${boot_device} ${boot_instance}; else run env_check;if test ${boot_device} = mmc;then env set boot_targets "mmc${boot_instance}"; fi;if test ${boot_device} = nand;then env set boot_targets ubifs0; fi;run distro_bootcmd;fi;
|
以上输出内容直接在uboot命令行中查看比较麻烦,可在uboot源码继续查看。
bootcmd_stm32mp定义在uboot源码:ebf_linux_uboot/include/configs/stm32mp1.h
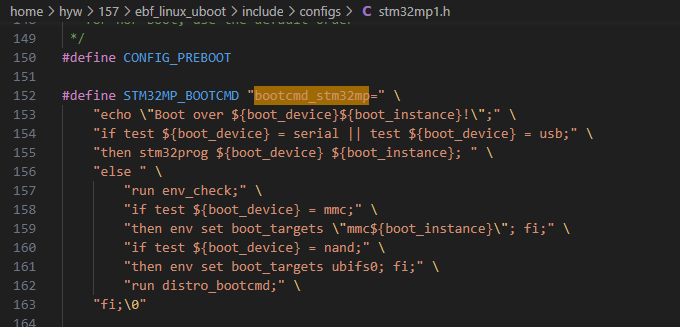
以上代码说明:如果 ${boot_device} 的值是 “serial” 或者 “usb”,则执行 stm32prog 命令,用来通过串行或者 USB 连接下载程序。 否则,会运行名为 env_check 的命令,然后根据 ${boot_device} 的值设置 boot_targets 环境变量。如果 ${boot_device} 是 “mmc”,则设置 boot_targets 为 “mmc${boot_instance}”;如果是 “nand”,则设置为 “ubifs0”。最后,会运行名为 distro_bootcmd 的命令。
在uboot命令行终端使用 printenv boot_device 和 printenv boot_instance 可查看内容
1 2 3 4 5 | => printenv boot_device
boot_device=mmc
=> printenv boot_instance
boot_instance=1
|
可见,boot_device为mmc,boot_instance为1,因此设置boot_targets为mmc1,然后执行distro_bootcmd命令。(如果是sd卡启动则boot_targets为mm0)
同样可以使用 printenv distro_bootcmd 查看distro_bootcmd的内容如下
1 2 | => printenv distro_bootcmd
distro_bootcmd=for target in ${boot_targets}; do run bootcmd_${target}; done
|
结合前面boot_targets为mmc1,也就是说distro_bootcmd最终会运行bootcmd_mmc1环境参数。
在前面我们知道,mmc0表示的sd卡的存储设备,mmc1表示的emmc设备。
1 2 3 4 | => printenv bootcmd_mmc0
bootcmd_mmc0=setenv devnum 0; run mmc_boot
=> printenv bootcmd_mmc1
bootcmd_mmc1=setenv devnum 1; run mmc_boot
|
以上devnum为设备分区号,所以运行bootcmd_mmc1则设置设备分区号为1,并运行mmc_boot环境参数。
同样可以使用 printenv mmc_boot 查看mmc_boot的内容如下
1 2 | => printenv mmc_boot
mmc_boot=if mmc dev ${devnum}; then setenv devtype mmc; run scan_dev_for_boot_part; fi
|
首先,使用我们前面介绍的uboot命令mmc dev ${devnum} 命令来尝试激活指定编号,如果成功则设置devtype为mmc,最后运行scan_dev_for_boot_part环境参数。
同样可以使用 printenv scan_dev_for_boot_part 查看scan_dev_for_boot_part的内容如下
1 2 3 | => pri scan_dev_for_boot_part
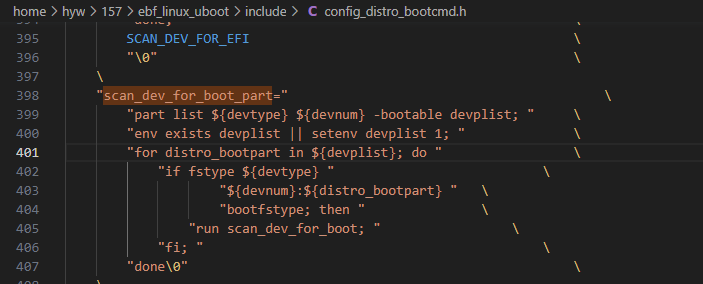
scan_dev_for_boot_part=part list ${devtype} ${devnum} -bootable devplist; env exists devplist || setenv devplist 1; for distro_bootpart in ${devplist}; do if fstype ${devtype} ${devnum}:${distro_bootpart} bootfstype; then run scan_dev_for_boot; fi; done
|
以上输出内容直接在uboot命令行中查看比较麻烦,可在uboot源码继续查看。
scan_dev_for_boot_part定义在uboot源码:ebf_linux_uboot/include/config_distro_bootcmd.h
结合前面设置的变量可知:
part list mmc 1 -bootable devplist; 列出指定设备中的可引导分区,并将结果存储在 devplist 变量中。可在ubtoo下手动执行并查看到devplist结果为2。
env exists devplist || setenv devplist 1,检查环境变量中是否存在devplist,如果不存在则设置为默认值 1。
for distro_bootpart in 2; do 遍历 devplist 中的每个分区。
if fstype mmc 1:2 bootfstype; then,其中fstype mmc 1:2 bootfstype用于获取 MMC 设备上第一个分区的文件系统类型,可在ubtoo下手动执行并查看到bootfstype结果为fat。
最后运行scan_dev_for_boot环境参数。
继续在uboot源码查看scan_dev_for_boot环境参数,如下:
scan_dev_for_boot_part定义在uboot源码:ebf_linux_uboot/include/config_distro_bootcmd.h
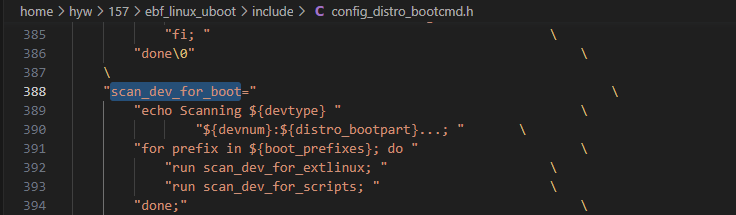
可以使用 printenv boot_prefixes 查看boot_prefixes的内容如下
1 2 | => pri boot_prefixes
boot_prefixes=/ /boot/
|
那么以上”for prefix in ${boot_prefixes}; do ” 则会遍历boot_prefixes,执行scan_dev_for_extlinux和scan_dev_for_scripts。
继续在uboot源码查看scan_dev_for_extlinux环境参数,如下:
scan_dev_for_extlinux定义在uboot源码:ebf_linux_uboot/include/config_distro_bootcmd.h
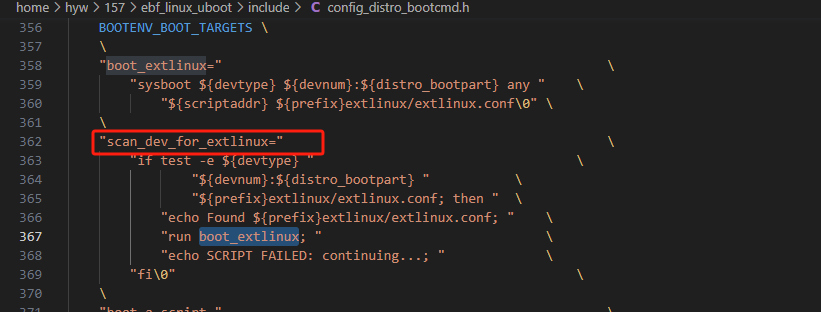
结合前面变量可知:devtype是mmc,devnum是1,distro_bootpart是2,而scriptaddr在uboot查看为0xc4100000。
那么以上内容则是扫描特定设备上是否存在Extlinux的配置文件,检查 ${devtype}:${devnum}:${distro_bootpart},也就是mmc 1:2 是否存在Extlinux的配置文件。
进入系统查看/和/boot,可在/boot发现存在Extlinux的配置文件,如下:
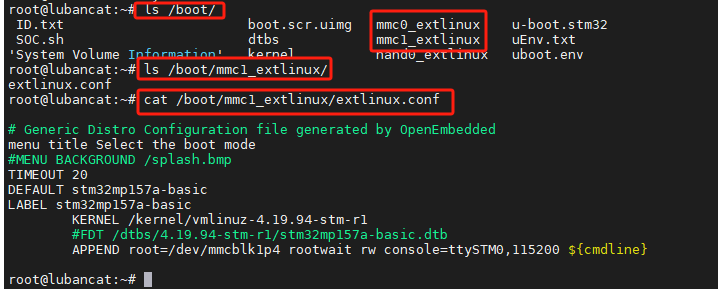
存在Extlinux的配置文件,那么会运行boot_extlinux环境参数,使用sysboot命令启动Extlinux,从指定设备的指定分区中读取Extlinux配置文件,并用于启动操作系统。
继续在uboot源码查看scan_dev_for_scripts环境参数,如下:
scan_dev_for_scripts定义在uboot源码:ebf_linux_uboot/include/config_distro_bootcmd.h
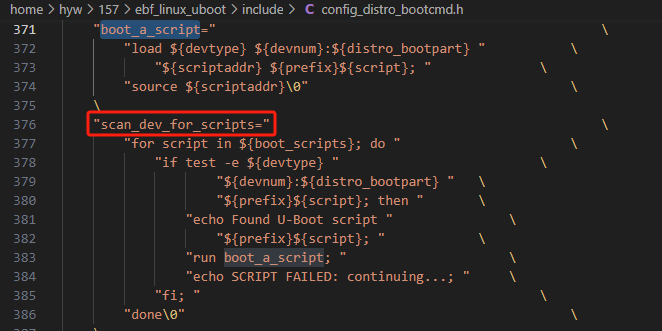
和scan_dev_for_extlinux类似,scan_dev_for_extlinux是查找Extlinux配置文件,那么scan_dev_for_scripts是查找scripts脚本文件,如果存则加载并执行该脚本文件。
在uboot下参看boot_scripts环境变量
1 2 | => pri boot_scripts
boot_scripts=boot.scr.uimg boot.scr
|
因此,scan_dev_for_scripts在/和/boot查找以上两个文件。
进入系统查看/和/boot,可在/boot发现存在boot.scr.uimg,如下:

boot.scr.uimg的内容如下:
1 2 3 4 5 6 7 8 9 10 11 12 13 14 15 16 17 18 19 20 21 22 23 24 25 26 27 28 29 30 31 32 33 34 35 36 37 38 39 40 41 42 43 44 45 46 47 48 49 50 51 52 53 54 55 56 57 58 59 60 61 62 63 64 65 66 67 68 69 70 71 72 73 74 75 76 77 78 79 80 81 82 83 84 85 86 87 88 89 90 91 92 93 94 95 96 97 98 99 100 101 102 103 104 105 106 107 108 109 110 111 | Generate boot.scr.uimg:
# ./tools/mkimage -C none -A arm -T script -d boot.scr.cmd boot.scr.uimg
#
#########################################################################
# SAMPLE BOOT SCRIPT: PLEASE DON'T USE this SCRIPT in REAL PRODUCT
#########################################################################
# this script is only a OpenSTLinux helper to manage multiple target with the
# same bootfs, for real product with only one supported configuration change the
# bootcmd in U-boot or use the normal path for extlinux.conf to use DISTRO
# boocmd (generic distibution); U-Boot searches with boot_prefixes="/ /boot/":
# - /extlinux/extlinux.conf
# - /boot/extlinux/extlinux.conf
#########################################################################
echo "Executing SCRIPT on target=${target}"
# M4 Firmware load
env set m4fw_name "rproc-m4-fw.elf"
env set m4fw_addr ${kernel_addr_r}
env set boot_m4fw 'rproc init; rproc load 0 ${m4fw_addr} ${filesize}; rproc start 0'
# boot M4 Firmware when available
env set scan_m4fw 'if test -e ${devtype} ${devnum}:${distro_bootpart} ${m4fw_name};then echo Found M4 FW $m4fw_name; if load ${devtype} ${devnum}:${distro_bootpart} ${m4fw_addr} ${m4fw_name}; then run boot_m4fw; fi; fi;'
# Update the DISTRO command to search in sub-directory and load M4 firmware
env set boot_prefixes "/${boot_device}${boot_instance}_"
env set boot_extlinux "run scan_m4fw;${boot_extlinux}"
# save the boot config for the 2nd boot
env set boot_targets ${target}
# when {boot_device} = nor, use ${target} = the location of U-Boot
# script boot.scr.img found in DISTRO script
# value can be "mmc0" (SD Card), "mmc1" (eMMC) or "ubifs0" (NAND)
if test ${target} = mmc0; then
if test -d ${devtype} ${devnum}:${distro_bootpart} /mmc0_extlinux; then
env set boot_prefixes "/mmc0_"
fi
elif test ${target} = mmc1; then
if test -d ${devtype} ${devnum}:${distro_bootpart} /mmc1_extlinux; then
env set boot_prefixes "/mmc1_"
fi
elif test ${target} = ubifs0; then
if test -d ${devtype} ${devnum}:${distro_bootpart} /nand0_extlinux; then
env set boot_prefixes "/nand0_"
fi
fi
if test -e ${devtype} ${devnum}:${distro_bootpart} ${boot_prefixes}extlinux/${board_name}_extlinux.conf; then
echo FOUND ${boot_prefixes}extlinux/${board_name}_extlinux.conf
env set boot_syslinux_conf "extlinux/${board_name}_extlinux.conf"
fi
# don't save the updated content of bootfile variable to avoid conflict
env delete bootfile
# save the boot config the 2nd boot (boot_prefixes/boot_extlinux)
#env save
#
echo Checking for: /uEnv.txt ...;
if test -e ${devtype} ${devnum}:${distro_bootpart} /uEnv.txt;then
if load ${devtype} ${devnum}:${distro_bootpart} ${kernel_addr_r} /uEnv.txt; then
echo Loaded environment from /uEnv.txt;
echo Importing environment from ${devtype} ...;
env import -t ${kernel_addr_r} ${filesize}
env set size 0x${filesize}
fi
fi
echo Checking if flash_firmware is set;
if test -n ${flash_firmware}; then
echo setting flash firmware...;
setenv cmdline ${storage_media};
fi;
#load base fdt
echo Checking for: /dtbs/stm32mp157a-basic.dtb ...;
if test -e ${devtype} ${devnum}:${distro_bootpart} /dtbs/stm32mp157a-basic.dtb;then
echo Loading base fdt...;
load ${devtype} ${devnum}:${distro_bootpart} ${fdt_addr_r} /dtbs/stm32mp157a-basic.dtb
fi;
if test -n ${enable_uboot_overlays}; then
setenv fdt_buffer 0x60000;
if test -n ${uboot_fdt_buffer}; then
setenv fdt_buffer ${uboot_fdt_buffer};
fi;
if test ${target} = ubifs0; then
#mount rootfs
ubifsmount ubi0:rootfs
fi;
echo uboot_overlays: [fdt_buffer=${fdt_buffer}] ... ;
dtfile ${fdt_addr_r} ${splashimage} /boot/uEnv.txt ${kernel_addr_r};
else
echo uboot_overlays: add [enable_uboot_overlays=1] to /boot/uEnv.txt to enable...;
fi;
env set fdt_addr ${fdt_addr_r}
# start the correct exlinux.conf
run bootcmd_${target}
echo SCRIPT FAILED... xterm-256colorxterm-256color${boot_prefixes}${boot_syslinux_conf} not found !
# restore environment to default value when failed
env default boot_targets
env default boot_prefixes
env default boot_extlinux
env default boot_syslinux_conf
env save
|
以上内容说明如下:
第17到20行,设置M4固件的名称、加载地址以及启动命令
第23行,定义了扫描M4固件的命令,并在引导时搜索相应的固件并加载。
第26到27行,更新了引导命令以搜索子目录并加载M4固件。
第30行,保存引导配置以备第二次引导时使用。
第32行到56行,和前面讲解类似,总的来说,根据目标设备的不同设置了相应的引导前缀,并且检查是否存在特定的引导配置文件,最后删除了不需要保存的引导文件路径。
第36行到48行,设定引导前缀(boot_prefixes)。
第50行到53行,检查引导配置文件,如果存在,就将其路径保存到boot_syslinux_conf环境变量中。
第56行,删除bootfile环境变量,这样在保存引导配置时就不会保存这个变量,避免与之前设置的引导前缀冲突。
第62行到第70行,检查是否存在/uEnv.txt文件,如果存在,则加载该文件中的环境配置到内存中。
第77到第97行,设置设备树和uEnv的加载位置,并进行加载。
第102行,通过run bootcmd_${target}执行相应的引导命令。
第107行到第111行,将一系列环境变量恢复为默认值,并保存环境变量。
总的来说,这个脚本的目的是配置引导过程,包括加载M4固件、设置设备树、启用uboot overlays等。
4.6. 手动引导系统启动
在讲解uboot如何引导系统启动后,我们可以尝试进行手动引导系统启动。在讲解uboot启动时,很多环境参数都是在查找设备、设置环境变量,如果我们知道需要加载什么文件,文件存放在哪个位置,需要加载到哪个位置,那么我们就可以手动引导系统启动。
先放结论,手动引导系统启动只需要将内核和设备树加载到正确位置,并进行启动即可。以下命令则是手动引导系统的全部命令,可在uboot下手动执行。
1 2 3 | load mmc 1:2 c2000000 kernel/vmlinuz-4.19.94-stm-r1
load mmc 1:2 c4000000 dtbs/stm32mp157a-basic.dtb
bootz c2000000 - c4000000
|
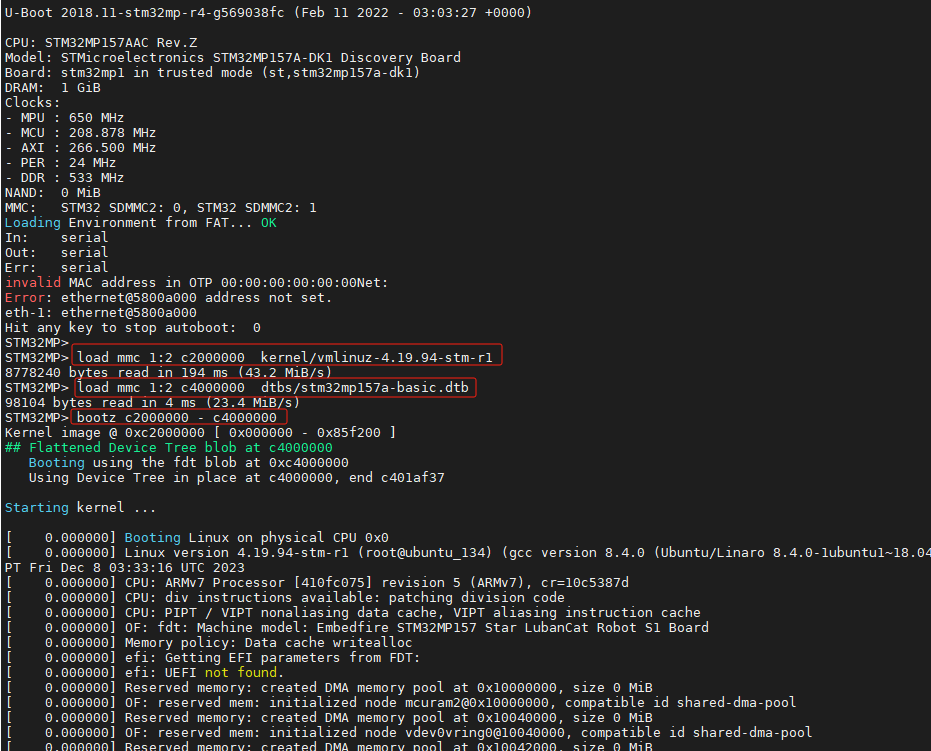
可见,只需要三条命令就可以启动系统。
结合前面讲解的uboot源码中的stm32mp1.h和config_distro_bootcmd.h文件,以及boot分区中的extlinux.conf和boot.scr.uimg文件,可以得到如下内容:
1、需要加载的文件
内核:vmlinuz-4.19.94-stm-r1
设备树:stm32mp157a-basic.dtb
2、文件存放位置
内核:mmc1设备的第二个分区,也就是mmc 1:2,kernel目录下的vmlinuz-4.19.94-stm-r1
设备树:mmc1设备的第二个分区,也就是mmc 1:2,dtbs目录下的stm32mp157a-basic.dtb
3、 加载位置
内核:c2000000,也就是kernel_addr_r环境变量
设备树:c4000000,也就是fdt_addr_r变量